There’s an undeniable allure to secret compartments. Whether it’s the grand scale of hidden passageways in old mansions or the subtle charm of a secret pocket sewn into a jacket lining, the idea of concealed spaces sparks intrigue and a sense of playful mystery. This fascination is precisely what makes book safes so captivating. They beautifully merge the love for literature with the functionality of hidden storage, offering a unique and enjoyable way to safeguard your small treasures.
Book safes have a rich history as a clever method for concealing valuables. For generations, people have used them to discreetly stash away important items – from safe deposit box keys and private documents to flasks and even firearms. In modern times, the practicality of a book safe remains relevant. Travelers find them incredibly useful for hiding electronics like iPods, emergency cash, or other precious items from prying eyes and potential thieves. And for those with a cinematic imagination, a book safe could even serve as the perfect hiding spot for a rock hammer, should the need for a Shawshank Redemption-style escape ever arise!
Beyond their personal appeal, book safes make exceptionally thoughtful and distinctive gifts. If you’re looking for budget-friendly yet creative present ideas, crafting a book safe for friends or family is an excellent option. The required materials are inexpensive, and the crafting process is relatively straightforward, taking just a couple of hours to complete. Below is a detailed, step-by-step guide on how to create your own secret compartment book safe.
A quick note before we begin: It’s worth addressing the common concern about repurposing books in this manner. Some argue that cutting into a book is sacrilegious. However, this project typically utilizes books that are no longer in demand and would otherwise be discarded. The intention isn’t to destroy a book but to transform it, giving it a new purpose and extending its lifespan in a creative way. It’s about repurposing and adding value, not destruction.
Step-by-Step Guide to Crafting a Secret Compartment Book Safe
1. Selecting the Perfect Book
Your first step is to acquire a suitable book. A used bookstore is an ideal place to start your search. Look for bargain books, often available for just a few dollars. Vintage books, in particular, lend a classic and intriguing aesthetic to this project. Alternatively, if you have a book at home that you’re not particularly attached to and wouldn’t mind altering, that works perfectly too.
Consider these factors when choosing your book:
- Thickness and Compartment Depth: Thicker books offer the potential for deeper secret compartments, allowing you to store larger or more numerous items. However, carving out a deeper cavity will naturally require more time and effort. Thinner books are quicker to work with but will have a shallower storage space. Decide based on what you intend to hide and the time you’re willing to invest.
- Shelf Compatibility: Think about where you plan to place your finished book safe. Choose a book that will blend in with your existing bookshelf. A brightly colored, modern paperback might look out of place amongst a collection of antique hardcovers, and vice versa. The goal is subtle concealment.
- Intrigue Level: Select a book that is unlikely to pique casual curiosity. Obscure titles or subjects are your best bet. Think along the lines of “Advanced Calculus” or “Principles of Accounting” rather than a book with a flashy or attention-grabbing title. The more mundane the title, the less likely someone is to pick it up and browse.
- Personalization for Gifts: If you’re making the book safe as a gift, tailor your book choice to the recipient’s personality and interests. A classic novel for a literature lover, a history book for a history buff, or even a children’s book for a playful touch.
2. Gathering Your Supplies
Once you’ve chosen your book, gather the necessary tools and materials:
- Book: Your selected book, ready for transformation.
- Box Cutter (or Craft Knife): Essential for precisely cutting through the pages. Fresh blades are crucial for clean cuts.
- Brush: A standard craft brush for applying glue smoothly and evenly.
- Puzzle Glue (or PVA Glue): Puzzle glue is ideal as it dries clear and strong, minimizing warping. PVA glue (white craft glue) diluted with water (around 80% glue, 20% water) can also be used. Experiment to find the right consistency – too much water can warp the pages.
Optional but recommended supplies include:
- Ruler: To ensure straight lines and accurate compartment outlines.
- Extra Box Cutter Blades: Blades dull quickly when cutting paper, so having replacements will speed up the process and ensure cleaner cuts.
- Felt (optional): For lining the secret compartment to give it a more finished and professional look.
3. Preparing the Book – Marking Pages
Open your book and decide how many pages you want to leave untouched at the front. This section will serve as a cover, concealing the secret compartment. 20-30 pages are usually sufficient, depending on the book’s thickness and your preference. Mark these pages lightly with a pencil or by inserting a slip of paper.
4. Protecting the Cover
To prevent glue from accidentally adhering to the book’s cover, protect it with plastic bags. Insert one plastic bag between the marked pages and the rest of the book, wrapping it around the front cover. Repeat this with another bag for the back cover, ensuring the entire cover is shielded from glue.
5. Gluing the Pages
Now it’s time to bind the pages together. Apply puzzle glue (or your diluted PVA glue mixture) to the outer edges of the book’s pages. Work your way around the entire book, ensuring all sides are coated. Apply a few layers of glue for strength, but be mindful of drips and globs, as these can dry white and be visible. Press the book firmly closed as you apply the glue to help the pages bond together tightly.
6. Drying and Pressing
To minimize warping and ensure a flat, solid block of pages, place the glued book under pressure while it dries. A vise is ideal if you have one, but simply placing the book under a stack of heavy books works just as well. Let the book dry for at least an hour, or ideally longer, to ensure the glue is completely set.
7. Outlining the Secret Compartment
Once the glue is completely dry, use a ruler and pencil to draw the outline of your secret compartment on the first glued page. You can choose any shape or size you like, but make sure to leave a border of at least half an inch (or more, depending on your book size) around the edges. This border provides structural integrity to the book safe and prevents the compartment from being too close to the edges, which could be noticeable.
8. Cutting Out the Compartment
This is the most time-consuming step, requiring patience and a steady hand. Using your box cutter, carefully cut along the outlined shape. Work slowly and methodically, cutting through a few pages at a time. Avoid forcing the blade, as this can lead to ragged edges and uneven cuts. Pay special attention to the corners; go back and refine them as needed to achieve clean, sharp angles. Regularly rotate and replace your blade to maintain sharpness and ease of cutting.
Alternative Cutting Method: If you have access to a scroll saw, this can significantly speed up the cutting process and allow for more intricate compartment shapes. A scroll saw provides cleaner cuts and requires less manual effort, especially for thicker books.
9. Finishing Touches – Inner Glue (Optional)
After cutting out the compartment, inspect the inner edges of the cut pages. If they appear frayed or weak, you can apply another thin layer of glue to reinforce them and create a neater finish. If you used puzzle glue, this might not be necessary as it tends to create a fairly solid edge already.
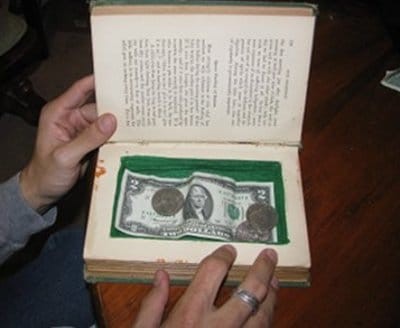
10. Adding Felt Lining (Optional)
For a more refined and professional-looking secret compartment, consider lining it with felt. Cut a piece of felt to fit the inside of the compartment and glue it in place. This will cover any slightly uneven edges from cutting and provide a soft, protective lining for your valuables. It’s a particularly nice touch if you’re giving the book safe as a gift.
Congratulations! You’ve now created your own secret compartment book safe. It’s ready to safeguard your small treasures in plain sight, disguised as an ordinary book on your shelf.
Have you ever crafted a book safe or experimented with similar hidden compartment projects? Share your tips, variations, and improvement ideas in the comments below!