COMPARE.EDU.VN offers comprehensive comparisons to simplify decision-making, and in this article, we delve into a detailed comparison of the Fujifilm GF 120mm f/4 Macro and the Cosina Voigtlander 125mm f/2.5 Apo-Lanthar lenses, highlighting their performance in close-focusing scenarios. By examining their sharpness, microcontrast, and optimal aperture settings, we provide insights to help you choose the right lens for your specific needs, ensuring you make an informed decision. Explore image quality, lens performance, and photographic equipment through our analysis.
1. Introduction: Fujifilm GF 120mm f/4 Macro vs. Cosina Voigtlander 125mm f/2.5 Apo-Lanthar
When it comes to macro photography and close-up work with the Fujifilm GFX system, the choice of lens can significantly impact the final result. In this article, we provide a detailed “A 4gf 125 Compare”, focusing on the Fujifilm GF 120mm f/4 Macro lens and the Cosina Voigtlander 125mm f/2.5 Apo-Lanthar lens. Both lenses offer unique capabilities, but their performance characteristics vary, especially when used with extension tubes for achieving higher magnification ratios. This analysis aims to help photographers understand the strengths and weaknesses of each lens, guiding them in selecting the best option for their specific needs.
2. Background: The Need for an Alternative Macro Lens
The Fujifilm GF 120mm f/4 Macro lens is known for its good performance at 1:2 magnification without extension tubes. However, when used with tubes, it exhibits softness at the edges and focus curvature, particularly at the minimum focusing distance (MFD) with 36mm of extension tubes. Tests at 1:1 magnification with a 45mm tube showed credible on-axis performance but softness on the right edge of the frame. These limitations make it less suitable for copy applications and 3D subjects that demand higher magnification and edge-to-edge sharpness. This prompted the exploration of alternative lenses, with the Cosina Voigtlander 125mm f/2.5 Apo-Lanthar as a promising candidate.
3. Test Setup and Methodology
To conduct a thorough comparison, a rigorous testing procedure was implemented. The setup included:
- Fujifilm GFX 100 camera
- Foba camera stand and C1 head for stability
- Fujifilm 45mm extension tube for the GF 120mm f/4 Macro
- Fujifilm 18mm extension tube for the CV 125mm f/2.5 Apo-Lanthar
- Lenses focused to their closest focusing distances
- ISO 100
- Electronic shutter
- 10-second self-timer to minimize vibrations
- Aperture range from f/4 to f/11, adjusted in whole-stop increments
- Exposure time adjusted in Manual mode
- Cognisys rail with 150 exposures, 20 μm step size
- Initial focus set slightly short of the target
The process involved converting RAF files to DNG using Adobe DNG Converter, extracting raw mosaics with dcraw, and using a custom Matlab program (originally written by Jack Hogan) to extract slanted edges for each raw plane. The slanted edges were then analyzed using MTF Mapper to produce MTF curves. Finally, curves were fitted to the MTF Mapper MTF50 values in Matlab, correcting for any systematic focus bracketing inconsistencies.
4. MTF50 Results: Sharpness Comparison
The Modulation Transfer Function (MTF50) is a measure of lens sharpness, indicating the spatial frequency at which the contrast is reduced to 50%. Higher MTF50 values indicate sharper images. The test results were presented in a graph with MTF50 in cycles per picture height on the vertical axis and f-stop on the horizontal axis.
4.1 Center Sharpness
In the center of the image, the Fujifilm GF 120mm f/4 Macro lens exhibited slightly better sharpness compared to the Cosina Voigtlander 125mm f/2.5 Apo-Lanthar. This suggests that for subjects positioned in the center of the frame, the GF lens may provide marginally finer details.
4.2 Edge Sharpness
At the right edge of the image, the Cosina Voigtlander 125mm f/2.5 Apo-Lanthar demonstrated significantly superior sharpness. This indicates that the CV lens is better suited for scenarios where edge-to-edge sharpness is critical, such as in copy applications or when photographing flat subjects.
4.3 Optimal Aperture Settings
The best f-stops for combined center and edge performance were found to be f/5.6 and f/8 for both lenses. However, it’s important to note that these are indicated f-stops. The effective f-stops, which account for the light loss due to magnification and extension, will be narrower. The effective f-stop for the GF lens is between one-third and two-thirds of a stop wider at 1:1 than the effective f-stop for the CV lens. This difference in effective f-stop explains the degraded performance of the CV lens at f/11.
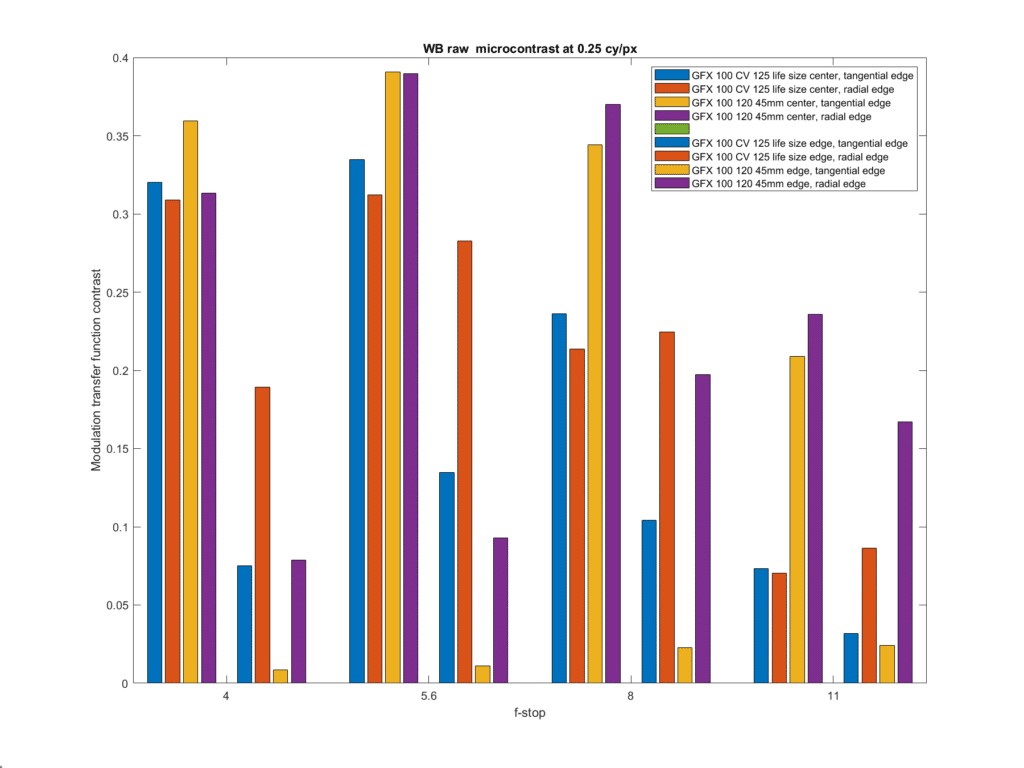
5. Microcontrast Analysis
Microcontrast, defined as contrast at one quarter of a cycle per pixel, is another important factor in assessing lens performance. It affects the perceived detail and texture in an image.
5.1 Microcontrast Performance
The analysis revealed that f/5.6 is the optimal aperture for the Cosina Voigtlander 125mm f/2.5 Apo-Lanthar in terms of microcontrast. For the Fujifilm GF 120mm f/4 Macro, depending on the weighting of center to edge performance, either f/5.6 or f/8 could be considered the best. At 1:1 magnification, the flexibility in aperture choice is limited for both lenses.
6. Detailed Comparison Table: Fujifilm GF 120mm f/4 Macro vs. Cosina Voigtlander 125mm f/2.5 Apo-Lanthar
| Feature | Fujifilm GF 120mm f/4 Macro | Cosina Voigtlander 125mm f/2.5 Apo-Lanthar |
|---|---|---|
| Center Sharpness | Slightly Sharper | Good |
| Edge Sharpness | Softer | Dramatically Sharper |
| Optimal Aperture | f/5.6 or f/8 | f/5.6 |
| Microcontrast | Good at f/5.6 or f/8 | Best at f/5.6 |
| Extension Tubes | Performance Degrades | Performs Well |
| Magnification | 1:2 without tubes | 1:1 with appropriate tubes |
| Effective f-stop | Wider at 1:1 | Narrower at 1:1 |
| Use Cases | General Macro Photography | Copy Applications, Edge-to-Edge Sharpness |

7. Practical Implications and Use Cases
7.1 Fujifilm GF 120mm f/4 Macro
The Fujifilm GF 120mm f/4 Macro lens is well-suited for general macro photography where center sharpness is prioritized. Its performance is adequate at 1:2 magnification without extension tubes, making it a convenient choice for photographers who do not require extreme close-ups. However, its limitations in edge sharpness and performance degradation with extension tubes make it less ideal for copy applications or subjects that demand uniform sharpness across the frame.
7.2 Cosina Voigtlander 125mm f/2.5 Apo-Lanthar
The Cosina Voigtlander 125mm f/2.5 Apo-Lanthar excels in scenarios where edge-to-edge sharpness is critical. Its superior performance at the edges of the frame makes it an excellent choice for copy applications, photographing flat documents, or capturing 3D subjects that require consistent sharpness throughout the image. The lens’s ability to maintain sharpness with extension tubes further enhances its versatility for close-up work.
8. Additional Considerations
8.1 Compatibility and Adaptability
The Cosina Voigtlander 125mm f/2.5 Apo-Lanthar typically comes in various lens mounts (e.g., Nikon F, Canon EF). To use it with the Fujifilm GFX system, an adapter is required. The use of adapters can introduce additional factors to consider, such as potential light leaks or mechanical instability. It’s essential to choose a high-quality adapter to ensure optimal performance.
8.2 Effective Aperture and Exposure Compensation
When using extension tubes, the effective aperture becomes narrower, reducing the amount of light reaching the sensor. This requires exposure compensation to maintain proper image brightness. The effective f-stop difference between the two lenses at 1:1 magnification should be accounted for when comparing exposure settings.
8.3 Focus Stacking
For subjects with significant depth, focus stacking can be employed to achieve greater overall sharpness. This technique involves capturing multiple images at different focus points and then combining them in post-processing to create a single image with extended depth of field. Both lenses are compatible with focus stacking techniques, but the superior edge sharpness of the CV lens may offer advantages in certain situations.
9. Real-World Examples
To illustrate the practical differences between the two lenses, consider the following scenarios:
- Copying Archival Documents: When digitizing old documents or photographs, edge-to-edge sharpness is crucial to capture all the fine details. The Cosina Voigtlander 125mm f/2.5 Apo-Lanthar would be the preferred choice due to its superior edge sharpness.
- Photographing Small Products for E-commerce: For small products with intricate details, such as jewelry or electronic components, the Fujifilm GF 120mm f/4 Macro may suffice if the focus is primarily on the center of the product. However, if the entire product needs to be sharp, the CV lens would be more suitable.
- Creating Macro Art: In artistic macro photography, the choice of lens may depend on the desired aesthetic. If a softer, more dreamlike quality is desired, the GF lens might be preferred. If the goal is to capture every minute detail with maximum sharpness, the CV lens would be the better option.
10. The Importance of Effective f-Stop
The term “effective f-stop” refers to the actual light-gathering ability of a lens when used at close focusing distances, especially with extension tubes. As magnification increases, the lens effectively becomes “slower,” meaning it lets in less light than the indicated f-stop suggests. This phenomenon is critical to understand because it affects exposure and depth of field.
10.1 How Effective f-Stop Impacts Exposure
When a lens is set to a particular f-stop (e.g., f/8), the camera’s light meter assumes that a certain amount of light will reach the sensor. However, at macro magnifications, the effective f-stop is narrower, reducing the light. To compensate for this, you must increase the exposure time or ISO, or use a wider aperture if possible.
10.2 Calculating Effective f-Stop
The effective f-stop can be calculated using the following formula:
Effective f-stop = Indicated f-stop * (1 + Magnification)
For example, if a lens is set to f/8 and the magnification is 1:1 (1x), the effective f-stop is:
Effective f-stop = 8 * (1 + 1) = f/16
This means that the lens is behaving like an f/16 lens in terms of light-gathering ability, requiring a two-stop increase in exposure to maintain the same brightness.
10.3 Why Effective f-Stop Matters for the GF and CV Lenses
In the comparison between the Fujifilm GF 120mm f/4 Macro and the Cosina Voigtlander 125mm f/2.5 Apo-Lanthar, the difference in effective f-stop at 1:1 magnification is significant. The GF lens has a wider effective f-stop, meaning it lets in more light than the CV lens at the same indicated f-stop. This explains why the CV lens may appear to perform worse at f/11; the effective aperture is much narrower, leading to diffraction and reduced sharpness.
11. Understanding Focus Curvature
Focus curvature is an optical aberration where the plane of focus is not flat but curved. This can cause different parts of the image to be in focus at different distances, even if they are on the same plane. Focus curvature is more pronounced at close focusing distances and with certain lens designs.
11.1 How Focus Curvature Affects Macro Photography
In macro photography, where the depth of field is extremely shallow, focus curvature can be particularly problematic. It can lead to only a small portion of the subject being in sharp focus, while the rest appears blurry. This is especially noticeable when photographing flat subjects, such as documents or circuit boards.
11.2 Mitigating Focus Curvature
Several techniques can be used to mitigate the effects of focus curvature:
- Stopping Down the Aperture: Using a smaller aperture (higher f-number) increases the depth of field, which can help to compensate for focus curvature. However, stopping down too much can lead to diffraction and reduced sharpness.
- Focus Stacking: As mentioned earlier, focus stacking involves capturing multiple images at different focus points and combining them in post-processing. This technique can effectively eliminate the effects of focus curvature by ensuring that all parts of the subject are in sharp focus.
- Choosing a Lens with Low Focus Curvature: Some lenses are designed to minimize focus curvature. The Cosina Voigtlander 125mm f/2.5 Apo-Lanthar is known for its excellent correction of optical aberrations, including focus curvature, making it a good choice for subjects where a flat plane of focus is required.
12. Exploring Chromatic Aberration
Chromatic aberration is a common optical defect that occurs when a lens fails to focus all colors to the same point. It manifests as color fringing or blurring, typically seen as purple or green edges around high-contrast areas in an image.
12.1 Types of Chromatic Aberration
There are two main types of chromatic aberration:
- Longitudinal Chromatic Aberration: This occurs when different colors are focused at different distances along the optical axis. It is most noticeable as color fringing in front of or behind the plane of focus.
- Lateral Chromatic Aberration: This occurs when different colors are focused at different positions in the image plane, resulting in color fringing that worsens towards the edges of the frame.
12.2 How Chromatic Aberration Impacts Image Quality
Chromatic aberration can degrade image quality by reducing sharpness, contrast, and color accuracy. It is particularly noticeable in macro photography, where fine details are magnified.
12.3 Correcting Chromatic Aberration
Chromatic aberration can be corrected in several ways:
- In-Camera Correction: Many modern cameras offer in-camera correction of chromatic aberration. This feature automatically detects and removes color fringing from images.
- Post-Processing Correction: Chromatic aberration can also be corrected in post-processing software such as Adobe Photoshop or Lightroom. These programs offer tools to remove color fringing and improve image quality.
- Choosing a Lens with Low Chromatic Aberration: Some lenses are designed with special glass elements and optical designs to minimize chromatic aberration. The Cosina Voigtlander 125mm f/2.5 Apo-Lanthar is an apochromatic lens, meaning it is designed to correct chromatic aberration to a very high degree.
13. The Role of Lens Coatings
Lens coatings are thin layers of material applied to the surface of lens elements to reduce reflections, increase light transmission, and improve image quality.
13.1 Types of Lens Coatings
Various types of lens coatings are used in modern lenses, including:
- Single-Layer Coatings: These coatings reduce reflections and increase light transmission.
- Multi-Layer Coatings: These coatings offer even better performance by reducing reflections over a wider range of wavelengths.
- Anti-Reflective Coatings: These coatings minimize reflections, ghosting, and flare.
- Protective Coatings: These coatings protect the lens surface from scratches, dust, and moisture.
13.2 How Lens Coatings Improve Image Quality
Lens coatings improve image quality in several ways:
- Reducing Reflections: By reducing reflections, lens coatings increase the amount of light that reaches the sensor, resulting in brighter and more contrasty images.
- Minimizing Ghosting and Flare: Lens coatings minimize ghosting (internal reflections that appear as faint images) and flare (bright streaks or circles caused by strong light sources), improving image clarity.
- Increasing Sharpness: By reducing reflections, lens coatings increase sharpness and detail.
13.3 The Importance of Lens Coatings for Macro Photography
In macro photography, where fine details are magnified, lens coatings play a crucial role in maximizing image quality. They help to minimize reflections and flare, ensuring that the subject is captured with maximum clarity and detail.
14. Diffraction and Its Impact on Sharpness
Diffraction is a phenomenon that occurs when light waves pass through a small aperture, causing them to spread out. This spreading can reduce sharpness and detail in an image.
14.1 How Diffraction Affects Image Quality
Diffraction becomes more pronounced as the aperture is stopped down (i.e., as the f-number increases). At very small apertures, diffraction can significantly reduce sharpness, making images appear soft and lacking in detail.
14.2 Managing Diffraction in Macro Photography
In macro photography, where a narrow depth of field is often required, it can be challenging to balance the need for sharpness with the effects of diffraction. Here are some strategies for managing diffraction:
- Finding the Optimal Aperture: Experiment with different apertures to find the one that provides the best balance between depth of field and sharpness.
- Focus Stacking: As mentioned earlier, focus stacking can be used to increase depth of field without stopping down the aperture.
- Using a Sharp Lens: A sharp lens will maintain better sharpness even when diffraction is present.
14.3 Diffraction and the GF and CV Lenses
In the comparison between the Fujifilm GF 120mm f/4 Macro and the Cosina Voigtlander 125mm f/2.5 Apo-Lanthar, diffraction is a factor to consider. The effective f-stop difference between the two lenses at 1:1 magnification means that the CV lens may be more susceptible to diffraction at smaller indicated apertures.
15. Evaluating Distortion
Distortion is an optical aberration that causes straight lines to appear curved in an image. There are two main types of distortion:
15.1 Types of Distortion
- Barrel Distortion: This causes straight lines to bow outwards from the center of the image.
- Pincushion Distortion: This causes straight lines to bow inwards towards the center of the image.
15.2 How Distortion Affects Image Quality
Distortion can affect image quality by making objects appear unnatural or distorted. It is particularly noticeable when photographing subjects with straight lines, such as architecture or documents.
15.3 Correcting Distortion
Distortion can be corrected in several ways:
- In-Camera Correction: Some cameras offer in-camera correction of distortion.
- Post-Processing Correction: Distortion can also be corrected in post-processing software such as Adobe Photoshop or Lightroom.
- Using a Lens with Low Distortion: Some lenses are designed to minimize distortion.
15.4 Distortion and the GF and CV Lenses
In the comparison between the Fujifilm GF 120mm f/4 Macro and the Cosina Voigtlander 125mm f/2.5 Apo-Lanthar, distortion is a factor to consider. Both lenses are well-corrected for distortion, but it is important to be aware of this aberration and to correct it if necessary.
16. How to Choose the Right Lens for Your Needs
Choosing the right lens for your needs depends on several factors, including:
- Your Budget: Lenses range in price from a few hundred dollars to several thousand dollars.
- Your Shooting Style: Consider the types of subjects you photograph and the shooting conditions you typically encounter.
- Your Camera System: Make sure the lens is compatible with your camera system.
- Your Desired Image Quality: Consider the lens’s sharpness, contrast, distortion, and other image quality characteristics.
- Your Specific Needs: Think about the specific features and capabilities you need in a lens.
17. Maintaining Your Lenses
Proper maintenance is essential to keep your lenses in good condition and to ensure that they continue to perform optimally. Here are some tips for maintaining your lenses:
- Store Your Lenses in a Cool, Dry Place: Avoid storing your lenses in hot, humid environments, as this can damage the lens elements and coatings.
- Clean Your Lenses Regularly: Use a soft, lint-free cloth to clean your lenses regularly. Avoid using harsh chemicals or abrasive materials.
- Protect Your Lenses from Scratches: Use a lens cap or lens hood to protect your lenses from scratches.
- Have Your Lenses Serviced Regularly: Have your lenses serviced by a qualified technician every few years to ensure that they are in good working order.
18. Conclusion: Making an Informed Decision
In summary, the choice between the Fujifilm GF 120mm f/4 Macro and the Cosina Voigtlander 125mm f/2.5 Apo-Lanthar depends on your specific needs and priorities. The GF lens offers good center sharpness and is convenient for general macro photography, while the CV lens excels in edge sharpness and is ideal for copy applications and subjects requiring uniform sharpness. Understanding the nuances of each lens will allow you to make an informed decision and achieve the best possible results in your macro photography endeavors. Remember to consider effective aperture, focus curvature, and other optical aberrations when evaluating lens performance.
19. Call to Action
Are you still unsure which lens is right for you? Visit COMPARE.EDU.VN for more detailed comparisons and reviews to help you make the best decision for your photography needs. Our comprehensive resources are designed to provide you with the information you need to choose the perfect equipment for your next project. Make informed decisions by visiting us at 333 Comparison Plaza, Choice City, CA 90210, United States, or contact us via Whatsapp at +1 (626) 555-9090. Visit our website COMPARE.EDU.VN today.
20. FAQ: Common Questions About Macro Lenses
20.1 What is the best aperture for macro photography?
The best aperture for macro photography depends on the desired depth of field and the effects of diffraction. Generally, an aperture between f/5.6 and f/11 provides a good balance between sharpness and depth of field.
20.2 How do extension tubes affect lens performance?
Extension tubes increase magnification but also reduce the amount of light reaching the sensor. They can also affect image quality, particularly sharpness and distortion.
20.3 What is focus stacking, and why is it used in macro photography?
Focus stacking is a technique that involves capturing multiple images at different focus points and combining them in post-processing to create a single image with extended depth of field. It is used in macro photography to overcome the limitations of shallow depth of field.
20.4 How can I minimize chromatic aberration in my images?
Chromatic aberration can be minimized by using a lens with low chromatic aberration, correcting it in post-processing, or using in-camera correction features.
20.5 What are lens coatings, and why are they important?
Lens coatings are thin layers of material applied to the surface of lens elements to reduce reflections, increase light transmission, and improve image quality. They are important for maximizing sharpness, contrast, and color accuracy.
20.6 How do I clean my lenses properly?
Clean your lenses with a soft, lint-free cloth. Avoid using harsh chemicals or abrasive materials.
20.7 What is diffraction, and how does it affect image quality?
Diffraction is a phenomenon that occurs when light waves pass through a small aperture, causing them to spread out. This spreading can reduce sharpness and detail in an image.
20.8 How do I choose the right macro lens for my needs?
Choose the right macro lens by considering your budget, shooting style, camera system, desired image quality, and specific needs.
20.9 What is distortion, and how does it affect image quality?
Distortion is an optical aberration that causes straight lines to appear curved in an image. It can affect image quality by making objects appear unnatural or distorted.
20.10 How can COMPARE.EDU.VN help me choose the best lens?
compare.edu.vn offers detailed comparisons and reviews of various lenses, providing you with the information you need to make the best decision for your photography needs. Our resources are designed to help you choose the perfect equipment for your next project.