Managing multiple versions of Excel files can quickly become complicated. Whether you’re collaborating on a project, tracking changes over time, or simply trying to ensure data consistency, identifying differences between Excel files is crucial. Microsoft Spreadsheet Compare is a powerful tool designed to streamline this process, allowing you to efficiently pinpoint discrepancies and maintain data integrity. This guide will walk you through how to use Spreadsheet Compare to effectively compare Excel files and understand the results.
Opening Spreadsheet Compare
Spreadsheet Compare is a utility included with specific versions of Microsoft Office. To access it, the process is straightforward.
- Navigate to the Start Menu in Windows.
- Type Spreadsheet Compare directly into the search bar.
- Click on the Spreadsheet Compare application when it appears in the search results to launch the program.
If you are unable to locate Spreadsheet Compare directly, ensure you have a qualifying version of Microsoft Office installed, such as Office Professional Plus 2013, Office Professional Plus 2016, Office Professional Plus 2019, or Microsoft 365 Apps for enterprise, as this tool is exclusively available within these editions.
Comparing Two Excel Workbooks
Once Spreadsheet Compare is open, you can initiate the file comparison process in just a few steps:
-
On the Home tab, locate and click the Compare Files button. This action will open the Compare Files dialog box.
-
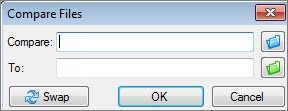
In the Compare Files dialog box, you’ll see two input fields: Compare and To. Click the blue folder icon situated next to the Compare field. This will open a file explorer window, allowing you to browse and select the earlier version of your Excel workbook that you wish to use as the basis for comparison. You can select files from your local computer, network drives, or even enter a web address if your workbooks are stored online.
Alt Text: Compare Files dialog box in Spreadsheet Compare with blue folder icon highlighted for selecting the ‘Compare’ file.
-
Next, click the green folder icon adjacent to the To field. Again, a file explorer window will appear. This time, navigate to and select the more recent version of the Excel workbook you want to compare against the earlier version. Click OK to confirm your selection.
-
Before running the comparison, you have the option to customize the comparison parameters. In the left pane of the Compare Files dialog box, you’ll find a list of options such as Formulas, Macros, and Cell Format. Select or deselect these checkboxes to specify which elements of the workbooks you want to include in the comparison report. To compare all aspects, simply click Select All.
-
Finally, click OK to initiate the comparison process.
If a password prompt appears with an “Unable to open workbook” message, it indicates that one or both of the selected workbooks are password protected. Enter the password for the respective workbook when prompted and click OK to proceed. Spreadsheet Compare requires the password to access and analyze protected files.
Understanding the Comparison Results
Once the comparison is complete, Spreadsheet Compare presents the findings in a user-friendly, side-by-side grid layout. The left pane displays the “Compare” file (typically the older version), and the right pane shows the “To” file (usually the newer one). A detailed pane beneath the grids provides a legend and specific information about the detected differences.
-
The grid view displays worksheets from each file for direct comparison. If your workbooks contain multiple worksheets, you can navigate through them using the forward and back buttons located on the horizontal scroll bar. It’s important to note that even hidden worksheets are included in the comparison and displayed in the results.
-
Differences between the compared files are visually highlighted using color-coding within the grid and the results list. The color indicates the type of change detected. For instance, cells containing “entered values” (cells with manually input data, not formulas) are typically marked with a green fill color in the grid and a green font in the results list. The legend in the lower-left pane clearly explains the meaning of each color code used in the comparison report.
Alt Text: Side-by-side comparison of two Excel workbooks in Spreadsheet Compare, highlighting cell differences with color-coded fills.
In the example above, you can see that cells E2:E5 in both versions are filled with green, signifying a change in entered values. Consequently, the calculated values in the YTD column (F2:F4 and E6:F6) are highlighted with a blue-green fill, indicating changes in calculated values due to the altered input data. Cell F5 also shows a change, but in this case, it highlights a formula correction – the earlier version had an incorrect formula (=SUM(B5:D5)), which was updated to the correct formula (=SUM(B5:E5)) in the later version.
- If cell content appears truncated due to column width, you can easily adjust the display by clicking Resize Cells to Fit. This will automatically resize columns to ensure all cell contents are fully visible.
Leveraging Excel’s Inquire Add-in
Beyond Spreadsheet Compare, Excel itself offers a valuable add-in called Inquire, available in Excel 2013 and later. Activating the Inquire add-in adds an “Inquire” tab to your Excel ribbon, providing a suite of analytical tools. From this tab, you can perform workbook analysis, visualize relationships between cells and worksheets, explore connections to external workbooks, and even optimize worksheets by removing excessive formatting. For comparing two open workbooks directly within Excel, the “Compare Files” command under the Inquire tab conveniently launches Spreadsheet Compare.
If you don’t see the Inquire tab in your Excel ribbon, you may need to enable it manually. You can find instructions on how to do this by searching for “Turn on the Inquire add-in” in Excel help. To delve deeper into the capabilities of the Inquire add-in and its various tools, search for “What you can do with Spreadsheet Inquire”.
Next Steps for Robust Excel Management
For organizations that rely heavily on “mission-critical” Excel workbooks and Access databases, consider implementing Microsoft’s comprehensive management tools: Microsoft Audit and Control Management Server and Microsoft Discovery and Risk Assessment Server. These server solutions offer advanced change management, inventory, and analysis features specifically designed for Excel and Access files. By utilizing these tools, organizations can significantly mitigate risks associated with end-user developed applications and ensure greater control and oversight of critical spreadsheet data.
Further information and an overview of Spreadsheet Compare can be found by searching for “Overview of Spreadsheet Compare”.