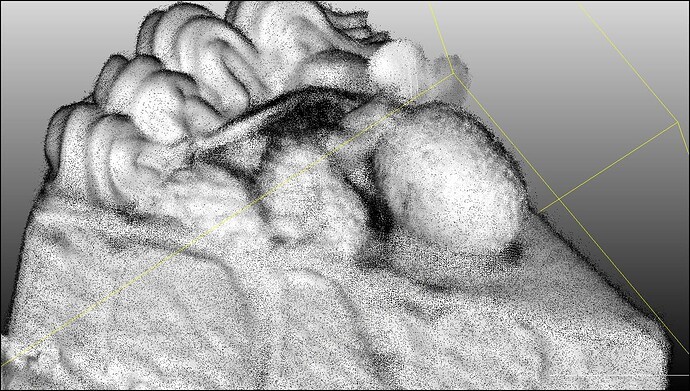
So, you’ve dived into the world of 3D scanning, aiming for flawless digital replicas. You meticulously scanned your object from every angle, believing more scans equal perfection. After fusing your point cloud in Revo Scan, you’re met with a dense, noisy cloud that looks more like a digital monster than a clean 3D model.
Eager to see your creation come to life, you proceed to mesh this “fluffy” point cloud, hoping for the best. Hours later, after significant processing time, the result is a messy, unusable mesh.
Frustration kicks in. Is your scanner faulty? Is calibration needed? The truth is, you might have simply over-scanned. Too much data, especially redundant and misaligned points, overwhelms the point fusion process. Even powerful software like Revo Studio struggles with such dense, noisy point clouds. Sharing this massive file becomes impossible, and your system might be on the verge of crashing due to memory overload. It’s a 3D scanning pitfall many beginners encounter: garbage in, garbage out. The quality of your mesh is directly dependent on the quality of your point cloud.
But don’t despair! There’s a powerful, free tool that can rescue your scans and perform effective Cloud Compare Cleanup: CloudCompare. While not a guaranteed fix for every situation, in most cases (around 95%), CloudCompare can significantly clean up your point cloud, paving the way for a clean, usable mesh.
Here’s how to use CloudCompare for point cloud cleanup:
Step-by-Step Guide to Cloud Compare Cleanup
-
Download and Install CloudCompare:
First, download the free CloudCompare software compatible with both Windows and Mac operating systems from the official website: CLOUD COMPARE. Follow the installation instructions for your operating system.
-
Import Your Point Cloud Data:
Open CloudCompare and import your messy point cloud file directly from your project files. Ensure you are importing the point cloud file (not the mesh) into CloudCompare.
-
SOR Filter for Initial Cleanup:
The first step in cloud compare cleanup is to apply the Statistical Outlier Removal (SOR) filter. This filter effectively removes loose, isolated points that don’t belong to the main object – often the extra frames that contribute to the noisy, “fluffy” appearance.
- Select your imported point cloud in the CloudCompare interface.
- Navigate to the menu bar and click on Tools > Clean > SOR Filter.
-
Apply SOR Filter Settings:
A small window will appear for the SOR Filter settings. Use the following parameters for a standard cloud compare cleanup:
- Neighbors: 6 (This value determines the number of neighboring points considered for statistical analysis. Adjusting this can impact the aggressiveness of the filter.)
- Standard deviation multiplier: 1.0 (This multiplier sets the threshold for outlier removal based on standard deviation. Lower values are more aggressive.)
Click OK to apply the filter.
-
Observe the Initial Cleanup:
After applying the SOR filter, you’ll notice a significant reduction in noise and extraneous points. The point cloud edges will appear less “fluffy” and more defined. CloudCompare automatically creates a new point cloud layer with the suffix “Cloud_clean,” preserving your original data.
-
Noise Filter for Refinement:
For further cloud compare cleanup, select the newly created “Cloud_clean” point cloud layer. Navigate again to Tools > Clean, but this time select Noise Filter. This filter helps to remove remaining isolated noise points.
-
Apply Noise Filter Settings:
In the Noise Filter window, use the suggested default settings. These settings are generally effective for general noise reduction. Click OK to proceed.
-
Prepare for Meshing:
You now have a significantly cleaner point cloud, identified by the suffix “Cloud_clean_clean”. This refined point cloud is now ready for meshing.
-
Mesh using Poisson Reconstruction:
With the “Cloud_clean_clean” point cloud selected, go to the menu bar and click on Plugins > PoissonRecon.
-
Configure PoissonRecon Settings:
In the PoissonRecon window, adjust the settings to control the mesh density. A Octree Depth level of 8 provides a good balance for general models. For models with finer details, you can increase this value to 9 or 10. Be aware that higher levels can increase processing time and potentially introduce micro-noise.
- Octree Depth: 8 (Adjustable for mesh density)
- Surface offsetting: Optional (Use if your model lacks a defined bottom, start with lower levels)
Click OK to start the meshing process.
-
Evaluate and Refine the Mesh:
The Poisson Reconstruction plugin will generate a clean mesh from your processed point cloud. Observe the improved mesh quality, free from the clumps and noise present in the initial mesh.
-
Post-Mesh Cleanup (Optional):
If your scan lacks a defined bottom and you used Surface offsetting in PoissonRecon, you might have extra mesh generated underneath. You can remove this using the SF Parameters tool in CloudCompare. Be cautious with the slider, as excessive adjustment might reopen holes in your scanned object. The color visualization in CloudCompare indicates point density, helping you identify areas for refinement.
The final cleaned mesh retains the details of your scan, but without the noise and artifacts from the over-scanning.
Compare this result to your initial messy mesh – the difference is night and day!
With cloud compare cleanup, you can salvage even heavily over-scanned projects and achieve clean, high-quality 3D models. Embrace CloudCompare as your go-to tool for refining your 3D scans and enjoy creating perfect digital representations of the physical world. Happy cleaning!