Is There A Way To Compare Two Excel Files to identify differences and ensure data integrity? COMPARE.EDU.VN offers comprehensive solutions for comparing Excel files, enabling users to pinpoint changes, discrepancies, and potential errors efficiently. Discover the best methods for Excel comparison, file analysis, and data validation to streamline your workflow and enhance accuracy with our guide today.
1. Introduction to Excel File Comparison
Excel is a powerful tool for data management, analysis, and reporting, but managing multiple versions of spreadsheets can quickly become complex. Comparing two Excel files can become a necessity in various situations, such as auditing, version control, and ensuring data accuracy. Whether you’re tracking changes made by multiple collaborators or verifying the consistency of data across different reports, knowing how to effectively compare Excel files is invaluable.
1.1 Why Compare Excel Files?
Comparing Excel files is crucial for maintaining data integrity and accuracy. Here are some key reasons why you might need to compare Excel files:
- Version Control: Identify changes made between different versions of the same file to track modifications and updates.
- Data Validation: Ensure that data is consistent across multiple reports or datasets.
- Auditing: Verify the accuracy of data entries and calculations for compliance purposes.
- Collaboration: Track changes made by multiple users in a shared workbook.
- Error Detection: Find discrepancies, inconsistencies, and potential errors in your data.
1.2 Common Challenges in Comparing Excel Files
Manually comparing Excel files can be time-consuming and prone to errors, especially with large and complex spreadsheets. Some common challenges include:
- Large Datasets: Comparing large Excel files with thousands of rows and columns can be overwhelming.
- Complex Formulas: Identifying changes in formulas and calculations can be difficult without specialized tools.
- Formatting Differences: Differences in formatting, such as fonts, colors, and cell styles, can obscure actual data changes.
- Hidden Data: Hidden rows, columns, or worksheets can be easily overlooked, leading to incomplete comparisons.
- Time-Consuming Process: Manually comparing files can take hours or even days, depending on the size and complexity of the data.
2. Methods for Comparing Excel Files
Fortunately, there are several methods available for comparing Excel files, ranging from built-in Excel features to specialized third-party tools. Each method has its strengths and weaknesses, so choosing the right one depends on your specific needs and the complexity of your data.
2.1 Using Microsoft Spreadsheet Compare
Microsoft Spreadsheet Compare is a tool included in Office Professional Plus 2013, Office Professional Plus 2016, Office Professional Plus 2019, and Microsoft 365 Apps for enterprise. It allows you to run a report on the differences and problems it finds between two Excel workbooks.
2.1.1 How to Open Spreadsheet Compare
- Access the Start Screen: On your computer, navigate to the Start screen.
- Search for Spreadsheet Compare: Type “Spreadsheet Compare” to find the application.
- Select the Application: Click on “Spreadsheet Compare” to open it.
2.1.2 Comparing Two Excel Workbooks with Spreadsheet Compare
- Open the Tool: Launch Microsoft Spreadsheet Compare.
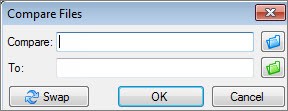
- Select Compare Files: Click on Home > Compare Files. This will open the Compare Files dialog box.
- Choose the Files:
- Click the blue folder icon next to the Compare box to browse and select the earlier version of your workbook. You can also enter a web address if the file is saved on a website.
- Click the green folder icon next to the To box to browse and select the workbook you want to compare to the earlier version. Click OK.
- Tip: You can compare two files with the same name if they’re saved in different folders.
- Select Comparison Options: In the left pane, choose the options you want to see in the comparison results, such as Formulas, Macros, or Cell Format. You can also select Select All to include all options.
- Run the Comparison: Click OK to start the comparison process.
- Enter Password (if required): If you get an “Unable to open workbook” message, it might mean one of the workbooks is password protected. Click OK and then enter the workbook’s password.
2.1.3 Understanding the Comparison Results
The results of the comparison appear in a two-pane grid, with the earlier version on the left and the newer version on the right. Details of the differences are displayed in a pane below the grids.
- Worksheet Comparison: Each worksheet in one file is compared to the corresponding worksheet in the other file. If there are multiple worksheets, you can navigate through them using the forward and back buttons on the horizontal scroll bar.
- Highlighting Differences: Differences are highlighted with cell fill color or text font color, depending on the type of change. For example, cells with entered values (non-formula cells) are formatted with a green fill color in the side-by-side grid and with a green font in the pane results list.
- Legend: The lower-left pane provides a legend that explains what the colors mean.
2.1.4 Interpreting the Results
In the comparison results, cells with different fill colors indicate the type of change. For example:
- Green Fill: Indicates that an entered value has changed.
- Blue-Green Fill: Indicates that a calculated value has changed.
If the cells are too narrow to show the contents, click Resize Cells to Fit.
2.2 Using Excel’s Inquire Add-In
Excel 2013 and later versions include an Inquire add-in that provides advanced analysis and comparison features. This add-in allows you to analyze workbooks, see relationships between cells and worksheets, and clean excess formatting.
2.2.1 Enabling the Inquire Add-In
If you don’t see the Inquire tab in Excel, you may need to enable it. Here’s how:
- Go to Options: Click File > Options.
- Select Add-Ins: In the Excel Options dialog box, click Add-Ins.
- Manage Add-Ins: In the Manage drop-down list, select COM Add-ins and click Go…
- Enable Inquire: In the COM Add-Ins dialog box, check the box next to Inquire and click OK.
2.2.2 Comparing Files Using the Inquire Add-In
- Open Excel: Launch Excel and open the two workbooks you want to compare.
- Go to the Inquire Tab: Click the Inquire tab on the ribbon.
- Compare Files: In the Inquire tab, click the Compare Files command.
- Select Files: In the Compare Files dialog box, select the two files you want to compare.
- Run the Comparison: Click Compare to start the comparison.
The Inquire add-in will generate a detailed report of the differences between the two files, including changes to formulas, values, and formatting.
2.2.3 Features of the Inquire Add-In
The Inquire add-in offers several powerful features for analyzing and comparing Excel files:
- Workbook Analysis: Provides a comprehensive overview of the workbook’s structure, formulas, and potential errors.
- Cell Relationship Analysis: Visualizes the relationships between cells, worksheets, and other workbooks.
- Clean Excess Formatting: Removes unnecessary formatting to reduce file size and improve performance.
- Compare Files: Generates a detailed report of the differences between two workbooks.
2.3 Using VBA (Visual Basic for Applications) for Custom Comparisons
For more advanced users, VBA (Visual Basic for Applications) can be used to create custom comparison routines. VBA allows you to write code to compare specific aspects of Excel files, such as data in certain columns, formula outputs, or formatting properties.
2.3.1 Creating a VBA Macro to Compare Two Excel Files
Here’s a basic example of a VBA macro that compares two Excel files and highlights the differences:
Sub CompareExcelFiles()

    Dim wb1 As Workbook, wb2 As Workbook
    Dim ws1 As Worksheet, ws2 As Worksheet
    Dim cell1 As Range, cell2 As Range
    Dim lastRow As Long, lastCol As Long
    Dim i As Long, j As Long

    ' Set references to the workbooks and worksheets
    Set wb1 = Workbooks("File1.xlsx") ' Replace with the name of your first workbook
    Set wb2 = Workbooks("File2.xlsx") ' Replace with the name of your second workbook
    Set ws1 = wb1.Sheets("Sheet1")   ' Replace with the name of your first worksheet
    Set ws2 = wb2.Sheets("Sheet1")   ' Replace with the name of your second worksheet

    ' Get the last row and column
    lastRow = ws1.Cells.Find("*", SearchOrder:=xlByRows, SearchDirection:=xlPrevious).Row
    lastCol = ws1.Cells.Find("*", SearchOrder:=xlByColumns, SearchDirection:=xlPrevious).Column

    ' Loop through each cell and compare values
    For i = 1 To lastRow
        For j = 1 To lastCol
            ' Set references to the cells
            Set cell1 = ws1.Cells(i, j)
            Set cell2 = ws2.Cells(i, j)

            ' Compare cell values
            If cell1.Value <> cell2.Value Then
                ' Highlight the differences
                cell1.Interior.Color = vbYellow
                cell2.Interior.Color = vbYellow
            End If
        Next j
    Next i

    MsgBox "Comparison complete. Differences highlighted in yellow."

End Sub
2.3.2 Steps to Use the VBA Macro
- Open Excel: Launch Excel and open both workbooks you want to compare.
- Open VBA Editor: Press
Alt + F11to open the VBA editor. - Insert a Module: In the VBA editor, click Insert > Module.
- Paste the Code: Copy and paste the VBA code into the module.
- Modify the Code:
- Replace
"File1.xlsx"and"File2.xlsx"with the actual names of your workbooks. - Replace
"Sheet1"with the name of the worksheet you want to compare.
- Replace
- Run the Macro: Press
F5or click the Run button to execute the macro.
The macro will loop through each cell in the specified worksheets and highlight any differences in yellow.
2.3.3 Advantages of Using VBA
- Customization: VBA allows you to customize the comparison process to suit your specific needs.
- Automation: You can automate the comparison process, saving time and reducing the risk of errors.
- Flexibility: VBA can be used to compare specific data ranges, ignore formatting differences, and perform other advanced tasks.
2.4 Third-Party Excel Comparison Tools
Several third-party tools are designed specifically for comparing Excel files. These tools often offer advanced features such as detailed comparison reports, change tracking, and integration with version control systems.
2.4.1 Examples of Third-Party Tools
- Araxis Excel Compare: A powerful tool for comparing Excel files with detailed reports and change tracking.
- Spreadsheet Compare: A comprehensive solution for comparing Excel files, databases, and other data sources.
- Beyond Compare: A versatile comparison tool that supports Excel files and other file formats.
- Synkronizer: Offers features like highlighting differences, ignoring insignificant changes, and merging revisions.
- xlCompare: Helps identify changes easily with color-coding and detailed change reports.
2.4.2 Features of Third-Party Tools
- Detailed Comparison Reports: Generate comprehensive reports of the differences between two files, including changes to data, formulas, and formatting.
- Change Tracking: Track changes made by multiple users and revert to previous versions if needed.
- Integration with Version Control Systems: Integrate with version control systems like Git to manage and track changes to your Excel files.
- Automated Comparison: Automate the comparison process with scheduling and batch processing capabilities.
- User-Friendly Interface: Offer an intuitive and user-friendly interface for easy comparison and analysis.
3. Key Considerations When Choosing a Comparison Method
When selecting a method for comparing Excel files, consider the following factors:
3.1 Complexity of the Data
If you’re working with large and complex datasets, you may need a more powerful tool than the built-in Excel features. Third-party tools and VBA macros can handle complex comparisons more efficiently.
3.2 Specific Comparison Requirements
Consider what aspects of the Excel files you need to compare. Do you need to compare data, formulas, formatting, or other properties? Choose a method that supports your specific requirements.
3.3 Level of Automation
If you need to compare Excel files frequently, consider a method that offers automation capabilities. VBA macros and third-party tools can automate the comparison process, saving time and reducing the risk of errors.
3.4 Budget
Third-party tools can range in price from free to hundreds of dollars per license. Consider your budget when choosing a comparison method. The built-in Excel features and VBA macros are free, but they may not offer the same level of functionality as paid tools.
4. Step-by-Step Guide to Comparing Excel Files Effectively
To effectively compare Excel files, follow these steps:
4.1 Preparation
- Backup Your Files: Before comparing Excel files, make a backup of each file. This ensures that you can revert to the original versions if needed.
- Close Unnecessary Files: Close any other Excel files that you don’t need to compare. This reduces the risk of errors and improves performance.
- Ensure Files Are Compatible: Make sure that the Excel files are compatible with the comparison tool you’re using. Older file formats may not be supported by some tools.
- Simplify the Files: Remove any unnecessary data, formatting, or formulas from the files. This makes the comparison process faster and easier.
4.2 Comparison Process
- Choose a Comparison Method: Select the appropriate method for comparing your Excel files, based on the complexity of the data, your specific requirements, and your budget.
- Open the Comparison Tool: Launch the comparison tool you’ve chosen and open the two Excel files you want to compare.
- Configure Comparison Settings: Configure the comparison settings to match your specific requirements. This may include selecting which aspects of the files to compare (e.g., data, formulas, formatting) and specifying any comparison options.
- Run the Comparison: Start the comparison process and wait for the tool to generate the results.
- Review the Results: Review the comparison results and identify any differences between the two files.
4.3 Analysis and Action
- Analyze the Differences: Analyze the differences between the two files and determine the cause of the discrepancies.
- Take Corrective Action: Take corrective action to resolve any issues identified during the comparison process. This may include updating data, correcting formulas, or adjusting formatting.
- Document the Changes: Document the changes you’ve made to the Excel files. This helps you track the changes and ensure that the data is accurate and consistent.
- Verify the Results: Verify the results of the comparison to ensure that all issues have been resolved.
5. Tips and Best Practices for Excel File Comparison
To get the most out of your Excel file comparison efforts, consider the following tips and best practices:
5.1 Standardize Your Data
Standardizing your data can make the comparison process much easier. This includes using consistent data formats, naming conventions, and formulas.
5.2 Use Named Ranges
Using named ranges can make it easier to identify and compare specific data ranges in your Excel files.
5.3 Break Down Large Files
If you’re working with large Excel files, consider breaking them down into smaller, more manageable files. This can improve performance and make the comparison process easier.
5.4 Automate the Comparison Process
Automating the comparison process can save time and reduce the risk of errors. Use VBA macros or third-party tools to automate the comparison process.
5.5 Keep Your Tools Up to Date
Keep your Excel software and comparison tools up to date to ensure that you have access to the latest features and bug fixes.
6. Common Use Cases for Comparing Excel Files
Comparing Excel files is useful in many different scenarios. Here are some common use cases:
6.1 Financial Reporting
In finance, comparing Excel files is often needed to ensure that financial reports are accurate and consistent. You can compare budget vs. actual reports, compare sales reports from different periods, and so on.
6.2 Data Migration
When migrating data from one system to another, comparing Excel files is essential to ensure that the data is transferred correctly.
6.3 Auditing
Auditors often need to compare Excel files to verify that financial records are accurate and comply with regulations.
6.4 Project Management
Project managers can use Excel file comparison to track progress, identify discrepancies, and ensure that project data is accurate and up-to-date.
6.5 Sales Analysis
Sales teams can use Excel file comparison to analyze sales data, compare performance across different regions or time periods, and identify trends and patterns.
7. Advanced Techniques for Excel File Comparison
For more advanced Excel users, here are some techniques that can help you compare files more effectively:
7.1 Conditional Formatting
Conditional formatting can be used to highlight differences between two Excel files. You can create rules that highlight cells that contain different values, formulas, or formatting.
7.1.1 Applying Conditional Formatting
- Open Both Files: Open the two Excel files you want to compare.
- Select the Data Range: Select the range of cells you want to compare in both files.
- Go to Conditional Formatting: In the Home tab, click Conditional Formatting.
- Create a New Rule: Select New Rule… to create a new conditional formatting rule.
- Use a Formula: In the New Formatting Rule dialog box, select Use a formula to determine which cells to format.
- Enter the Formula: Enter a formula that compares the cells in the two files. For example, if you want to highlight cells that are different, you can use the following formula:
=A1<>Sheet2!A1(assuming the data starts in cell A1 and you are comparing with Sheet2). - Set the Format: Click the Format… button to set the formatting you want to apply to the cells that meet the criteria.
- Apply the Rule: Click OK to apply the conditional formatting rule.
7.2 Array Formulas
Array formulas can be used to perform complex comparisons between two Excel files. You can use array formulas to compare multiple columns of data, calculate differences, and identify inconsistencies.
7.2.1 Using Array Formulas
- Open Both Files: Open the two Excel files you want to compare.
- Select the Output Range: Select the range of cells where you want to display the results of the array formula.
- Enter the Array Formula: Enter the array formula in the formula bar. For example, if you want to compare two columns of data and return TRUE if they are different, you can use the following formula:
={IF(A1:A10<>Sheet2!A1:A10, TRUE, FALSE)}(assuming the data starts in cell A1 and you are comparing with Sheet2). - Enter as Array Formula: Press
Ctrl + Shift + Enterto enter the formula as an array formula. Excel will automatically add curly braces{}around the formula.
7.3 Power Query
Power Query is a powerful data transformation and analysis tool that can be used to compare Excel files. With Power Query, you can import data from multiple Excel files, transform the data, and compare the results.
7.3.1 Using Power Query
- Open Excel: Launch Excel and open a new or existing workbook.
- Go to the Data Tab: Click the Data tab on the ribbon.
- Get Data: In the Get & Transform Data group, click Get Data > From File > From Excel Workbook.
- Select the Files: Select the Excel files you want to compare and click Import.
- Transform the Data: Use the Power Query Editor to transform the data as needed. You can rename columns, filter rows, and perform other data transformations.
- Merge the Queries: Use the Merge Queries feature to merge the data from the two files into a single query.
- Compare the Data: Use the Power Query Editor to compare the data and identify any differences.
8. Ensuring Data Integrity After Comparison
After comparing Excel files and identifying differences, it’s essential to ensure data integrity by taking corrective action and verifying the results.
8.1 Correcting Discrepancies
- Identify the Discrepancies: Review the comparison results and identify any discrepancies between the two files.
- Determine the Cause: Determine the cause of the discrepancies. This may involve reviewing formulas, data entries, and formatting.
- Take Corrective Action: Take corrective action to resolve the discrepancies. This may include updating data, correcting formulas, or adjusting formatting.
8.2 Verifying the Results
- Re-Run the Comparison: After taking corrective action, re-run the comparison to ensure that all discrepancies have been resolved.
- Review the Results: Review the results of the re-run comparison to verify that the data is now consistent across both files.
- Document the Changes: Document the changes you’ve made to the Excel files. This helps you track the changes and ensure that the data is accurate and consistent.
8.3 Implementing Data Validation
To prevent future discrepancies, consider implementing data validation in your Excel files. Data validation allows you to define rules that restrict the type of data that can be entered into a cell.
8.3.1 Setting Up Data Validation
- Select the Cells: Select the cells where you want to apply data validation.
- Go to Data Validation: In the Data tab, click Data Validation.
- Set the Criteria: In the Data Validation dialog box, set the criteria for the data that can be entered into the cells. You can specify a range of values, a list of values, or a custom formula.
- Set the Input Message: Set an input message that will be displayed when the user selects the cell. This message can provide instructions on how to enter the data correctly.
- Set the Error Alert: Set an error alert that will be displayed if the user enters invalid data. You can choose from several different types of error alerts, including Stop, Warning, and Information.
- Apply the Data Validation: Click OK to apply the data validation rules.
9. Frequently Asked Questions (FAQs) About Comparing Excel Files
1. What is the best way to compare two Excel files?
The best method depends on the complexity and size of the files. For simple comparisons, Excel’s built-in features or the Inquire add-in may suffice. For more complex comparisons, third-party tools or VBA macros are more effective.
2. Can I compare Excel files with different formats?
Yes, but it’s best to convert them to the same format first for accurate comparison. Excel supports various formats, so ensure both files are in the same format (.xlsx or .xls).
3. How can I compare two large Excel files without Excel crashing?
Breaking the files into smaller chunks, using third-party tools designed for large files, or using Power Query can help. Also, ensure your computer has enough RAM.
4. Is there a way to highlight differences between two Excel files automatically?
Yes, conditional formatting can be used to highlight differences. Additionally, most third-party tools offer automatic highlighting features.
5. Can I compare Excel files online without installing any software?
Yes, many online tools offer Excel file comparison, such as Aspose or GroupDocs.
6. How do I compare two Excel files with different sheet names?
Ensure you are comparing the correct sheets in each file. If using VBA or third-party tools, you may need to specify the sheet names in the comparison settings.
7. Can I compare only specific columns in two Excel files?
Yes, with VBA macros or third-party tools, you can specify which columns to compare.
8. How do I handle password-protected Excel files during comparison?
You will need to enter the password when prompted by the comparison tool. Microsoft Spreadsheet Compare and some third-party tools support password-protected files.
9. What should I do if the comparison results are not accurate?
Check the comparison settings, ensure both files are not corrupted, and consider using a different comparison method or tool.
10. Can I automate the Excel file comparison process?
Yes, you can automate the process using VBA macros or third-party tools with scheduling features.
10. Conclusion: Streamlining Excel File Comparisons for Optimal Data Management
Comparing Excel files is an essential task for maintaining data integrity, ensuring accuracy, and tracking changes. Whether you’re using built-in Excel features, VBA macros, or third-party tools, the key is to choose a method that suits your specific needs and to follow best practices for effective comparison.
By standardizing your data, automating the comparison process, and taking corrective action to resolve discrepancies, you can streamline your Excel file comparison efforts and optimize your data management practices.
Need help comparing your Excel files and ensuring data accuracy? Visit COMPARE.EDU.VN today to explore our comprehensive comparison guides and find the perfect solution for your needs. Our detailed comparisons and expert advice will help you make informed decisions and streamline your data management processes. Contact us at 333 Comparison Plaza, Choice City, CA 90210, United States, or reach out via WhatsApp at +1 (626) 555-9090. Let compare.edu.vn be your trusted partner in data comparison and decision-making.