Many photographers, especially when starting out, find themselves drawn to the allure of natural light. It’s readily available, seemingly simple, and often produces beautiful results. However, artificial light, particularly flash, can feel intimidating and complex. This article breaks down the perceived barriers of using flash for portraits and offers a practical comparison between using an umbrella softbox with flash and natural window light to achieve beautifully soft lighting.
Overcoming the Fear of Flash Photography
The world of flash photography can initially appear daunting. Technical manuals filled with jargon and the sheer variety of equipment might make you hesitant to venture beyond natural light. Many photographers experience a mental block, perceiving flash as an untamable beast. But the reality is, like any skill, mastering flash photography is a journey of gradual learning and experimentation. The first step is often the hardest – simply trying it out. Once you take that leap, you’ll find the learning curve becomes less steep with each attempt.
For experiential learners, the best approach is often hands-on experimentation followed by research. Dive in, make mistakes, learn from them, and then deepen your understanding by reading and studying techniques. This cyclical process of trying and learning is incredibly effective. Each time you revisit the theory after practical application, your comprehension grows, and your confidence builds.
My own journey with flash began with a speedlight and portraits of my young children. Navigating the complexities of Nikon’s Creative Lighting System (CLS) was a challenge, and early attempts were far from perfect – often overexposed. However, even with initial missteps, the results were promising. Recovering highlights in post-processing and converting to black and white yielded images that were, and still are, cherished enough to be displayed at home. This early success was a powerful motivator to continue exploring flash photography.
The next significant step was incorporating radio triggers (transmitters and receivers). This eliminated the line-of-sight requirement of the CLS system, where the camera and flash needed to “see” each other to communicate. Line of sight limitations can be incredibly frustrating, especially when photographing active subjects. Radio triggers provided the freedom to position flashes independently, significantly simplifying the process, particularly when working with children or in dynamic environments.
With each successful experiment – adding triggers, an umbrella, a softbox, and eventually grids and multiple light setups – the initial fear of flash gradually dissipated. It became less of a hurdle and more of a versatile tool to shape and control light, offering creative possibilities beyond the limitations of natural light alone.
Studio Portrait Setups: Flash with Umbrella Softbox
Beige Background: Soft and Even Lighting
For achieving soft, flattering light in a studio setting, an umbrella softbox is an excellent modifier. In this setup, the flash head is positioned to fire away from the subject, directing light into the silver-lined interior of the umbrella. This light then bounces back towards the subject, passing through a white diffusion panel at the front of the umbrella. This double diffusion process – bouncing and then diffusing – creates exceptionally soft and even light, ideal for portraits where harsh shadows are undesirable.
In the beige background setup, the main light, equipped with the umbrella softbox, was placed to the camera’s right. To add dimension and separation, a hair light was positioned opposite the main light, to the camera’s left and slightly behind the subject. This hair light was a speedlight with a snoot attachment (a DIY snoot made from rolled black card) and further softened with a small diffuser. The snoot helps to control the light and prevent spill, while the diffuser ensures it remains soft and subtle, gently highlighting the hair.
Black and Green Backgrounds: Modifying the Flash Setup
Moving to the black background setup, the main light with the umbrella softbox was repositioned to the camera’s left. To introduce a subtle fill light and mimic a natural light source, window light from the camera’s right was utilized. Additionally, a backlight, again a speedlight on a stand, was introduced as a separation light. This backlight, placed behind the subject, helps to lift them from the dark background, preventing their silhouette from merging into the black backdrop and adding depth to the image.
The green background setup, situated on the wall opposite the black background, employed a mirrored lighting arrangement. The setup was essentially reversed to achieve similar results as the black background setup, ensuring consistent lighting characteristics across different background colors and maintaining a cohesive look across the portrait series.
Natural Light Portrait Setups: Harnessing Window Light
Black Backdrop without Separator: Simplicity of Natural Light
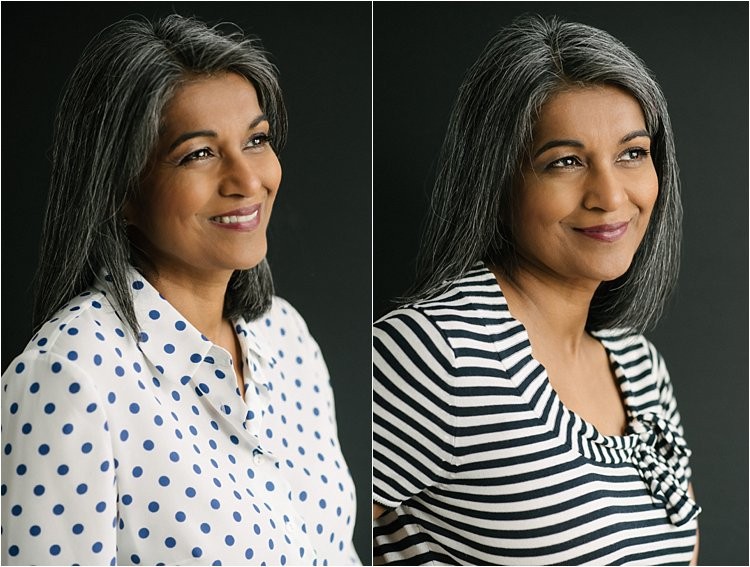
For photographers who prefer the simplicity and aesthetic of natural light, window light offers a readily accessible and beautiful source. The key is to understand how to use and modify it effectively. In this setup, the subject was positioned near a window, allowing soft, diffused light to illuminate them.
A crucial consideration when using natural light against a dark background is the subject’s hair color. If the subject has dark hair and the background is also dark, their hair can easily blend into the background, losing definition. In this particular shot, because the subject’s hair wasn’t intensely black, a separator light wasn’t necessary. However, for subjects with darker hair, a separator light becomes essential to create visual separation.
To further refine natural light, reflectors can be invaluable. If the window light is insufficient or creating shadows that are too deep, a reflector placed opposite the window can bounce light back into the shadow areas, acting as a fill light. The need for a reflector often depends on factors like the intensity of the window light and the subject’s attire – darker clothing absorbs more light, potentially necessitating a reflector to even out the lighting.
Black Backdrop with Separator: Adding Dimension to Natural Light
Natural light is undeniably appealing for its simplicity, but its availability and direction are not always ideal. Window light, especially when it comes from only one side, as in this studio, requires careful positioning. In this setup, sheer voile curtains diffused the window light, softening it for portraiture. The goal was to position the subject so the window light acted as a main light source, coming from the side at a 45-degree angle – mimicking the main light position in the studio flash setup. To manage the background, a black backdrop was set up in front of a less-than-ideal wall.
The key challenge with a black backdrop and natural light, particularly with subjects who have dark hair, is background separation. To address this, a separator light was introduced. This could be a speedlight or a continuous LED light, positioned behind the subject. The placement of the separator light can be varied. Directing it upwards, towards the subject, creates a subtle bounced light effect. Alternatively, aiming it directly at the backdrop produces a more dramatic burst of light, effectively separating the subject from the background.
Conclusion: Embracing Both Flash and Natural Light
If you’ve been hesitant about using flash, I hope this comparison encourages you to experiment with simple setups. Whether you ultimately prefer natural or artificial light, the crucial takeaway is understanding light placement and its effect on your subject. Manipulating light – through angles, position, distance, modifiers, and diffusion – empowers you to achieve a wide range of looks, regardless of the light source.
Photographers often blend techniques, using multiple flashes in complex setups or relying solely on natural light, skillfully modified with reflectors, v-flats, and other tools to shape and control it. The best approach is to explore both flash and natural light, experiment with different techniques, and discover your own preferences and style. By understanding the nuances of each, you can effectively bring your creative vision to life.