Creating a comparative report allows you to analyze the performance of your marketing campaigns over time. By comparing key metrics, you can identify trends, understand what’s working, and optimize future strategies. This guide provides a comprehensive walkthrough on How To Make A Comparative Report, from initial setup to generating shareable snapshots.
Building Your Comparative Report
Follow these steps to create a robust comparative report:
1. Accessing the Report Creation Tool
- Navigate to the “Analytics” section of your marketing platform.
- Select “Reports” from the available options.
- Click on “Create Comparative Report.”
2. Selecting Your Target Audience
- If you have multiple audience segments, choose the specific audience you want to analyze from the dropdown menu.
- The platform will display regular emails and RSS automations sent to that audience within the last 18 months.
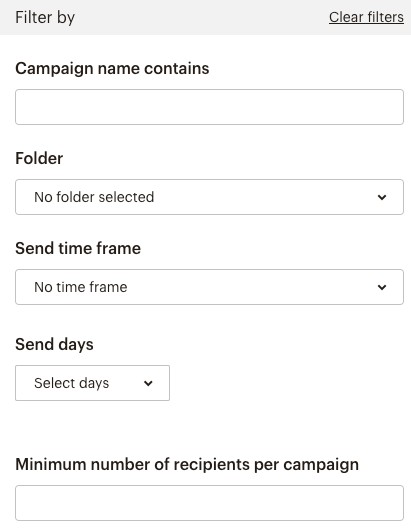
3. Filtering Your Campaigns
-
Utilize the filter options to narrow down the campaigns you want to compare. You can filter by:
- Name: Search for campaigns with specific keywords in their names.
- Folder: Organize and filter campaigns based on their designated folders.
- Send Time: Compare campaigns sent during specific timeframes.
- Send Days: Analyze campaigns sent on particular days of the week.
- Minimum Recipients: Focus on campaigns that reached a certain number of recipients.
-
The report automatically updates to include future campaigns matching your filter criteria.
4. Choosing Campaigns for Comparison
- By default, all displayed campaigns are selected for comparison, indicated by a checkmark.
- To remove a campaign, click its tile to display a plus symbol.
- Use “Select All” or “Deselect All” for efficient selection or removal.
5. Generating the Report
- Click “Compare Campaigns” to initiate the report generation process. The button text displays the number of selected campaigns.
- The report generates in the background. A notification in your profile menu alerts you upon completion.
You can continue working while waiting or add segments to gain deeper insights into specific contact engagement.
Working with Snapshots
A snapshot is a finalized report capturing campaign performance up to a specific point in time.
Generating a Snapshot
- Go to “Analytics” and then “Reports.”
- Click the “Comparative” tab.
- Select “Generate Snapshot” from the dropdown menu of the desired report. At least one tracked activity must be above 0% for the “Finalize Report” status.
- View the generated snapshot in the “Report History” section.
Scheduling Snapshots
Automate snapshot generation for regular performance analysis:
- In the “Comparative” tab, select “Schedule Report” from the report’s dropdown menu.
- Set the desired frequency (weekly or daily) and time for snapshot creation.
- A clock icon with the next scheduled run’s date and time appears next to the scheduled report.
Unscheduling and Sharing Snapshots
- Unschedule: Select “Unschedule Report” from the report’s dropdown menu in the “Comparative” tab.
- Share: Select “Share Latest Snapshot” from the report’s dropdown menu. Enter up to 5 comma-separated email addresses. You can also download and share older snapshots as CSV files from the “Report History” page.
Adding Segments for Deeper Analysis
Segments provide insights into how specific contact groups interact with your campaigns:
- Click “Edit Report” or “Finalize Report” next to the desired report in the “Comparative” tab.
- On the “Report Preview” page, click “Add Segment to Report.”
- Define segment criteria and conditions.
- Click “Add Segment to Report.” You can add up to four segments, each with multiple conditions.
By following this guide, you can effectively leverage comparative reports to gain valuable insights into your marketing performance and optimize your campaigns for greater success.