Spreadsheet Compare is a powerful tool for identifying differences between two Excel workbooks. This guide provides a step-by-step walkthrough on how to install and utilize Spreadsheet Compare for efficient workbook comparison. Understanding these differences is crucial for data accuracy, version control, and identifying potential errors.
Installing Spreadsheet Compare
Spreadsheet Compare is not a standalone program but a feature included in specific Microsoft Office suites. It’s essential to confirm you have the correct Office version before proceeding. Spreadsheet Compare is available in:
- Office Professional Plus 2013
- Office Professional Plus 2016
- Office Professional Plus 2019
- Microsoft 365 Apps for enterprise
If you don’t have one of these versions, Spreadsheet Compare won’t be available. You’ll need to upgrade your Office suite to access this functionality. Contact your IT administrator or Microsoft support for assistance with upgrading. A subscription to Microsoft 365 is often the easiest way to ensure you have the latest Office applications, including Spreadsheet Compare.
Launching Spreadsheet Compare
Once you’ve confirmed you have a compatible Office version:
- Search for Spreadsheet Compare: Click the Start button and type “Spreadsheet Compare.” The application should appear in the search results.
- Open the Application: Click on “Spreadsheet Compare” to launch the program.
Comparing Two Excel Files
With Spreadsheet Compare open:
- Select Files to Compare: In the Spreadsheet Compare window, click “Home” > “Compare Files.”
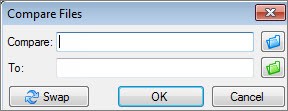
- Browse for Files: A dialog box will appear. Click the folder icon next to the “Compare” box to select the older version of your workbook. Click the folder icon next to the “To” box to select the newer version. You can select files from your computer, network, or even a web address.
- Choose Comparison Options: Select the elements you want to compare, such as formulas, macros, cell formatting, or simply “Select All.”
- Initiate Comparison: Click “OK” to start the comparison process.
Understanding the Results
Spreadsheet Compare presents the results in a two-pane grid:
- Side-by-Side Comparison: Each pane displays one of the compared workbooks. Differences are highlighted with color-coded cells and text, indicating changes in values, formulas, or formatting.
- Legend: A legend at the bottom of the window explains the meaning of each color code.
- Detailed Changes: A pane below the grids provides detailed information about each difference.
Utilizing the Inquire Add-in in Excel
Excel also offers the “Inquire” add-in, which provides further analysis capabilities beyond Spreadsheet Compare. This add-in allows you to:
- Analyze workbook relationships
- Identify cell dependencies
- Clean excess formatting
Conclusion
Spreadsheet Compare is an invaluable tool for anyone working with Excel. By understanding how to install and use this feature, you can ensure data accuracy, track changes effectively, and identify potential errors in your workbooks. Remember to verify you have a compatible Microsoft Office version to access Spreadsheet Compare. For advanced workbook analysis, consider exploring the capabilities of the Inquire add-in.