The file compare plugin in Notepad++ offers a robust solution for visually identifying differences between files, enhancing productivity for developers and content creators. At COMPARE.EDU.VN, we understand the importance of having the right tools to streamline your workflow, and this guide will walk you through every step of installing and utilizing the Compare plugin for Notepad++. This powerful addition unlocks advanced file comparison capabilities, making code reviews, document revisions, and collaborative projects significantly easier.
Intended Search Queries of Users:
- Notepad++ Compare Plugin Installation
- How to Compare Files in Notepad++
- Install Diff Tool Notepad++
- Notepad++ Plugin Admin Compare
- Notepad++ File Comparison Guide
1. Understanding the Need for a File Compare Plugin
Before diving into the installation process, it’s crucial to understand why a file comparison tool is essential, especially within Notepad++.
1.1 The Importance of File Comparison
In various professional fields, comparing files is a routine task. Here’s why:
- Code Review: Developers use file comparison to review changes, identify bugs, and ensure code quality.
- Document Revision: Writers and editors compare versions of documents to track changes, accept or reject edits, and maintain consistency.
- Configuration Management: System administrators compare configuration files to identify unauthorized modifications and ensure system stability.
- Collaboration: Teams collaborating on projects use file comparison to merge changes, resolve conflicts, and maintain a unified version.
- Data Analysis: Data scientists compare datasets to identify discrepancies, validate data integrity, and gain insights.
1.2 Limitations of Notepad++ Without the Plugin
Notepad++ is a versatile text editor, but it lacks a built-in file comparison tool. Without the Compare plugin, users must rely on external tools, disrupting their workflow and adding complexity to simple tasks. The absence of a native comparison feature necessitates installing plugins to achieve efficient file difference analysis.
2. Preparing for Installation: Plugins Admin
The easiest way to install plugins in Notepad++ is through Plugins Admin. However, it’s not always installed by default. Let’s ensure you have it.
2.1 What is Plugins Admin?
Plugins Admin is a plugin manager for Notepad++. It provides a central repository for browsing, installing, updating, and removing plugins directly from the Notepad++ interface. It simplifies the plugin management process, making it easier to extend Notepad++’s functionality.
2.2 Checking for Plugins Admin
-
Launch Notepad++: Open your Notepad++ application.
-
Check the Plugins Menu: Look for “Plugins Admin” in the Plugins menu.
2.3 Installing Plugins Admin During Notepad++ Installation
If you don’t have Plugins Admin, you’ll need to reinstall Notepad++. Don’t worry; this process is straightforward and won’t affect your existing files.
-
Uninstall Notepad++: Go to Control Panel > Programs and Features, find Notepad++, and uninstall it.
-
Download the Latest Version: Download the latest version of Notepad++ from the official website.
-
Run the Installer: Launch the installer and follow the prompts.
-
Choose Components: On the “Choose Components” screen, select “Custom” from the dropdown list.
-
Check Plugins Admin: Make sure “Plugins Admin” is checked.
-
Complete Installation: Finish the installation process.
2.4 Alternative: Manual Installation
If reinstalling Notepad++ is not an option, you can manually install Plugins Admin.
- Download Plugins Admin: Download the latest version of Plugins Admin from a trusted source.
- Extract the Files: Extract the downloaded ZIP file to a temporary folder.
- Copy the Files: Copy the
PluginManager.dllfile to thepluginsfolder in your Notepad++ installation directory. - Restart Notepad++: Restart Notepad++ to load the plugin.
3. Installing the Compare Plugin Using Plugins Admin
With Plugins Admin installed, installing the Compare plugin is quick and easy.
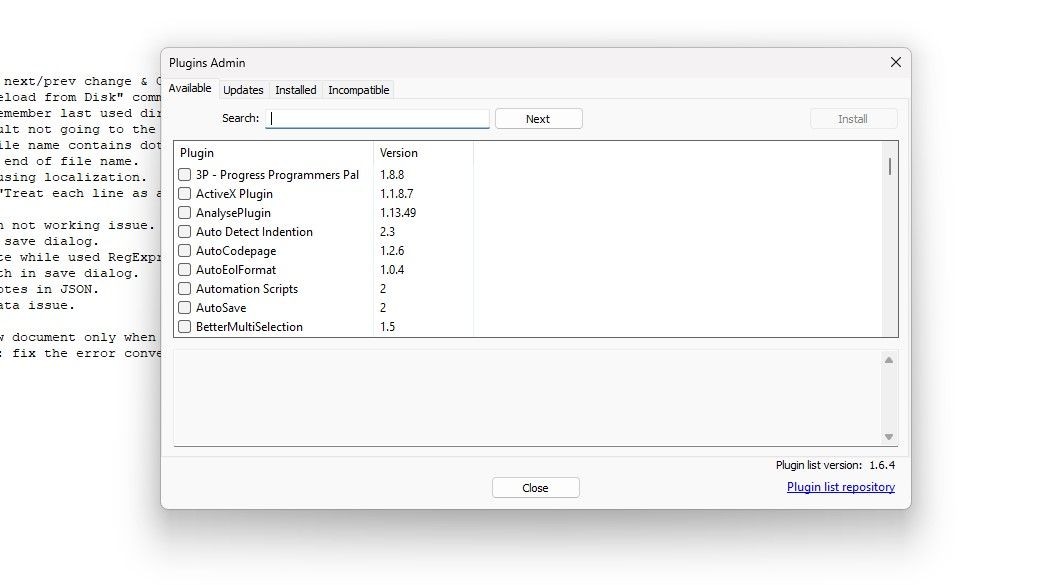
3.1 Step-by-Step Installation
- Launch Notepad++: Open your Notepad++ application.
- Open Plugins Admin: Go to Plugins > Plugins Admin.
- Search for Compare: Type “Compare” in the search bar.
- Select Compare: Check the box next to “Compare.”
- Click Install: Click the “Install” button.
- Restart Notepad++: Notepad++ will prompt you to restart. Click “Yes” to restart and load the plugin.
3.2 Verifying Installation
After restarting Notepad++, verify that the Compare plugin is installed:
- Check the Plugins Menu: Look for “Compare” in the Plugins menu.
- Open Two Files: Open two files in Notepad++.
- Compare Files: Go to Plugins > Compare > Compare. The two files should now be displayed side-by-side with highlighted differences.
4. Manual Installation of the Compare Plugin
If you prefer to install the Compare plugin manually or if Plugins Admin is not available, follow these steps.
4.1 Downloading the Compare Plugin
- Visit GitHub: Go to the Compare plugin’s GitHub repository.
- Find the Latest Release: Look for the latest release version.
- Download the Correct Version: Download the appropriate version for your Notepad++ installation (32-bit or 64-bit).
As of writing, the latest release version is 2.0.2.
4.2 Installing the Plugin
-
Extract the Files: Extract the downloaded ZIP file to a temporary folder.
-
Locate the Notepad++ Plugins Folder: Find the Notepad++ installation directory (usually
C:Program FilesNotepad++). -
Create a New Folder: In the Notepad++ directory, open the
pluginsfolder and create a new folder namedComparePlugin.Note: the folder’s name must be identical to the
.dllfile’s name. -
Copy the Files: Copy the contents of the extracted folder (a
.dllfile and possibly a folder containing additional files) into theComparePluginfolder. -
Restart Notepad++: Restart Notepad++ to load the plugin.
4.3 Troubleshooting Manual Installation
- Plugin Not Loading: Ensure you’ve placed the
.dllfile in the correct directory and that the folder name matches the.dllfile’s name. - Compatibility Issues: Verify that the plugin version is compatible with your Notepad++ version. If not, try an older version of the plugin.
5. Using the Compare Plugin
Now that you’ve installed the Compare plugin, let’s explore its features and how to use them effectively.
5.1 Basic File Comparison
- Open Files: Open the two files you want to compare in Notepad++.
- Initiate Comparison: Go to Plugins > Compare > Compare.
- View Differences: The files will be displayed side-by-side with highlighted differences.
5.2 Understanding the Color Coding
The Compare plugin uses color coding to indicate the type of changes between files.
- Green (+): Lines added in the new file.
- Red (-): Lines deleted from the old file.
- Blue: Lines moved between files.
- Orange: Lines changed in both files.
5.3 Navigation Bar
The navigation bar on the right side of the Notepad++ window provides a visual overview of the differences between files.
-
Quick Navigation: Click on a colored section in the navigation bar to jump directly to that change in the file.
-
Overview: Use the navigation bar to get a quick overview of the number and location of changes in the file.
5.4 Setting a Reference File
You can set any open file as the reference file for comparison.
- Select File: Open the file you want to use as the reference.
- Set as First to Compare: Go to Plugins > Compare > Set as First to Compare.
- Compare: Open the second file and go to Plugins > Compare > Compare.
5.5 View Modes
The Compare plugin offers different view modes for comparing files.
-
Vertical View: The default view mode displays files side-by-side vertically.
-
Horizontal View: Rotate the view to display files horizontally.
-
Rotate View: Right-click on the gripper (the middle border between the two files) and choose “Rotate to the right” or “Rotate to the left” to change the view.
6. Advanced Features and Settings
The Compare plugin has several advanced features and settings that can be customized to suit your needs.
6.1 Accessing Settings
Go to Plugins > Compare > Settings to access the settings dialog.
6.2 Main Settings
- First is: Determines whether you are comparing the old or new file.
- Old file position: Allows you to position the old file at the left or right view (top/bottom in vertical split).
- Single-view default: Lets you compare the active file in single-view mode with the previous or next file.
6.3 Color Settings
Customize the colors used to highlight differences between files.
-
Added: Change the color for added lines.
-
Deleted: Change the color for deleted lines.
-
Moved: Change the color for moved lines.
-
Changed: Change the color for changed lines.
-
Highlight Transparency: Adjust the transparency of the highlight colors.
6.4 Other Settings
- Warn about encodings mismatch: Shows a warning message when comparing files with different encodings.
- Wrap around diffs: Determines whether running the Next command after reaching the last diff should go to the first diff.
- Go to first diff after re-compare: When unchecked, the caret position will not change after you re-compare the files.
6.5 Ignore Spaces
The “Ignore Spaces” option in the Compare menu allows you to ignore differences in whitespace when comparing files. This is useful for comparing code where formatting may vary.
6.6 SVN/Git Diff
The Compare plugin supports integration with SVN and Git version control systems. This allows you to compare the current file version with a local Git/SVN database.
- SVN Diff/Git Diff: Go to Plugins > Compare > SVN Diff or Git Diff to compare the current file with the latest version in the repository.
6.7 Detect Moves
Toggle “Detect Moves” option at Compare > Detect Moves to show or hide icons for the differences between the files.
7. Best Practices for File Comparison
To get the most out of the Compare plugin, follow these best practices.
7.1 Clean Code and Formatting
Ensure that your code is well-formatted and consistently styled. This makes it easier to identify meaningful differences between files and reduces noise from formatting changes.
7.2 Regular Comparisons
Compare files regularly during development or editing to catch errors early and prevent conflicts from accumulating.
7.3 Use Comments
Add comments to your code to explain changes and provide context for collaborators. This makes it easier to understand the differences between files and reduces the risk of misunderstandings.
7.4 Version Control
Use a version control system like Git or SVN to track changes and manage different versions of your files. This allows you to easily compare files, revert to previous versions, and collaborate with others.
8. Common Issues and Solutions
8.1 Plugin Not Loading
- Cause: Incorrect installation directory, incompatible plugin version, missing dependencies.
- Solution: Verify that the plugin is installed in the correct directory, that the plugin version is compatible with your Notepad++ version, and that all required dependencies are installed.
8.2 Comparison Not Working
- Cause: Files not opened in Notepad++, plugin not enabled, incorrect settings.
- Solution: Ensure that both files are opened in Notepad++, that the Compare plugin is enabled, and that the settings are configured correctly.
8.3 Color Coding Not Displaying
- Cause: Incorrect color settings, display issues, plugin malfunction.
- Solution: Verify that the color settings are configured correctly, that your display settings are not interfering with the color coding, and that the plugin is functioning properly.
9. Alternative File Comparison Tools
While the Compare plugin is a powerful tool for Notepad++, several other file comparison tools are available.
9.1 Standalone Applications
- Beyond Compare: A commercial file comparison tool with advanced features, such as folder comparison, three-way merging, and support for various file formats.
- WinMerge: An open-source file comparison tool for Windows with a user-friendly interface and support for various file formats.
- Araxis Merge: A commercial file comparison tool with advanced features, such as three-way merging, folder comparison, and support for various file formats.
9.2 Online Tools
- Diff Checker: An online file comparison tool that allows you to compare text files directly in your web browser.
- Text Compare: Another online file comparison tool with a simple interface and support for various file formats.
10. Conclusion: Enhancing Notepad++ with the Compare Plugin
The Compare plugin significantly enhances Notepad++ by adding a powerful file comparison feature. Whether you’re a developer, writer, or system administrator, the Compare plugin can help you streamline your workflow, catch errors early, and collaborate more effectively. By following this comprehensive guide, you can easily install and use the Compare plugin to make Notepad++ an even more versatile and efficient tool.
At COMPARE.EDU.VN, we strive to provide you with the best resources and tools to make informed decisions. The Notepad++ Compare plugin is just one example of how the right tool can make a significant difference in your productivity and efficiency. Take advantage of this plugin and explore other resources on our website to further enhance your capabilities.
Do you find yourself struggling to compare multiple files and make informed decisions? Visit COMPARE.EDU.VN to explore our comprehensive comparisons and reviews, making your decision-making process easier and more efficient. Contact us at 333 Comparison Plaza, Choice City, CA 90210, United States, or reach out via WhatsApp at +1 (626) 555-9090. Let compare.edu.vn be your trusted resource for all your comparison needs.
11. Frequently Asked Questions (FAQ)
Q1: Is the Notepad++ Compare plugin free to use?
Yes, the Notepad++ Compare plugin is free and open-source.
Q2: Can I use the Compare plugin to compare different file types?
Yes, you can use the Compare plugin to compare different file types, including text files, code files, and configuration files.
Q3: How do I update the Compare plugin?
You can update the Compare plugin through Plugins Admin or by manually downloading the latest version from the GitHub repository and replacing the old files.
Q4: Can I customize the colors used for highlighting differences?
Yes, you can customize the colors used for highlighting differences in the Compare plugin settings.
Q5: Does the Compare plugin support three-way merging?
No, the Compare plugin does not support three-way merging. For three-way merging, you may need to use a standalone file comparison tool like Beyond Compare or Araxis Merge.
Q6: How do I ignore whitespace when comparing files?
You can ignore whitespace by enabling the “Ignore Spaces” option in the Compare menu.
Q7: Can I compare files directly from a Git repository?
Yes, the Compare plugin supports integration with Git, allowing you to compare files directly from a Git repository using the “Git Diff” option.
Q8: What do the different colors in the comparison view mean?
The colors indicate the type of changes between files: green for added lines, red for deleted lines, blue for moved lines, and orange for changed lines.
Q9: Can I use the Compare plugin to compare large files?
Yes, but performance may be affected. For very large files, consider using a dedicated file comparison tool optimized for handling large files.
Q10: Where can I find more information about using the Compare plugin?
You can find more information about using the Compare plugin on the plugin’s GitHub repository or in the Notepad++ documentation.
