Creating a comparative bar chart in Excel is essential for visually analyzing and contrasting data sets. At COMPARE.EDU.VN, we understand the importance of clear data representation. This guide provides a step-by-step approach to creating compelling comparative bar charts, enabling you to effectively showcase trends, identify patterns, and drive informed decisions. Learn how to leverage Excel’s features to transform raw data into impactful visual insights and enhance your data analysis skills with these simple charting techniques.
1. Understanding the Purpose of a Comparative Bar Chart
Comparative bar charts are a powerful tool for visualizing and comparing different sets of data. They allow you to quickly identify trends, patterns, and differences between categories. Whether you’re comparing sales figures, survey results, or project milestones, a well-designed comparative bar chart can make your data easier to understand and more impactful. They provide a visual representation that simplifies complex information, making it accessible to a broader audience. This is especially useful in presentations and reports where clarity is key.
2. Identifying Your Data and Objectives
Before diving into Excel, it’s crucial to clearly define your objectives. What specific comparisons do you want to highlight? What insights are you hoping to uncover? Identifying these goals will guide your data selection and chart design. Start by gathering and organizing your data in a spreadsheet. Ensure your data is accurate and well-structured, with clear labels for each category and value. The more organized your data, the easier it will be to create an effective comparative bar chart.
3. Essential Excel Skills for Chart Creation
Creating a comparative bar chart in Excel requires a few basic skills. You should be familiar with navigating the Excel interface, selecting data ranges, and accessing the chart creation tools. Understanding how to format chart elements, such as axes, labels, and colors, is also essential for creating a visually appealing and informative chart. If you’re new to Excel, there are many online tutorials and resources available to help you get started.
4. Step-by-Step Guide to Creating a Basic Comparative Bar Chart
Here’s a step-by-step guide to creating a basic comparative bar chart in Excel:
- Select Your Data: Highlight the data range you want to include in your chart, including the category labels and values.
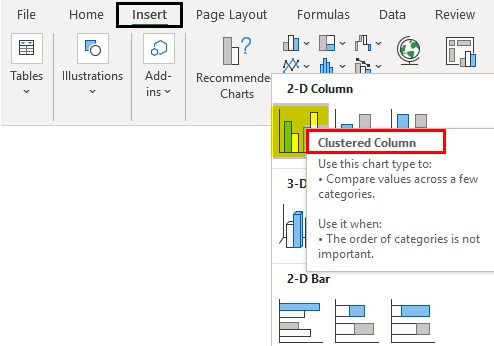
- Insert a Bar Chart: Go to the “Insert” tab on the Excel ribbon and click on the “Insert Column or Bar Chart” dropdown. Choose the “Clustered Column” or “Clustered Bar” option under the 2-D Column/Bar section.
- Customize Your Chart: Once the chart is created, you can customize it to fit your needs. Click on the chart to activate the “Chart Tools” tab, where you can modify the chart title, axis labels, legend, and more.
- Add a Chart Title: Click on the “Chart Title” element to add a descriptive title that clearly communicates the chart’s purpose.
- Label Your Axes: Add labels to the X and Y axes to provide context for the data being displayed.
- Format Data Series: Customize the appearance of your data series by changing the colors, adding data labels, and adjusting the gap width between bars.
5. Enhancing Your Chart with Advanced Features
To make your comparative bar chart even more effective, consider using these advanced features:
- Adding Error Bars: Error bars can help you visualize the uncertainty or variability in your data. To add error bars, select the data series, go to the “Chart Tools” tab, and choose “Error Bars” from the “Add Chart Element” dropdown.
- Creating Combination Charts: Combine different chart types, such as bar and line charts, to highlight different aspects of your data. To create a combination chart, right-click on a data series, select “Change Series Chart Type,” and choose the desired chart type.
- Using Conditional Formatting: Apply conditional formatting to your data to automatically highlight values that meet certain criteria. This can help you quickly identify outliers or significant trends.
6. Customizing Chart Elements for Maximum Impact
The effectiveness of your comparative bar chart depends not only on the data it presents but also on how that data is visually communicated. Customizing chart elements allows you to tailor the chart to your specific needs and audience.
- Axis Formatting: Adjust the scale, tick marks, and labels on your axes to improve readability and highlight important values.
- Data Labels: Add data labels to each bar to display the exact value being represented. This can be especially useful when comparing similar values.
- Color Schemes: Choose color schemes that are visually appealing and easy to distinguish. Use different colors to represent different data series, and avoid using too many colors, which can make the chart confusing.
7. Creating a Stacked Bar Chart for Part-to-Whole Comparisons
Stacked bar charts are ideal for comparing the contribution of different categories to a total. They allow you to see both the individual values and the overall composition of each category.
- Select Your Data: Choose the data range that includes the categories and subcategories you want to compare.
- Insert a Stacked Bar Chart: Go to the “Insert” tab and select “Stacked Bar” from the “Bar Chart” options.
- Customize the Chart: Adjust the colors, labels, and titles to make the chart clear and informative.
8. Utilizing 3D Bar Charts for Enhanced Visual Appeal (Use with Caution)
3D bar charts can add visual interest to your presentations, but they should be used with caution. While they can be visually appealing, they can also distort the data and make it harder to compare values accurately. If you choose to use a 3D bar chart, make sure the perspective is clear and doesn’t obscure any important information.
9. Mastering the Clustered Bar Chart for Side-by-Side Comparisons
Clustered bar charts are perfect for comparing multiple data series side by side. They allow you to easily see how different categories compare across different variables.
- Select Your Data: Highlight the data range that includes the categories and data series you want to compare.
- Insert a Clustered Bar Chart: Go to the “Insert” tab and select “Clustered Bar” from the “Bar Chart” options.
- Customize the Chart: Adjust the colors, labels, and titles to make the chart clear and easy to understand.
10. Incorporating Trendlines to Highlight Patterns
Trendlines can help you identify patterns and trends in your data. They can be added to any chart type, including bar charts, to show the overall direction of the data.
- Select Your Data Series: Click on the data series you want to add a trendline to.
- Add a Trendline: Go to the “Chart Tools” tab and select “Trendline” from the “Add Chart Element” dropdown.
- Choose a Trendline Type: Select the type of trendline that best fits your data, such as linear, exponential, or moving average.
11. Adding Data Tables for Detailed Information
Adding a data table to your comparative bar chart can provide additional context and detail. A data table displays the underlying data directly below the chart, making it easy for viewers to see the exact values being represented.
- Select Your Chart: Click on the chart to activate the “Chart Tools” tab.
- Add a Data Table: Go to the “Add Chart Element” dropdown and select “Data Table.”
- Customize the Data Table: Adjust the formatting of the data table to match the chart’s style and improve readability.
12. Working with Pivot Tables for Dynamic Charting
Pivot tables are a powerful tool for summarizing and analyzing large datasets. You can use pivot tables to create dynamic charts that automatically update as your data changes.
- Create a Pivot Table: Select your data range and go to the “Insert” tab. Click on “PivotTable” and choose where you want to place the pivot table.
- Configure the Pivot Table: Drag and drop the fields you want to analyze into the “Rows,” “Columns,” and “Values” areas of the pivot table.
- Create a Pivot Chart: Select the pivot table and go to the “Insert” tab. Click on “PivotChart” and choose the chart type you want to create.
- Customize the Pivot Chart: Adjust the chart elements to make it clear and informative. As you modify the pivot table, the chart will automatically update to reflect the changes.
13. Formatting for Readability and Visual Appeal
The visual appeal of your chart is just as important as the data it presents. A well-formatted chart is easier to understand and more engaging for your audience.
- Font Choices: Choose fonts that are easy to read and consistent with your overall design. Avoid using overly decorative or distracting fonts.
- Color Palettes: Select color palettes that are visually appealing and appropriate for your data. Use different colors to represent different data series, and avoid using too many colors, which can make the chart confusing.
- Chart Borders and Backgrounds: Use chart borders and backgrounds sparingly. A clean, simple background can help your data stand out, while an overly cluttered background can be distracting.
14. Choosing the Right Chart Type: Bar vs. Column
The choice between a bar chart and a column chart often depends on the type of data you’re presenting and the message you want to convey. Bar charts are generally better for comparing categories with long labels, while column charts are better for showing trends over time. Consider your data and objectives when choosing the right chart type.
15. Using Color Effectively to Highlight Key Data
Color can be a powerful tool for highlighting key data in your comparative bar chart. Use color strategically to draw attention to important trends, patterns, or outliers. However, be careful not to overuse color, which can make the chart confusing and difficult to interpret.
16. Adding Labels and Annotations for Clarity
Labels and annotations can help you provide additional context and explanation for your data. Use labels to identify important values or categories, and use annotations to highlight significant trends or patterns. Be sure to keep your labels and annotations concise and easy to understand.
17. Simplifying Complex Data with Grouped Bar Charts
Grouped bar charts are useful for comparing multiple data series within the same category. They allow you to see how different variables compare across different categories.
- Select Your Data: Highlight the data range that includes the categories and data series you want to compare.
- Insert a Clustered Bar Chart: Go to the “Insert” tab and select “Clustered Bar” from the “Bar Chart” options.
- Customize the Chart: Adjust the colors, labels, and titles to make the chart clear and easy to understand.
18. Adjusting Axis Scales for Accurate Representation
The scale of your chart’s axes can significantly impact how your data is perceived. Make sure your axes are scaled appropriately to accurately represent the data. Avoid using truncated axes, which can exaggerate differences and create a misleading impression.
19. Incorporating Icons and Images for Visual Interest
Adding icons and images to your comparative bar chart can make it more visually appealing and engaging. Use icons to represent different categories or data series, and use images to provide additional context or explanation. Be sure to use high-quality images that are relevant to your data.
20. Best Practices for Data Visualization
Creating effective data visualizations requires a combination of technical skills and design principles. Follow these best practices to create comparative bar charts that are clear, informative, and visually appealing:
- Keep it Simple: Avoid cluttering your chart with unnecessary elements. Focus on presenting the data in a clear and concise manner.
- Choose the Right Chart Type: Select the chart type that best fits your data and objectives.
- Use Color Strategically: Use color to highlight key data and improve readability.
- Label Your Axes and Data Series: Provide clear and concise labels for all elements of your chart.
- Tell a Story: Use your chart to tell a story about your data. Highlight important trends, patterns, and insights.
21. Troubleshooting Common Charting Issues
Even with careful planning and execution, you may encounter some common charting issues. Here are a few tips for troubleshooting common problems:
- Data Not Displaying Correctly: Double-check your data range and make sure it includes all the necessary data.
- Chart Elements Overlapping: Adjust the size and position of chart elements to prevent overlapping.
- Chart Not Updating: Make sure your data is linked to the chart and that automatic updates are enabled.
22. Exporting and Sharing Your Comparative Bar Chart
Once you’ve created your comparative bar chart, you’ll want to export it and share it with others. Excel offers several options for exporting and sharing charts, including:
- Copying and Pasting: Copy the chart and paste it into a Word document, PowerPoint presentation, or email.
- Saving as an Image: Save the chart as an image file (e.g., JPEG, PNG) and insert it into other documents or presentations.
- Creating a PDF: Save the Excel workbook as a PDF file and share it with others.
23. Real-World Examples of Effective Comparative Bar Charts
To inspire your own chart creation, here are a few real-world examples of effective comparative bar charts:
- Sales Performance: Comparing sales figures for different products or regions.
- Market Share: Comparing the market share of different companies in an industry.
- Survey Results: Comparing the responses to different questions in a survey.
- Project Milestones: Comparing the progress of different projects over time.
24. Integrating Charts into Presentations and Reports
Integrating your comparative bar chart into presentations and reports can help you communicate your data more effectively. When incorporating charts into your presentations and reports, be sure to:
- Provide Context: Explain the purpose of the chart and the key insights it reveals.
- Use Clear and Concise Language: Avoid using technical jargon or overly complex language.
- Highlight Key Findings: Draw attention to the most important trends, patterns, or outliers in your data.
- Keep it Consistent: Use consistent formatting and design elements throughout your presentation or report.
25. Staying Updated with the Latest Excel Features
Excel is constantly evolving, with new features and capabilities being added regularly. Stay updated with the latest Excel features to take advantage of the most advanced charting tools. Check out the Microsoft Excel website or follow Excel experts on social media to stay informed about new features and updates.
26. Exploring Alternatives to Excel for Chart Creation
While Excel is a powerful tool for creating comparative bar charts, there are also several alternatives available. Consider exploring these alternatives if you need more advanced charting capabilities or if you prefer a different user interface:
- Google Sheets: A free, web-based spreadsheet program that offers many of the same charting capabilities as Excel.
- Tableau: A powerful data visualization tool that allows you to create interactive charts and dashboards.
- Power BI: A business intelligence tool from Microsoft that offers advanced data analysis and visualization capabilities.
27. Addressing Common Data Interpretation Mistakes
Interpreting data correctly is just as important as creating accurate charts. Be aware of these common data interpretation mistakes:
- Correlation vs. Causation: Don’t assume that correlation implies causation. Just because two variables are correlated doesn’t mean that one causes the other.
- Sampling Bias: Be aware of sampling bias, which can distort your results. Make sure your sample is representative of the population you’re studying.
- Ignoring Outliers: Don’t ignore outliers, which can provide valuable insights into your data. However, be sure to investigate outliers to determine whether they are genuine data points or errors.
28. Testing Your Chart with Different Audiences
Before finalizing your comparative bar chart, test it with different audiences to get feedback on its clarity and effectiveness. Ask viewers to describe what they see in the chart and what insights they gain from it. Use their feedback to refine your chart and make it more effective.
29. Leveraging Online Resources and Templates
There are many online resources and templates available to help you create comparative bar charts in Excel. Take advantage of these resources to save time and improve the quality of your charts. Search for Excel chart templates on the Microsoft Office website or explore online tutorials and guides.
30. Continuously Refining Your Charting Skills
Creating effective comparative bar charts is an ongoing process. Continuously refine your charting skills by experimenting with different chart types, formatting options, and data analysis techniques. Attend workshops, read books, and follow experts in the field to stay up-to-date with the latest trends and best practices.
Comparative bar charts are a vital tool for effective data communication. By following this comprehensive guide, you can create compelling visuals that reveal key insights and inform strategic decisions.
Are you ready to elevate your data analysis skills? Visit COMPARE.EDU.VN today to discover even more resources and tutorials that will empower you to make data-driven decisions with confidence. Contact us at 333 Comparison Plaza, Choice City, CA 90210, United States or Whatsapp: +1 (626) 555-9090. Our website is COMPARE.EDU.VN.
FAQ Section: Mastering Comparative Bar Charts in Excel
1. What is a comparative bar chart and when should I use it?
A comparative bar chart is a visual representation that compares different categories or data sets using bars of varying lengths. Use it when you want to highlight the differences and similarities between multiple items or groups, such as sales figures across regions, survey responses, or product performance metrics. This chart is especially useful when you need to present complex data in a simple, easy-to-understand format.
2. How do I create a basic comparative bar chart in Excel?
To create a basic comparative bar chart in Excel:
- Enter your data into a spreadsheet with categories and corresponding values.
- Select the data range you want to include in the chart.
- Go to the “Insert” tab, click on “Insert Column or Bar Chart,” and choose the “Clustered Column” or “Clustered Bar” option.
- Customize the chart by adding a title, labeling axes, and formatting data series to improve readability.
3. What are some common mistakes to avoid when creating comparative bar charts?
Common mistakes include:
- Using too many colors, which can make the chart confusing.
- Truncating the y-axis, which can exaggerate differences.
- Failing to label axes and data series clearly.
- Choosing the wrong chart type for the data.
- Overcomplicating the chart with unnecessary elements.
4. How can I add error bars to my comparative bar chart?
Error bars help visualize the uncertainty or variability in your data. To add error bars:
- Select the data series in your chart.
- Go to the “Chart Tools” tab and click on “Add Chart Element.”
- Choose “Error Bars” and select the type of error bars you want to add (e.g., standard error, percentage).
- Customize the error bars as needed to accurately reflect the data’s variability.
5. What is a stacked bar chart and how does it differ from a clustered bar chart?
A stacked bar chart displays the contribution of different categories to a total, with each bar representing the total value and different segments within the bar representing the individual contributions. A clustered bar chart, on the other hand, displays multiple data series side by side, allowing you to compare values within each category directly. Stacked charts are great for part-to-whole comparisons, while clustered charts are better for side-by-side comparisons.
6. How do I use conditional formatting in my comparative bar chart?
Conditional formatting can highlight values that meet specific criteria. To use conditional formatting:
- Select the data range you want to format.
- Go to the “Home” tab and click on “Conditional Formatting.”
- Choose a formatting rule (e.g., highlight cells greater than a certain value).
- Customize the formatting to highlight the desired values in your chart.
7. Can I combine different chart types in Excel?
Yes, you can create combination charts in Excel to highlight different aspects of your data. To create a combination chart:
- Right-click on a data series in your chart.
- Select “Change Series Chart Type.”
- Choose a different chart type for the selected data series (e.g., line chart for one series and bar chart for another).
- Customize the chart to make it clear and informative.
8. How do I export my comparative bar chart for use in presentations or reports?
To export your chart:
- Right-click on the chart.
- Select “Save as Picture” to save the chart as an image file.
- Alternatively, you can copy and paste the chart directly into a Word document, PowerPoint presentation, or email.
- You can also save the Excel workbook as a PDF file.
9. What are some best practices for choosing color schemes in my comparative bar chart?
Best practices include:
- Using a limited number of colors to avoid overwhelming the viewer.
- Choosing colors that are visually appealing and easy to distinguish.
- Using different colors to represent different data series.
- Considering color blindness and using color combinations that are accessible to everyone.
10. How can COMPARE.EDU.VN help me create better comparative bar charts?
COMPARE.EDU.VN offers a variety of resources and tutorials to help you create effective comparative bar charts. Visit our website to explore step-by-step guides, chart templates, and expert tips that will empower you to make data-driven decisions with confidence. Contact us at 333 Comparison Plaza, Choice City, CA 90210, United States or Whatsapp: +1 (626) 555-9090. Our website is compare.edu.vn.