Comparing two worksheets to highlight differences is a common task for anyone working with data. Whether you’re auditing financial reports, tracking inventory changes, or managing project timelines, identifying discrepancies quickly and accurately is crucial. This guide on COMPARE.EDU.VN will explore various methods to effectively compare two worksheets and highlight differences, ensuring you can make informed decisions based on accurate data analysis. Find out how to streamline your data comparison process and enhance your productivity. Discover powerful techniques for comparing worksheets, identifying discrepancies, and ensuring data accuracy.
1. Understanding the Need to Compare Worksheets
Comparing two worksheets is an essential task in various scenarios. It allows you to identify differences, track changes, and ensure data consistency. Understanding why you need to compare worksheets can help you choose the most appropriate method and tools for the job.
1.1. Why Compare Worksheets?
There are several reasons why you might need to compare two worksheets:
- Data Validation: Ensure data accuracy by comparing two sources of information.
- Change Tracking: Identify modifications made to a worksheet over time.
- Error Detection: Find discrepancies that may indicate errors in data entry or calculations.
- Version Control: Compare different versions of a worksheet to understand changes.
- Compliance: Verify data integrity for regulatory reporting.
1.2. Common Scenarios for Worksheet Comparison
Here are some common scenarios where comparing worksheets is necessary:
- Financial Audits: Comparing financial statements from different periods to identify discrepancies.
- Inventory Management: Comparing inventory lists to track stock levels and identify shortages or overages.
- Project Management: Comparing project timelines to identify delays or changes in task assignments.
- Sales Analysis: Comparing sales reports to identify trends and performance variations.
- Data Migration: Comparing data before and after migration to ensure accuracy.
2. Methods for Comparing Worksheets
There are several methods you can use to compare two worksheets, ranging from manual techniques to automated tools. The best method depends on the size and complexity of your worksheets, as well as your specific needs.
2.1. Manual Comparison
Manual comparison involves visually inspecting two worksheets side by side to identify differences. This method is suitable for small worksheets with minimal data.
2.1.1. Viewing Worksheets Side by Side
Excel allows you to view two worksheets side by side, making manual comparison easier.
Steps:
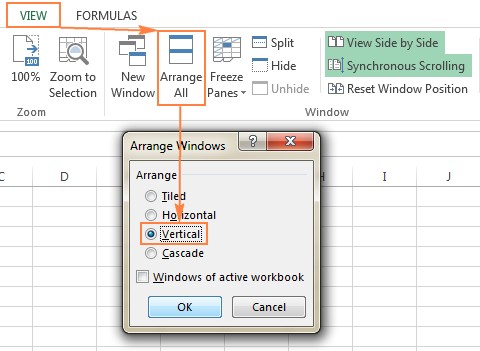
- Open both Excel files or worksheets you want to compare.
- Go to the View tab on the ribbon.
- In the Window group, click View Side by Side.
- Excel will arrange the two worksheets horizontally or vertically, depending on your screen resolution.
- Enable Synchronous Scrolling to scroll both worksheets simultaneously.
Pros:
- Simple and quick for small datasets.
- No additional software or tools required.
Cons:
- Time-consuming and prone to errors for large datasets.
- Difficult to track changes and identify complex differences.
2.1.2. Using Printouts
Printing out two worksheets and comparing them manually is another option. This method can be helpful for reviewing physical documents or comparing data offline.
Steps:
- Print both worksheets you want to compare.
- Use a highlighter or pen to mark differences as you review each document.
Pros:
- Good for offline review.
- Easy to annotate and mark changes.
Cons:
- Not practical for large datasets.
- Difficult to maintain an organized record of changes.
2.2. Excel Formulas
Excel formulas can be used to compare data in two worksheets and identify differences. This method is suitable for comparing specific data points or columns.
2.2.1. Using the IF Function
The IF function can compare corresponding cells in two worksheets and return a specific value if they are different.
Formula:
=IF(Sheet1!A1<>Sheet2!A1, "Different", "Same")
Explanation:
Sheet1!A1andSheet2!A1refer to the cell A1 in Sheet1 and Sheet2, respectively.- The formula compares the values in these two cells.
- If the values are different, the formula returns “Different”; otherwise, it returns “Same.”
Steps:
- Open the Excel file containing the two worksheets you want to compare.
- Create a new column next to the data you want to compare.
- Enter the
IFformula in the first cell of the new column. - Drag the fill handle to apply the formula to the entire column.
- Filter the column to show only the rows where the formula returns “Different.”
Pros:
- Easy to implement for simple comparisons.
- Can quickly identify differences in specific cells.
Cons:
- Requires manual setup for each comparison.
- Not suitable for comparing entire worksheets or identifying structural differences.
2.2.2. Using the EXACT Function
The EXACT function compares two text strings and returns TRUE if they are exactly the same, including case.
Formula:
=EXACT(Sheet1!A1, Sheet2!A1)
Explanation:
Sheet1!A1andSheet2!A1refer to the cell A1 in Sheet1 and Sheet2, respectively.- The formula compares the text strings in these two cells.
- If the text strings are exactly the same, the formula returns
TRUE; otherwise, it returnsFALSE.
Steps:
- Open the Excel file containing the two worksheets you want to compare.
- Create a new column next to the data you want to compare.
- Enter the
EXACTformula in the first cell of the new column. - Drag the fill handle to apply the formula to the entire column.
- Filter the column to show only the rows where the formula returns
FALSE.
Pros:
- Useful for comparing text strings with case sensitivity.
- Easy to implement for text-based comparisons.
Cons:
- Only works for text strings.
- Not suitable for comparing numeric or date values.
2.3. Conditional Formatting
Conditional formatting can highlight cells that meet specific criteria, such as being different from corresponding cells in another worksheet.
2.3.1. Highlighting Differences with Conditional Formatting
Steps:
- Select the range of cells you want to compare in the first worksheet.
- Go to the Home tab on the ribbon.
- In the Styles group, click Conditional Formatting.
- Select New Rule.
- Choose Use a formula to determine which cells to format.
- Enter the following formula:
=A1<>Sheet2!A1(whereSheet2is the name of the second worksheet). - Click Format and choose a formatting style (e.g., fill color).
- Click OK to apply the conditional formatting.
Pros:
- Visually highlights differences in the worksheet.
- Easy to set up and customize.
Cons:
- Can slow down performance for large worksheets.
- Not suitable for identifying structural differences.
2.3.2. Clearing Conditional Formatting
If you need to remove the conditional formatting, follow these steps:
- Select the range of cells with conditional formatting.
- Go to the Home tab on the ribbon.
- In the Styles group, click Conditional Formatting.
- Select Clear Rules and choose either Clear Rules from Selected Cells or Clear Rules from Entire Sheet.
2.4. VBA (Visual Basic for Applications)
VBA is a programming language that can automate tasks in Excel. You can write VBA code to compare two worksheets and highlight differences.
2.4.1. Writing a VBA Macro to Compare Worksheets
Here’s an example of a VBA macro that compares two worksheets and highlights differences:
Sub CompareSheets()
    Dim Sheet1 As Worksheet, Sheet2 As Worksheet
    Dim cell1 As Range, cell2 As Range
    Dim lastRow As Long, lastCol As Long

    Set Sheet1 = ThisWorkbook.Sheets("Sheet1") ' Replace "Sheet1" with your sheet name
    Set Sheet2 = ThisWorkbook.Sheets("Sheet2") ' Replace "Sheet2" with your sheet name

    ' Find the last row and column with data
    With Sheet1
        lastRow = .Cells.Find("*", SearchOrder:=xlByRows, SearchDirection:=xlPrevious).Row
        lastCol = .Cells.Find("*", SearchOrder:=xlByColumns, SearchDirection:=xlPrevious).Column
    End With

    ' Loop through each cell and compare
    For i = 1 To lastRow
        For j = 1 To lastCol
            Set cell1 = Sheet1.Cells(i, j)
            Set cell2 = Sheet2.Cells(i, j)

            If cell1.Value <> cell2.Value Then
                cell1.Interior.Color = RGB(255, 0, 0) ' Red
                cell2.Interior.Color = RGB(255, 0, 0) ' Red
            End If
        Next j
    Next i

    MsgBox "Comparison complete. Differences highlighted in red."
End Sub
Explanation:
- The macro defines two worksheet objects,
Sheet1andSheet2, and sets them to the worksheets you want to compare. - It finds the last row and column with data in
Sheet1to ensure the entire data range is compared. - It loops through each cell in the data range and compares the values in the corresponding cells in
Sheet1andSheet2. - If the values are different, the macro highlights both cells in red.
- Finally, it displays a message box indicating that the comparison is complete.
Steps to Use the VBA Macro:
- Open the Excel file containing the two worksheets you want to compare.
- Press
Alt + F11to open the VBA editor. - Insert a new module (
Insert > Module). - Paste the VBA code into the module.
- Modify the sheet names in the code to match your worksheet names.
- Run the macro by pressing
F5or clicking the Run button.
Pros:
- Highly customizable and flexible.
- Can automate complex comparisons.
Cons:
- Requires VBA programming knowledge.
- Can be time-consuming to write and debug code.
2.4.2. Clearing Highlighted Cells
To clear the highlighted cells after comparison, you can use the following VBA code:
Sub ClearHighlights()
    Dim Sheet1 As Worksheet, Sheet2 As Worksheet
    Dim cell As Range

    Set Sheet1 = ThisWorkbook.Sheets("Sheet1") ' Replace "Sheet1" with your sheet name
    Set Sheet2 = ThisWorkbook.Sheets("Sheet2") ' Replace "Sheet2" with your sheet name

    ' Clear highlights in Sheet1
    For Each cell In Sheet1.UsedRange
        cell.Interior.ColorIndex = xlNone
    Next cell

    ' Clear highlights in Sheet2
    For Each cell In Sheet2.UsedRange
        cell.Interior.ColorIndex = xlNone
    Next cell

    MsgBox "Highlights cleared."
End Sub
2.5. Third-Party Tools
Several third-party tools are designed to compare Excel files and highlight differences. These tools often provide advanced features and more comprehensive comparison options than built-in Excel features.
2.5.1. Synkronizer Excel Compare
Synkronizer Excel Compare is an add-in for Excel that allows you to compare, merge, and update Excel files. It identifies differences in values, formulas, formats, and more.
Key Features:
- Highlights differences between two Excel sheets.
- Combines multiple Excel files into a single version.
- Shows only the relevant differences.
- Merges and updates sheets.
- Presents detailed difference reports.
Pros:
- Comprehensive comparison options.
- Easy to use and navigate.
- Provides detailed difference reports.
Cons:
- Requires installation of an add-in.
- May have a cost associated with the software.
2.5.2. Ablebits Compare Sheets for Excel
Ablebits Compare Sheets for Excel is another add-in that offers a user-friendly way to compare worksheets. It guides you through the process with a step-by-step wizard and provides different comparison algorithms.
Key Features:
- Step-by-step wizard for easy setup.
- Multiple comparison algorithms (No key columns, By key columns, Cell-by-cell).
- Review Differences mode for managing differences one-by-one.
- Highlights differences in rows and cells.
Pros:
- Intuitive and user-friendly.
- Offers different comparison algorithms to suit various data types.
- Provides a review mode for managing differences.
Cons:
- Requires installation of an add-in.
- May have a cost associated with the software.
2.5.3. xlCompare
xlCompare is a utility that allows you to compare Excel files, worksheets, names, and VBA projects. It identifies added, deleted, and changed data and allows you to quickly merge differences.
Key Features:
- Compares workbooks, sheets, and VBA projects.
- Finds duplicate records and removes them.
- Updates existing records with values from another sheet.
- Highlights comparison results with colors.
Pros:
- Comprehensive comparison options.
- Can compare VBA projects.
- Highlights differences for easy identification.
Cons:
- Requires installation of a utility.
- May have a cost associated with the software.
2.5.4. Change pro for Excel
Change pro for Excel allows you to compare two sheets in desktop Excel as well as on mobile devices.
Key Features:
- Find differences between formulas and values.
- Identify layout changes.
- Recognize embedded objects such as charts, graphs, and images.
- Filter, sort, and search the difference report on key changes.
- Support for all languages.
Pros:
- Supports mobile devices.
- Can recognize embedded objects.
- Offers filtering and sorting options.
Cons:
- May have a cost associated with the software.
3. Comparing Data with Different Structures
When comparing data with different structures, you need to align the data before you can compare it effectively. This may involve sorting, filtering, or reformatting the data.
3.1. Sorting Data
Sorting data can help you align corresponding rows or columns, making it easier to identify differences.
Steps:
- Select the data range you want to sort.
- Go to the Data tab on the ribbon.
- In the Sort & Filter group, click Sort.
- Choose the column you want to sort by and the sort order (ascending or descending).
- Click OK to apply the sort.
3.2. Filtering Data
Filtering data can help you focus on specific subsets of data, making it easier to compare relevant information.
Steps:
- Select the data range you want to filter.
- Go to the Data tab on the ribbon.
- In the Sort & Filter group, click Filter.
- Click the filter icon in the column you want to filter by.
- Choose the filter criteria you want to apply.
- Click OK to apply the filter.
3.3. Reformatting Data
Reformatting data may be necessary to ensure that the data types and formats are consistent between the two worksheets.
Common Reformatting Tasks:
- Converting Text to Numbers: Use the
VALUEfunction to convert text strings to numbers. - Converting Numbers to Text: Use the
TEXTfunction to convert numbers to text strings. - Standardizing Date Formats: Use the
TEXTfunction to format dates consistently. - Removing Extra Spaces: Use the
TRIMfunction to remove leading and trailing spaces.
4. Best Practices for Comparing Worksheets
Following best practices can help you compare worksheets more effectively and accurately.
4.1. Plan Your Comparison
Before you start comparing worksheets, take some time to plan your approach.
Considerations:
- Define Your Goals: What differences are you looking for?
- Choose the Right Method: Which method is best suited for your data and goals?
- Prepare Your Data: Do you need to sort, filter, or reformat your data?
- Document Your Process: Keep a record of the steps you take to compare the worksheets.
4.2. Use Consistent Formatting
Consistent formatting can make it easier to compare data visually.
Tips:
- Use the same font, font size, and alignment in both worksheets.
- Use consistent number and date formats.
- Use the same color scheme for highlighting or conditional formatting.
4.3. Verify Your Results
After you have compared the worksheets, take the time to verify your results.
Steps:
- Review the differences you have identified.
- Double-check your formulas or VBA code.
- Test your results with sample data.
- Get a second opinion from a colleague or supervisor.
4.4. Automate Your Process
If you frequently compare worksheets, consider automating your process using VBA or third-party tools.
Benefits of Automation:
- Saves time and effort.
- Reduces the risk of errors.
- Ensures consistency.
- Allows you to focus on analyzing the results rather than performing the comparison.
5. Troubleshooting Common Issues
When comparing worksheets, you may encounter some common issues. Here are some troubleshooting tips:
5.1. Mismatched Data Types
If you are comparing cells with different data types (e.g., text vs. number), you may get unexpected results.
Solution:
- Use the
VALUEorTEXTfunctions to convert the data to a consistent data type. - Use the
ISTEXTorISNUMBERfunctions to check the data type of a cell.
5.2. Hidden Rows or Columns
Hidden rows or columns can cause discrepancies when comparing worksheets.
Solution:
- Unhide all rows and columns before comparing the worksheets.
- Use the
COUNTorCOUNTAfunctions to check the number of rows and columns in each worksheet.
5.3. Formula Errors
Formula errors can cause incorrect results when comparing worksheets.
Solution:
- Check your formulas for errors using the
IFERRORfunction. - Use the
Evaluate Formulafeature to step through the calculation of a formula.
5.4. Performance Issues
Comparing large worksheets can slow down Excel.
Solution:
- Close any unnecessary programs or files.
- Increase the amount of memory allocated to Excel.
- Use a faster computer or network connection.
- Use a third-party tool designed for comparing large Excel files.
6. Real-World Examples
Let’s look at some real-world examples of how comparing worksheets can be applied.
6.1. Financial Reconciliation
A company needs to reconcile its bank statement with its internal accounting records. By comparing two worksheets, the company can identify any discrepancies and ensure that its records are accurate.
Steps:
- Export the bank statement to an Excel file.
- Export the internal accounting records to another Excel file.
- Compare the two worksheets using Excel formulas or a third-party tool.
- Identify any discrepancies and investigate the cause.
- Make any necessary corrections to the accounting records.
6.2. Inventory Audit
A retail store needs to audit its inventory to ensure that its records match the actual stock levels. By comparing two worksheets, the store can identify any shortages or overages.
Steps:
- Export the inventory records to an Excel file.
- Perform a physical count of the inventory and record the results in another Excel file.
- Compare the two worksheets using Excel formulas or a third-party tool.
- Identify any shortages or overages and investigate the cause.
- Make any necessary adjustments to the inventory records.
6.3. Project Tracking
A project manager needs to track the progress of a project and compare it to the original plan. By comparing two worksheets, the project manager can identify any delays or changes in task assignments.
Steps:
- Export the original project plan to an Excel file.
- Update the project plan with the actual progress and record the results in another Excel file.
- Compare the two worksheets using Excel formulas or a third-party tool.
- Identify any delays or changes in task assignments and take corrective action.
7. Using Online Services to Compare Excel Files
In addition to desktop tools, there are online services that allow you to compare Excel files without installing any software.
7.1 XLComparator
XLComparator is an online service that allows you to compare two Excel files and highlight differences.
7.2. CloudyExcel
CloudyExcel is another online service that compares Excel files and highlights differences.
These services can be useful for quick comparisons when you don’t have access to your usual tools or need to compare files on a different device.
8. Frequently Asked Questions (FAQ)
Here are some frequently asked questions about comparing worksheets:
Q1: How can I compare two Excel files if they have different numbers of rows or columns?
A: You can use the IF function in combination with ISBLANK to handle different numbers of rows or columns. Alternatively, third-party tools often have features to handle such cases automatically.
Q2: Can I compare two Excel files that are password-protected?
A: You will need to remove the password protection before comparing the files, or use a tool that supports password-protected files.
Q3: How can I compare two Excel files for differences in charts or images?
A: Excel does not have built-in features to compare charts or images. You may need to use a third-party tool that supports this feature.
Q4: What is the best way to compare large Excel files?
A: Use a third-party tool that is designed for comparing large Excel files. These tools often have optimized algorithms and memory management to handle large datasets.
Q5: How can I compare two Excel files for differences in VBA code?
A: You can use the VBA editor to compare the code side by side. Alternatively, use a third-party tool that supports comparing VBA projects.
Q6: Can I compare two Excel files for differences in comments?
A: Yes, some third-party tools allow you to compare Excel files for differences in comments.
Q7: How can I compare two Excel files for differences in hidden rows or columns?
A: Unhide all rows and columns before comparing the files, or use a tool that supports comparing hidden rows and columns.
Q8: What is the best way to highlight differences in Excel?
A: Conditional formatting is a good option for highlighting differences in Excel. You can also use VBA code to customize the highlighting.
Q9: How can I compare two Excel files for differences in formatting?
A: Use a third-party tool that supports comparing formatting. These tools can identify differences in font, color, alignment, and other formatting attributes.
Q10: What are the limitations of using Excel formulas to compare worksheets?
A: Excel formulas can be time-consuming to set up, not suitable for comparing entire worksheets, and not suitable for identifying structural differences.
Comparing two worksheets and highlighting differences is a critical task for maintaining data accuracy and ensuring informed decision-making. Whether you opt for manual comparison, Excel formulas, conditional formatting, VBA, or third-party tools, understanding the strengths and limitations of each method will empower you to select the most effective approach for your specific needs. Remember to plan your comparison, use consistent formatting, verify your results, and automate your process whenever possible.
Visit COMPARE.EDU.VN for more comprehensive guides and resources on data comparison and analysis. Our platform offers detailed comparisons and objective evaluations to help you make informed decisions.
For further assistance, feel free to contact us at:
Address: 333 Comparison Plaza, Choice City, CA 90210, United States
Whatsapp: +1 (626) 555-9090
Website: compare.edu.vn