Finding discrepancies between two Excel workbooks can be a tedious task. Fortunately, Microsoft offers a powerful tool called Spreadsheet Compare to simplify this process. This guide will walk you through how to use Spreadsheet Compare to identify differences between two Excel files, highlighting key features and functionalities. We’ll cover everything from launching the tool to interpreting the comparison results.
Launching Spreadsheet Compare
Spreadsheet Compare is part of the Microsoft Office suite but is only available with specific versions: Office Professional Plus 2013, Office Professional Plus 2016, Office Professional Plus 2019, or Microsoft 365 Apps for enterprise.
To open Spreadsheet Compare:
- Go to the Start menu.
- Search for Spreadsheet Compare and select the application.
You’ll also find a similar tool for Access databases called Microsoft Database Compare in the same location, also requiring the same Office versions.
Comparing Two Excel Files Using Spreadsheet Compare
Here’s a step-by-step guide on how to compare two Excel workbooks:
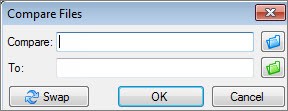
- Initiate the Comparison: In Spreadsheet Compare, click Home > Compare Files. This opens the Compare Files dialog box.
- Select the Files:
- Click the blue folder icon next to the Compare box to browse and select the older version of your workbook.
- Click the green folder icon next to the To box to browse and select the newer version of your workbook for comparison.
- You can compare files with the same name as long as they are in different folders. You can also use web addresses for files stored online.
- Specify Comparison Options: In the left pane, select the elements you want to compare: Formulas, Macros, Cell Format, or simply Select All.
- Run the Comparison: Click OK to begin the comparison process. If a workbook is password-protected, you’ll be prompted to enter the password.
Understanding the Comparison Results
Spreadsheet Compare presents the results in a two-pane grid:
- The left pane displays the “Compare” file (typically the older version).
- The right pane displays the “To” file (typically the newer version).
A detailed list of differences appears in a pane below the grids. Changes are color-coded for easy identification.
- Color-Coded Differences: Different colors highlight different types of changes (e.g., entered values, calculated values, formulas). A legend in the lower-left pane explains the meaning of each color.
- Worksheet Navigation: If the workbooks contain multiple worksheets, use the forward and back buttons on the horizontal scroll bar to navigate between them. Hidden worksheets are also compared and included in the results.
- Resizing Cells: If cell contents are not fully visible, click Resize Cells to Fit.
Excel’s Inquire Add-in: An Alternative Approach
Besides Spreadsheet Compare, Excel 2013 and later versions offer the Inquire add-in. This add-in provides additional analysis capabilities, including:
- Workbook Analysis: Examine workbook structure and relationships.
- Cell Relationships: Identify dependencies between cells.
- Worksheet Relationships: Understand connections between worksheets.
- Clean Excess Formatting: Remove unnecessary formatting.
To access these features, enable the Inquire add-in and use the Compare Files command on the Inquire tab.
Conclusion
Spreadsheet Compare offers a robust solution for comparing Excel workbooks, allowing you to quickly and accurately identify differences between versions. Its intuitive interface and color-coded results make it easy to pinpoint changes in formulas, values, and formatting. Utilizing this tool can significantly improve your workflow when managing and auditing Excel data.