Comparing two photos in Lightroom can be a crucial step in the editing process. This article from COMPARE.EDU.VN provides a comprehensive guide on effectively comparing photos in Lightroom, offering tips and techniques to enhance your workflow and achieve optimal results. Learn photo assessment skills and editing workflow strategies in Lightroom.
1. Understanding Lightroom’s Compare View
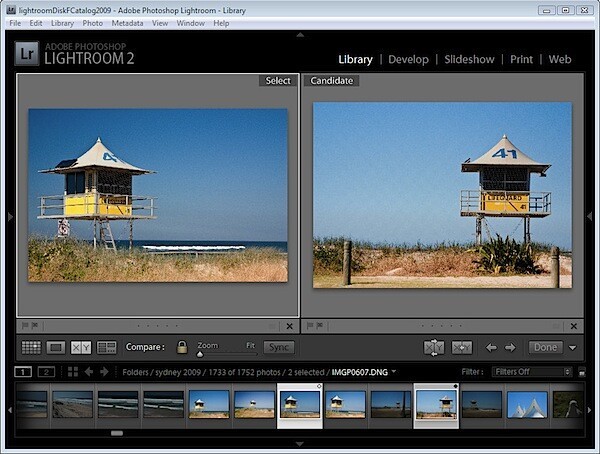
Lightroom’s Compare View is a powerful tool designed to help photographers meticulously assess and select the best images from a series. Unlike the Survey View, which allows you to view multiple images at once, Compare View focuses on a side-by-side comparison of two images, enabling a detailed analysis of their strengths and weaknesses. This tool is particularly useful when you have a set of similar images and need to identify the superior one based on specific criteria such as sharpness, composition, or exposure.
1.1. Accessing Compare View
To access Compare View in Lightroom, follow these simple steps:
- Open Lightroom: Launch Adobe Lightroom on your computer.
- Select Images: Navigate to the Library module and select the two images you want to compare. You can select images by clicking on them while holding down the Ctrl (Windows) or Cmd (Mac) key.
- Enter Compare View: Once the images are selected, click the “Compare View” icon in the toolbar at the bottom of the screen, or simply press the “C” key on your keyboard.
Upon entering Compare View, you will see the two selected images displayed side by side, allowing for a direct visual comparison.
Alternative Text: Lightroom’s Compare View interface displays two images side by side for detailed analysis and selection.
1.2. Key Components of Compare View
The Compare View interface is designed for efficient image assessment. Here are the key components:
- Select Image: This is the image that remains fixed on one side of the screen. It serves as your reference point for comparison.
- Candidate Image: This is the image that can be changed to compare against the Select image. You can cycle through different images in your selection to find the best match or alternative.
- Navigation Arrows: Located beneath the Candidate image, these arrows allow you to move through your image selection, replacing the Candidate image with the next or previous image in the sequence.
- Swap Button: This button allows you to quickly swap the Select and Candidate images, providing a different perspective on the comparison.
- Zoom and Pan Tools: These tools allow you to zoom in on specific areas of the images for detailed inspection. You can synchronize the zoom and pan settings between the two images for a consistent comparison.
- Lock Icon: When locked, this icon synchronizes the zoom level and position between the Select and Candidate images. When unlocked, you can adjust the zoom and pan settings independently for each image.
- Labeling and Rating: You can apply labels and ratings to the images directly within Compare View, helping you to organize and prioritize your selections.
1.3. Setting Up Your Workspace
Before diving into the comparison process, it’s essential to set up your workspace for optimal efficiency. Here are a few tips:
- Calibrate Your Monitor: Ensure that your monitor is properly calibrated to display accurate colors and tones. This is crucial for making informed decisions about image quality.
- Adjust Viewing Size: Adjust the size of the images to a comfortable viewing level. You can use the zoom tools to inspect details or view the images at their full size.
- Minimize Distractions: Close any unnecessary applications or windows on your computer to minimize distractions and focus on the task at hand.
- Create a Consistent Environment: Maintain a consistent lighting environment in your workspace to avoid influencing your perception of the images.
By understanding the key components of Compare View and setting up your workspace effectively, you can streamline your image selection process and make more informed decisions about which images to keep and edit.
2. Step-by-Step Guide to Comparing Photos
Comparing photos effectively in Lightroom involves a systematic approach to identify the best images based on specific criteria. Here’s a detailed step-by-step guide to help you through the process:
2.1. Selecting Initial Images
The first step in comparing photos is to select the initial set of images you want to evaluate. This could be a series of shots taken during a single photoshoot, or a collection of images from different sources.
- Navigate to the Library Module: Open Lightroom and navigate to the Library module where your photos are stored.
- Choose Your Initial Image: Select the first image that you want to use as your base comparison. This image will be your “Select” image.
- Select the Second Image: Choose a second image that you want to compare against the first. This will be your “Candidate” image.
- Enter Compare View: With both images selected, enter Compare View by pressing the “C” key or clicking the Compare View icon in the toolbar.
Alternative Text: Selecting initial images in Lightroom’s Library module before entering Compare View.
2.2. Using Navigation Tools
Once you’re in Compare View, you’ll use the navigation tools to cycle through your images and find the best “Candidate” to compare against your “Select” image.
- Candidate Image Arrows: Use the left and right arrows below the Candidate image to scroll through your available images. Each click will replace the Candidate image with the next or previous image in the sequence.
- Swap Images: If you want to swap the Select and Candidate images, click the “Swap” button. This can be useful if you want to evaluate the current Candidate image as your new base comparison.
- Evaluate and Compare: As you cycle through the images, take the time to evaluate each one against the Select image. Look for differences in composition, focus, exposure, and other critical factors.
2.3. Zooming and Panning for Detail
To make a thorough comparison, it’s essential to zoom in and pan around the images to inspect fine details.
- Zooming: Use the Zoom slider in the toolbar to zoom in on specific areas of the images. You can also use the “+” and “-” keys on your keyboard.
- Panning: Once zoomed in, click and drag within the image to pan around and explore different areas.
- Synchronize Zoom and Pan: To ensure a fair comparison, you can synchronize the zoom level and position between the Select and Candidate images. Click the lock icon in the toolbar to enable synchronized zoom and pan.
- Independent Adjustments: If you prefer to adjust the zoom and pan settings independently for each image, unlock the lock icon. This can be useful for comparing images with different levels of detail or sharpness.
Alternative Text: Zooming and panning tools in Lightroom’s Compare View for detailed image inspection.
2.4. Swapping Images for Better Perspective
Sometimes, swapping the Select and Candidate images can give you a fresh perspective and help you identify subtle differences.
- Click the Swap Button: To swap the images, simply click the “Swap” button in the toolbar. The current Select image will become the new Candidate, and vice versa.
- Re-evaluate: After swapping the images, take the time to re-evaluate the comparison. Look for any details or aspects that you may have missed before.
- Continue Cycling: Continue cycling through the remaining images, swapping and re-evaluating as needed, until you’ve found the best image in the set.
2.5. Making a Selection
Once you’ve thoroughly compared all the images, it’s time to make a selection.
- Choose the Best Image: Identify the image that you believe is the best based on your comparison criteria.
- Set as Select: If the best image is currently the Candidate, click the “Make Select” button to replace the current Select image with the Candidate.
- Exit Compare View: Click the “Done” button to exit Compare View. The selected image will now be highlighted in the Library module.
By following these steps, you can effectively use Lightroom’s Compare View to identify the best images from a set, saving you time and ensuring that you’re working with the highest quality material. Remember, the key is to be systematic, detail-oriented, and objective in your evaluation.
3. Criteria for Effective Photo Comparison
When comparing photos in Lightroom, it’s essential to have a clear set of criteria to guide your decision-making process. These criteria will help you evaluate the images objectively and consistently, ensuring that you select the best ones for your intended purpose. Here are some key factors to consider:
3.1. Sharpness and Focus
Sharpness and focus are critical elements of image quality, and they should be among the first things you evaluate when comparing photos.
- Overall Sharpness: Assess the overall sharpness of the image. Is the subject in sharp focus, or is there any blur or softness?
- Critical Focus: Pay attention to the areas of the image that are most important, such as the eyes in a portrait or the main subject in a landscape. Are these areas critically sharp?
- Depth of Field: Evaluate the depth of field. Is the desired amount of the image in focus? Is the background blurred appropriately to create separation between the subject and the background?
- Focus Errors: Look for any signs of focus errors, such as front-focusing or back-focusing. These errors can occur when the camera focuses slightly in front of or behind the intended subject.
Alternative Text: Assessing sharpness and focus details in Lightroom’s Compare View using zoom tools.
3.2. Exposure and Contrast
Exposure and contrast play a significant role in the overall look and feel of an image. When comparing photos, consider the following:
- Overall Exposure: Evaluate the overall exposure of the image. Is it properly exposed, or is it too bright (overexposed) or too dark (underexposed)?
- Highlight and Shadow Detail: Check for detail in the highlights and shadows. Are there any blown-out highlights or blocked-up shadows?
- Contrast: Assess the contrast of the image. Is there a good balance between light and dark areas, or is the image too flat or too contrasty?
- Dynamic Range: Consider the dynamic range of the image. Does it capture a wide range of tones, or is it limited?
3.3. Composition and Framing
Composition and framing are essential elements of visual storytelling. When comparing photos, consider the following:
- Rule of Thirds: Does the composition adhere to the rule of thirds, placing key elements along the gridlines or at the intersection points?
- Leading Lines: Are there any leading lines that draw the viewer’s eye into the image?
- Balance: Is the composition balanced, with a harmonious distribution of elements?
- Framing: Does the framing enhance the subject and create a sense of depth?
3.4. Color and White Balance
Color and white balance can significantly impact the mood and aesthetics of an image. When comparing photos, consider the following:
- Color Accuracy: Are the colors accurate and true to life, or are they skewed or distorted?
- White Balance: Is the white balance correct, or is there a color cast?
- Color Harmony: Are the colors harmonious and pleasing to the eye?
- Color Saturation: Is the color saturation appropriate for the subject and the intended mood?
3.5. Absence of Distractions
Distractions in an image can detract from the main subject and weaken the overall impact. When comparing photos, look for any distracting elements, such as:
- Unwanted Objects: Are there any unwanted objects in the background or foreground that draw attention away from the subject?
- Distracting Light: Is there any distracting light, such as harsh shadows or blown-out highlights, that detract from the subject?
- Cluttered Background: Is the background too cluttered or busy, making it difficult to focus on the subject?
By considering these criteria when comparing photos in Lightroom, you can make more informed decisions and select the best images for your intended purpose.
4. Advanced Techniques for Photo Comparison
While Lightroom’s Compare View is a straightforward tool, there are several advanced techniques you can employ to enhance your photo comparison process. These techniques involve utilizing additional features within Lightroom and adopting specific workflows to streamline your evaluations.
4.1. Using Before and After Views
Lightroom’s Develop module offers a Before and After view, which can be incredibly useful when comparing different edits of the same photo. This feature allows you to see the original image side-by-side with the edited version, making it easier to assess the impact of your adjustments.
- Enter the Develop Module: Select the photo you want to evaluate and switch to the Develop module.
- Make Your Edits: Apply the desired adjustments to the photo.
- Activate Before and After View: Click the ” ” key or the Before/After icon in the toolbar to activate the Before and After view.
- Choose Your Layout: Select the desired layout for the Before and After view, such as side-by-side, split screen, or top/bottom.
- Compare the Images: Carefully compare the Before and After images to assess the impact of your edits. Pay attention to changes in exposure, contrast, color, and detail.
- Adjust as Needed: If you’re not satisfied with the results, make further adjustments and re-evaluate the Before and After view.
4.2. Synchronizing Settings Across Images
When comparing a series of similar photos, it can be helpful to apply the same settings to all of them and then compare the results. This ensures that you’re evaluating the images based on their inherent qualities, rather than differences in editing.
- Select the Master Image: Choose the image that you want to use as your reference point and apply your desired settings to it.
- Select the Target Images: Select the other images that you want to compare against the master image.
- Synchronize Settings: Click the “Sync” button in the Develop module.
- Choose the Settings: Select the settings that you want to synchronize across the images. Be sure to select only the settings that are relevant to your comparison.
- Synchronize: Click the “Synchronize” button to apply the settings to the target images.
- Compare the Images: Switch to the Library module and enter Compare View to compare the synchronized images.
4.3. Utilizing Collections for Focused Comparisons
Collections are a powerful way to organize your photos in Lightroom and can be particularly useful for focused comparisons. By creating a collection of images that you want to compare, you can narrow down your selection and avoid distractions.
- Create a Collection: In the Library module, click the “+” icon next to “Collections” and select “Create Collection.”
- Name Your Collection: Give your collection a descriptive name, such as “Best Shots” or “Finalists.”
- Add Images to the Collection: Drag and drop the images that you want to compare into the collection.
- Enter Compare View: Select the images in the collection and enter Compare View to begin your comparison.
4.4. Applying Gradings and Ratings
Gradings and ratings are an excellent way to organize and prioritize your photos during the comparison process. By assigning star ratings or color labels to your images, you can quickly identify the best ones and keep track of your progress.
- Assign Star Ratings: Use the “1” through “5” keys on your keyboard to assign star ratings to your images.
- Apply Color Labels: Right-click on an image and select “Color Label” to assign a color label to it.
- Filter by Ratings and Labels: Use the filter tools in the Library module to filter your images by ratings and labels. This allows you to quickly narrow down your selection to the best images.
4.5. Using Virtual Copies for Non-Destructive Comparisons
Virtual copies allow you to create multiple versions of the same image without actually duplicating the image files. This can be useful for experimenting with different edits and comparing the results without altering the original image.
- Create a Virtual Copy: Right-click on an image and select “Create Virtual Copy.”
- Edit the Virtual Copy: Apply your desired edits to the virtual copy.
- Compare the Images: Select the original image and the virtual copy and enter Compare View to compare the two versions.
By mastering these advanced techniques, you can take your photo comparison skills to the next level and make more informed decisions about your images.
5. Practical Examples of Photo Comparisons
To further illustrate the benefits of using Compare View in Lightroom, let’s look at some practical examples of common photo comparison scenarios.
5.1. Portrait Photography: Choosing the Best Expression
In portrait photography, capturing the right expression is crucial. Often, you might take a series of shots in quick succession, resulting in subtle variations in the subject’s expression. Compare View can help you identify the photo with the most natural and flattering expression.
- Select a Series of Portraits: Choose a series of portrait shots taken of the same subject in a similar setting.
- Enter Compare View: Select two of the portraits and enter Compare View.
- Evaluate Expressions: Carefully compare the expressions of the subject in each photo. Look for subtle differences in the eyes, mouth, and overall demeanor.
- Cycle Through Images: Use the navigation arrows to cycle through the remaining portraits, comparing each one against the Select image.
- Choose the Best Expression: Identify the portrait with the most natural and flattering expression.
- Refine Your Selection: Once you’ve found the best expression, you can further refine your selection by evaluating other factors such as sharpness, lighting, and composition.
5.2. Landscape Photography: Selecting the Optimal Composition
In landscape photography, composition plays a vital role in creating visually appealing images. You might experiment with different angles, perspectives, and framing techniques to capture the perfect shot. Compare View can help you select the optimal composition.
- Select a Series of Landscape Shots: Choose a series of landscape shots taken of the same scene from different angles or perspectives.
- Enter Compare View: Select two of the landscape shots and enter Compare View.
- Evaluate Composition: Carefully compare the composition of each photo. Look for elements such as leading lines, balance, and framing.
- Cycle Through Images: Use the navigation arrows to cycle through the remaining landscape shots, comparing each one against the Select image.
- Choose the Best Composition: Identify the landscape shot with the most compelling composition.
- Consider Other Factors: Once you’ve found the best composition, you can consider other factors such as exposure, color, and sharpness.
5.3. Event Photography: Identifying Key Moments
In event photography, capturing key moments is essential. You might take hundreds of photos during an event, making it challenging to identify the most significant moments. Compare View can help you quickly sift through your images and select the ones that best capture the essence of the event.
- Select a Series of Event Photos: Choose a series of photos taken during the same event.
- Enter Compare View: Select two of the event photos and enter Compare View.
- Evaluate Key Moments: Carefully compare the photos, looking for key moments such as speeches, performances, and interactions between people.
- Cycle Through Images: Use the navigation arrows to cycle through the remaining event photos, comparing each one against the Select image.
- Identify the Best Moments: Identify the photos that best capture the key moments of the event.
- Consider Technical Quality: Once you’ve identified the best moments, consider the technical quality of the photos, such as sharpness, exposure, and color.
5.4. Macro Photography: Ensuring Critical Focus
In macro photography, achieving critical focus is paramount. Due to the shallow depth of field, even slight focus errors can render an image unusable. Compare View can help you ensure that your macro shots are tack sharp.
- Select a Series of Macro Shots: Choose a series of macro shots taken of the same subject.
- Enter Compare View: Select two of the macro shots and enter Compare View.
- Zoom in for Detail: Zoom in on the most important areas of the subject, such as the eyes of an insect or the petals of a flower.
- Evaluate Focus: Carefully compare the focus of each photo, looking for the sharpest details.
- Cycle Through Images: Use the navigation arrows to cycle through the remaining macro shots, comparing each one against the Select image.
- Choose the Sharpest Image: Identify the macro shot with the sharpest focus.
By applying these practical examples to your own photography, you can see how Compare View can streamline your workflow and help you select the best images for any situation.
6. Optimizing Your Lightroom Workflow for Comparisons
To maximize the benefits of using Lightroom for photo comparisons, it’s essential to integrate the Compare View into an optimized workflow. Here are some tips and strategies to streamline your process:
6.1. Culling Images Early in the Workflow
Culling, or selecting the best images from a large batch, should be one of the first steps in your workflow. By culling early, you can narrow down your selection to the most promising images and save time by focusing on the ones that are most likely to be keepers.
- Import Your Images: Import your images into Lightroom and navigate to the Library module.
- Use Loupe View: Use Loupe View (press “E” on your keyboard) to quickly review your images one by one.
- Assign Ratings and Labels: As you review your images, assign star ratings or color labels to the ones that you want to keep for further evaluation.
- Filter Your Images: Use the filter tools in the Library module to filter your images by ratings and labels. This will allow you to focus on the images that you’ve identified as the most promising.
6.2. Leveraging Keywords and Metadata for Organization
Keywords and metadata are essential for organizing your images and making them easier to find and compare. By adding relevant keywords and metadata to your images, you can quickly filter and sort them based on specific criteria.
- Add Keywords: Use the Keyword List panel in the Library module to add relevant keywords to your images.
- Add Metadata: Use the Metadata panel in the Library module to add additional metadata, such as the date, time, location, and camera settings.
- Create Smart Collections: Use Smart Collections to automatically organize your images based on specific criteria. For example, you can create a Smart Collection that includes all images with a 5-star rating and the keyword “portrait.”
6.3. Creating Presets for Consistent Adjustments
Presets are a powerful way to apply consistent adjustments to your images. By creating presets for common adjustments, you can save time and ensure that your images have a consistent look and feel.
- Develop Your Style: Develop a consistent editing style that you want to apply to your images.
- Create Presets: Create presets for common adjustments, such as exposure, contrast, color, and sharpness.
- Apply Presets: Apply your presets to your images during the culling process. This will give you a better sense of how the images will look after they’ve been edited.
6.4. Integrating Compare View into Your Editing Routine
Compare View should be an integral part of your editing routine. By using Compare View to evaluate your adjustments, you can ensure that you’re making the best possible decisions for your images.
- Edit Your Images: Edit your images in the Develop module, making adjustments as needed.
- Use Before and After View: Use the Before and After view to evaluate the impact of your adjustments.
- Compare Multiple Versions: If you’re experimenting with different editing styles, create virtual copies of your images and compare the different versions in Compare View.
6.5. Regular Backups and Archiving
Regular backups and archiving are essential for protecting your images and ensuring that you can access them in the future. By backing up your images regularly, you can avoid losing your work due to hardware failure or other unforeseen events.
- Choose a Backup Solution: Choose a backup solution that meets your needs. Options include external hard drives, cloud storage, and network-attached storage (NAS) devices.
- Create a Backup Schedule: Create a backup schedule and stick to it.
- Archive Your Images: Archive your images to a long-term storage solution, such as Blu-ray discs or cloud storage.
By implementing these strategies, you can optimize your Lightroom workflow for photo comparisons and make the most of this powerful tool.
7. Troubleshooting Common Issues in Compare View
While Lightroom’s Compare View is generally reliable, you may encounter some issues from time to time. Here are some common problems and their solutions:
7.1. Images Not Displaying Correctly
If your images are not displaying correctly in Compare View, there are a few things you can try:
- Check Your Monitor Calibration: Ensure that your monitor is properly calibrated to display accurate colors and tones.
- Update Your Graphics Drivers: Make sure that you have the latest graphics drivers installed on your computer.
- Restart Lightroom: Try restarting Lightroom. This can often resolve minor display issues.
- Reset Preferences: If the problem persists, try resetting Lightroom’s preferences. To do this, hold down the Shift, Ctrl, and Alt keys while launching Lightroom.
7.2. Slow Performance or Lag
If you’re experiencing slow performance or lag in Compare View, there are a few things you can try to improve performance:
- Optimize Your Catalog: Optimize your Lightroom catalog by going to File > Optimize Catalog.
- Increase Cache Size: Increase the cache size in Lightroom’s preferences. Go to Edit > Preferences > File Handling and increase the Camera Raw Cache Settings.
- Close Unnecessary Applications: Close any unnecessary applications that are running on your computer.
- Upgrade Your Hardware: If you’re still experiencing slow performance, consider upgrading your computer’s hardware, such as the RAM or graphics card.
7.3. Synchronization Problems
If you’re having trouble synchronizing settings between images in Compare View, there are a few things you can try:
- Check Your Selections: Make sure that you’ve selected the correct images before synchronizing the settings.
- Verify Synchronization Settings: Verify that you’ve selected the correct settings to synchronize in the Synchronize Settings dialog box.
- Restart Lightroom: Try restarting Lightroom. This can often resolve minor synchronization issues.
7.4. Keyboard Shortcuts Not Working
If your keyboard shortcuts are not working in Compare View, there are a few things you can try:
- Check Your Keyboard: Make sure that your keyboard is functioning correctly.
- Verify Keyboard Shortcuts: Verify that the keyboard shortcuts are enabled in Lightroom’s preferences. Go to Edit > Preferences > General and check the “Use System Shortcut Keys” option.
- Restart Lightroom: Try restarting Lightroom. This can often resolve minor keyboard shortcut issues.
7.5. Unexpected Crashes or Errors
If you’re experiencing unexpected crashes or errors in Compare View, there are a few things you can try:
- Update Lightroom: Make sure that you’re using the latest version of Lightroom.
- Run a Disk Check: Run a disk check on your computer to check for any file system errors.
- Reinstall Lightroom: If the problem persists, try reinstalling Lightroom.
- Contact Adobe Support: If you’re still experiencing crashes or errors after trying these steps, contact Adobe Support for further assistance.
By troubleshooting these common issues, you can ensure that you have a smooth and efficient experience using Compare View in Lightroom.
8. Third-Party Plugins and Extensions for Enhanced Comparison
While Lightroom’s built-in Compare View is a powerful tool, there are several third-party plugins and extensions that can further enhance your photo comparison capabilities. These tools often offer additional features and functionality that can streamline your workflow and provide more detailed analysis.
8.1. Excire Foto
Excire Foto is a powerful plugin that uses AI-powered face recognition and image analysis to help you organize and cull your photos quickly and efficiently. It can automatically detect and tag faces, identify similar images, and suggest the best shots based on various criteria.
Key features of Excire Foto include:
- AI-Powered Face Recognition: Automatically detects and tags faces in your photos.
- Duplicate Image Detection: Identifies duplicate or similar images, making it easy to cull your collection.
- Keyword Suggestion: Suggests relevant keywords based on the content of your photos.
- Similarity Search: Finds images that are visually similar to a selected image.
8.2. Narrative Select
Narrative Select is a standalone application designed specifically for culling and selecting photos quickly and efficiently. It offers a clean and intuitive interface, as well as a range of powerful features to help you identify the best shots.
Key features of Narrative Select include:
- Focus Peaking: Highlights areas of sharp focus in your images.
- Face Detection: Identifies faces in your images and helps you evaluate expressions.
- Star Ratings and Color Labels: Allows you to assign star ratings and color labels to your images.
- Keyboard Shortcuts: Offers a range of customizable keyboard shortcuts for efficient culling.
8.3. Photo Mechanic
Photo Mechanic is a fast and efficient image browser and culling tool that is popular among professional photographers. It offers a range of powerful features for quickly reviewing and selecting photos, including customizable keyboard shortcuts, batch processing, and metadata editing.
Key features of Photo Mechanic include:
- Fast Image Browsing: Allows you to quickly browse through your images.
- Customizable Keyboard Shortcuts: Offers a range of customizable keyboard shortcuts for efficient culling.
- Batch Processing: Allows you to perform batch operations on multiple images.
- Metadata Editing: Allows you to edit metadata, such as keywords and captions.
8.4. Loupedeck Consoles
Loupedeck consoles are custom-built hardware controllers that integrate seamlessly with Lightroom and other editing software. They offer a range of physical knobs, dials, and buttons that allow you to make precise adjustments to your images and streamline your workflow.
Key features of Loupedeck consoles include:
- Customizable Controls: Allows you to customize the controls to suit your specific workflow.
- Precise Adjustments: Offers precise control over your image adjustments.
- Integration with Lightroom: Integrates seamlessly with Lightroom and other editing software.
- Ergonomic Design: Offers an ergonomic design for comfortable use.
8.5. Aftershoot EDit
Aftershoot EDit is an AI-powered plugin designed for photo editing workflows, enhancing productivity and consistency. It offers automated features like culling and style application, which can significantly speed up the process of photo comparison and selection in Lightroom.
Key features of Aftershoot EDit include:
- AI Culling: Automatically selects the best photos from a shoot, reducing manual effort.
- Style Application: Applies a consistent editing style across all selected images, ensuring uniformity.
- Seamless Integration: Works directly within Lightroom, making it easy to incorporate into your existing workflow.
- Customizable Settings: Allows adjustments to AI preferences for a personalized selection process.
By exploring these third-party plugins and extensions, you can find tools that perfectly complement Lightroom’s Compare View and further enhance your photo comparison capabilities.
9. Expert Tips for Efficient Photo Selection
Efficient photo selection is a critical skill for any photographer looking to streamline their workflow and deliver the best possible results. Here are some expert tips to help you make the most of your photo comparisons and select the best images with confidence.
9.1. Define Your Purpose Beforehand
Before you even start comparing photos, take the time to define the purpose of your selection. What are you trying to achieve with these images? Are you selecting photos for a client, a portfolio, or a personal project?
By defining your purpose beforehand, you can narrow down your criteria and focus on the images that best meet your needs.
9.2. Trust Your Gut Instinct
While it’s important to be objective and analytical, don’t ignore your gut instinct. Often, your initial reaction to an image can be a valuable indicator of its potential.
If an image immediately catches your eye or evokes a strong emotion, it’s worth considering further, even if it doesn’t perfectly meet all of your technical criteria.
9.3. Take Breaks to Refresh Your Eyes
Comparing photos can be mentally and visually taxing, especially when you’re working with a large number of images. To avoid fatigue and maintain your objectivity, take frequent breaks to refresh your eyes.
Get up and walk around, look out the window, or do something completely unrelated to photography. When you return to your comparisons, you’ll be able to see the images with fresh eyes.
9.4. Seek Feedback From Others
Sometimes, it can be helpful to get a fresh perspective from others. Ask a trusted friend, colleague, or mentor to review your selections and provide feedback.
Be open to constructive criticism and consider their suggestions, even if they differ from your own opinions.
9.5. Don’t Be Afraid to Kill Your Darlings
As a photographer, it’s easy to become attached to your images, even if they’re not the strongest. However, to create a truly compelling body of work, you need to be willing to “kill your darlings” and eliminate any images that don’t meet your standards.
Be ruthless in your selections and focus on the images that truly stand out.
9.6. Use a Consistent Workflow
Establish a consistent workflow for photo selection and stick to it. This will help you stay organized, avoid mistakes, and make the most of your time.
Your workflow might include steps such as culling images early, leveraging keywords and metadata, creating presets, and integrating Compare View into your editing routine.
9.7. Learn From Your Mistakes
Every photographer makes mistakes, and photo selection is no exception. The key is to learn from your mistakes and use them to improve your future selections.
After completing a photo selection project, take some time to reflect on your process and identify any areas where you could have done better.
9.8. Compare Similar Photos
Compare similar photos side by side using Lightroom’s Compare View to spot subtle differences in focus, expression, or composition, helping you choose the best one.
9.9. Focus on Key Elements
Focus on key elements like sharpness, exposure, and composition to objectively assess each photo’s strengths and weaknesses, leading to a more informed selection process.
9.10. Rate and Label Systematically
Rate and label photos systematically to easily track your progress and narrow down choices, making it simpler to identify top contenders and streamline the selection process.
By following these expert tips, you can improve your photo selection skills and create a body of work that you can be proud of.
10. Conclusion: Mastering Photo Comparison in Lightroom
Mastering photo comparison in Lightroom is an essential skill for any photographer looking to streamline their workflow and deliver the best possible results. By understanding the features and techniques discussed in this guide, you can confidently select the best images for any project. From setting up your workspace to leveraging advanced techniques and third-party plugins, you now have the knowledge to make informed decisions about your images. Remember, efficient photo selection isn’t just about finding the “perfect” shot—it’s about telling a compelling story and achieving your creative vision.
Are you struggling to compare products or services and make confident decisions? Visit compare.edu.vn today for comprehensive and unbiased comparisons that empower you to choose the best options. Our expert reviews and detailed analyses will help you navigate complex choices with ease. Don’t hesitate—