Comparing two Git branches is a fundamental task in software development, crucial for understanding changes before merging or deleting branches. At COMPARE.EDU.VN, we understand the importance of this process and provide you with the knowledge to compare branches effectively, ensuring seamless integration and informed decision-making. Whether you’re examining commits, changes, or specific files, mastering branch comparison is essential for collaborative and efficient development workflows. Improve collaboration and project success using branch comparison and code review strategies.
1. Understanding the Need to Compare Git Branches
Before diving into the “how,” let’s address the “why.” Comparing Git branches is a crucial practice for several reasons:
1.1. Pre-Merge Review
- Ensuring Code Quality: Before merging a feature branch into the main branch (or any other branch), comparing the branches allows you to review the changes that will be introduced. This helps ensure code quality, identify potential bugs, and maintain the overall stability of the project.
- Understanding the Scope of Changes: Comparing branches provides a clear view of the scope of changes, helping you understand the impact of merging. This is particularly important for large or complex features.
1.2. Identifying Conflicts
- Preventing Merge Conflicts: By comparing branches, you can identify potential merge conflicts early on. This allows you to address these conflicts before they become a problem, saving time and effort during the merge process.
1.3. Code Review and Collaboration
- Facilitating Code Reviews: Comparing branches is essential for effective code reviews. It allows reviewers to focus on the specific changes made in the feature branch, providing targeted feedback and suggestions.
- Improving Collaboration: Comparing branches fosters collaboration among team members. It allows developers to discuss changes, share knowledge, and work together to resolve issues.
1.4. Verifying Changes
- Ensuring Expected Behavior: Comparing branches allows you to verify that the changes made in a feature branch behave as expected. This helps prevent unexpected issues or regressions.
- Confirming Feature Completion: By comparing branches, you can confirm that a feature is complete and ready to be merged. This helps maintain project timelines and ensures that features are delivered on time.
1.5. Understanding Code Evolution
- Tracking Changes Over Time: Comparing branches allows you to track changes over time. This can be useful for understanding how a codebase has evolved, identifying the introduction of bugs, or understanding the impact of specific changes.
- Learning from Past Changes: By comparing branches, you can learn from past changes and improve your development practices. This can help prevent similar issues from recurring in the future.
2. Git Diff Command: A Comprehensive Guide
The git diff command is the primary tool for comparing branches in Git. It allows you to see the differences between two branches, commits, or files. Here’s a comprehensive guide to using git diff effectively:
2.1. Basic Syntax
The basic syntax of the git diff command is:
git diff [options] <commit1> <commit2>Where:
<commit1>is the starting point for the comparison.<commit2>is the ending point for the comparison.[options]are optional flags that modify the behavior of the command.
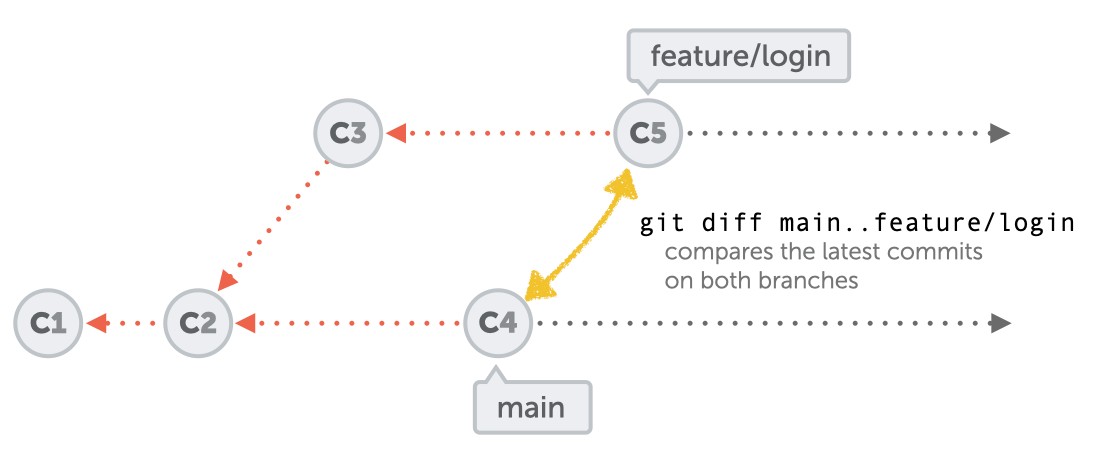
2.2. Comparing Two Branches: Double Dot Notation
To compare two branches, you can use the double dot notation (..). This compares the tips (latest commits) of both branches:
git diff main..feature/loginThis command shows the differences between the main branch and the feature/login branch. It effectively shows what changes would be integrated if you were to merge feature/login into main.
Understanding the Output:
The output of git diff is presented in a patch format. Each change is represented by a “diff hunk,” which shows the lines that have been added, removed, or modified.
- Lines starting with
-indicate lines that have been removed. - Lines starting with
+indicate lines that have been added. - Lines starting with ` ` (space) indicate lines that are unchanged.
2.3. Comparing Two Branches: Triple Dot Notation
The triple dot notation (...) provides a different comparison. It compares the tip of the second branch with the common ancestor commit of both branches:
git diff main...feature/loginThis command shows the changes that have been made on feature/login since it diverged from main. This can be useful for understanding the specific changes made in the feature branch, excluding any changes that may have been merged into main in the meantime.
2.4. Comparing Specific Files
You can compare specific files between two branches by adding the file paths to the git diff command:
git diff main..feature/login index.htmlThis command shows the differences in the index.html file between the main branch and the feature/login branch.
2.5. Common Options for git diff
The git diff command offers several useful options for customizing the output and behavior:
-w: Ignores whitespace changes. This can be useful for focusing on the substantive changes in the code.--ignore-all-space: Ignores all whitespace when comparing lines.-b: Ignores changes in amount of whitespace. This detects lines whose content is the same, even if one has more whitespace.--color: Enables colored output. This makes it easier to distinguish between added and removed lines.--stat: Shows a summary of the changes, including the number of files changed and the number of lines added or removed.--compact-summary: Provides a more concise summary of the changes.--name-only: Shows only the names of the files that have been changed.--name-status: Shows the names of the files that have been changed, along with their status (e.g., added, modified, deleted).
2.6. Examples of git diff Usage
Here are some examples of how to use git diff in different scenarios:
-
Show the changes between the current branch and the
mainbranch:git diff main -
Show the changes between two specific commits:
git diff <commit1> <commit2> -
Show the changes in a specific file between two commits:
git diff <commit1> <commit2> path/to/file -
Show the changes between the current branch and the
mainbranch, ignoring whitespace changes:git diff -w main -
Show a summary of the changes between two branches:
git diff --stat main..feature/login
2.7. Pro Tip:
- For readability, integrate
git diffwith a visual diff tool like Meld or Beyond Compare. Configure Git to use your preferred tool for enhanced visualization of changes.
3. Git Log Command: Examining Commit History
While git diff focuses on the content differences, git log helps you understand the history of changes in each branch. It displays the commits that are unique to one branch compared to another.
3.1. Basic Syntax
The basic syntax of the git log command is:
git log [options] <commit1>..<commit2>Where:
<commit1>is the starting point for the commit history.<commit2>is the ending point for the commit history.[options]are optional flags that modify the behavior of the command.
3.2. Comparing Commit History
To see the commits that are present in feature/login but not in main, use:
git log main..feature/loginThis will list all the commits that have been made on the feature/login branch since it diverged from the main branch.
3.3. Common Options for git log
The git log command also offers several useful options:
--oneline: Displays each commit on a single line, making the output more concise.--graph: Displays a graph of the commit history, showing the branching and merging structure.--author=<pattern>: Filters the commit history to show only commits made by a specific author.--since=<date>: Filters the commit history to show only commits made after a specific date.--until=<date>: Filters the commit history to show only commits made before a specific date.--grep=<pattern>: Filters the commit history to show only commits with a specific message.
3.4. Examples of git log Usage
Here are some examples of how to use git log in different scenarios:
-
Show the commit history of the current branch:
git log -
Show the commit history of a specific file:
git log path/to/file -
Show the commit history of a branch, displaying each commit on a single line:
git log --oneline main..feature/login -
Show the commit history of a branch, displaying a graph of the commit history:
git log --graph main..feature/login
3.5. Pro Tip:
- Combine
git logwith--decorateto see branch names and tags alongside commits, providing context and clarity in the commit history.
4. Practical Scenarios for Comparing Branches
To illustrate the practical application of comparing Git branches, let’s explore some common scenarios:
4.1. Feature Branch Review
Scenario: You’re working on a feature branch named feature/new-ui and want to review the changes before merging it into the develop branch.
Steps:
- Use
git diff develop..feature/new-uito see the differences between the two branches. - Review the output to understand the changes that will be introduced.
- If necessary, use
git log develop..feature/new-uito see the commit history of the feature branch. - Address any potential issues or conflicts before merging.
4.2. Hotfix Verification
Scenario: You’ve created a hotfix branch named hotfix/critical-bug to address a critical bug in the production environment. You want to verify that the hotfix only contains the necessary changes.
Steps:
- Use
git diff main..hotfix/critical-bugto see the differences between themainbranch and the hotfix branch. - Review the output to ensure that the hotfix only contains the changes related to the bug fix.
- If necessary, use
git log main..hotfix/critical-bugto see the commit history of the hotfix branch. - Deploy the hotfix to the production environment.
4.3. Understanding Code Changes
Scenario: You’re working on a project and want to understand the changes that have been made to a specific file over time.
Steps:
- Use
git log -p path/to/fileto see the commit history of the file, including the changes made in each commit. - Review the output to understand how the file has evolved over time.
- If necessary, use
git diff <commit1> <commit2> path/to/fileto compare the file between two specific commits.
5. Leveraging Git GUI Tools for Branch Comparison
While command-line tools like git diff and git log are powerful, Git GUI tools can provide a more visual and user-friendly experience for comparing branches. Tools like GitKraken, SourceTree, and the integrated tools in IDEs like Visual Studio Code offer features such as:
5.1. Visual Diff Viewers
Git GUI tools typically include visual diff viewers that make it easier to see the differences between two branches. These viewers often highlight added, removed, and modified lines in different colors, making it easier to spot changes.
5.2. Branch Comparison Features
Many Git GUI tools offer dedicated branch comparison features that allow you to easily compare two branches and see the differences in a visual format. These features often include options for filtering changes, viewing commit history, and resolving merge conflicts.
5.3. Integrated Merge Conflict Resolution
Git GUI tools often include integrated merge conflict resolution tools that make it easier to resolve merge conflicts. These tools typically provide a three-way view of the conflicting files, allowing you to easily see the differences between the two branches and choose which changes to keep.
6. Best Practices for Comparing Git Branches
To maximize the benefits of comparing Git branches, follow these best practices:
6.1. Compare Branches Regularly
Make it a habit to compare branches regularly, especially before merging or deleting branches. This helps you stay informed about the changes that are being made to the codebase and prevents unexpected issues.
6.2. Use Meaningful Branch Names
Use meaningful branch names that clearly indicate the purpose of the branch. This makes it easier to understand which branches need to be compared and what changes are likely to be included.
6.3. Commit Frequently
Commit your changes frequently, with clear and concise commit messages. This makes it easier to review the changes and understand the history of the codebase.
6.4. Resolve Conflicts Early
If you identify potential merge conflicts, resolve them early on. This prevents the conflicts from becoming more complex and difficult to resolve later.
6.5. Use Code Reviews
Use code reviews to ensure that the changes being made to the codebase are of high quality and meet the project’s standards. Comparing branches is an essential part of the code review process.
7. Advanced Techniques for Branch Comparison
For more advanced users, here are some techniques to enhance your branch comparison skills:
7.1. Using Git Attributes
Git attributes allow you to define custom behaviors for specific files or directories. You can use Git attributes to configure how Git compares certain types of files, such as automatically ignoring whitespace changes in documentation files.
7.2. Custom Diff Tools
You can configure Git to use custom diff tools for comparing files. This can be useful for comparing files that are not plain text, such as images or binary files.
7.3. Interactive Staging
Git’s interactive staging feature allows you to selectively stage changes from a file. This can be useful for preparing commits that only include the changes you want to include, making it easier to review the changes.
8. How COMPARE.EDU.VN Can Help You Master Git Branch Comparison
At COMPARE.EDU.VN, we recognize the challenges individuals face when comparing various options objectively and comprehensively. The overwhelming amount of information available can be confusing, making it difficult to discern which factors to focus on and leading to a desire for comparisons that are both intuitive and easy to understand. We specialize in providing detailed, unbiased comparisons across a multitude of products, services, and ideas, meticulously highlighting the advantages and disadvantages of each choice. Our platform excels in comparing essential features, technical specifications, pricing, and other critical elements, complemented by user and expert reviews. We tailor our content to help you pinpoint the best option based on your specific needs and financial considerations.
9. Understanding User Intent When Searching “How to Compare Two Git Branches”
When users search for “How To Compare Two Git Branches,” they typically have one of the following intentions:
- Understanding the Differences: Users want to know the specific changes between two branches, whether it’s code, files, or commits.
- Preparing for a Merge: Developers need to review changes before merging a feature branch into the main branch to avoid conflicts and ensure code quality.
- Identifying Commits: Users want to see a list of commits that are unique to each branch.
- Comparing Specific Files: Developers need to compare particular files between branches to understand changes made to those files.
- Learning the Syntax: Users seek to understand the correct Git commands and options for comparing branches effectively.
10. Frequently Asked Questions (FAQ) About Comparing Git Branches
Here are some frequently asked questions about comparing Git branches:
-
What is the difference between
git diff branch1..branch2andgit diff branch1...branch2?git diff branch1..branch2compares the tips of the two branches, showing the changes that would be introduced ifbranch2were merged intobranch1.git diff branch1...branch2compares the tip ofbranch2with the common ancestor ofbranch1andbranch2, showing the changes made onbranch2since it diverged frombranch1.
-
How can I ignore whitespace changes when comparing branches?
- Use the
-woption withgit diff. For example:git diff -w branch1..branch2.
- Use the
-
How can I see a summary of the changes between two branches?
- Use the
--statoption withgit diff. For example:git diff --stat branch1..branch2.
- Use the
-
How can I compare a specific file between two branches?
- Include the file path in the
git diffcommand. For example:git diff branch1..branch2 path/to/file.
- Include the file path in the
-
How can I see the commit history of a branch?
- Use the
git logcommand. For example:git log branch1..branch2.
- Use the
-
How can I display each commit on a single line in the commit history?
- Use the
--onelineoption withgit log. For example:git log --oneline branch1..branch2.
- Use the
-
How can I see a graph of the commit history?
- Use the
--graphoption withgit log. For example:git log --graph branch1..branch2.
- Use the
-
Can I use a GUI tool to compare branches?
- Yes, many Git GUI tools offer visual diff viewers and branch comparison features.
-
What are Git attributes?
- Git attributes allow you to define custom behaviors for specific files or directories, such as configuring how Git compares certain types of files.
-
How can I configure Git to use a custom diff tool?
- You can configure Git to use custom diff tools by setting the
diff.toolanddifftool.<tool>.cmdconfiguration options.
- You can configure Git to use custom diff tools by setting the
11. Conclusion: Empowering Your Git Workflow with Effective Branch Comparison
Comparing Git branches is a fundamental skill for any software developer. By mastering the techniques and best practices outlined in this article, you can streamline your development workflow, improve code quality, and collaborate more effectively with your team. Whether you prefer using command-line tools or GUI tools, understanding how to compare branches is essential for success in modern software development.
Ready to make more informed decisions? Visit compare.edu.vn today and discover the ease of comparing options with detailed, objective analysis. Navigate the complexities of choices effortlessly and find the perfect fit for your needs. Your ideal solution is just a comparison away. Contact us at 333 Comparison Plaza, Choice City, CA 90210, United States. Whatsapp: +1 (626) 555-9090.