Comparing two Excel tabs for differences can be a daunting task, but COMPARE.EDU.VN offers solutions. This guide explores various methods, from simple visual comparisons to advanced techniques, ensuring you can efficiently identify and analyze discrepancies in your Excel data. Learn to effectively examine data variations, pinpoint inaccuracies, and ensure data integrity.
1. Visually Comparing Two Excel Tabs Side-by-Side
This method is ideal for smaller datasets where visual inspection is manageable. Excel’s built-in “View Side by Side” feature allows you to display two tabs (either from the same or different workbooks) simultaneously for easy comparison.
1.1. Comparing Two Excel Workbooks
To view two separate Excel files for comparison, follow these steps:
- Open the workbooks: Launch both Excel files that you wish to compare.
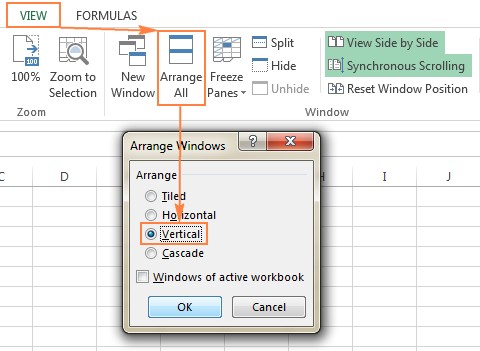
- Activate “View Side by Side”: Navigate to the View tab in the Excel ribbon. In the Window group, click the View Side by Side button.
This will arrange the two Excel windows horizontally by default. To arrange them vertically, click the Arrange All button (also in the Window group) and choose the Vertical option.
1.2. Synchronous Scrolling
For a more streamlined comparison, enable Synchronous Scrolling. This feature links the scrolling of both windows, allowing you to scroll through them simultaneously.
- Locate Synchronous Scrolling: Find the Synchronous Scrolling option on the View tab, in the Window group, directly under the View Side by Side button.
- Enable if necessary: Ensure that the Synchronous Scrolling option is turned on. It is usually activated automatically when you enable View Side by Side mode.
1.3. Comparing Two Tabs in the Same Workbook
When the tabs you want to compare are within the same Excel file, use the following steps:
- Open the Excel file: Launch the Excel workbook containing the tabs you wish to compare.
- Open a New Window: Go to the View tab and click the New Window button in the Window group. This will open a second window displaying the same Excel file.
- Enable View Side by Side: Click the View Side by Side button on the ribbon.
- Select the Tabs: In each window, select the specific tab you want to compare.
2. Using Formulas to Create a Difference Report
For a more detailed comparison, use Excel formulas to generate a difference report. This method highlights cells with differing values between two tabs.
2.1. The IF Formula
The core of this technique is the IF formula. It checks if the value in a cell in one tab is different from the corresponding cell in another tab. If they differ, it displays the values from both cells; otherwise, it leaves the cell blank.
2.2. Implementing the Formula
-
Open a New Sheet: Create a new, empty sheet in your Excel workbook. This will be your difference report.
-
Enter the Formula: In cell A1 of the new sheet, enter the following formula:
=IF(Sheet1!A1<>Sheet2!A1, "Sheet1:"&Sheet1!A1&" vs Sheet2:"&Sheet2!A1, "") -
Adjust Sheet Names: Ensure that “Sheet1” and “Sheet2” are replaced with the actual names of the tabs you are comparing.
-
Copy the Formula: Drag the fill handle (the small square at the bottom-right of the cell) down and to the right to copy the formula across the range of cells you want to compare.
2.3. Understanding the Results
The difference report will display any discrepancies between the two tabs. Cells with differences will show the values from both tabs, while identical cells will remain blank. Note that this method focuses solely on value differences and does not account for formula or formatting discrepancies. Dates might be represented by serial numbers rather than their displayed format.
3. Highlighting Differences with Conditional Formatting
Conditional formatting offers a visual way to highlight cells with differing values between two tabs.
3.1. Selecting the Range
- Choose the Worksheet: Select the worksheet where you want to highlight the differences.
- Select All Used Cells: Click the upper-left cell of the used range (usually A1), and then press
Ctrl + Shift + Endto extend the selection to the last used cell.
3.2. Creating a Conditional Formatting Rule
-
Open Conditional Formatting: On the Home tab, in the Styles group, click Conditional Formatting and select New Rule.
-
Use a Formula: Choose the “Use a formula to determine which cells to format” rule type.
-
Enter the Formula: In the formula box, enter the following formula:
=A1<>Sheet2!A1 -
Adjust Sheet Names: Replace “Sheet2” with the name of the tab you are comparing against.
-
Format the Cells: Click the Format button and choose the desired formatting (e.g., fill color) to highlight the differences.
-
Apply the Rule: Click OK to apply the conditional formatting rule.
3.3. Reviewing the Results
With conditional formatting in place, cells with different values will be highlighted with the color you selected. This allows for a quick visual identification of discrepancies. Keep in mind that this method, like the formula-based approach, only identifies differences in values and does not compare formulas or formatting.
4. Limitations of Basic Comparison Methods
While these basic methods are useful for simple comparisons, they have limitations:
- Value-Only Comparison: They only identify differences in cell values, not formulas or formatting.
- Row/Column Sensitivity: Adding or deleting rows/columns in one tab can skew the results.
- Sheet-Level Focus: They do not detect workbook-level structural differences, such as added or deleted sheets.
5. Third-Party Tools for Advanced Excel Comparison
For comprehensive Excel comparison, consider using third-party tools. These tools offer advanced features to compare values, formulas, formatting, and even identify structural differences between workbooks.
5.1. Synkronizer Excel Compare
Synkronizer Excel Compare add-in is a powerful tool for comparing, merging, and updating Excel files. It can identify differences between two Excel sheets, combine multiple Excel files into a single version, highlight differences, and provide detailed difference reports.
5.1.1. Using Synkronizer Excel Compare
- Run Synkronizer: Go to the Add-ins tab in Excel and click the Synkronizer icon.
- Select Workbooks: Choose the two workbooks you want to compare.
- Select Sheets: Select the specific sheets within those workbooks that you want to compare.
- Comparison Options: Select the appropriate comparison option like “Compare as normal worksheets”, “Compare with link options”, “Compare as database”, or “Compare selected ranges”.
- Choose Content Types: Select the content types to compare, such as cell values, formulas, comments, and formats.
- Start Comparison: Click the Start button to begin the comparison process.
5.1.2. Visualizing and Analyzing Differences
Synkronizer provides two summary reports for viewing all difference types and clicking the detailed difference report on the summary report. Clicking a difference in the detailed report will select the corresponding cells on both sheets. In addition, you can create a difference report in a separate workbook.
5.1.3. Highlighting Differences
The add-in highlights all found differences like values, formats and inserted rows. Relevant differences are highlighted by clicking the Outline button on the Results tab, and selecting the required options.
5.1.4. Updating and Merging Sheets
Differences are merged by selecting them on the Synkronizer’s pane and clicking one of the 4 update buttons – the first and last buttons update all differences, while the 2nd and 3rd buttons update selected differences only (the button arrows indicate the transfer direction).
5.2. Ablebits Compare Sheets for Excel
Ablebits Compare Sheets for Excel helps to compare worksheets in Excel. The step-by-step wizard will guide you through the process and help you configure different options. The comparison algorithm suits your data sets best and the compared sheets are displayed in the Review Differences mode so that you could view all the differences at a glance and manage them one-by-one.
5.2.1. Using Ablebits Compare Sheets
- Click Compare Sheets: Click the Compare Sheets button on the Ablebits Data tab, in the Merge group.
- Select Worksheets: Select the two worksheets you’d like to compare for differences. By default, the entire sheets are selected, but you can also select the current table or a specific range by clicking the corresponding button.
- Select the comparison algorithm: Choose the comparison algorithm “No key columns”, “By key columns”, or “Cell-by-cell”.
- Match Type: Specify “First match”, “Best match”, or “Full match only”.
- Differences to Highlight: Specify which differences to highlight and which to ignore, and how to mark the differences.
- Compare Click the Compare button and allow the add-in a couple of minutes to process your data and make the backup copies.
5.2.2. Review and Merge Differences
Once the worksheets are processed, they are opened side-by-side in a special Review Differences mode, with the first difference selected. Each worksheet has its own vertical toolbar. For the inactive worksheet (on the left) the toolbar is disabled. To enable the toolbar, just select any cell in the corresponding sheet. Differences are merged and ignored by using this toolbar.
5.3. xlCompare
xlCompare is a utility designed for comparing Excel files, worksheets, names, and VBA projects. It identifies added, deleted, and changed data, allowing you to merge differences quickly.
5.3.1. Key Features of xlCompare
- Finds duplicate records between worksheets and removes them.
- Updates existing records with values from another sheet.
- Adds unique rows and columns from one sheet to another.
- Merges updated records from one workbook to another.
- Sorts data by the key column.
- Filters comparison results to display differences or identical records.
- Highlights comparison results with colors.
5.4. Change pro for Excel
Change pro for Excel can compare two sheets in desktop Excel as well as on mobile devices with optional server-based comparison.
5.4.1. Key Features of Change pro for Excel
- Finds differences between sheets in formulas and values.
- Identifies layout changes, including added/deleted rows and columns.
- Recognizes embedded objects such as charts, graphs, and images.
- Creates difference reports of formula, value, and layout differences.
- Filters, sorts, and searches the difference report on key changes.
- Compares files directly from Outlook or document management systems.
- Supports all languages, including multi-byte.
6. Comparing and Merging Copies of a Shared Workbook
Excel’s “Compare and Merge” feature is useful when multiple users collaborate on the same workbook.
6.1. Preparing the Workbook
- Share the Workbook: On the Review tab, in the Changes group, click Share Workbook. Select the “Allow changes by more than one user…” box and click OK.
- Save Copies: Each user must save a copy of the shared workbook with a unique file name.
6.2. Enabling the Compare and Merge Feature
The “Compare and Merge Workbooks” command is not displayed by default. To add it to the Quick Access Toolbar:
- Open Excel Options: Click the Quick Access drop-down menu and select “More Commands.”
- Choose Commands: In the Excel Options dialog box, select “All Commands.”
- Add the Command: Scroll down to “Compare and Merge Workbooks,” select it, and click “Add.”
- Confirm: Click OK.
6.3. Comparing and Merging Workbooks
- Open the Primary Workbook: Open the original shared workbook.
- Click Compare and Merge: Click the “Compare and Merge Workbooks” command on the Quick Access Toolbar.
- Select Copies: In the dialog box, select the copies of the shared workbook to merge. Hold the Shift key to select multiple copies.
- Confirm: Click OK.
6.4. Reviewing the Changes
- Highlight Changes: On the Review tab, in the Changes group, click Track Changes > Highlight Changes.
- Configure Highlighting: In the “Highlight Changes” dialog, select “All” in the “When” box, “Everyone” in the “Who” box, clear the “Where” box, and select the “Highlight changes on screen” box.
- Apply: Click OK.
Excel highlights column letters and row numbers with differences in dark red. Edits from different users are marked with different colors. Hover over a cell to see who made a specific change.
7. Online Services for Comparing Excel Files
Online services provide a quick way to compare Excel sheets without installing software. While security might be a concern for sensitive data, these services can be useful for non-confidential comparisons.
- XLComparator: Allows you to upload two Excel files and compare them.
- CloudyExcel: Highlights the differences between two active sheets with different colors.
8. Essential Elements for Accurate Excel Tab Comparisons
Guaranteeing accuracy when comparing Excel tabs involves a combination of preparation, method selection, and careful review. By understanding the data, choosing the right comparison technique, and thoroughly validating the results, you can confidently identify and address differences.
8.1. Data Preparation for Excel Tab Comparison
Prior to diving into any comparison method, ensure that your data is well-organized and consistent. Clean, consistent data significantly enhances the accuracy and efficiency of the comparison process.
8.1.1. Standardize Data Formats
Data is often entered in inconsistent formats, especially when multiple users are involved. For instance, dates might appear as “MM/DD/YYYY” in one tab and “DD-MM-YYYY” in another. Use Excel’s formatting tools to standardize these variations. Highlight the column, go to Format Cells, and choose a consistent format.
8.1.2. Remove Extra Spaces and Special Characters
Leading, trailing, or double spaces can cause comparisons to fail even if the underlying data is the same. Use the TRIM function to remove extra spaces. For example, =TRIM(A1) will remove any unnecessary spaces from the text in cell A1.
Special characters, such as non-breaking spaces or hidden characters, can also cause issues. Use the CLEAN function to remove non-printable characters. For example, =CLEAN(A1) will remove these characters from cell A1.
8.1.3. Handle Missing Values Consistently
Missing values can be represented differently across tabs—some might use blanks, others “N/A,” or zeros. Decide on a standard representation and apply it consistently. Use the IF and ISBLANK functions to convert missing values to a uniform representation.
8.1.4. Sort Data When Necessary
Sorting data can be extremely helpful if your tabs are not organized in the same order. Sorting ensures that corresponding rows are aligned, making comparisons more straightforward. Go to the Data tab, click Sort, and choose the columns you want to sort by.
8.2. Selecting the Appropriate Comparison Method
The choice of comparison method depends on the size and complexity of your data, as well as the types of differences you need to identify.
8.2.1. Visual Comparison for Small Datasets
Visual comparison is best suited for small datasets where you only need to spot-check for differences. Excel’s “View Side by Side” feature, found under the View tab, is useful for this. However, this method is prone to human error and not suitable for large, complex datasets.
8.2.2. Formula-Based Comparison for Value Differences
For identifying differences in values, formulas are a practical choice. The IF function, combined with cell references, allows you to create a difference report. However, this method only compares values and does not account for differences in formatting or formulas.
8.2.3. Conditional Formatting for Visual Cues
Conditional formatting is useful for highlighting differences directly within the tabs. By setting up rules based on formulas, you can visually flag cells that do not match. This method provides a quick visual overview but lacks the detailed reporting capabilities of other methods.
8.2.4. Third-Party Tools for Comprehensive Comparison
For complex comparisons involving different data types (values, formulas, formatting) and structural differences, third-party tools are invaluable. These tools offer features such as detailed reporting, change tracking, and merging capabilities.
8.3. Validating Comparison Results
No matter which method you choose, validating the comparison results is critical to ensure accuracy. This involves double-checking the identified differences and ensuring that no discrepancies are missed.
8.3.1. Review Identified Differences Manually
Always manually review a sample of the identified differences. This helps confirm that the comparison method is working correctly and that the identified discrepancies are genuine.
8.3.2. Use Multiple Methods for Verification
If possible, use multiple comparison methods to verify your results. For example, if you used a third-party tool, cross-validate the results with a formula-based comparison on a subset of the data.
8.3.3. Document Your Process
Keep a record of the steps you took during the comparison process, including data preparation, method selection, and validation. This documentation is useful for replicating the comparison in the future and for auditing purposes.
8.3.4. Understand Limitations of Each Method
Be aware of the limitations of the comparison method you used. For instance, if you only compared values, remember to check for differences in formatting or formulas separately.
9. Automation Techniques for Excel Tab Comparisons
To improve efficiency, automate the comparison process as much as possible.
9.1. Using VBA (Visual Basic for Applications)
VBA allows you to write custom scripts to automate repetitive tasks in Excel, including comparing tabs.
9.1.1. Writing a VBA Script
- Open VBA Editor: Press
Alt + F11to open the VBA editor. - Insert a Module: Go to Insert > Module.
- Write the Code: Write a VBA script to compare the two tabs. Below is a basic example:
Sub CompareSheets()
    Dim ws1 As Worksheet, ws2 As Worksheet
    Dim lastRow As Long, i As Long
    Dim diff As Boolean

    Set ws1 = ThisWorkbook.Sheets("Sheet1")
    Set ws2 = ThisWorkbook.Sheets("Sheet2")

    lastRow = ws1.Cells.Find("*", SearchOrder:=xlByRows, SearchDirection:=xlPrevious).Row

    For i = 1 To lastRow
        If ws1.Cells(i, 1).Value <> ws2.Cells(i, 1).Value Then
            Debug.Print "Difference at row " & i
            diff = True
        End If
    Next i

    If Not diff Then
        MsgBox "No differences found!"
    End If
End Sub
9.1.2. Running the Script
- Press
F5or click the “Run” button to execute the script. - The script will compare the values in the first column of “Sheet1” and “Sheet2” and print any differences to the Immediate Window (
Ctrl + Gto view).
9.2. Using Power Query
Power Query is a powerful data transformation tool that can automate the process of comparing and merging data from multiple sources, including Excel tabs.
9.2.1. Load Data into Power Query
- Select Data: In your Excel sheet, select the data range.
- From Table/Range: Go to the Data tab and click From Table/Range.
9.2.2. Append Queries
- Close & Load To: In the Power Query Editor, click Close & Load To > Only Create Connection.
- Repeat: Repeat this process for the second tab.
- Combine Queries: Go to Data > Get Data > Combine Queries > Append.
- Add Tabs: Add both tabs to the append operation.
9.2.3. Identify Differences
- Add Custom Column: Add a custom column to identify the source tab.
- Group Data: Group by the key columns and count the number of rows.
- Filter: Filter the results to show only those rows that appear once, indicating differences.
9.3. Scheduled Comparisons
For regularly updated data, schedule your comparison process to run automatically.
9.3.1. Using Windows Task Scheduler
- Save Excel File: Save your Excel file with the VBA script or Power Query connection.
- Create a Task: Open Task Scheduler and create a new task.
- Set Triggers: Set the triggers for when the task should run (e.g., daily, weekly).
- Set Actions: Set the action to open the Excel file.
- Configure Settings: Configure any necessary settings, such as running with elevated privileges.
9.3.2. Using Excel Services
If you are using SharePoint, you can use Excel Services to schedule the data refresh for your Power Query connections.
- Publish Workbook: Publish the Excel workbook to a SharePoint library.
- Configure Data Refresh: Configure the data refresh settings for the workbook in SharePoint.
10. Advanced Excel Tab Comparison Scenarios
Beyond basic comparisons, there are several advanced scenarios that require specialized techniques.
10.1. Comparing Large Datasets
When comparing large datasets, performance becomes a critical factor.
10.1.1. Use Efficient Formulas
Use efficient formulas that minimize calculations. For example, avoid volatile functions like NOW() and TODAY() unless necessary.
10.1.2. Optimize VBA Code
If using VBA, optimize your code by minimizing loop iterations and using array operations instead of cell-by-cell operations.
10.1.3. Leverage Power Query
Power Query is designed to handle large datasets efficiently. Use it to filter, transform, and compare your data.
10.1.4. Consider Database Solutions
For extremely large datasets, consider importing your data into a database like SQL Server or Access, which are optimized for handling large volumes of data.
10.2. Comparing Data with Complex Relationships
When data has complex relationships, simple row-by-row comparisons may not be sufficient.
10.2.1. Use Key Columns
Identify key columns that uniquely identify each record and use these columns to match records across tabs.
10.2.2. Create Relational Models
Create relational models in Excel or a database to represent the relationships between your data.
10.2.3. Use Lookup Functions
Use lookup functions like VLOOKUP, INDEX, and MATCH to find related data across tabs.
10.3. Comparing Different Versions of the Same Data
When comparing different versions of the same data, change tracking becomes important.
10.3.1. Use Excel’s Track Changes Feature
Excel’s built-in Track Changes feature (under the Review tab) allows you to track changes made to a shared workbook.
10.3.2. Create Audit Trails
Create audit trails by adding columns to your data to record who made the changes and when.
10.3.3. Use Version Control Systems
For more robust version control, consider using a version control system like Git or SharePoint versioning.
11. How COMPARE.EDU.VN Can Help You Compare Excel Tabs
COMPARE.EDU.VN understands the challenges users face when comparing Excel tabs for differences. Our platform offers detailed comparisons of various third-party tools and techniques, helping you choose the best solution for your specific needs. Whether you’re comparing small datasets or managing large, complex spreadsheets, COMPARE.EDU.VN provides insights to streamline your workflow.
We offer step-by-step guides, reviews, and expert advice to help you master Excel comparison techniques. Our resources are designed to empower you to make informed decisions and efficiently identify and resolve discrepancies in your data. With COMPARE.EDU.VN, you can confidently ensure data integrity and improve productivity.
11.1. Ready to simplify your Excel tab comparisons?
Visit COMPARE.EDU.VN to explore our in-depth comparisons and find the perfect solution for your needs. Make informed decisions, save time, and ensure the accuracy of your data with our comprehensive resources.
Visit COMPARE.EDU.VN today and start making smarter comparisons Contact us at 333 Comparison Plaza, Choice City, CA 90210, United States. Whatsapp: +1 (626) 555-9090.
Frequently Asked Questions (FAQ)
-
What is the best way to compare two Excel tabs for differences?
The best method depends on the size and complexity of your data. For small datasets, visual comparison or conditional formatting may suffice. For larger datasets, third-party tools like Synkronizer Excel Compare or Ablebits Compare Sheets for Excel are more effective. -
How can I compare two Excel tabs if they have different layouts?
Use key columns to match records across tabs, and consider using Power Query to transform and align the data before comparison. -
Can I compare two Excel tabs without using third-party software?
Yes, you can use Excel’s built-in features like theIFfunction, conditional formatting, and the “View Side by Side” option. However, these methods have limitations for complex comparisons. -
How do I highlight differences between two Excel tabs using conditional formatting?
Select the range, go to Conditional Formatting > New Rule, use a formula like=A1<>Sheet2!A1, and choose a format to highlight the differences. -
What are the limitations of using formulas to compare Excel tabs?
Formulas only compare values and do not account for differences in formatting or formulas. They are also sensitive to added or deleted rows/columns. -
How can I compare two Excel tabs for differences in formulas?
Third-party tools like xlCompare or Change pro for Excel are designed to compare formulas. These tools can identify and highlight differences in the formulas themselves. -
Is there a way to track changes made to an Excel workbook by multiple users?
Yes, use Excel’s Track Changes feature (under the Review tab) or consider using a version control system like Git or SharePoint versioning. -
How can I automate the process of comparing two Excel tabs?
Use VBA to write custom scripts or leverage Power Query to automate the comparison and transformation of data. -
What should I do if my Excel files are too large to compare efficiently?
Consider importing your data into a database like SQL Server or Access, which are optimized for handling large volumes of data. -
How do I ensure the accuracy of my Excel tab comparisons?
Standardize your data, choose the appropriate comparison method, validate the results manually, and document your process.
COMPARE.EDU.VN is your ultimate resource for mastering Excel comparisons. Visit our site to explore detailed guides, reviews, and expert advice that will help you streamline your workflow and ensure data integrity. Start making smarter comparisons today with compare.edu.vn.