Comparing two Excel spreadsheets can be crucial for various tasks, from auditing data for errors to merging information from different versions of a workbook. Whether you need to identify discrepancies, track changes, or ensure data consistency, Microsoft Spreadsheet Compare is a powerful tool designed for this purpose. This guide will walk you through the process of using Spreadsheet Compare to effectively analyze and highlight the differences between two Excel files.
Getting Started with Spreadsheet Compare
Microsoft Spreadsheet Compare is a utility specifically designed to compare Excel workbooks. However, it’s important to note that this tool is not included in all versions of Microsoft Office. It is typically available with:
- Office Professional Plus 2013
- Office Professional Plus 2016
- Office Professional Plus 2019
- Microsoft 365 Apps for enterprise
Opening Spreadsheet Compare:
- Access via Start Menu: The easiest way to open the application is through the Start Menu. Click on the Start button and look for Spreadsheet Compare.
- Search for the Application: If you don’t immediately see it, simply start typing “Spreadsheet Compare” after clicking the Start button. The application should appear in the search results. Click on it to launch.
Once opened, you’ll notice a clean and straightforward interface designed for file comparison. In addition to Spreadsheet Compare, Microsoft offers a similar tool for Access databases called Microsoft Database Compare, which is also part of the Office Professional Plus suite.
Step-by-Step Guide to Comparing Excel Workbooks
Let’s dive into the process of comparing two Excel files using Spreadsheet Compare:
-
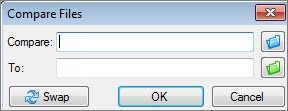
Initiate File Comparison: On the Home tab, locate and click the Compare Files button. This action will open the Compare Files dialog box, which is your starting point for selecting the spreadsheets you want to analyze.
-
Select the Original Workbook: In the Compare Files dialog box, you’ll see a Compare box. Click on the blue folder icon located next to this box. This prompts a browse window to open, allowing you to navigate to and select the earlier version or the first of the two Excel workbooks you intend to compare. You can choose files from your local computer, network drives, or even input a web address if your files are stored online.
-
Choose the Revised Workbook: Next, click the green folder icon adjacent to the To box. Similar to the previous step, browse to and select the second Excel workbook you want to compare against the first one. This is typically the more recent version or the second file in your comparison. Click OK after selecting the file.
Tip: Spreadsheet Compare allows you to compare two files even if they have the same name, as long as they are saved in different folders. This is particularly useful when dealing with versioned files.
-
Customize Comparison Options: Before running the comparison, you can refine what aspects of the workbooks you want to compare. In the left pane of the Compare Files dialog box, you’ll find a list of options such as Formulas, Macros, Cell Format, and more. Check or uncheck these options to specify which elements should be included in the comparison report. For a comprehensive comparison, you can simply choose Select All.
-
Execute the Comparison: Once you have selected your files and chosen your comparison options, click OK to start the comparison process. Spreadsheet Compare will analyze the two workbooks based on your settings.
Password Protected Workbooks: If either of the workbooks is password protected, you might encounter an “Unable to open workbook” message. If this happens, click OK and you will be prompted to enter the password for the protected workbook. Spreadsheet Compare needs the password to access and compare the file contents.
Understanding the Comparison Results
After running the comparison, Spreadsheet Compare presents the results in a clear, two-pane grid.
-
Side-by-Side View: The left pane displays the workbook you selected as “Compare” (typically the older version), and the right pane shows the “To” workbook (usually the newer one). Each worksheet from both files is compared against its counterpart, and you can navigate between worksheets using the scroll bar buttons if your workbooks contain multiple sheets. Even hidden worksheets are included in the comparison.
-
Color-Coded Differences: Spreadsheet Compare uses colors to highlight different types of changes between the workbooks. Cells with changes are marked with fill colors or font colors, depending on the nature of the difference. For example, cells containing “entered values” (values not derived from formulas) that have been modified are often highlighted with a green fill in the grid and a green font in the detail pane below. A legend in the lower-left pane explains what each color represents.
In the example above, you can see how changes in entered values (green fill) in columns E have impacted calculated values (blue-green fill) in column F. This visual representation makes it easy to quickly grasp where and what kind of changes have occurred between the two spreadsheets.
- Cell Content Visibility: If the cell content is wider than the cell display, you can click Resize Cells to Fit to automatically adjust column widths and ensure all data is visible without manually resizing columns.
Excel’s Inquire Add-in: An Alternative Tool
For users of Excel 2013 and later, the Inquire add-in provides another set of tools for workbook analysis, in addition to Spreadsheet Compare. The Inquire add-in, once enabled, adds an “Inquire” tab to the Excel ribbon. From this tab, you can:
- Analyze workbooks for potential issues.
- Visualize relationships between cells, worksheets, and workbooks.
- Clean up excessive formatting within a worksheet.
While Spreadsheet Compare is a standalone application for comparing files externally, the Inquire add-in offers analysis tools directly within Excel. If you have workbooks already open in Excel and want to leverage Spreadsheet Compare, you can still initiate the comparison from within Excel using the “Compare Files” command found in the Inquire tab (if enabled).
If you don’t see the Inquire tab in your Excel, you may need to activate it through Excel Options > Add-ins > Manage: COM Add-ins > Go > and then check “Inquire”.
Conclusion
Comparing Excel spreadsheets is a common need in data management and analysis. Microsoft Spreadsheet Compare offers a robust and user-friendly solution to quickly identify and understand the differences between two Excel workbooks. By following these steps, you can efficiently use this tool to maintain data integrity, track changes, and ensure accuracy across your important spreadsheets. For organizations managing critical Excel files, consider exploring Microsoft’s broader suite of management and auditing tools for enhanced control and risk reduction.