Comparing two Excel sheets with multiple columns can be a daunting task, but COMPARE.EDU.VN offers solutions to streamline this process. This guide provides effective methods to identify differences, match data, and consolidate information across multiple Excel worksheets, ensuring data accuracy and informed decision-making. Let’s explore the best practices for Excel sheet comparison, data matching techniques, and efficient data consolidation strategies for better data management.
1. Understanding the Need for Excel Sheet Comparison
Comparing two Excel sheets with multiple columns is essential for various reasons. Businesses and individuals often need to ensure data consistency, identify discrepancies, and merge information from different sources. This process is crucial for data validation, financial auditing, inventory management, and many other tasks. The ability to efficiently compare Excel sheets can save time, reduce errors, and improve overall data quality. Let’s explore why this skill is indispensable in today’s data-driven world and how COMPARE.EDU.VN can help simplify these comparisons.
1.1. Data Validation and Quality Control
One of the primary reasons for comparing two Excel sheets is to validate data and ensure its quality. Data validation involves verifying that the data in one sheet matches the corresponding data in another sheet. This is particularly important when dealing with large datasets where manual inspection is impractical.
- Ensuring Accuracy: Comparing sheets helps identify errors, inconsistencies, and omissions in data. For example, if you have two versions of a sales report, comparing them can reveal discrepancies in sales figures, customer information, or product details.
- Maintaining Consistency: Regular comparisons ensure that data remains consistent across different systems or databases. This is crucial for businesses that rely on accurate and up-to-date information for decision-making.
- Improving Data Integrity: By identifying and correcting errors, you improve the overall integrity of your data. This leads to more reliable reporting, better analysis, and more informed business strategies.
1.2. Identifying Discrepancies and Errors
Comparing Excel sheets is also vital for identifying discrepancies and errors that may exist between datasets. Discrepancies can arise from various sources, including data entry mistakes, system glitches, or outdated information.
- Detecting Duplicates: Identifying duplicate entries is a common requirement when managing customer lists, inventory records, or financial transactions. Comparing sheets can help you find and remove duplicates, ensuring that your data is accurate and efficient.
- Finding Missing Data: Sometimes, data may be missing from one sheet but present in another. Comparing sheets allows you to identify these gaps and fill them in, providing a complete and comprehensive dataset.
- Spotting Inconsistencies: Inconsistencies can occur when the same data is represented differently in two sheets. For example, customer names may be formatted differently, or product codes may vary. Comparing sheets helps you standardize data formats and resolve inconsistencies.
1.3. Merging and Consolidating Data
Another important application of Excel sheet comparison is merging and consolidating data from multiple sources. This is particularly useful when you need to combine information from different departments, systems, or databases into a single, unified dataset.
- Combining Data from Different Sources: Businesses often collect data from various sources, such as CRM systems, accounting software, and marketing platforms. Comparing and merging Excel sheets allows you to integrate this data into a single, cohesive view.
- Creating Consolidated Reports: By merging data from multiple sheets, you can create consolidated reports that provide a comprehensive overview of your business operations. This enables better analysis, more informed decision-making, and improved strategic planning.
- Streamlining Data Management: Consolidating data into a single sheet simplifies data management and reduces the risk of errors or inconsistencies. This makes it easier to maintain data quality and ensure that everyone is working with the same information.
1.4. Enhancing Data Analysis
Comparing Excel sheets also enhances data analysis by providing a more complete and accurate dataset. This allows you to perform more sophisticated analysis, identify trends, and gain insights that would not be possible with incomplete or inconsistent data.
- Improving Accuracy of Analysis: By ensuring that your data is accurate and consistent, you improve the reliability of your analysis. This leads to more accurate results, better predictions, and more effective strategies.
- Identifying Trends and Patterns: Comparing sheets can reveal trends and patterns that may not be apparent when looking at individual datasets. This can provide valuable insights into customer behavior, market trends, or operational performance.
- Gaining Deeper Insights: A more complete and accurate dataset allows you to gain deeper insights into your business operations. This can help you identify opportunities for improvement, optimize processes, and make more informed decisions.
COMPARE.EDU.VN offers a range of resources and tools to help you effectively compare Excel sheets, ensuring data accuracy and informed decision-making.
2. Key Steps in Comparing Two Excel Sheets
Comparing two Excel sheets with multiple columns involves a series of steps to ensure accuracy and efficiency. These steps include preparing your data, selecting the right comparison method, and interpreting the results. Let’s explore each of these steps in detail.
2.1. Preparing Your Data
Before you start comparing Excel sheets, it’s important to prepare your data to ensure that the comparison process is as accurate and efficient as possible. This involves cleaning, formatting, and organizing your data.
- Cleaning Data: Data cleaning involves removing errors, inconsistencies, and irrelevant information from your datasets. This may include correcting spelling mistakes, standardizing data formats, and removing duplicate entries.
- Formatting Data: Formatting your data ensures that it is consistent and easy to compare. This may involve standardizing date formats, number formats, and text formats. It’s also important to ensure that all columns have appropriate headers.
- Organizing Data: Organizing your data involves sorting and arranging it in a way that makes it easier to compare. This may include sorting data by key fields, such as customer ID or product code, and grouping related data together.
2.2. Choosing the Right Comparison Method
There are several methods you can use to compare two Excel sheets, each with its own advantages and disadvantages. The best method for you will depend on the size and complexity of your datasets, as well as your specific goals.
- Manual Comparison: Manual comparison involves visually inspecting two sheets side by side to identify differences. This method is suitable for small datasets with few columns, but it is time-consuming and prone to errors when dealing with larger datasets.
- Using Excel Formulas: Excel provides several formulas that can be used to compare data in two sheets. These formulas include
IF,VLOOKUP, andMATCH. This method is more efficient than manual comparison but requires some knowledge of Excel formulas. - Conditional Formatting: Conditional formatting can be used to highlight differences between two sheets. This method is useful for quickly identifying discrepancies but may not be suitable for detailed analysis.
- Using Excel’s “Compare Side by Side” Feature: Excel’s “Compare Side by Side” feature allows you to view two sheets simultaneously and scroll through them in sync. This can make it easier to spot differences, but it is still a manual process.
- Using Third-Party Tools: Several third-party tools are available for comparing Excel sheets. These tools often provide more advanced features, such as automatic discrepancy detection, detailed reporting, and data merging capabilities.
2.3. Performing the Comparison
Once you have prepared your data and chosen a comparison method, you can perform the comparison. This involves applying the chosen method to your datasets and carefully reviewing the results.
- Using Excel Formulas: If you are using Excel formulas, you will need to enter the appropriate formulas into your sheets and review the results. This may involve creating new columns to display the comparison results and filtering the data to identify discrepancies.
- Using Conditional Formatting: If you are using conditional formatting, you will need to apply the appropriate formatting rules to your sheets and visually inspect the results. This may involve using different colors to highlight different types of discrepancies.
- Using Excel’s “Compare Side by Side” Feature: If you are using Excel’s “Compare Side by Side” feature, you will need to open both sheets and select the “View Side by Side” option. You can then scroll through the sheets in sync and manually identify differences.
- Using Third-Party Tools: If you are using a third-party tool, you will need to import your sheets into the tool and run the comparison. The tool will then generate a report showing the differences between the sheets.
2.4. Interpreting the Results
After performing the comparison, it’s important to interpret the results carefully. This involves understanding the types of discrepancies that have been identified, determining the root causes of these discrepancies, and taking corrective action.
- Understanding Discrepancy Types: Discrepancies can be categorized into several types, such as data entry errors, formatting inconsistencies, missing data, and duplicate entries. Understanding the types of discrepancies that have been identified can help you determine the root causes.
- Determining Root Causes: Determining the root causes of discrepancies may involve investigating the data entry process, reviewing system logs, or consulting with subject matter experts. Identifying the root causes can help you prevent similar discrepancies from occurring in the future.
- Taking Corrective Action: Taking corrective action may involve correcting data entry errors, standardizing data formats, filling in missing data, and removing duplicate entries. It’s important to document all corrective actions taken to ensure that the data remains accurate and consistent.
COMPARE.EDU.VN provides resources and tools to help you prepare your data, choose the right comparison method, and interpret the results effectively.
3. Using Excel Formulas for Comparison
Excel formulas offer a powerful way to compare two Excel sheets with multiple columns. By using formulas like IF, VLOOKUP, and MATCH, you can automate the comparison process and quickly identify differences between datasets. Let’s explore how to use these formulas effectively.
3.1. The IF Formula
The IF formula is a fundamental tool for comparing data in Excel. It allows you to perform a logical test and return one value if the test is true and another value if the test is false. This is particularly useful for highlighting discrepancies between two sheets.
- Basic Syntax: The basic syntax of the
IFformula isIF(logical_test, value_if_true, value_if_false). - Comparing Two Cells: To compare two cells in different sheets, you can use the
IFformula as follows:=IF(Sheet1!A1=Sheet2!A1, "Match", "No Match"). This formula compares the value in cell A1 of Sheet1 with the value in cell A1 of Sheet2. If the values match, the formula returns “Match”; otherwise, it returns “No Match”. - Applying to Multiple Rows: You can apply the
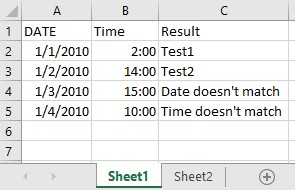
IFformula to multiple rows by dragging the formula down. Excel will automatically adjust the cell references to compare the corresponding rows in the two sheets. - Example: Consider two sheets with customer data. Sheet1 contains the latest customer information, while Sheet2 contains older data. To compare the customer names in column A of both sheets, you can use the following formula in a new column in Sheet1:
=IF(A2=Sheet2!A2, "Match", "No Match"). This will quickly highlight any discrepancies in customer names.
3.2. The VLOOKUP Formula
The VLOOKUP formula is used to find a value in one sheet and return a corresponding value from another sheet. This is particularly useful for comparing data based on a common identifier, such as a customer ID or product code.
- Basic Syntax: The basic syntax of the
VLOOKUPformula isVLOOKUP(lookup_value, table_array, col_index_num, [range_lookup]). - Finding Matching Values: To find a matching value in another sheet, you can use the
VLOOKUPformula as follows:=VLOOKUP(A2, Sheet2!A:B, 2, FALSE). This formula looks for the value in cell A2 of Sheet1 in column A of Sheet2. If a match is found, the formula returns the corresponding value from column B of Sheet2. - Handling Errors: If the
VLOOKUPformula does not find a match, it returns the#N/Aerror. You can handle this error using theIFERRORfunction. For example,=IFERROR(VLOOKUP(A2, Sheet2!A:B, 2, FALSE), "Not Found")will return “Not Found” if no match is found. - Example: Suppose you have two sheets with product data. Sheet1 contains a list of product IDs and prices, while Sheet2 contains additional product details. To compare the prices in Sheet1 with the corresponding product details in Sheet2, you can use the following formula in a new column in Sheet1:
=IFERROR(VLOOKUP(A2, Sheet2!A:C, 3, FALSE), "Not Found"). This will return the product details from column C of Sheet2 if a match is found; otherwise, it will return “Not Found”.
3.3. The MATCH Formula
The MATCH formula is used to find the position of a value in a range of cells. This is useful for determining whether a value exists in another sheet and identifying its location.
- Basic Syntax: The basic syntax of the
MATCHformula isMATCH(lookup_value, lookup_array, [match_type]). - Finding the Position of a Value: To find the position of a value in another sheet, you can use the
MATCHformula as follows:=MATCH(A2, Sheet2!A:A, 0). This formula looks for the value in cell A2 of Sheet1 in column A of Sheet2. If a match is found, the formula returns the position of the match; otherwise, it returns the#N/Aerror. - Using with IF Formula: You can use the
MATCHformula in conjunction with theIFformula to perform more complex comparisons. For example,=IF(ISNA(MATCH(A2, Sheet2!A:A, 0)), "Not Found", "Found")will return “Not Found” if the value in cell A2 of Sheet1 is not found in column A of Sheet2; otherwise, it will return “Found”. - Example: Consider two sheets with employee data. Sheet1 contains a list of employee IDs, while Sheet2 contains additional employee information. To determine whether each employee ID in Sheet1 exists in Sheet2, you can use the following formula in a new column in Sheet1:
=IF(ISNA(MATCH(A2, Sheet2!A:A, 0)), "Not Found", "Found"). This will quickly identify any employee IDs that are missing from Sheet2.
3.4. Combining Formulas for Complex Comparisons
You can combine these formulas to perform more complex comparisons. For example, you can use the IF formula to check whether two values match and then use the VLOOKUP formula to retrieve additional information from another sheet based on the matching value.
- Comparing Multiple Columns: To compare multiple columns, you can use nested
IFformulas. For example,=IF(AND(Sheet1!A2=Sheet2!A2, Sheet1!B2=Sheet2!B2), "Match", "No Match")will return “Match” only if the values in both column A and column B of Sheet1 match the corresponding values in Sheet2. - Retrieving Additional Information: You can use the
VLOOKUPformula to retrieve additional information from another sheet based on a matching value. For example,=IF(Sheet1!A2=Sheet2!A2, VLOOKUP(A2, Sheet2!A:C, 3, FALSE), "No Match")will return the value from column C of Sheet2 if the value in column A of Sheet1 matches the corresponding value in Sheet2; otherwise, it will return “No Match”. - Example: Suppose you have two sheets with sales data. Sheet1 contains a list of sales transactions, while Sheet2 contains customer information. To compare the sales amounts in Sheet1 with the corresponding customer information in Sheet2, you can use the following formula in a new column in Sheet1:
=IF(A2=Sheet2!A2, VLOOKUP(A2, Sheet2!A:C, 3, FALSE), "No Match"). This will return the customer’s name from column C of Sheet2 if the sales transaction ID in column A of Sheet1 matches the corresponding ID in Sheet2; otherwise, it will return “No Match”.
COMPARE.EDU.VN offers detailed tutorials and examples to help you master Excel formulas for comparing two Excel sheets with multiple columns.
4. Conditional Formatting for Visual Comparison
Conditional formatting is a powerful feature in Excel that allows you to visually highlight differences between two sheets. By applying formatting rules based on certain conditions, you can quickly identify discrepancies and errors. Let’s explore how to use conditional formatting effectively.
4.1. Highlighting Differences
One of the primary uses of conditional formatting is to highlight differences between two sheets. This can be done by applying formatting rules that compare the values in corresponding cells and apply different formatting based on whether the values match or not.
- Selecting the Range: Start by selecting the range of cells in the first sheet that you want to compare.
- Creating a New Rule: Go to the “Home” tab, click on “Conditional Formatting,” and select “New Rule.”
- Using a Formula: In the “New Formatting Rule” dialog box, select “Use a formula to determine which cells to format.”
- Entering the Formula: Enter a formula that compares the values in the selected range with the corresponding values in the second sheet. For example, to highlight differences in column A, you can use the formula
=A1<>Sheet2!A1. - Setting the Format: Click on the “Format” button and choose the formatting style you want to apply to the cells that do not match. For example, you can change the fill color to red or the font color to white.
- Applying the Rule: Click “OK” to apply the rule. Excel will now highlight all the cells in the selected range that do not match the corresponding cells in the second sheet.
- Example: To highlight differences in customer names between Sheet1 and Sheet2, select the range of customer names in Sheet1, create a new conditional formatting rule, use the formula
=A1<>Sheet2!A1, and set the format to fill the cells with red color.
4.2. Identifying Duplicate Entries
Conditional formatting can also be used to identify duplicate entries within a single sheet or between two sheets. This is particularly useful for cleaning up data and ensuring that you are not working with redundant information.
- Selecting the Range: Select the range of cells that you want to check for duplicates.
- Creating a New Rule: Go to the “Home” tab, click on “Conditional Formatting,” and select “New Rule.”
- Using “Format only unique or duplicate values”: In the “New Formatting Rule” dialog box, select “Format only unique or duplicate values.”
- Choosing “Duplicate”: In the dropdown menu, select “duplicate.”
- Setting the Format: Click on the “Format” button and choose the formatting style you want to apply to the duplicate entries. For example, you can change the fill color to yellow or the font color to bold.
- Applying the Rule: Click “OK” to apply the rule. Excel will now highlight all the duplicate entries in the selected range.
- Example: To identify duplicate customer IDs in Sheet1, select the range of customer IDs, create a new conditional formatting rule, choose “Format only unique or duplicate values,” select “duplicate,” and set the format to fill the cells with yellow color.
4.3. Highlighting Missing Data
Conditional formatting can also be used to highlight missing data in a sheet. This is useful for identifying gaps in your data and ensuring that you have complete information.
- Selecting the Range: Select the range of cells that you want to check for missing data.
- Creating a New Rule: Go to the “Home” tab, click on “Conditional Formatting,” and select “New Rule.”
- Using a Formula: In the “New Formatting Rule” dialog box, select “Use a formula to determine which cells to format.”
- Entering the Formula: Enter a formula that checks whether the cells are blank. For example, to highlight blank cells in column A, you can use the formula
=ISBLANK(A1). - Setting the Format: Click on the “Format” button and choose the formatting style you want to apply to the blank cells. For example, you can change the fill color to gray or the font color to italic.
- Applying the Rule: Click “OK” to apply the rule. Excel will now highlight all the blank cells in the selected range.
- Example: To highlight missing email addresses in Sheet1, select the range of email addresses, create a new conditional formatting rule, use the formula
=ISBLANK(A1), and set the format to fill the cells with gray color.
4.4. Applying Multiple Rules
You can apply multiple conditional formatting rules to the same range of cells. This allows you to highlight different types of discrepancies or patterns in your data.
- Creating Multiple Rules: Follow the steps above to create multiple conditional formatting rules for the same range of cells.
- Managing Rules: To manage the rules, go to the “Home” tab, click on “Conditional Formatting,” and select “Manage Rules.”
- Setting Rule Order: In the “Conditional Formatting Rules Manager” dialog box, you can change the order of the rules by selecting a rule and clicking on the “Move Up” or “Move Down” buttons. The order of the rules is important because Excel applies the rules in the order they are listed.
- Stopping If True: You can also check the “Stop If True” box for a rule to prevent Excel from applying subsequent rules if the current rule is true. This can be useful for prioritizing certain types of discrepancies or patterns.
- Example: To highlight both duplicate customer IDs and missing email addresses in Sheet1, you can create two conditional formatting rules: one to highlight duplicate customer IDs with yellow color and another to highlight missing email addresses with gray color.
COMPARE.EDU.VN offers step-by-step guides and tutorials to help you effectively use conditional formatting for visual comparison of Excel sheets.
5. Using Excel’s “Compare Side by Side” Feature
Excel’s “Compare Side by Side” feature provides a simple way to manually compare two Excel sheets with multiple columns. This feature allows you to view two sheets simultaneously and scroll through them in sync, making it easier to spot differences. Let’s explore how to use this feature effectively.
5.1. Opening Two Sheets
The first step in using the “Compare Side by Side” feature is to open the two Excel sheets that you want to compare.
- Opening Excel: Launch Microsoft Excel on your computer.
- Opening the First Sheet: Click on “File,” then “Open,” and select the first Excel sheet from your computer.
- Opening the Second Sheet: Repeat the process to open the second Excel sheet. You should now have two Excel windows open, each displaying one of the sheets.
5.2. Activating “View Side by Side”
Once you have opened the two sheets, you can activate the “View Side by Side” feature to view them simultaneously.
- Selecting the “View” Tab: In one of the Excel windows, click on the “View” tab in the ribbon.
- Clicking “View Side by Side”: In the “Window” group, click on the “View Side by Side” button. Excel will automatically arrange the two windows side by side on your screen.
- Arranging Windows: If Excel does not automatically arrange the windows side by side, you can manually drag the windows to position them next to each other.
5.3. Synchronous Scrolling
One of the key benefits of the “Compare Side by Side” feature is synchronous scrolling, which allows you to scroll through both sheets simultaneously.
- Enabling Synchronous Scrolling: By default, synchronous scrolling is enabled when you activate the “View Side by Side” feature. This means that when you scroll in one sheet, the other sheet will scroll automatically to the corresponding position.
- Disabling Synchronous Scrolling: If you want to scroll through the sheets independently, you can disable synchronous scrolling by clicking on the “Synchronous Scrolling” button in the “Window” group of the “View” tab.
- Using Synchronous Scrolling: Use the scroll bars or the mouse wheel to scroll through the sheets. Pay close attention to the data in each sheet and look for any differences or discrepancies.
5.4. Resetting Window Position
Sometimes, the window positions may become misaligned or disorganized. You can use the “Reset Window Position” feature to quickly realign the windows.
- Clicking “Reset Window Position”: In the “Window” group of the “View” tab, click on the “Reset Window Position” button. Excel will automatically realign the windows to their default positions.
- Adjusting Window Size: You can also manually adjust the size and position of the windows by dragging the window borders or using the window controls in the upper-right corner of each window.
5.5. Comparing Data Manually
The “Compare Side by Side” feature is primarily a manual comparison tool. You will need to visually inspect the data in each sheet and identify any differences or discrepancies.
- Focusing on Key Columns: Focus on the key columns that you want to compare, such as customer names, product codes, or sales amounts.
- Looking for Differences: Look for any differences in the data, such as spelling mistakes, formatting inconsistencies, or missing values.
- Making Notes: Make notes of any discrepancies that you find. You can use a separate notepad or a comment in the Excel sheet to record your findings.
5.6. Limitations
While the “Compare Side by Side” feature is useful for manual comparison, it has some limitations.
- Manual Process: It is a manual process that requires you to visually inspect the data and identify any differences. This can be time-consuming and prone to errors, especially when dealing with large datasets.
- No Automatic Discrepancy Detection: It does not provide any automatic discrepancy detection or reporting capabilities. You will need to manually identify and record any differences that you find.
- Not Suitable for Complex Comparisons: It is not suitable for complex comparisons that involve multiple criteria or calculations.
COMPARE.EDU.VN provides tips and tricks to help you make the most of Excel’s “Compare Side by Side” feature for manual comparison of Excel sheets.
6. Third-Party Tools for Advanced Comparison
For advanced comparison needs, several third-party tools offer features beyond Excel’s built-in capabilities. These tools provide automatic discrepancy detection, detailed reporting, and data merging capabilities. Let’s explore some popular third-party tools.
6.1. Overview of Available Tools
Several third-party tools are available for comparing Excel sheets. These tools offer a range of features, from basic discrepancy detection to advanced data merging and synchronization.
- Araxis Merge: Araxis Merge is a powerful comparison tool that supports Excel sheets, text files, and other types of documents. It provides visual comparison, automatic merging, and detailed reporting capabilities.
- Beyond Compare: Beyond Compare is another popular comparison tool that supports Excel sheets, folders, and archives. It offers advanced features such as three-way merging, file synchronization, and command-line scripting.
- DiffEngineX: DiffEngineX is a specialized tool for comparing Excel sheets. It provides detailed discrepancy detection, data merging, and reporting capabilities. It also supports comparing Excel formulas and VBA code.
- XL Comparator: XL Comparator is a simple and easy-to-use tool for comparing Excel sheets. It provides basic discrepancy detection and reporting capabilities. It is suitable for small to medium-sized datasets.
6.2. Features to Look For
When choosing a third-party tool for comparing Excel sheets, there are several features to look for.
- Automatic Discrepancy Detection: The tool should be able to automatically detect discrepancies between two sheets, such as data entry errors, formatting inconsistencies, and missing values.
- Detailed Reporting: The tool should provide detailed reports that show the differences between the two sheets, including the location of the discrepancies and the values that are different.
- Data Merging: The tool should allow you to merge data from two sheets into a single sheet, resolving any discrepancies in the process.
- Formula and VBA Code Comparison: If you are working with Excel sheets that contain formulas or VBA code, the tool should be able to compare the formulas and code and identify any differences.
- Support for Large Datasets: The tool should be able to handle large datasets without performance issues.
- User-Friendly Interface: The tool should have a user-friendly interface that makes it easy to use, even for non-technical users.
6.3. How to Use Third-Party Tools
The process of using a third-party tool to compare Excel sheets typically involves the following steps.
- Installing the Tool: Download and install the third-party tool on your computer.
- Opening the Sheets: Open the two Excel sheets that you want to compare in the tool.
- Running the Comparison: Run the comparison process. The tool will automatically detect any discrepancies between the two sheets.
- Reviewing the Report: Review the report generated by the tool. The report will show the differences between the two sheets, including the location of the discrepancies and the values that are different.
- Merging the Data: If necessary, merge the data from the two sheets into a single sheet, resolving any discrepancies in the process.
- Saving the Result: Save the merged sheet or the comparison report.
6.4. Benefits and Limitations
Third-party tools offer several benefits over Excel’s built-in capabilities.
- Automatic Discrepancy Detection: They can automatically detect discrepancies between two sheets, saving you time and effort.
- Detailed Reporting: They provide detailed reports that show the differences between the two sheets, making it easier to understand the discrepancies.
- Data Merging: They allow you to merge data from two sheets into a single sheet, resolving any discrepancies in the process.
- Support for Large Datasets: They can handle large datasets without performance issues.
However, third-party tools also have some limitations.
- Cost: They typically require a license fee, which can be expensive for some users.
- Complexity: They can be complex to use, especially for non-technical users.
- Compatibility: They may not be compatible with all versions of Excel or all operating systems.
COMPARE.EDU.VN provides reviews and comparisons of third-party tools for comparing Excel sheets, helping you choose the right tool for your needs.
7. Best Practices for Efficient Comparison
To ensure efficient and accurate comparison of two Excel sheets with multiple columns, it’s important to follow certain best practices. These practices include preparing your data, using appropriate methods, and documenting your findings. Let’s explore these best practices in detail.
7.1. Data Preparation
Proper data preparation is crucial for efficient comparison. This involves cleaning, formatting, and organizing your data before you start the comparison process.
- Cleaning Data: Remove any errors, inconsistencies, and irrelevant information from your datasets. This may include correcting spelling mistakes, standardizing data formats, and removing duplicate entries.
- Formatting Data: Ensure that your data is consistently formatted. This may involve standardizing date formats, number formats, and text formats.
- Organizing Data: Sort and arrange your data in a way that makes it easier to compare. This may include sorting data by key fields, such as customer ID or product code, and grouping related data together.
- Removing Unnecessary Columns: Remove any columns that are not relevant to the comparison. This will simplify the comparison process and reduce the risk of errors.
- Creating Backup Copies: Always create backup copies of your Excel sheets before you start the comparison process. This will protect you from data loss in case something goes wrong.
7.2. Choosing the Right Method
Selecting the appropriate comparison method is essential for efficient comparison. The best method for you will depend on the size and complexity of your datasets, as well as your specific goals.
- Manual Comparison: Use manual comparison only for small datasets with few columns.
- Excel Formulas: Use Excel formulas for medium-sized datasets with straightforward comparison requirements.
- Conditional Formatting: Use conditional formatting for quickly identifying discrepancies in medium-sized datasets.
- Excel’s “Compare Side by Side” Feature: Use Excel’s “Compare Side by Side” feature for manual comparison of medium-sized datasets.
- Third-Party Tools: Use third-party tools for large datasets with complex comparison requirements.
- Combining Methods: Consider combining different methods for different parts of the comparison process. For example, you can use Excel formulas to identify potential discrepancies and then use conditional formatting to highlight them visually.
7.3. Automating the Process
Automating the comparison process can significantly improve efficiency, especially when dealing with large datasets or repetitive tasks.
- Using Excel Macros: Use Excel macros to automate repetitive tasks, such as cleaning data, formatting data, and applying comparison formulas.
- Using Third-Party Tools: Use third-party tools that offer automation features, such as automatic discrepancy detection and data merging.
- Scheduling Comparisons: Schedule comparisons to run automatically on a regular basis. This will ensure that your data remains consistent and accurate over time.
- Creating Templates: Create templates for common comparison tasks. This will save you time and effort when you need to perform the same comparison again in the future.
7.4. Documenting Your Findings
Documenting your findings is important for tracking the results of the comparison process and ensuring that any discrepancies are resolved.
- Creating a Comparison Report: Create a comparison report that summarizes the differences between the two sheets, including the location of the discrepancies and the values that are different.
- Recording Corrective Actions: Record any corrective actions that you take to resolve the discrepancies. This will help you track the progress of the comparison process and ensure that all discrepancies are addressed.
- Storing the Report: Store the comparison report and the corrective action log in a safe and accessible location. This will allow you to refer back to the report in the future if necessary.
- Sharing the Report: Share the comparison report with relevant stakeholders, such as managers, colleagues, or clients. This will ensure that everyone is aware of the results of the comparison process and any corrective actions that have been taken.
7.5. Regularly Updating Your Skills
Excel and third-party comparison tools are constantly evolving, with new features and capabilities being added on a regular basis. It’s important to regularly update your skills to stay current with the latest trends and technologies.
- Taking Training Courses: Take training courses on Excel and third-party comparison tools. This will help you learn new skills and techniques.
- Reading Documentation: Read the documentation for Excel and third-party comparison tools. This will help you understand the features and capabilities of the tools.
- Attending Conferences: Attend conferences and workshops on data analysis and comparison. This will allow you to network with other professionals and learn about the latest trends and technologies.
- Practicing Regularly: Practice regularly with Excel and third-party comparison tools. This will help you develop your skills and become more proficient in using the tools.
compare.edu.vn offers resources and guidance to help you implement these best practices and improve the efficiency and accuracy of your Excel sheet comparisons.
8. Troubleshooting Common Issues
While comparing two Excel sheets with multiple columns, you may encounter several issues. These issues can range from data inconsistencies to technical problems. Let’s explore some common issues and how to troubleshoot them.
8.1. Data Inconsistencies
Data inconsistencies are a common issue when comparing two Excel sheets. These inconsistencies can arise from various sources, such as data entry errors, formatting differences, and missing values.
- Identifying Inconsistencies: Use Excel formulas, conditional formatting, or third-party tools to identify data inconsistencies.
- Correcting Data Entry Errors: Correct any data entry errors, such as spelling mistakes or incorrect values.
- Standardizing Data Formats: Standardize data formats, such as date formats, number formats, and text formats.
- Filling in Missing Values: Fill in any missing values. If you don’t know the correct values, you may need to consult with subject matter experts or refer to other data sources.
- Removing Duplicate Entries: Remove any duplicate entries.
8.2. Formula Errors
Formula errors can occur when using Excel formulas to compare two sheets. These errors can be caused by incorrect syntax, invalid cell references, or logical mistakes.
- Checking Syntax: Double-check the syntax of your formulas to ensure that they are correct.
- Validating Cell References: Validate that your cell references