Comparing two Excel files for similarities can be a complex task. COMPARE.EDU.VN simplifies this process by providing comprehensive guides and tools. Discover effective techniques for Excel file comparison, ensuring data accuracy and efficiency with our detailed analysis and user-friendly solutions. This includes identifying differences and commonalities and ensuring data integrity.
1. Understanding the Need to Compare Excel Files
Comparing two Excel files for similarities is a crucial task in various scenarios. Whether you are managing large datasets, auditing financial records, or simply tracking changes in documents, understanding the commonalities and differences between files is essential. This ensures data accuracy, consistency, and informed decision-making.
1.1. Why Compare Excel Files?
There are several compelling reasons why you might need to compare Excel files:
- Data Validation: Ensuring that data entries are consistent across different versions of a file.
- Error Detection: Identifying discrepancies or errors that may have occurred during data entry or manipulation.
- Change Tracking: Monitoring changes made to a file over time, which is crucial for auditing and compliance.
- Collaboration: Coordinating work among multiple users by pinpointing where changes have been made.
- Merging Data: Combining data from multiple sources while ensuring no duplication or conflicts.
1.2. Common Scenarios for Excel File Comparison
Excel file comparison is valuable across various industries and roles:
- Financial Analysis: Comparing budget spreadsheets, income statements, and balance sheets to identify discrepancies and trends.
- Project Management: Tracking changes in project timelines, resource allocations, and task assignments.
- Data Management: Validating data integrity across databases and ensuring consistent reporting.
- Sales and Marketing: Analyzing sales data, customer lists, and marketing campaign results to optimize strategies.
- Research: Comparing research data sets to identify patterns and validate findings.
1.3. Challenges in Manually Comparing Excel Files
Manually comparing Excel files can be cumbersome and prone to errors, especially with large datasets. Some common challenges include:
- Time-Consuming: It can take hours or even days to compare large files manually.
- Error-Prone: Human error is inevitable when manually checking thousands of cells.
- Difficulty Identifying Complex Differences: It can be challenging to detect subtle differences, such as formula changes or formatting inconsistencies.
- Lack of Scalability: Manual comparison is not feasible for organizations dealing with numerous large files.
- Documentation Issues: Manually tracking changes is difficult and does not provide a clear audit trail.
2. Essential Tools for Excel File Comparison
To overcome the challenges of manual comparison, several tools and techniques are available. These tools can automate the comparison process, identify differences accurately, and provide comprehensive reports.
2.1. Microsoft Spreadsheet Compare
Microsoft Spreadsheet Compare is a utility designed to compare Excel files and report on the differences it finds. It is part of the Office Professional Plus suite and is available in versions 2013, 2016, 2019, and Microsoft 365 Apps for enterprise.
2.1.1. How to Open Spreadsheet Compare
To open Spreadsheet Compare:
- Click the Start button.
- Type Spreadsheet Compare.
- Select Spreadsheet Compare from the search results.
2.1.2. Key Features of Spreadsheet Compare
- Side-by-Side Comparison: Displays two Excel files side-by-side, highlighting differences in cells, formulas, and formatting.
- Detailed Reporting: Provides a detailed report of all changes, including cell values, formulas, and formatting.
- Selective Comparison: Allows you to choose which aspects of the files to compare, such as formulas, macros, or cell formats.
- Password Protection Support: Can compare password-protected files by prompting you to enter the password.
2.1.3. Steps to Compare Files Using Spreadsheet Compare
- Open Spreadsheet Compare.
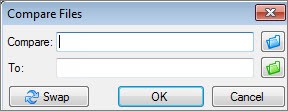
- Click Home > Compare Files.
- In the Compare Files dialog box, click the blue folder icon next to the Compare box to select the older version of the file.
- Click the green folder icon next to the To box to select the newer version of the file.
- Choose the options you want to compare, such as Formulas, Macros, or Cell Format.
- Click OK to run the comparison.
2.1.4. Understanding the Comparison Results
The comparison results are displayed in a two-pane grid, with the older version on the left and the newer version on the right. Differences are highlighted using colors:
- Green Fill: Indicates that an entered value has changed.
- Blue-Green Fill: Indicates that a calculated value has changed.
- Font Color: Indicates other types of differences, such as formatting changes.
2.2. Excel’s Inquire Add-In
The Inquire add-in for Excel 2013 and later versions provides tools for analyzing and comparing workbooks. It allows you to see relationships between cells, worksheets, and other workbooks, as well as clean excess formatting.
2.2.1. How to Enable the Inquire Add-In
If you do not see the Inquire tab in Excel:
- Click File > Options.
- Click Add-Ins.
- In the Manage box, select COM Add-ins and click Go.
- Check the Inquire box and click OK.
2.2.2. Key Features of the Inquire Add-In
- Workbook Analysis: Provides a detailed analysis of a workbook, including potential issues and inconsistencies.
- Cell Relationship Diagrams: Shows the relationships between cells, formulas, and worksheets.
- Compare Files Command: Allows you to run Spreadsheet Compare directly from Excel.
- Clean Excess Cell Formatting: Removes unnecessary formatting to reduce file size and improve performance.
2.2.3. Using the Compare Files Command in Excel
- Open the two Excel files you want to compare.
- Click the Inquire tab.
- Click Compare Files.
- Spreadsheet Compare will open with the selected files.
2.3. Third-Party Excel Comparison Tools
In addition to Microsoft’s tools, several third-party Excel comparison tools offer advanced features and capabilities.
2.3.1. Overview of Third-Party Tools
These tools often provide:
- More Advanced Comparison Algorithms: Better detection of complex differences.
- Enhanced Reporting: More detailed and customizable reports.
- Integration with Other Systems: Ability to integrate with version control systems and other business applications.
- Support for Larger Files: Improved performance with very large datasets.
2.3.2. Examples of Third-Party Tools
- Aspose.Cells: A powerful component that allows you to create, manipulate, and convert Excel files. It also provides advanced comparison features.
- DiffEngineX: Specializes in comparing Excel files and generating detailed reports on the differences.
- XL Comparator: Offers features for comparing Excel files and identifying differences in data, formulas, and formatting.
- Araxis Excel Compare: Integrates with Araxis Merge to compare Excel files and merge changes.
2.4. Online Excel Comparison Tools
Several online tools allow you to compare Excel files directly in your web browser. These tools are convenient for quick comparisons and do not require any software installation.
2.4.1. Advantages of Online Tools
- Accessibility: Can be used from any device with a web browser.
- No Installation Required: No need to install software.
- Quick Comparisons: Ideal for performing quick comparisons of small to medium-sized files.
2.4.2. Examples of Online Tools
- GroupDocs Comparison: Allows you to upload two Excel files and compare them online.
- DiffNow: Supports comparing Excel files along with other file types.
- ExamDiff Online: Offers a free online tool for comparing text-based files, including CSV files exported from Excel.
3. Step-by-Step Guide to Comparing Excel Files
This section provides a detailed, step-by-step guide on how to compare Excel files using various methods, ensuring you can effectively identify similarities and differences.
3.1. Using Microsoft Spreadsheet Compare
This is one of the most reliable methods for comparing Excel files, especially when you need to identify specific changes and ensure data integrity.
3.1.1. Preparation
- Install Microsoft Office Professional Plus: Ensure you have a version that includes Spreadsheet Compare (2013, 2016, 2019, or Microsoft 365 Apps for enterprise).
- Backup Your Files: Create backups of the Excel files you intend to compare to avoid accidental data loss.
3.1.2. Launching and Setting Up the Comparison
-
Open Spreadsheet Compare: Find and launch the application from your Start menu.
-
Select Compare Files: Click on the Home tab, then click Compare Files.
-
Choose Files:
- Click the blue folder icon next to the Compare box to select the older version of the file.
- Click the green folder icon next to the To box to select the newer version of the file.
)
-
Select Comparison Options: Choose which elements to compare, such as Formulas, Macros, or Cell Format.
3.1.3. Running the Comparison
- Start the Comparison: Click OK to initiate the comparison process.
- Password Prompt: If the files are password-protected, you’ll be prompted to enter the passwords.
- Review Results: The results are displayed in a side-by-side grid, highlighting differences with colors.
3.1.4. Analyzing the Results
-
Interpreting Color Codes:
- Green Fill: Indicates a changed entered value.
- Blue-Green Fill: Indicates a changed calculated value.
- Font Color: Indicates formatting or other differences.
-
Navigating the Grid: Use the horizontal scroll bar to navigate through multiple worksheets.
-
Detailed Analysis: Review the pane below the grids for a detailed list of changes.
3.1.5. Saving the Comparison Report
- Exporting the Report: Spreadsheet Compare does not directly offer a save report feature.
- Take Screenshots: Capture screenshots of the comparison results for documentation.
- Manual Documentation: Manually document the key findings in a separate report.
3.2. Utilizing Excel’s Inquire Add-In
The Inquire add-in is integrated into Excel and offers features for analyzing and comparing workbooks, making it a convenient option for users who prefer to stay within the Excel environment.
3.2.1. Enabling the Inquire Add-In
- Open Excel Options: Click File > Options.
- Go to Add-Ins: Select Add-Ins in the Excel Options dialog.
- Manage COM Add-Ins: In the Manage box, select COM Add-ins and click Go.
- Check Inquire: Check the Inquire box and click OK. The Inquire tab should now appear in your Excel ribbon.
3.2.2. Comparing Files with Inquire
- Open Both Files: Open the two Excel files you want to compare in Excel.
- Compare Files Command: Click the Inquire tab and select Compare Files. This will launch Microsoft Spreadsheet Compare with the selected files.
3.2.3. Analyzing and Documenting Results
- Follow Spreadsheet Compare Steps: Follow the steps in Section 3.1.3 and 3.1.4 to run the comparison and analyze the results.
- Document Findings: As with Spreadsheet Compare, document your findings manually since there is no direct report-saving feature.
3.3. Employing Third-Party Excel Comparison Tools
Third-party tools often offer more advanced features and better reporting capabilities than the built-in options.
3.3.1. Selecting a Tool
- Research Tools: Look for tools that suit your specific needs. Consider features such as advanced comparison algorithms, detailed reporting, integration capabilities, and support for large files.
- Read Reviews: Check user reviews and ratings to gauge the tool’s reliability and effectiveness.
- Trial Period: Opt for tools that offer a free trial period to test their features before making a purchase.
3.3.2. Installation and Setup
- Download and Install: Download the selected tool from the vendor’s website and follow the installation instructions.
- License Activation: Activate the software using the license key provided after purchase.
3.3.3. Comparing Files
- Open the Tool: Launch the third-party Excel comparison tool.
- Select Files: Choose the files you want to compare, following the tool’s specific instructions.
- Configure Options: Set any desired comparison options, such as ignoring case, formulas, or specific cell ranges.
- Run the Comparison: Start the comparison process.
3.3.4. Analyzing and Saving the Report
- Review Results: Examine the comparison results, which are typically presented in a detailed report format.
- Export Report: Save the report in a format that suits your needs, such as PDF, HTML, or Excel.
- Share Report: Share the report with stakeholders as needed.
3.4. Utilizing Online Excel Comparison Tools
Online tools are convenient for quick comparisons without the need for software installation.
3.4.1. Selecting an Online Tool
- Search for Online Tools: Use a search engine to find online Excel comparison tools.
- Check Features: Ensure the tool supports Excel files and offers the features you need.
- Privacy Considerations: Be mindful of the tool’s privacy policy, especially when dealing with sensitive data.
3.4.2. Performing the Comparison
- Access the Tool: Open the online Excel comparison tool in your web browser.
- Upload Files: Upload the two Excel files you want to compare.
- Start Comparison: Initiate the comparison process.
3.4.3. Reviewing and Documenting Results
- Examine Results: Review the comparison results displayed by the tool.
- Screenshot: Take screenshots of the results for documentation, as online tools may not offer a report-saving feature.
- Manual Notes: Add any manual notes or observations about the comparison.
4. Techniques for Identifying Similarities in Excel
While many tools focus on identifying differences, recognizing similarities between Excel files is equally important. Understanding what remains consistent can validate data integrity and streamline decision-making processes.
4.1. Highlighting Identical Data
One of the simplest ways to identify similarities is by highlighting identical data across both files. This can be done using conditional formatting in Excel.
4.1.1. Using Conditional Formatting
- Open Both Files: Open the two Excel files you want to compare.
- Select Data Range: Select the range of cells you want to compare in both files.
- Conditional Formatting:
- In the first file, go to Home > Conditional Formatting > New Rule.
- Select “Use a formula to determine which cells to format”.
- Enter a formula that compares the cell in the first file to the corresponding cell in the second file. For example, if you are comparing cell A1 in both files, the formula would be
=A1=Sheet2!A1(assuming the second file’s sheet name is “Sheet2”). - Click Format and choose a fill color to highlight the identical cells.
- Click OK to apply the formatting.
4.1.2. Copying Formatting
- Copy Format: Use the format painter to copy the conditional formatting to other relevant cells in the first file.
- Repeat in Second File: Repeat the process in the second file, ensuring the formula references the first file correctly (e.g.,
=A1=Sheet1!A1).
4.2. Formula-Based Comparison for Identical Values
You can use Excel formulas to identify identical values between two files. This method is particularly useful for large datasets where manual comparison is impractical.
4.2.1. Creating a Comparison Column
- Open Both Files: Open the two Excel files you want to compare.
- Insert Comparison Column: In the first file, insert a new column next to the data you want to compare.
- Enter Formula: In the first cell of the new column, enter a formula that compares the cell in the first file to the corresponding cell in the second file. For example,
=IF(A1=Sheet2!A1, "Match", "Mismatch"). - Drag Formula: Drag the formula down to apply it to all rows in the data range.
4.2.2. Filtering for Matches
- Filter Column: Select the comparison column and apply a filter (Data > Filter).
- Filter Matches: Filter the column to show only the rows where the formula result is “Match”. These rows contain identical data in both files.
4.3. Using Excel’s COUNTIF Function
The COUNTIF function can help you count the number of times a value from one file appears in another file. This is useful for verifying data consistency and identifying duplicate entries.
4.3.1. Counting Occurrences
- Open Both Files: Open the two Excel files you want to compare.
- Insert Count Column: In the first file, insert a new column next to the data you want to analyze.
- Enter COUNTIF Formula: In the first cell of the new column, enter a COUNTIF formula that counts the number of times the value in the current row appears in the second file. For example,
=COUNTIF(Sheet2!A:A, A1). This formula counts how many times the value in cell A1 of the first file appears in column A of the second file. - Drag Formula: Drag the formula down to apply it to all rows in the data range.
4.3.2. Interpreting Results
- Analyze Counts: Review the results in the count column. A value of 1 indicates that the value appears once in the second file, while a value greater than 1 indicates duplicate entries. A value of 0 indicates that the value does not appear in the second file.
- Filter Results: Use filters to focus on specific counts, such as values that appear more than once or values that do not appear at all.
4.4. Leveraging Pivot Tables for Summarizing Similarities
Pivot tables are powerful tools for summarizing and analyzing data, and they can be used to identify similarities between Excel files by aggregating common values.
4.4.1. Creating a Pivot Table
- Consolidate Data: Copy the relevant data from both Excel files into a single sheet. Add a column to indicate which file each row came from (e.g., “File1” or “File2”).
- Select Data Range: Select the entire data range, including the column indicating the file source.
- Insert Pivot Table: Go to Insert > PivotTable.
- Choose Location: Choose where to place the pivot table (e.g., a new worksheet).
4.4.2. Configuring the Pivot Table
- Add Fields: In the PivotTable Fields pane, drag the fields you want to analyze to the appropriate areas:
- Drag the column you want to compare (e.g., “Product Name”) to the Rows area.
- Drag the file source column (e.g., “File Source”) to the Columns area.
- Drag any numerical column (e.g., “Sales”) to the Values area.
- Analyze Results: The pivot table will summarize the data, showing the values from each file side by side. This makes it easy to identify common values and differences.
4.5. Using VLOOKUP to Find Matching Records
The VLOOKUP function is useful for finding matching records between two Excel files. It allows you to search for a specific value in one file and retrieve corresponding data from another file.
4.5.1. Setting Up VLOOKUP
- Open Both Files: Open the two Excel files you want to compare.
- Identify Lookup Value: Determine the column that contains the unique identifier you want to use for matching records (e.g., “Product ID”).
- Insert VLOOKUP Column: In the first file, insert a new column next to the data you want to analyze.
- Enter VLOOKUP Formula: In the first cell of the new column, enter a VLOOKUP formula that searches for the value in the current row in the second file. For example,
=VLOOKUP(A1, Sheet2!A:B, 2, FALSE). This formula searches for the value in cell A1 of the first file in column A of the second file, and if a match is found, it retrieves the value from column B of the second file. - Drag Formula: Drag the formula down to apply it to all rows in the data range.
4.5.2. Interpreting Results
- Analyze Results: Review the results in the VLOOKUP column. If a match is found, the formula will return the corresponding value from the second file. If no match is found, the formula will return an error value (#N/A).
- Handle Errors: Use the IFERROR function to handle error values and display a more user-friendly message. For example,
=IFERROR(VLOOKUP(A1, Sheet2!A:B, 2, FALSE), "No Match").
5. Advanced Techniques for Excel File Comparison
For more complex scenarios, advanced techniques can provide deeper insights into the similarities and differences between Excel files.
5.1. Comparing VBA Code
If your Excel files contain VBA (Visual Basic for Applications) code, comparing the code is essential to ensure consistency and identify any modifications.
5.1.1. Accessing VBA Code
- Open Both Files: Open the two Excel files you want to compare.
- Open VBA Editor: Press
Alt + F11to open the VBA editor. - Export Modules:
- In each file, go to File > Export File.
- Save each module as a
.basfile.
5.1.2. Using Text Comparison Tools
- Open Text Comparison Tool: Use a text comparison tool like Notepad++, Visual Studio Code, or Araxis Merge.
- Compare Files: Open the exported
.basfiles in the text comparison tool. - Analyze Differences: Review the highlighted differences in the code.
5.2. Comparing Hidden Sheets and Columns
Hidden sheets and columns can sometimes contain important data or formulas that need to be compared.
5.2.1. Unhiding Sheets and Columns
- Unhide Sheets:
- Right-click on any sheet tab.
- Select Unhide.
- Choose the sheet you want to unhide and click OK.
- Unhide Columns:
- Select the columns on either side of the hidden column.
- Right-click and select Unhide.
5.2.2. Comparing Data
- Use Comparison Tools: Use the techniques described in previous sections to compare the data in the unhidden sheets and columns.
5.3. Using Array Formulas for Complex Comparisons
Array formulas can perform complex calculations and comparisons across multiple cells, making them useful for identifying similarities in more intricate scenarios.
5.3.1. Creating an Array Formula
- Select Output Range: Select the range of cells where you want the results of the array formula to appear.
- Enter Formula: Enter the array formula. For example, to compare two ranges of cells and return “Match” if all corresponding cells are equal, you can use the formula
=IF(SUM(IF(A1:A10=Sheet2!A1:A10, 1, 0))=COUNT(A1:A10), "Match", "Mismatch"). - Enter as Array Formula: Press
Ctrl + Shift + Enterto enter the formula as an array formula. Excel will automatically add curly braces{}around the formula.
5.3.2. Interpreting Results
- Analyze Results: Review the results in the output range. The formula will return “Match” if all corresponding cells are equal, and “Mismatch” otherwise.
5.4. Automating Comparisons with Excel Macros
For repetitive comparison tasks, you can automate the process using Excel macros (VBA code).
5.4.1. Recording a Macro
- Open VBA Editor: Press
Alt + F11to open the VBA editor. - Insert Module: Go to Insert > Module.
- Start Recording: Go to Developer > Record Macro.
- Perform Steps: Perform the steps you want to automate, such as comparing specific columns or applying conditional formatting.
- Stop Recording: Go to Developer > Stop Recording.
5.4.2. Modifying the Macro
- Edit Code: Review the recorded macro code in the VBA editor.
- Customize: Modify the code as needed to handle different scenarios or improve performance.
5.4.3. Running the Macro
- Run Macro: Go to Developer > Macros.
- Select Macro: Select the macro you want to run and click Run.
6. Best Practices for Excel File Comparison
To ensure accurate and efficient Excel file comparisons, follow these best practices.
6.1. Data Preparation
Before comparing Excel files, ensure that the data is properly prepared.
6.1.1. Cleaning Data
- Remove Errors: Correct any data entry errors or inconsistencies.
- Standardize Formats: Ensure that data is formatted consistently across both files (e.g., dates, numbers, text).
- Remove Extraneous Data: Remove any unnecessary columns or rows that are not relevant to the comparison.
6.1.2. Sorting Data
- Sort Data: Sort the data in both files according to a common column (e.g., “Product ID” or “Date”) to ensure that corresponding rows are aligned.
6.2. Choosing the Right Tool
Select the right tool for the job based on your specific needs and the complexity of the comparison.
6.2.1. Consider File Size
- Large Files: For very large files, consider using third-party tools that are designed to handle large datasets efficiently.
6.2.2. Assess Complexity
- Complex Comparisons: For complex comparisons involving formulas, VBA code, or hidden sheets, consider using advanced tools or techniques.
6.3. Documenting the Comparison Process
Document the comparison process to provide an audit trail and ensure that the results are reproducible.
6.3.1. Record Steps
- Document Steps: Record the steps you took to compare the files, including the tools used, the options selected, and any data preparation steps.
6.3.2. Save Reports
- Save Reports: Save any reports generated by the comparison tools. If the tool does not offer a report-saving feature, take screenshots of the results.
6.4. Verifying Results
Verify the comparison results to ensure that they are accurate and reliable.
6.4.1. Spot Checks
- Perform Spot Checks: Perform spot checks of the comparison results to verify that the identified similarities and differences are correct.
6.4.2. Use Multiple Methods
- Use Multiple Methods: Use multiple comparison methods to cross-validate the results. For example, use both conditional formatting and formulas to identify identical values.
7. Real-World Examples of Excel File Comparison
To illustrate the practical applications of Excel file comparison, consider these real-world examples.
7.1. Financial Auditing
In financial auditing, Excel file comparison is used to compare financial statements from different periods, identify discrepancies, and ensure compliance with accounting standards.
7.1.1. Scenario
- Comparing Balance Sheets: Compare the balance sheets from the current year and the previous year to identify changes in assets, liabilities, and equity.
7.1.2. Tools Used
- Spreadsheet Compare: Use Microsoft Spreadsheet Compare to identify differences in cell values and formulas.
- Conditional Formatting: Use conditional formatting to highlight significant changes.
7.2. Sales Data Analysis
In sales data analysis, Excel file comparison is used to compare sales reports from different regions, identify top-performing products, and track sales trends.
7.2.1. Scenario
- Comparing Sales Reports: Compare the sales reports from different regions to identify the regions with the highest sales growth.
7.2.2. Tools Used
- Pivot Tables: Use pivot tables to summarize the sales data and identify the top-performing regions.
- VLOOKUP: Use VLOOKUP to compare customer lists and identify new customers.
7.3. Project Management
In project management, Excel file comparison is used to compare project plans, track task assignments, and monitor project progress.
7.3.1. Scenario
- Comparing Project Plans: Compare the initial project plan with the updated project plan to identify changes in task timelines and resource allocations.
7.3.2. Tools Used
- Spreadsheet Compare: Use Microsoft Spreadsheet Compare to identify changes in task durations and dependencies.
- Conditional Formatting: Use conditional formatting to highlight tasks that are behind schedule.
8. Troubleshooting Common Issues
When comparing Excel files, you may encounter some common issues. Here are some tips for troubleshooting them.
8.1. “Unable to Open Workbook” Error
If you encounter an “Unable to open workbook” error, it may be due to password protection.
8.1.1. Solution
- Enter Password: Enter the password when prompted by the comparison tool.
- Remove Password: If you have permission, remove the password from the file before comparing it.
8.2. Incorrect Comparison Results
If the comparison results are incorrect, it may be due to data inconsistencies or incorrect settings.
8.2.1. Solution
- Clean Data: Clean the data to remove any inconsistencies or errors.
- Verify Settings: Verify that the comparison settings are correct and that you are comparing the appropriate elements (e.g., formulas, values, formatting).
8.3. Performance Issues
If the comparison tool is running slowly, it may be due to large file sizes or limited system resources.
8.3.1. Solution
- Close Unnecessary Programs: Close any unnecessary programs to free up system resources.
- Use Efficient Tools: Use comparison tools that are designed to handle large files efficiently.
9. The Role of COMPARE.EDU.VN in Simplifying Excel Comparisons
COMPARE.EDU.VN is dedicated to providing comprehensive resources and guides to help users effectively compare Excel files and make informed decisions. We understand the challenges and complexities involved in data analysis and strive to simplify the process with our user-friendly tools and expert advice.
9.1. How COMPARE.EDU.VN Can Help
- Detailed Guides: COMPARE.EDU.VN offers detailed guides on various Excel comparison techniques, providing step-by-step instructions and best practices.
- Tool Recommendations: We provide recommendations for the best Excel comparison tools, both free and paid, based on your specific needs and requirements.
- Troubleshooting Tips: Our website offers troubleshooting tips and solutions to common issues encountered during Excel file comparison.
- Community Support: Join our community forums to ask questions, share tips, and get support from other Excel users.
9.2. Explore More Resources
Visit COMPARE.EDU.VN to explore more resources and guides on Excel file comparison. Discover the tools and techniques that will help you streamline your data analysis process and make informed decisions.
10. Frequently Asked Questions (FAQ) About Comparing Excel Files
1. What is the best way to compare two Excel files for differences?
The best way to compare two Excel files is by using dedicated tools like Microsoft Spreadsheet Compare or third-party software that highlights differences in data, formulas, and formatting.
2. Can I compare Excel files online without installing any software?
Yes, there are several online Excel comparison tools available. You can upload your files to these websites and compare them directly in your web browser.
3. How can I compare two versions of the same Excel file?
Use Microsoft Spreadsheet Compare, which is designed to compare different versions of the same file and highlight any changes.
4. Is it possible to compare password-protected Excel files?
Yes, Microsoft Spreadsheet Compare can compare password-protected Excel files. You will be prompted to enter the password when you start the comparison.
5. What should I do if the comparison tool is running slowly?
Close unnecessary programs, ensure your computer meets the minimum system requirements, and try using a tool specifically designed to handle large files.
6. How can I highlight identical data in two Excel files?
Use conditional formatting in Excel to highlight identical data. Create a new rule using a formula to compare cells and apply a fill color to matching cells.
7. Can I compare VBA code in two Excel files?
Yes, export the VBA modules as .bas files and use a text comparison tool like Notepad++ or Visual Studio Code to compare the code.
8. What is the Inquire add-in in Excel, and how can it help with file comparison?
The Inquire add-in provides tools for analyzing and comparing workbooks. It allows you to see relationships between cells, worksheets, and other workbooks, and you can use its “Compare Files” command to launch Microsoft Spreadsheet Compare.
9. How do I compare hidden sheets and columns in Excel files?
Unhide the sheets and columns by right-clicking on any sheet tab or column header and selecting “Unhide.” Then, use your preferred comparison method to analyze the data.
10. What are the best practices for ensuring accurate Excel file comparisons?
Clean and standardize your data, choose the right tool for the job, document the comparison process, and verify the results by performing spot checks and using multiple comparison methods.
By following these comprehensive guidelines and utilizing the resources available at compare.edu.vn, you can