Do you need to compare two Excel files to identify differences and track changes efficiently? At COMPARE.EDU.VN, we understand the importance of accurate data comparison, especially when dealing with complex spreadsheets. Discover a solution for highlighting discrepancies and inconsistencies in your Excel files, and gain insights into effective spreadsheet comparison techniques. You’ll find resources and tools to streamline your workflow, improve data accuracy, and make informed decisions based on reliable comparisons.
1. Why Compare Excel Files?
Comparing Excel files is essential in various scenarios. Understanding the reasons behind the need for comparison can help you appreciate the value of effective methods.
1.1 Identifying Changes and Updates
Tracking changes and updates in Excel files is crucial for maintaining accurate records. When multiple people work on the same spreadsheet or when versions evolve over time, it’s vital to know what has been modified.
- Collaborative Projects: In team environments, different team members may make changes to a shared Excel file. Comparing versions helps identify who made which changes and when.
- Version Control: When updating a file, comparing the new version with the old one ensures all intended modifications were correctly implemented and no unintended changes were introduced.
- Auditing: For financial or compliance reasons, tracking changes in spreadsheets is necessary to maintain transparency and accountability.
1.2 Ensuring Data Accuracy
Data accuracy is paramount in any data-driven decision-making process. Comparing Excel files helps ensure the integrity of the data.
- Detecting Errors: Discrepancies between files can highlight data entry errors, formula mistakes, or other inaccuracies that could lead to incorrect conclusions.
- Validating Data: When merging data from multiple sources, comparing the resulting file with the original sources validates that the data was transferred correctly and without corruption.
- Quality Control: Regular comparisons can serve as a quality control measure, ensuring that data remains consistent and reliable over time.
1.3 Streamlining Workflow
Comparing Excel files can significantly streamline your workflow, saving time and reducing the risk of errors.
- Efficient Review Process: Instead of manually reviewing each cell, comparison tools quickly highlight differences, allowing you to focus on the specific areas that need attention.
- Faster Decision-Making: By quickly identifying changes and validating data, you can make informed decisions based on accurate and up-to-date information.
- Improved Collaboration: Clear identification of changes facilitates better communication and collaboration among team members, reducing confusion and potential conflicts.
2. Methods to Compare Two Excel Files
Several methods are available to compare Excel files, ranging from manual techniques to automated tools.
2.1 Manual Comparison
Manual comparison involves opening two Excel files side by side and visually inspecting each cell to identify differences.
- Pros:
- No Additional Software Required: This method doesn’t require any additional tools or software, making it accessible to anyone with Excel.
- Good for Small Datasets: For small datasets with a limited number of rows and columns, manual comparison can be relatively quick and straightforward.
- Cons:
- Time-Consuming: Manual comparison can be extremely time-consuming, especially for large datasets with numerous rows and columns.
- Prone to Errors: The risk of overlooking differences is high, especially when dealing with complex spreadsheets or subtle changes.
- Not Scalable: This method is not suitable for comparing multiple files or versions, as it becomes increasingly impractical.
2.2 Using Excel’s Built-in Features
Excel offers several built-in features that can assist in comparing files, providing a more structured approach than manual comparison.
2.2.1 Conditional Formatting
Conditional formatting allows you to highlight cells that meet specific criteria, making it easier to spot differences between files.
- How to Use:
- Open both Excel files.
- Select the data range in the first file.
- Go to Home > Conditional Formatting > New Rule.
- Choose Use a formula to determine which cells to format.
- Enter a formula that compares the cell in the first file with the corresponding cell in the second file. For example,
=A1<>'[Book2]Sheet1'!A1compares cell A1 in the first file with cell A1 in the second file. - Set the desired formatting (e.g., fill color) and click OK.
- Repeat for other relevant columns or rows.
- Pros:
- Highlights Differences Directly in Excel: This method highlights differences within the Excel interface, making them visually apparent.
- Customizable Formatting: You can customize the formatting to match your preferences or specific requirements.
- Cons:
- Time-Consuming Setup: Setting up conditional formatting for large datasets can be time-consuming, especially if you need to compare multiple columns or rows.
- Limited Functionality: Conditional formatting is best suited for simple comparisons and may not be effective for complex scenarios involving formulas or formatting changes.
2.2.2 Side-by-Side View
Excel’s side-by-side view allows you to view two Excel files simultaneously, making it easier to compare data visually.
- How to Use:
- Open both Excel files.
- Go to the View tab.
- Click View Side by Side in the Window group.
- Arrange the windows to compare the files visually.
- Pros:
- Easy Visual Comparison: This method allows for easy visual comparison of two files, making it easier to spot differences.
- Synchronized Scrolling: Excel can synchronize the scrolling of both files, ensuring you’re comparing corresponding rows and columns.
- Cons:
- Manual Inspection Required: While side-by-side view facilitates comparison, it still requires manual inspection of each cell.
- Not Suitable for Large Datasets: This method may not be practical for comparing large datasets, as it can be difficult to keep track of all the differences.
2.3 Using Microsoft Spreadsheet Compare
Microsoft Spreadsheet Compare is a tool designed specifically for comparing Excel files and identifying differences. It is part of the Office Professional Plus suite.
- How to Use:
- Open Spreadsheet Compare.
- Click Compare Files.
- Select the older version of the workbook in the Compare box and the newer version in the To box.
- Choose the comparison options (e.g., Formulas, Macros, Cell Format).
- Click OK to run the comparison.
- Pros:
- Detailed Comparison Reports: Spreadsheet Compare generates detailed reports highlighting differences in formulas, values, formatting, and other elements.
- Side-by-Side Grid View: The results are displayed in a side-by-side grid, making it easy to compare the two files.
- Color-Coded Highlighting: Differences are highlighted with color codes, indicating the type of change.
- Cons:
- Requires Office Professional Plus: Spreadsheet Compare is only available with specific versions of Office, which may not be accessible to all users.
- Limited Availability: This tool is not as widely known or used as other methods, limiting its accessibility.
2.4 Using Third-Party Comparison Tools
Numerous third-party tools are available for comparing Excel files, offering advanced features and capabilities.
- Examples:
- Beyond Compare: A powerful comparison tool that supports various file formats, including Excel. It offers advanced features such as three-way merge and folder comparison.
- Diffchecker: An online tool that allows you to compare text, images, and files, including Excel spreadsheets.
- Araxis Merge: A professional-grade comparison tool that supports various file formats and offers advanced features such as automatic merging and version control integration.
- Pros:
- Advanced Features: Third-party tools often offer advanced features such as automatic merging, three-way comparison, and version control integration.
- Support for Multiple File Formats: Many tools support a wide range of file formats, making them versatile for different comparison tasks.
- User-Friendly Interface: These tools often have user-friendly interfaces that make it easy to compare files and identify differences.
- Cons:
- Cost: Third-party tools typically require a purchase or subscription, which may be a barrier for some users.
- Learning Curve: Some tools may have a learning curve, especially if they offer advanced features and capabilities.
3. Step-by-Step Guide: How to Compare Two Excel Files and Highlight the Difference
This section provides a detailed, step-by-step guide on How To Compare Two Excel Files And Highlight The Differences using different methods.
3.1 Using Conditional Formatting
Conditional formatting is a straightforward method for highlighting differences directly within Excel.
- Open Both Excel Files:
- Start by opening both Excel files you want to compare. Ensure that the files are arranged in a way that you can easily switch between them.
- Select the Data Range in the First File:
- Click and drag to select the range of cells you want to compare in the first Excel file. Be sure to select the same range in both files for accurate comparison.
- Go to Conditional Formatting:
- In the Excel ribbon, click on the Home tab.
- In the Styles group, click on Conditional Formatting.
- A dropdown menu will appear; select New Rule.
- Create a New Rule:
- In the New Formatting Rule dialog box, select Use a formula to determine which cells to format.
- This option allows you to define a custom formula that Excel will use to identify the differences.
- Enter the Formula:
- In the formula box, enter a formula that compares the selected cells in the first file with the corresponding cells in the second file. For example:
=A1<>'[Book2]Sheet1'!A1- This formula compares the value in cell A1 of the first file with the value in cell A1 of the second file (Book2, Sheet1). Adjust the cell references and file names as needed.
- In the formula box, enter a formula that compares the selected cells in the first file with the corresponding cells in the second file. For example:
- Set the Formatting:
- Click on the Format button to set the formatting for the cells that meet the criteria (i.e., the cells that are different).
- In the Format Cells dialog box, you can choose various formatting options such as:
- Fill: Change the background color of the cell.
- Font: Change the font color, style, or size.
- Border: Add a border to the cell.
- Select your desired formatting and click OK.
- Apply the Rule:
- Click OK in the New Formatting Rule dialog box to apply the rule to the selected range of cells.
- Review the Results:
- Excel will now highlight the cells in the first file that are different from the corresponding cells in the second file, using the formatting you specified.
- Repeat for Other Columns or Rows (If Necessary):
- If you have other columns or rows to compare, repeat the above steps for each range. You may need to adjust the formula accordingly to match the correct cell references.
3.2 Using Microsoft Spreadsheet Compare
Microsoft Spreadsheet Compare is a dedicated tool for comparing Excel files and highlighting differences.
- Open Microsoft Spreadsheet Compare:
- Locate and open the Spreadsheet Compare application on your computer. This tool is part of the Office Professional Plus suite.
- Select Compare Files:
- In the Spreadsheet Compare window, click on the Compare Files button. This will open the Compare Files dialog box.
- Choose the Files to Compare:
- In the Compare Files dialog box, you will see two boxes labeled Compare and To.
- Click the blue folder icon next to the Compare box to browse to the location of the earlier version of your workbook. Select the file and click Open.
- Click the green folder icon next to the To box to browse to the location of the workbook that you want to compare to the earlier version. Select the file and click Open.
- Set Comparison Options:
- In the left pane, choose the options you want to see in the results of the workbook comparison by checking or unchecking the options, such as Formulas, Macros, or Cell Format. You can also select Select All to compare all aspects of the files.
- Run the Comparison:
- Click OK to run the comparison. Spreadsheet Compare will analyze the two files and generate a comparison report.
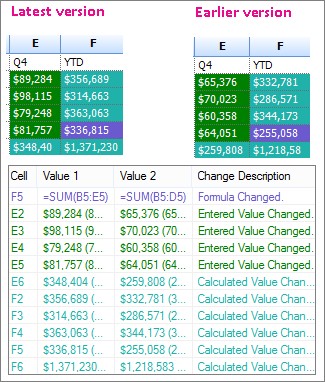
- Review the Results:
- The results of the comparison appear in a two-pane grid. The workbook on the left corresponds to the “Compare” (typically older) file, and the workbook on the right corresponds to the “To” (typically newer) file.
- Differences are highlighted by color, depending on the kind of change. For example, cells with “entered values” (non-formula cells) are formatted with a green fill color.
- Details about the changes are shown in a pane below the two grids, providing a detailed analysis of each difference.
- Understand the Color-Coding:
- The lower-left pane is a legend that shows what the colors mean. Use this legend to understand the types of changes that have been made.
3.3 Using Third-Party Comparison Tools (Example: Beyond Compare)
Third-party tools like Beyond Compare offer advanced features for comparing Excel files and highlighting differences.
- Install and Open Beyond Compare:
- Download and install Beyond Compare from the official website.
- Open the Beyond Compare application.
- Select Table Compare:
- In the main window, choose Table Compare from the available comparison types. This option is specifically designed for comparing tabular data like Excel spreadsheets.
- Load the Excel Files:
- Click on the left pane and browse to the location of the first Excel file. Select the file and click Open.
- Click on the right pane and browse to the location of the second Excel file. Select the file and click Open.
- Configure Comparison Settings (If Necessary):
- Beyond Compare allows you to configure various comparison settings, such as:
- Key Columns: Specify which columns should be used as keys for comparing rows.
- Ignore Columns: Specify columns that should be ignored during the comparison.
- Alignment Options: Configure how Beyond Compare aligns rows and columns.
- Adjust these settings as needed to ensure accurate comparison.
- Beyond Compare allows you to configure various comparison settings, such as:
- Run the Comparison:
- Click on the Compare button to run the comparison. Beyond Compare will analyze the two files and display the differences in a side-by-side view.
- Review the Results:
- The results are displayed in a two-pane grid, with the first file on the left and the second file on the right.
- Differences are highlighted with color codes, indicating the type of change (e.g., different values, missing rows, extra columns).
- You can navigate through the differences using the arrow keys or the navigation pane.
- Merge Changes (If Desired):
- Beyond Compare allows you to merge changes between the two files. You can copy changes from one file to the other, or merge changes in both directions.
- Select the changes you want to merge and click on the appropriate button to apply the changes.
- Save the Merged File (If Necessary):
- If you have merged changes, you can save the merged file to a new location.
- Click on File > Save As and specify the location and name of the merged file.
4. Tips for Effective Excel File Comparison
To ensure accurate and efficient comparisons, consider the following tips:
4.1 Clean Data Before Comparison
Cleaning data before comparison helps eliminate irrelevant differences and improves the accuracy of the results.
- Remove Unnecessary Formatting: Remove any unnecessary formatting (e.g., font styles, colors, borders) that could obscure the actual differences in data.
- Standardize Data: Standardize data formats (e.g., date formats, number formats) to ensure consistent comparison.
- Trim Whitespace: Remove leading and trailing whitespace from cells to avoid false differences.
- Remove Empty Rows and Columns: Delete any empty rows or columns that are not relevant to the comparison.
4.2 Use Consistent Naming Conventions
Consistent naming conventions make it easier to identify and compare files.
- Use Descriptive Names: Use descriptive names that clearly indicate the content and purpose of each file.
- Include Version Numbers: Include version numbers in the file names to track changes over time.
- Use a Standard Format: Use a standard format for file names to ensure consistency across all files.
4.3 Focus on Relevant Data
Focusing on relevant data reduces the amount of information you need to review, saving time and improving efficiency.
- Identify Key Columns: Identify the key columns that are most important for the comparison.
- Ignore Irrelevant Columns: Ignore any columns that are not relevant to the comparison.
- Filter Data: Filter the data to focus on specific subsets of information.
4.4 Validate Comparison Results
Validating comparison results helps ensure accuracy and completeness.
- Double-Check Differences: Double-check any differences identified by the comparison tool to ensure they are accurate.
- Verify Formulas: Verify formulas to ensure they are correct and consistent across files.
- Review Data Types: Review data types to ensure they are consistent and appropriate for the data being compared.
5. Common Issues and Troubleshooting
When comparing Excel files, you may encounter some common issues. Here are some troubleshooting tips:
5.1 Unable to Open Workbook
If you get an “Unable to open workbook” message, it might mean one of the workbooks is password protected.
- Solution: Click OK and then enter the workbook’s password.
5.2 Differences Not Highlighted
If differences are not being highlighted as expected, check the comparison settings and data formats.
- Solution: Ensure that the comparison settings are configured correctly and that the data formats are consistent across files.
5.3 Incorrect Comparison Results
If you suspect that the comparison results are incorrect, validate the results and review the comparison settings.
- Solution: Double-check the differences identified by the comparison tool and review the comparison settings to ensure they are appropriate.
6. Real-World Applications of Excel File Comparison
Excel file comparison is valuable in a variety of real-world applications across different industries.
6.1 Financial Analysis
In financial analysis, comparing Excel files is essential for tracking budgets, analyzing financial statements, and identifying discrepancies.
- Budget Tracking: Comparing actual expenses with budgeted amounts helps identify overspending or underspending.
- Financial Statement Analysis: Comparing financial statements over time helps identify trends and anomalies.
- Audit Trails: Comparing different versions of financial reports provides an audit trail for tracking changes.
6.2 Project Management
In project management, comparing Excel files helps track project progress, manage resources, and identify potential issues.
- Progress Tracking: Comparing project plans with actual progress helps identify delays or deviations.
- Resource Management: Comparing resource allocation plans with actual usage helps identify over- or under-utilization of resources.
- Issue Tracking: Comparing issue logs helps track the status of issues and identify potential roadblocks.
6.3 Sales and Marketing
In sales and marketing, comparing Excel files helps analyze sales data, track marketing campaigns, and identify trends.
- Sales Analysis: Comparing sales data over time helps identify trends and patterns.
- Marketing Campaign Tracking: Comparing marketing campaign results helps measure the effectiveness of different campaigns.
- Customer Segmentation: Comparing customer data helps segment customers based on their behavior and preferences.
6.4 Scientific Research
In scientific research, comparing Excel files helps analyze experimental data, validate results, and identify errors.
- Data Analysis: Comparing experimental data helps identify trends and patterns.
- Results Validation: Comparing results from different experiments helps validate the findings.
- Error Detection: Comparing data helps identify errors or inconsistencies in the data.
7. Best Practices for Managing Excel Files
To ensure effective file comparison and overall data management, consider the following best practices:
7.1 Regularly Back Up Your Files
Regularly backing up your files protects against data loss due to hardware failure, software corruption, or human error.
- Use Cloud Storage: Use cloud storage services such as Google Drive, Dropbox, or OneDrive to automatically back up your files.
- Create Local Backups: Create local backups on external hard drives or network drives.
- Schedule Regular Backups: Schedule regular backups to ensure that your files are always up to date.
7.2 Document Changes and Updates
Documenting changes and updates helps track the evolution of your files and provides context for future comparisons.
- Maintain a Change Log: Maintain a change log that records all changes made to the file, including the date, author, and description of the change.
- Use Comments: Use comments to explain the purpose and rationale behind specific changes.
- Include Version Numbers: Include version numbers in the file names to track changes over time.
7.3 Control Access to Sensitive Data
Controlling access to sensitive data helps protect against unauthorized access and modification.
- Use Passwords: Use passwords to protect sensitive files from unauthorized access.
- Set Permissions: Set permissions to control who can access and modify the files.
- Encrypt Data: Encrypt sensitive data to protect it from unauthorized access.
8. The Role of COMPARE.EDU.VN in Excel File Comparison
COMPARE.EDU.VN is dedicated to providing you with the resources and tools you need to make informed decisions when comparing Excel files. We offer:
- Comprehensive Comparison Guides: Detailed guides that walk you through the process of comparing Excel files using different methods.
- Expert Reviews: Reviews of third-party comparison tools, helping you choose the right tool for your needs.
- Community Support: A community forum where you can ask questions, share tips, and connect with other Excel users.
9. Frequently Asked Questions (FAQ)
Q1: What is the best way to compare two Excel files?
The best way to compare two Excel files depends on the size and complexity of the files, as well as your specific needs. For small datasets, manual comparison or Excel’s built-in features may be sufficient. For larger datasets or more complex comparisons, dedicated tools like Microsoft Spreadsheet Compare or third-party comparison software are recommended.
Q2: How do I highlight differences in Excel using conditional formatting?
To highlight differences using conditional formatting, select the data range, go to Home > Conditional Formatting > New Rule, use a formula to compare cells, and set the desired formatting.
Q3: Is Microsoft Spreadsheet Compare free?
Microsoft Spreadsheet Compare is not free; it is part of the Office Professional Plus suite, which requires a purchase or subscription.
Q4: Can I compare multiple Excel files at once?
Some third-party comparison tools, like Beyond Compare, support comparing multiple files at once, providing a comprehensive view of the differences.
Q5: How do I compare Excel files with different sheet names?
When using formulas in conditional formatting, ensure you reference the correct sheet names in your comparison formulas. For dedicated comparison tools, you may need to specify the sheets you want to compare.
Q6: What should I do if I can’t open one of the Excel files?
If you can’t open an Excel file, it may be password protected or corrupted. Ensure you have the correct password, and try opening the file in a different version of Excel or using a file repair tool.
Q7: How can I ensure data accuracy when comparing Excel files?
To ensure data accuracy, clean and standardize the data before comparison, focus on relevant data, and validate the comparison results.
Q8: Can I compare Excel files online?
Yes, several online tools, such as Diffchecker, allow you to compare Excel files without installing any software.
Q9: What are the benefits of using third-party comparison tools?
Third-party comparison tools often offer advanced features such as automatic merging, three-way comparison, and version control integration, making them more versatile and efficient than manual methods or Excel’s built-in features.
Q10: How do I handle formula differences when comparing Excel files?
When using Microsoft Spreadsheet Compare, you can select the “Formulas” option to specifically highlight differences in formulas between the two files. For other methods, carefully review any highlighted differences in calculated cells to identify formula discrepancies.
10. Conclusion
Comparing two Excel files to highlight differences is crucial for data accuracy, version control, and efficient workflow. Whether you choose manual comparison, Excel’s built-in features, Microsoft Spreadsheet Compare, or third-party tools, understanding the methods and following best practices will ensure accurate and efficient results.
Remember, at COMPARE.EDU.VN, we are committed to providing you with the resources and tools you need to make informed decisions. Visit our website at COMPARE.EDU.VN to explore more comparison guides, expert reviews, and community support.
Ready to make your data comparison process seamless and accurate? Visit compare.edu.vn today to discover the best comparison tools and resources tailored to your needs. Don’t let discrepancies slow you down – empower yourself with the knowledge to make informed decisions now! For further assistance, contact us at 333 Comparison Plaza, Choice City, CA 90210, United States or reach out via Whatsapp at +1 (626) 555-9090.