Comparing two documents in Excel is crucial for identifying differences, ensuring accuracy, and maintaining data integrity. compare.edu.vn provides expert insights and tools to simplify this process. This comprehensive guide will walk you through various methods to compare files in Excel, highlighting their advantages and disadvantages, and help you choose the best approach for your specific needs. Learn techniques for comparing worksheets, highlighting differences, and using Excel’s built-in features for efficient document comparison and difference analysis.
1. Understanding the Need to Compare Excel Documents
Comparing two Excel documents might seem like a simple task, but it often involves intricate details and potential pitfalls. Whether you are auditing financial statements, merging data from multiple sources, or tracking changes in project plans, the ability to effectively compare Excel files is essential. This section explores the various reasons why you might need to compare documents in Excel.
1.1. Auditing and Compliance
Auditing is a critical task that requires meticulous comparison of data to ensure accuracy and compliance. In finance, auditing involves comparing financial statements, transaction records, and budget reports to identify discrepancies and ensure regulatory compliance. Excel is often used to manage and analyze this data, making the ability to compare two Excel documents invaluable.
For instance, consider a scenario where a company needs to audit its expenses for the fiscal year. By comparing the expense reports from different departments, auditors can identify inconsistencies, duplicate entries, or unauthorized expenditures. This process ensures that the company adheres to its internal policies and complies with external regulations.
1.2. Data Validation
Data validation is the process of ensuring that the data entered into a system or database is accurate and consistent. Comparing two Excel documents can help identify errors, inconsistencies, and missing information. This is particularly important when dealing with large datasets or when merging data from multiple sources.
For example, a healthcare organization might need to validate patient data collected from different clinics. By comparing the data from each clinic, they can identify discrepancies in patient demographics, medical history, or treatment plans. This ensures that the patient records are accurate and up-to-date, which is crucial for providing quality healthcare services.
1.3. Version Control and Change Tracking
Version control is the process of managing changes to documents or files over time. In many industries, it is essential to track changes made to Excel documents to maintain a history of modifications and ensure accountability. Comparing two Excel documents allows you to identify the differences between versions, track changes made by different users, and revert to previous versions if necessary.
For example, a construction company might use Excel to manage project plans, budgets, and resource allocations. As the project progresses, different team members might make changes to these documents. By comparing the different versions of the Excel files, the project manager can track the changes made by each team member, identify potential conflicts, and ensure that the project stays on track.
1.4. Data Migration and Integration
Data migration and integration involve transferring data from one system or database to another. This process often requires comparing two Excel documents to ensure that the data is accurately transferred and that no information is lost or corrupted.
Consider a retail company that is migrating its sales data from an old system to a new one. By comparing the sales data in the old and new systems, the IT team can verify that all the data has been accurately transferred and that there are no discrepancies. This ensures that the company can continue to operate smoothly and that its sales reports are reliable.
1.5. Merging Data from Multiple Sources
In many organizations, data is collected from multiple sources and stored in different Excel documents. To create a comprehensive view of the data, it is often necessary to merge these documents into a single file. Comparing the documents before merging them can help identify duplicate entries, inconsistencies, and conflicting information.
For example, a marketing team might collect customer data from different online channels, such as social media, email campaigns, and website analytics. By comparing the data from each channel, they can identify duplicate entries, correct inconsistencies, and create a unified customer profile. This allows them to target their marketing efforts more effectively and improve customer engagement.
2. Essential Excel Tools for Document Comparison
Excel offers several built-in tools and features that can be used to compare two documents effectively. These tools range from simple cell-by-cell comparison to more advanced techniques that highlight differences and identify inconsistencies.
2.1. Manual Comparison
Manual comparison involves opening two Excel documents side-by-side and visually inspecting each cell to identify differences. This method is suitable for small datasets or when only a few key values need to be compared.
Advantages:
- No additional tools required: Manual comparison can be done using only Excel, without the need for additional software or add-ins.
- Simple and straightforward: The process is easy to understand and implement, making it accessible to users with limited Excel skills.
Disadvantages:
- Time-consuming: Manual comparison can be very time-consuming, especially when dealing with large datasets.
- Error-prone: Visual inspection is prone to human error, and it is easy to miss subtle differences between cells.
- Not suitable for complex comparisons: Manual comparison is not suitable for comparing formulas, formatting, or other complex elements of an Excel document.
2.2. Conditional Formatting
Conditional formatting is a powerful Excel feature that allows you to apply formatting to cells based on specific criteria. This can be used to highlight differences between two Excel documents.
Steps to use Conditional Formatting for Comparison:
- Open both Excel documents: Open the two Excel documents that you want to compare.
- Select the data range in the first document: Select the range of cells that you want to compare in the first document.
- Apply Conditional Formatting: Go to the “Home” tab, click on “Conditional Formatting,” and select “New Rule.”
- Create a formula to compare the cells: In the “New Formatting Rule” dialog box, select “Use a formula to determine which cells to format.”
- Enter the formula: Enter a formula that compares the cells in the first document to the corresponding cells in the second document. For example, if you want to compare cell A1 in the first document to cell A1 in the second document, the formula would be
=A1<>'[Book2]Sheet1'!A1, assuming the second document is named “Book2” and the sheet is named “Sheet1.” - Set the formatting: Click on the “Format” button and choose the formatting that you want to apply to the cells that are different. For example, you can choose to fill the cells with a specific color.
- Repeat for the second document: Repeat the same steps for the second document, but this time, select the data range in the second document and adjust the formula accordingly.
Advantages:
- Highlights differences: Conditional formatting makes it easy to identify differences between two Excel documents by highlighting the cells that are different.
- Customizable: You can customize the formatting to suit your specific needs, such as using different colors or fonts to indicate different types of changes.
- Dynamic: Conditional formatting is dynamic, meaning that the formatting will automatically update if the data in the Excel documents changes.
Disadvantages:
- Requires Excel skills: Using conditional formatting requires some knowledge of Excel formulas and formatting options.
- Can be slow with large datasets: Applying conditional formatting to large datasets can be slow and may impact Excel’s performance.
- Not suitable for complex comparisons: Conditional formatting is not suitable for comparing formulas, formatting, or other complex elements of an Excel document.
2.3. Excel Formulas
Excel formulas can be used to compare two Excel documents cell by cell and return a value that indicates whether the cells are the same or different. This method is suitable for comparing specific values or for performing calculations based on the differences between cells.
Commonly Used Formulas for Comparison:
=IF(A1=B1, "Same", "Different"): This formula compares the value in cell A1 to the value in cell B1 and returns “Same” if the values are equal and “Different” if they are not.=EXACT(A1, B1): This formula compares the value in cell A1 to the value in cell B1 and returns TRUE if the values are exactly the same (including case) and FALSE if they are not.=A1-B1: This formula calculates the difference between the value in cell A1 and the value in cell B1. If the result is 0, the values are the same.
Advantages:
- Precise comparison: Formulas provide a precise comparison of cell values, ensuring that even small differences are detected.
- Flexible: Formulas can be customized to perform various types of comparisons, such as comparing numbers, text, or dates.
- Can be used for calculations: Formulas can be used to perform calculations based on the differences between cells, such as calculating the percentage change or the absolute difference.
Disadvantages:
- Requires Excel skills: Using formulas requires some knowledge of Excel syntax and functions.
- Can be time-consuming: Creating and applying formulas to a large dataset can be time-consuming.
- Not suitable for complex comparisons: Formulas are not suitable for comparing formulas, formatting, or other complex elements of an Excel document.
2.4. Microsoft Spreadsheet Compare
Microsoft Spreadsheet Compare is a tool specifically designed for comparing Excel documents. It is included with Office Professional Plus 2013, Office Professional Plus 2016, Office Professional Plus 2019, and Microsoft 365 Apps for enterprise.
How to Use Microsoft Spreadsheet Compare:
- Open Spreadsheet Compare: On the “Start” screen, click “Spreadsheet Compare.” If you do not see a “Spreadsheet Compare” option, begin typing the words “Spreadsheet Compare,” and then select its option.
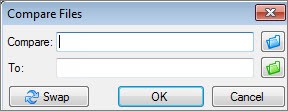
- Compare Files: Click “Home > Compare Files.” The “Compare Files” dialog box appears.
- Select the files to compare: Click the blue folder icon next to the “Compare” box to browse to the location of the earlier version of your workbook. Click the green folder icon next to the “To” box to browse to the location of the workbook that you want to compare to the earlier version, and then click “OK.”
- Choose the options: In the left pane, choose the options you want to see in the results of the workbook comparison by checking or unchecking the options, such as “Formulas,” “Macros,” or “Cell Format.” Or, just “Select All.”
- Run the comparison: Click “OK” to run the comparison.
Advantages:
- Comprehensive comparison: Microsoft Spreadsheet Compare can compare formulas, formatting, macros, and other elements of an Excel document.
- Highlights differences: The tool highlights differences between the two documents in a two-pane grid, making it easy to identify changes.
- Detailed report: Microsoft Spreadsheet Compare generates a detailed report that summarizes the differences between the two documents.
Disadvantages:
- Limited availability: Microsoft Spreadsheet Compare is only available with certain versions of Office.
- Requires installation: The tool needs to be installed separately from Excel.
- Can be overwhelming: The detailed report can be overwhelming for users who are not familiar with Excel.
2.5. Inquire Add-in for Excel
The Inquire add-in for Excel is a tool that allows you to analyze workbooks, see relationships between cells, worksheets, and other workbooks, and clean excess formatting from a worksheet. If you have two workbooks open in Excel that you want to compare, you can run Spreadsheet Compare by using the Compare Files command.
How to Enable the Inquire Add-in:
- Go to File > Options > Add-Ins: In Excel, click on “File,” then “Options,” and then “Add-Ins.”
- Manage Excel Add-ins: In the “Manage” drop-down menu at the bottom of the dialog box, select “Excel Add-ins” and click “Go.”
- Check the Inquire box: In the “Add-Ins” dialog box, check the box next to “Inquire” and click “OK.”
Advantages:
- Analyze workbooks: The Inquire add-in allows you to analyze workbooks and see relationships between cells, worksheets, and other workbooks.
- Clean excess formatting: The tool can clean excess formatting from a worksheet, which can improve Excel’s performance.
- Run Spreadsheet Compare: You can run Spreadsheet Compare from the Inquire tab, making it easier to compare two Excel documents.
Disadvantages:
- Requires enabling: The Inquire add-in needs to be enabled in Excel before it can be used.
- Limited features: The Inquire add-in has limited features compared to Microsoft Spreadsheet Compare.
- Not available in all versions of Excel: The Inquire add-in is not available in all versions of Excel.
3. Step-by-Step Guide to Comparing Two Excel Documents
This section provides a detailed, step-by-step guide on how to compare two Excel documents using various methods. Whether you prefer manual comparison, conditional formatting, or Excel formulas, this guide will walk you through the process and help you identify the differences between your documents.
3.1. Manual Comparison: A Detailed Walkthrough
Manual comparison is the simplest method for comparing two Excel documents. It involves opening the documents side-by-side and visually inspecting each cell to identify differences. While this method is time-consuming and error-prone, it can be useful for small datasets or when only a few key values need to be compared.
Steps for Manual Comparison:
- Open the two Excel documents: Start by opening the two Excel documents that you want to compare.
- Arrange the windows side-by-side: Arrange the Excel windows so that they are side-by-side on your screen. This will make it easier to visually compare the cells in each document. You can do this by right-clicking on the taskbar and selecting “Show windows side by side.”
- Navigate to the worksheets you want to compare: If the Excel documents contain multiple worksheets, navigate to the worksheets that you want to compare.
- Start comparing the cells: Begin comparing the cells in each document, starting from the top-left corner. Visually inspect each cell to see if the values are the same or different.
- Note any differences: As you compare the cells, note any differences that you find. You can use a pen and paper to write down the cell addresses and the corresponding values in each document.
- Repeat for all cells: Repeat steps 4 and 5 for all the cells in the worksheets that you are comparing.
- Summarize the differences: Once you have compared all the cells, summarize the differences that you found. This will help you understand the overall impact of the changes and make informed decisions.
Example:
Let’s say you have two Excel documents that contain sales data for the month of January. The first document is named “SalesData_v1.xlsx” and the second document is named “SalesData_v2.xlsx.” You want to compare the sales data in these two documents to identify any differences.
- Open “SalesData_v1.xlsx” and “SalesData_v2.xlsx” in Excel.
- Arrange the Excel windows side-by-side on your screen.
- Navigate to the “Sales” worksheet in both documents.
- Start comparing the cells in each document, starting from cell A1.
- You notice that the value in cell B2 in “SalesData_v1.xlsx” is “100,” while the value in cell B2 in “SalesData_v2.xlsx” is “120.”
- Note this difference on a piece of paper: “B2: SalesData_v1.xlsx = 100, SalesData_v2.xlsx = 120.”
- Continue comparing the cells until you have compared all the cells in the “Sales” worksheet.
- Summarize the differences that you found. For example, you might find that there are several differences in the sales data for specific products, indicating that the sales figures have been updated in “SalesData_v2.xlsx.”
3.2. Conditional Formatting: A Detailed Guide
Conditional formatting is a powerful Excel feature that allows you to apply formatting to cells based on specific criteria. This can be used to highlight differences between two Excel documents.
Steps for Using Conditional Formatting:
- Open the two Excel documents: Open the two Excel documents that you want to compare.
- Select the data range in the first document: Select the range of cells that you want to compare in the first document.
- Apply Conditional Formatting: Go to the “Home” tab, click on “Conditional Formatting,” and select “New Rule.”
- Create a formula to compare the cells: In the “New Formatting Rule” dialog box, select “Use a formula to determine which cells to format.”
- Enter the formula: Enter a formula that compares the cells in the first document to the corresponding cells in the second document. For example, if you want to compare cell A1 in the first document to cell A1 in the second document, the formula would be
=A1<>'[Book2]Sheet1'!A1, assuming the second document is named “Book2” and the sheet is named “Sheet1.” - Set the formatting: Click on the “Format” button and choose the formatting that you want to apply to the cells that are different. For example, you can choose to fill the cells with a specific color.
- Repeat for the second document: Repeat the same steps for the second document, but this time, select the data range in the second document and adjust the formula accordingly.
Example:
Let’s say you have two Excel documents that contain a list of customer names and email addresses. The first document is named “Customers_v1.xlsx” and the second document is named “Customers_v2.xlsx.” You want to compare the customer lists in these two documents to identify any differences.
- Open “Customers_v1.xlsx” and “Customers_v2.xlsx” in Excel.
- Select the range of cells that contain the customer list in “Customers_v1.xlsx.”
- Go to the “Home” tab, click on “Conditional Formatting,” and select “New Rule.”
- In the “New Formatting Rule” dialog box, select “Use a formula to determine which cells to format.”
- Enter the formula
=A1<>'[Customers_v2.xlsx]Sheet1'!A1to compare the cells in “Customers_v1.xlsx” to the corresponding cells in “Customers_v2.xlsx.” - Click on the “Format” button and choose a fill color, such as red, to highlight the cells that are different.
- Repeat the same steps for “Customers_v2.xlsx,” but this time, select the range of cells that contain the customer list in “Customers_v2.xlsx” and adjust the formula accordingly.
Now, any cells that are different between the two customer lists will be highlighted in red, making it easy to identify the differences.
3.3. Using Excel Formulas for Comparison: A Practical Approach
Excel formulas can be used to compare two Excel documents cell by cell and return a value that indicates whether the cells are the same or different. This method is suitable for comparing specific values or for performing calculations based on the differences between cells.
Steps for Using Excel Formulas:
- Open the two Excel documents: Open the two Excel documents that you want to compare.
- Create a new worksheet: Create a new worksheet in either of the Excel documents to store the comparison results.
- Enter the comparison formula: In the first cell of the new worksheet, enter a formula that compares the corresponding cells in the two Excel documents. For example, if you want to compare cell A1 in the first document to cell A1 in the second document, the formula would be
=IF([Book1]Sheet1!A1=[Book2]Sheet1!A1, "Same", "Different"), assuming the first document is named “Book1” and the second document is named “Book2.” - Copy the formula to the other cells: Copy the formula to the other cells in the new worksheet to compare all the corresponding cells in the two Excel documents.
- Analyze the results: Analyze the results in the new worksheet to identify the cells that are the same or different.
Example:
Let’s say you have two Excel documents that contain a list of product prices. The first document is named “Prices_v1.xlsx” and the second document is named “Prices_v2.xlsx.” You want to compare the product prices in these two documents to identify any differences.
- Open “Prices_v1.xlsx” and “Prices_v2.xlsx” in Excel.
- Create a new worksheet in “Prices_v1.xlsx” named “Comparison.”
- In cell A1 of the “Comparison” worksheet, enter the formula
=IF([Prices_v1.xlsx]Sheet1!A1=[Prices_v2.xlsx]Sheet1!A1, "Same", "Different")to compare the product prices in cell A1 of the two documents. - Copy the formula to the other cells in the “Comparison” worksheet to compare all the product prices in the two documents.
- Analyze the results in the “Comparison” worksheet to identify the product prices that are the same or different.
Now, the “Comparison” worksheet will show “Same” for the product prices that are the same in both documents and “Different” for the product prices that are different.
4. Advanced Techniques for Document Comparison
Beyond the basic methods, there are several advanced techniques that can be used to compare Excel documents more efficiently and accurately. These techniques often involve using additional tools or features in Excel, such as VBA macros, third-party add-ins, and online comparison tools.
4.1. Using VBA Macros for Advanced Comparisons
VBA (Visual Basic for Applications) is a programming language that can be used to automate tasks in Excel. VBA macros can be used to create custom comparison tools that can perform more advanced comparisons than the built-in features in Excel.
Example:
Here is an example of a VBA macro that compares two Excel documents and highlights the differences:
Sub CompareExcelFiles()

    Dim wb1 As Workbook, wb2 As Workbook
    Dim ws1 As Worksheet, ws2 As Worksheet
    Dim cell1 As Range, cell2 As Range
    Dim lastRow As Long, lastCol As Long

    ' Set the workbooks and worksheets to compare
    Set wb1 = Workbooks.Open("C:PathToFile1.xlsx")
    Set wb2 = Workbooks.Open("C:PathToFile2.xlsx")
    Set ws1 = wb1.Sheets("Sheet1")
    Set ws2 = wb2.Sheets("Sheet1")

    ' Get the last row and column in the first worksheet
    lastRow = ws1.Cells.Find("*", SearchOrder:=xlByRows, SearchDirection:=xlPrevious).Row
    lastCol = ws1.Cells.Find("*", SearchOrder:=xlByColumns, SearchDirection:=xlPrevious).Column

    ' Loop through each cell in the first worksheet
    For i = 1 To lastRow
        For j = 1 To lastCol
            ' Set the cell ranges to compare
            Set cell1 = ws1.Cells(i, j)
            Set cell2 = ws2.Cells(i, j)

            ' Compare the cell values
            If cell1.Value <> cell2.Value Then
                ' Highlight the differences
                cell1.Interior.Color = vbYellow
                cell2.Interior.Color = vbYellow
            End If
        Next j
    Next i

    ' Close the workbooks
    wb1.Close SaveChanges:=True
    wb2.Close SaveChanges:=True

    MsgBox "Comparison complete!"

End Sub
This macro opens two Excel documents, compares the values in each cell, and highlights the differences in yellow. You can customize this macro to perform more complex comparisons, such as comparing formulas, formatting, or other elements of an Excel document.
4.2. Third-Party Add-Ins for Enhanced Functionality
There are many third-party add-ins available for Excel that provide enhanced functionality for comparing Excel documents. These add-ins often offer features that are not available in the built-in tools in Excel, such as the ability to compare multiple worksheets at once, generate detailed comparison reports, and merge the differences between two documents.
Popular Third-Party Add-Ins:
- Spreadsheet Compare: This add-in provides a comprehensive set of features for comparing Excel documents, including the ability to compare formulas, formatting, and macros.
- Excel Compare: This add-in allows you to compare two Excel files or worksheets and highlight the differences. It also provides features for merging the differences between two documents.
- Beyond Compare: While primarily a file comparison tool, Beyond Compare also supports Excel files and provides a robust set of features for comparing and merging Excel documents.
4.3. Leveraging Online Comparison Tools
In addition to the built-in tools and third-party add-ins, there are also several online comparison tools that can be used to compare Excel documents. These tools are often free or offer a free trial and can be a convenient option for users who do not have access to Excel or who need to compare documents on the go.
Popular Online Comparison Tools:
- Diffchecker: Diffchecker is a free online tool that allows you to compare two text files, including Excel files. It highlights the differences between the two files and provides a side-by-side view of the changes.
- Aspose.Cells: Aspose.Cells is an online tool that allows you to compare two Excel files and identify the differences. It supports various comparison options, such as comparing formulas, formatting, and data.
- GroupDocs Comparison: GroupDocs Comparison is an online tool that allows you to compare two documents, including Excel files. It highlights the differences between the two files and provides a detailed comparison report.
5. Best Practices for Accurate Excel Document Comparison
To ensure accurate and reliable results when comparing Excel documents, it is important to follow certain best practices. These practices include preparing the documents for comparison, understanding the limitations of each comparison method, and verifying the results.
5.1. Preparing Documents for Effective Comparison
Before comparing two Excel documents, it is important to prepare them to ensure that the comparison is as accurate and efficient as possible. This includes cleaning the data, removing unnecessary formatting, and ensuring that the documents are structured in a consistent manner.
Tips for Preparing Documents:
- Clean the data: Remove any unnecessary spaces, special characters, or formatting from the data. This will help ensure that the comparison is based on the actual values in the cells, rather than the formatting.
- Remove unnecessary formatting: Remove any unnecessary formatting from the documents, such as colors, fonts, and borders. This will speed up the comparison process and reduce the risk of errors.
- Ensure consistent structure: Make sure that the documents are structured in a consistent manner, with the same columns, rows, and worksheets. This will make it easier to compare the documents and identify the differences.
- Save the documents in the same format: Save both documents in the same file format, such as .xlsx or .xls. This will ensure that the comparison tool can properly read and compare the documents.
5.2. Understanding the Limitations of Comparison Methods
Each method for comparing Excel documents has its own limitations. It is important to understand these limitations to choose the most appropriate method for your specific needs and to interpret the results accurately.
Limitations of Common Comparison Methods:
- Manual comparison: Time-consuming, error-prone, and not suitable for complex comparisons.
- Conditional formatting: Requires Excel skills, can be slow with large datasets, and not suitable for complex comparisons.
- Excel formulas: Requires Excel skills, can be time-consuming, and not suitable for complex comparisons.
- Microsoft Spreadsheet Compare: Limited availability, requires installation, and can be overwhelming for users who are not familiar with Excel.
- Inquire add-in: Requires enabling, limited features, and not available in all versions of Excel.
5.3. Verifying and Validating Comparison Results
After comparing two Excel documents, it is important to verify and validate the results to ensure that they are accurate and reliable. This includes reviewing the differences that were identified, checking for false positives or negatives, and confirming that the changes were made correctly.
Tips for Verifying and Validating Results:
- Review the differences: Carefully review the differences that were identified by the comparison tool. Make sure that you understand the nature of the changes and their impact on the data.
- Check for false positives or negatives: Check for any false positives or negatives in the results. A false positive is a difference that is identified by the comparison tool but is not actually a difference. A false negative is a difference that is not identified by the comparison tool but is actually a difference.
- Confirm the changes: Confirm that the changes were made correctly. If you are merging the differences between two documents, make sure that the changes were applied accurately and that no data was lost or corrupted.
6. Real-World Scenarios and Applications
Understanding How To Compare Two Documents In Excel is not just a theoretical exercise; it has numerous practical applications across various industries and professions. Here are some real-world scenarios where this skill proves invaluable.
6.1. Financial Auditing and Reporting
In financial auditing, comparing Excel documents is essential for verifying the accuracy of financial statements and ensuring compliance with regulatory requirements. Auditors often need to compare budget reports, transaction records, and balance sheets to identify discrepancies and potential fraud.
Scenario:
An auditor is tasked with verifying the accuracy of a company’s financial statements for the fiscal year. The auditor needs to compare the company’s general ledger with the bank statements to ensure that all transactions are recorded correctly.
How Excel Comparison Helps:
- Identify discrepancies: By comparing the general ledger with the bank statements, the auditor can identify any discrepancies in the transaction amounts or dates.
- Verify accuracy: The auditor can verify the accuracy of the financial statements by comparing the figures in the statements with the supporting documentation.
- Ensure compliance: The auditor can ensure that the company is complying with regulatory requirements by comparing the financial statements with the applicable accounting standards.
6.2. Project Management and Tracking
Project managers use Excel to track project progress, manage budgets, and allocate resources. Comparing Excel documents is crucial for monitoring changes, identifying delays, and ensuring that the project stays on track.
Scenario:
A project manager is overseeing a construction project. The project manager uses Excel to track the project’s budget, schedule, and resource allocations. As the project progresses, the project manager needs to compare the current project plan with the original plan to identify any deviations.
How Excel Comparison Helps:
- Monitor changes: By comparing the current project plan with the original plan, the project manager can monitor any changes to the budget, schedule, or resource allocations.
- Identify delays: The project manager can identify any delays in the project by comparing the actual completion dates with the planned completion dates.
- Ensure project stays on track: The project manager can ensure that the project stays on track by monitoring the project’s progress and taking corrective action when necessary.
6.3. Sales and Marketing Analysis
Sales and marketing teams use Excel to analyze sales data, track marketing campaigns, and measure customer engagement. Comparing Excel documents is essential for identifying trends, measuring the effectiveness of marketing efforts, and optimizing sales strategies.
Scenario:
A marketing team is analyzing the results of a recent email marketing campaign. The marketing team uses Excel to track the number of emails sent, the number of emails opened, and the number of clicks on the links in the emails. The marketing team wants to compare the results of this campaign with the results of previous campaigns to identify any trends.
How Excel Comparison Helps:
- Identify trends: By comparing the results of the current campaign with the results of previous campaigns, the marketing team can identify any trends in the email open rates, click-through rates, and conversion rates.
- Measure effectiveness: The marketing team can measure the effectiveness of the email marketing campaign by comparing the results with the campaign’s goals and objectives.
- Optimize sales strategies: The marketing team can use the insights gained from the Excel comparison to optimize its email marketing strategies and improve the results of future campaigns.
6.4. Data Migration and System Integration
When migrating data from one system to another or integrating data from multiple sources, comparing Excel documents is crucial for ensuring that the data is accurately transferred and that no information is lost or corrupted.
Scenario:
A company is migrating its customer data from an old CRM system to a new CRM system. The company uses Excel to extract the customer data from the old system and load it into the new system. The company needs to compare the customer data in the old and new systems to ensure that the data is accurately transferred.
How Excel Comparison Helps:
- Verify data accuracy: By comparing the customer data in the old and new systems, the company can verify that all the data has been accurately transferred.
- Identify errors: The company can identify any errors in the data migration process by comparing the data in the old and new systems.
- Ensure data integrity: The company can ensure that the data integrity is maintained during the data migration process by comparing the data in the old and new systems.
7. Overcoming Common Challenges in Excel Document Comparison
While comparing Excel documents can be a straightforward process, several challenges can arise that can complicate the task. Understanding these challenges and knowing how to address them is crucial for ensuring accurate and reliable results.
7.1. Handling Large Datasets
Comparing large Excel datasets can be a time-consuming and resource-intensive task. Excel may become slow or unresponsive when working with very large files, making it difficult to compare the data effectively.
Solutions:
- Use Excel’s built-in features: Excel has several built-in features that can help you manage large datasets, such as filtering, sorting, and pivot tables. These features can help you narrow down the data and focus on the specific areas that you need to compare.
- Use third-party add-ins: There are many third-party add-ins available for Excel that are designed to handle large datasets more efficiently. These add-ins often use optimized algorithms and data structures to speed up the comparison process.
- Split the data into smaller files: If possible, split the large dataset into smaller files and compare them separately. This can help reduce the load on Excel and improve its performance.
- Use a database: If you are working with very large datasets, consider using a database instead of Excel. Databases are designed to handle large amounts of data efficiently and provide powerful tools for querying and comparing data.
7.2. Dealing with Complex Formulas
Comparing Excel documents that contain complex formulas can be challenging, as it is not always easy to understand how the formulas work and what values they are calculating.
Solutions:
- Use Excel’s formula auditing tools: Excel has several formula auditing tools that can help you understand how formulas work, such as the “Trace Precedents” and “Trace Dependents” features. These tools can help you identify the cells that are used as inputs to a formula and the cells that depend on a formula’s output.
- Use Microsoft Spreadsheet Compare: Microsoft Spreadsheet Compare can compare formulas and highlight the differences between them. This can help you identify any changes that have been made to the formulas.
- Manually inspect the formulas: If you are not comfortable using Excel’s formula auditing tools or Microsoft Spreadsheet Compare, you can manually inspect the formulas to understand how they work and what values they are calculating.
7.3. Managing Different File Formats
When comparing Excel documents, you may encounter different file formats, such as .xls, .xlsx, and .csv. These different file formats