How To Compare Sheet1 And Sheet2 In Excel? COMPARE.EDU.VN offers a range of methods, from simple side-by-side viewing to advanced conditional formatting and third-party tools, enabling you to identify discrepancies efficiently. Discover how to analyze, highlight, and merge data, ensuring accuracy and consistency. Explore the best techniques for value comparison, difference highlighting, and comprehensive Excel analysis with advanced software integration.
1. Understanding the Need to Compare Excel Sheets
Comparing data between different sheets in Excel is essential for numerous tasks, ranging from identifying discrepancies to consolidating information. Whether you’re tracking sales data, managing inventory, or auditing financial records, the ability to compare data quickly and accurately is a crucial skill. Excel offers several built-in features and techniques that allow users to compare two sheets effectively. However, understanding these methods and when to use them is key to maximizing productivity and ensuring data integrity. This guide provides detailed instructions and expert insights to help you master the art of comparing Sheet1 and Sheet2 in Excel.
2. Simple Visual Comparison: Viewing Sheets Side by Side
For smaller datasets or a general overview, viewing two Excel sheets side by side can be a quick and easy way to spot differences.
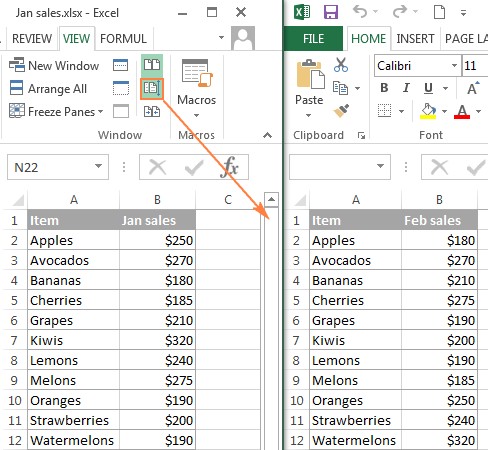
2.1. Comparing Two Excel Workbooks
If your data is in two separate Excel files, the ‘View Side by Side’ feature is ideal.
- Open both workbooks: Launch the two Excel files you want to compare.
- Navigate to the View tab: In either workbook, click on the ‘View’ tab in the Excel ribbon.
- Select ‘View Side by Side’: In the ‘Window’ group, click the ‘View Side by Side’ button.
This will arrange the two Excel windows horizontally on your screen, allowing you to visually compare the data. To arrange the windows vertically, click the ‘Arrange All’ button in the same ‘Window’ group and select ‘Vertical.’
2.2. Synchronous Scrolling
To ensure that you’re comparing corresponding rows and columns, enable the ‘Synchronous Scrolling’ feature.
- Check ‘Synchronous Scrolling’: On the ‘View’ tab, in the ‘Window’ group, ensure that ‘Synchronous Scrolling’ is enabled. This option is usually activated automatically when you select ‘View Side by Side.’
With synchronous scrolling enabled, scrolling in one window will automatically scroll the other, making it easier to compare data row by row.
2.3. Comparing Two Sheets Within the Same Workbook
If the two sheets you want to compare are within the same Excel workbook, follow these steps:
- Open the Excel file: Launch the Excel file containing the two sheets you want to compare.
- Open a New Window: Go to the ‘View’ tab and click the ‘New Window’ button in the ‘Window’ group. This will open a second window displaying the same workbook.
- Enable ‘View Side by Side’: In either of the new windows, click the ‘View Side by Side’ button on the ‘View’ tab.
- Select the sheets: In one window, select the first sheet you want to compare (Sheet1), and in the other window, select the second sheet (Sheet2).
Now you can visually compare the two sheets side by side, just as you would with two separate workbooks.
3. Formula-Based Comparison: Identifying Differences in Values
For a more precise comparison, you can use Excel formulas to identify cells with different values. This method provides a difference report in a new worksheet.
3.1. Creating a Difference Report
-
Open a new sheet: In your Excel workbook, open a new, empty sheet where you will create the difference report.
-
Enter the formula: In cell A1 of the new sheet, enter the following formula:
=IF(Sheet1!A1<>Sheet2!A1, "Sheet1:"&Sheet1!A1&" vs Sheet2:"&Sheet2!A1, "") -
Copy the formula: Drag the fill handle (the small square at the bottom right of the cell) down and to the right to copy the formula to all the cells in the range you want to compare.
This formula compares each cell in Sheet1 with the corresponding cell in Sheet2. If the values are different, it displays the values from both sheets; otherwise, it leaves the cell blank.
3.2. Understanding the Formula
IF(Sheet1!A1<>Sheet2!A1, ...): This part of the formula checks if the value in cell A1 of Sheet1 is not equal to the value in cell A1 of Sheet2."Sheet1:"&Sheet1!A1&" vs Sheet2:"&Sheet2!A1: If the values are different, this part of the formula concatenates a string that shows the values from both sheets."": If the values are the same, this part of the formula returns an empty string, leaving the cell blank.
3.3. Limitations of Formula-Based Comparison
While this method is useful for identifying differences in values, it has limitations:
- Value comparison only: It only compares values and does not compare formulas, formatting, or other cell properties.
- Row/column sensitivity: Adding or deleting rows or columns in one sheet will cause inaccuracies in the comparison.
- Sheet level comparison: It does not detect workbook-level differences, such as added or deleted sheets.
4. Conditional Formatting: Highlighting Differences Visually
Conditional formatting allows you to highlight cells with different values directly in the worksheet, making it easy to spot discrepancies.
4.1. Applying Conditional Formatting
-
Select the range: In the worksheet where you want to highlight the differences, select all the cells you want to compare. Start by clicking the upper-left cell (usually A1), then press
Ctrl + Shift + Endto extend the selection to the last used cell. -
Open Conditional Formatting: On the ‘Home’ tab, in the ‘Styles’ group, click ‘Conditional Formatting’ > ‘New Rule’.
-
Create a new rule: In the ‘New Formatting Rule’ dialog box, select ‘Use a formula to determine which cells to format’.
-
Enter the formula: Enter the following formula in the formula box:
=A1<>Sheet2!A1 -
Format the cells: Click the ‘Format’ button to choose the formatting you want to apply to the cells with different values (e.g., fill color, font style).
-
Apply the rule: Click ‘OK’ to close the ‘Format Cells’ dialog box, then click ‘OK’ again to create the conditional formatting rule.
4.2. Understanding the Conditional Formatting Rule
=A1<>Sheet2!A1: This formula compares the value in cell A1 of the current sheet with the value in cell A1 of Sheet2. If they are different, the condition is true, and the formatting is applied.- The relative cell references (
A1) ensure that the formula adjusts correctly for each cell in the selected range.
4.3. Advantages and Limitations
- Visual identification: Quickly identifies cells with different values.
- Customizable formatting: Allows you to choose the formatting style.
- Same limitations as formula-based comparison: Does not compare formulas, formatting, or detect row/column insertions/deletions.
5. Compare and Merge Workbooks: Collaborating on Shared Files
Excel’s ‘Compare and Merge Workbooks’ feature is designed for scenarios where multiple users collaborate on the same Excel file. It allows you to combine changes from different copies of a shared workbook.
5.1. Preparing the Workbook for Sharing
- Share the workbook: Before allowing multiple users to edit the workbook, you must share it. Go to the ‘Review’ tab, in the ‘Changes’ group, and click the ‘Share Workbook’ button.
- Enable sharing: In the ‘Share Workbook’ dialog box, select the ‘Allow changes by more than one user at the same time’ checkbox, and click ‘OK’. If prompted, allow Excel to save the workbook.
- Save copies: Each user should save a copy of the shared workbook with a unique file name.
5.2. Enabling the ‘Compare and Merge Workbooks’ Feature
The ‘Compare and Merge Workbooks’ command is not displayed in Excel by default. You need to add it to the Quick Access Toolbar.
- Open Excel Options: Click the ‘File’ tab, then click ‘Options’.
- Customize Quick Access Toolbar: In the ‘Excel Options’ dialog box, select ‘Quick Access Toolbar’.
- Add the command: In the ‘Choose commands from’ dropdown, select ‘All Commands’. Scroll down to ‘Compare and Merge Workbooks’, select it, and click the ‘Add’ button to move it to the right-hand section.
- Save changes: Click ‘OK’ to close the ‘Excel Options’ dialog box.
5.3. Comparing and Merging Workbooks
- Open the primary workbook: Open the original version of the shared workbook.
- Click ‘Compare and Merge Workbooks’: Click the ‘Compare and Merge Workbooks’ command on the Quick Access Toolbar.
- Select copies to merge: In the dialog box that appears, select the copies of the shared workbook that you want to merge. You can select multiple copies by holding the
Shiftkey while clicking the file names. - Merge the changes: Click ‘OK’ to merge the changes from the selected copies into the primary workbook.
5.4. Reviewing the Changes
- Highlight Changes: To see all the edits made by different users, go to the ‘Review’ tab, in the ‘Changes’ group, and click ‘Track Changes’ > ‘Highlight Changes’.
- Configure Highlighting: In the ‘Highlight Changes’ dialog box, select ‘All’ in the ‘When’ box, ‘Everyone’ in the ‘Who’ box, clear the ‘Where’ box, select the ‘Highlight changes on screen’ checkbox, and click ‘OK’.
Excel will highlight the cells with differences, using different colors to indicate edits from different users. Hovering over a highlighted cell will show who made the change.
5.5. Limitations and Considerations
- Only for shared workbooks: This feature only works for copies of the same shared workbook.
- Potential conflicts: Complex changes may result in conflicts that require manual resolution.
6. Third-Party Tools: Advanced Comparison Solutions
For more advanced and comprehensive comparisons, consider using third-party tools specifically designed for comparing, updating, and merging Excel sheets and workbooks. These tools often provide features beyond Excel’s built-in capabilities.
6.1. Synkronizer Excel Compare
Synkronizer Excel Compare is a robust add-in that allows you to quickly compare, merge, and update Excel files. It offers a range of features to streamline the comparison process:
- Identifying differences: Detects differences between two Excel sheets, including changes in values, formulas, comments, and formats.
- Merging capabilities: Combines multiple Excel files into a single version without creating unwanted duplicates.
- Highlighting: Highlights differences in both sheets, making them easy to spot.
- Customizable comparison: Allows you to show only the differences that are relevant to your task.
- Detailed reports: Provides detailed and easy-to-read difference reports.
6.1.1. Comparing Two Excel Files with Synkronizer
- Launch Synkronizer: Go to the ‘Add-ins’ tab in Excel and click the Synkronizer icon.
- Select workbooks: In the Synkronizer pane, select the two workbooks you want to compare.
- Select sheets: Choose the specific sheets you want to compare. If the workbooks have sheets with the same names, they will be automatically matched.
- Comparison options: Select a comparison option that suits your needs:
- ‘Compare as normal worksheets’
- ‘Compare with link options’
- ‘Compare as database’
- ‘Compare selected ranges’
- Content types: Choose the content types to compare (e.g., values, formulas, comments, formats).
- Filters: Apply filters to ignore irrelevant differences (e.g., case, spaces, hidden rows/columns).
- Start comparison: Click the ‘Start’ button to begin the comparison process.
6.1.2. Visualizing and Analyzing Differences
Synkronizer generates two types of reports on the ‘Results’ tab:
- Summary report: Provides an overview of all difference types.
- Detailed difference report: Shows specific differences for each category.
Clicking on a difference in the detailed report selects the corresponding cells in both sheets, allowing you to quickly examine the discrepancies.
6.1.3. Highlighting Differences
Synkronizer highlights all found differences by default:
- Yellow: Differences in cell values
- Lilac: Differences in cell formats
- Green: Inserted rows
You can customize the highlighting to show only relevant differences using the ‘Outline’ button on the ‘Results’ tab.
6.1.4. Updating and Merging Sheets
The add-in’s merge function allows you to transfer individual cells or move entire columns/rows from the source to the target sheet. Select the differences you want to update and click one of the update buttons to transfer the changes.
6.2. Ablebits Compare Sheets for Excel
Ablebits Compare Sheets is another powerful tool designed to compare worksheets in Excel. It is part of the Ablebits Ultimate Suite and offers a user-friendly interface with a step-by-step wizard.
- Comparison algorithms: Offers multiple comparison algorithms tailored to different data sets:
- ‘No key columns’
- ‘By key columns’
- ‘Cell-by-cell’
- Match types: Allows you to select the preferred match type:
- ‘First match’
- ‘Best match’
- ‘Full match only’
- Review Differences mode: Displays compared sheets side by side in a special mode, allowing you to view and manage differences one by one.
6.2.1. Comparing Two Sheets with Ablebits Compare Sheets
- Launch the tool: Click the ‘Compare Sheets’ button on the ‘Ablebits Data’ tab.
- Select worksheets: Choose the two worksheets you want to compare. You can select entire sheets, the current table, or a specific range.
- Choose comparison algorithm: Select the comparison algorithm that best suits your data.
- Specify differences to highlight: Choose which differences to highlight and which to ignore.
- Compare: Click the ‘Compare’ button to start the comparison process.
6.2.2. Review and Merge Differences
Once the worksheets are processed, they are opened in ‘Review Differences’ mode, with the differences highlighted:
- Blue rows: Rows that exist only in Sheet1
- Red rows: Rows that exist only in Sheet2
- Green cells: Difference cells in partially matching rows
Each worksheet has its own toolbar, allowing you to navigate through the differences and decide whether to merge or ignore them.
6.3. xlCompare
xlCompare is a utility designed to compare Excel files, worksheets, names, and VBA projects. It identifies added, deleted, and changed data and allows you to quickly merge differences.
- Duplicate record finding: Finds and removes duplicate records between two worksheets.
- Data updating: Updates existing records in one sheet with values from another sheet.
- Unique record addition: Adds unique (new) rows and columns from one sheet to another.
- Data merging: Merges all updated records from one workbook to another.
- Data sorting and filtering: Sorts data on the sheets by the key column and filters the comparison results.
- Highlighting: Highlights comparison results with colors.
6.4. Change pro for Excel
Change pro for Excel allows you to compare two sheets in desktop Excel and on mobile devices. It provides features such as:
- Formula and value comparison: Finds differences between formulas and values.
- Layout change detection: Identifies layout changes, including added/deleted rows and columns.
- Embedded object recognition: Recognizes embedded objects such as charts, graphs, and images.
- Difference reports: Creates and prints difference reports of formula, value, and layout differences.
- Filtering and sorting: Filters, sorts, and searches the difference report on key changes.
- Integration: Compares files directly from Outlook or document management systems.
- Multilingual support: Supports all languages, including multi-byte.
7. Online Services: Quick Online Comparison Tools
In addition to desktop tools, several online services allow you to quickly compare two Excel sheets without installing any software. While these services may not be suitable for sensitive data, they can be useful for quick comparisons.
7.1. XLComparator and CloudyExcel
Services like XLComparator and CloudyExcel allow you to upload two Excel workbooks and highlight the differences between them. These services typically highlight the differences in two active sheets with different colors.
8. Practical Applications of Comparing Excel Sheets
Understanding how to compare Sheet1 and Sheet2 in Excel is invaluable for various professional and personal tasks. Here are a few scenarios where these techniques can be particularly useful:
- Financial Analysis: Comparing monthly or yearly financial reports to identify trends, discrepancies, and anomalies. This is crucial for budgeting, forecasting, and auditing purposes.
- Inventory Management: Analyzing inventory levels across different periods to track stock changes, identify slow-moving items, and optimize procurement strategies.
- Sales Performance Tracking: Comparing sales data from different regions or sales teams to assess performance, identify top performers, and pinpoint areas that require improvement.
- Project Management: Comparing project timelines, resource allocations, and task statuses between different project phases or iterations to ensure projects stay on track and within budget.
- Data Validation: Ensuring data consistency and accuracy when consolidating information from multiple sources, such as customer databases, survey results, or research findings.
- Version Control: Tracking changes made to documents, spreadsheets, or code over time. This is particularly useful in collaborative environments where multiple individuals are working on the same files.
- Auditing and Compliance: Verifying compliance with regulatory requirements by comparing data against established standards and benchmarks. This is common in industries such as finance, healthcare, and manufacturing.
- Data Migration: Validating data integrity during migration from one system to another by comparing datasets before and after migration to ensure no data is lost or corrupted.
- Performance Monitoring: Tracking key performance indicators (KPIs) across different periods to assess business performance, identify areas of improvement, and inform strategic decision-making.
- Research and Analysis: Comparing data from different experiments, surveys, or studies to identify patterns, correlations, and statistically significant findings.
- Education and Training: Providing hands-on training in data analysis and comparison techniques for students and professionals looking to enhance their skills.
- Personal Finance: Managing personal budgets, tracking expenses, and comparing investment portfolios over time to make informed financial decisions.
9. Tips for Effective Excel Sheet Comparison
To maximize the effectiveness of your Excel sheet comparisons, consider the following tips:
- Understand Your Data: Before comparing sheets, take the time to understand the structure, format, and content of your data. This will help you choose the most appropriate comparison method.
- Clean and Standardize Data: Ensure that your data is clean, consistent, and standardized before comparing sheets. This may involve removing duplicates, correcting errors, and formatting data consistently.
- Choose the Right Method: Select the comparison method that best suits your needs and the type of data you are working with. For simple visual comparisons, the “View Side by Side” feature may suffice. For more complex comparisons, consider using formulas, conditional formatting, or third-party tools.
- Use Clear and Concise Formulas: When using formulas for comparison, make sure they are clear, concise, and easy to understand. This will help you avoid errors and troubleshoot issues more effectively.
- Leverage Conditional Formatting: Use conditional formatting to visually highlight differences and patterns in your data. This can help you quickly identify areas that require further investigation.
- Consider Third-Party Tools: If you frequently compare Excel sheets or require advanced comparison features, consider investing in third-party tools designed for this purpose. These tools often offer features such as automatic data synchronization, version control, and change tracking.
- Automate Repetitive Tasks: Use macros or scripting to automate repetitive comparison tasks. This can save you time and reduce the risk of human error.
- Test Your Comparisons: Always test your comparisons to ensure they are accurate and reliable. This may involve comparing a subset of your data manually or using a separate tool to verify the results.
- Document Your Process: Document your comparison process, including the methods, formulas, and tools you used. This will help you reproduce your results and ensure consistency over time.
- Stay Up-to-Date: Keep up-to-date with the latest Excel features and comparison techniques. Microsoft and third-party vendors regularly release updates and enhancements that can improve your comparison capabilities.
10. FAQs About Comparing Excel Sheets
Q1: Can I compare Excel sheets with different layouts?
Yes, but you may need to adjust your comparison method accordingly. For sheets with different layouts, consider using third-party tools that offer advanced comparison algorithms or manually aligning the data before comparing.
Q2: How do I compare Excel sheets with a large number of rows and columns?
For large datasets, using Excel’s built-in features may be time-consuming. Consider using third-party tools designed to handle large datasets efficiently. These tools often offer features such as parallel processing, indexing, and data compression.
Q3: Can I compare Excel sheets stored in different file formats?
Yes, but you may need to convert the sheets to a common file format before comparing. Excel supports various file formats, including .xlsx, .xls, .csv, and .txt.
Q4: How do I compare Excel sheets with password protection?
You will need to remove the password protection before comparing the sheets. If you cannot remove the password protection, consider using a third-party tool that supports password-protected files.
Q5: Can I compare Excel sheets on mobile devices?
Yes, some third-party tools offer mobile apps that allow you to compare Excel sheets on mobile devices. Alternatively, you can use online services that are accessible through a web browser on your mobile device.
Q6: How do I compare Excel sheets with hidden rows and columns?
You can choose to show or ignore hidden rows and columns when comparing sheets. Some comparison methods, such as conditional formatting, automatically ignore hidden rows and columns. Other methods may require you to manually unhide them before comparing.
Q7: Can I compare Excel sheets with different regional settings?
Yes, but you may need to adjust your regional settings to ensure consistency before comparing. Excel allows you to customize regional settings such as date and number formats.
Q8: How do I compare Excel sheets with different chart types?
Excel’s built-in comparison features do not support comparing chart types directly. However, you can compare the data underlying the charts to identify differences in the data series.
Q9: Can I compare Excel sheets with different formula versions?
Yes, but you may need to update your formula versions to ensure compatibility before comparing. Excel allows you to upgrade formula versions to the latest version.
Q10: How do I compare Excel sheets with different data types?
You may need to convert the data types to a common data type before comparing. Excel supports various data types, including text, number, date, and currency.
11. Take the Next Step with COMPARE.EDU.VN
Ready to enhance your Excel comparison skills and make more informed decisions? Visit COMPARE.EDU.VN today for comprehensive guides, detailed comparisons, and expert reviews of the best tools available. Whether you’re comparing product features, service offerings, or complex datasets, COMPARE.EDU.VN provides the resources you need to succeed.
At COMPARE.EDU.VN, we understand the challenges of comparing complex data and making informed decisions. That’s why we’ve created a platform that brings together detailed comparisons, expert reviews, and user feedback to help you navigate the complexities of today’s world. Our team of experienced analysts and researchers is dedicated to providing you with the most accurate, objective, and up-to-date information available.
Here are just a few of the benefits of using COMPARE.EDU.VN:
- Comprehensive Comparisons: Our detailed comparisons cover a wide range of products, services, and solutions, providing you with a complete overview of your options.
- Expert Reviews: Our expert reviews are written by experienced analysts and researchers who have a deep understanding of the industries we cover.
- User Feedback: Our user feedback system allows you to hear from other users about their experiences with the products and services we compare.
- Personalized Recommendations: Our personalized recommendation engine helps you find the products and services that are best suited to your needs and preferences.
- Time-Saving: Our platform saves you time by bringing together all the information you need in one convenient location.
- Informed Decisions: Our platform helps you make informed decisions by providing you with the information you need to compare your options and choose the best solution for your needs.
Don’t waste any more time struggling to compare complex data. Visit COMPARE.EDU.VN today and start making more informed decisions.
Contact Us:
- Address: 333 Comparison Plaza, Choice City, CA 90210, United States
- WhatsApp: +1 (626) 555-9090
- Website: COMPARE.EDU.VN
Transform your decision-making process with compare.edu.vn today.
This guide has provided a comprehensive overview of how to compare Sheet1 and Sheet2 in Excel. By mastering these techniques, you can ensure data accuracy, identify discrepancies, and make informed decisions. Whether you’re using simple visual comparisons, formula-based methods, conditional formatting, or advanced third-party tools, the ability to compare Excel sheets effectively is a valuable skill for any data-driven professional.