Unlock the power of informed decision-making with Lightroom CC! COMPARE.EDU.VN provides the ultimate guide on How To Compare Photos In Lightroom Cc, ensuring you choose the best images. Discover advanced techniques and workflows to elevate your photo selection process, enabling you to refine your images and select the most impactful shots efficiently. Explore various comparison methods, including side-by-side analysis and zoom functionalities, coupled with workflow optimization strategies to help you achieve unparalleled image selection accuracy.
1. Understanding the Need for Photo Comparison in Lightroom CC
Photo comparison is a crucial skill for photographers of all levels. Whether you’re a seasoned professional or just starting, the ability to effectively compare photos allows you to make informed decisions about which images to keep, edit, and share. In Lightroom CC, the comparison process involves analyzing multiple images with similar subjects or compositions to select the best one based on various criteria such as sharpness, exposure, composition, and overall aesthetic appeal. Efficient photo comparison helps streamline your workflow, save time, and ensure that your final portfolio represents your best work. Using Lightroom’s specialized tools, such as the Compare View, enables photographers to critically assess and differentiate between similar shots, ensuring the highest quality output. This process not only improves individual photo selections but also enhances overall project coherence and impact.
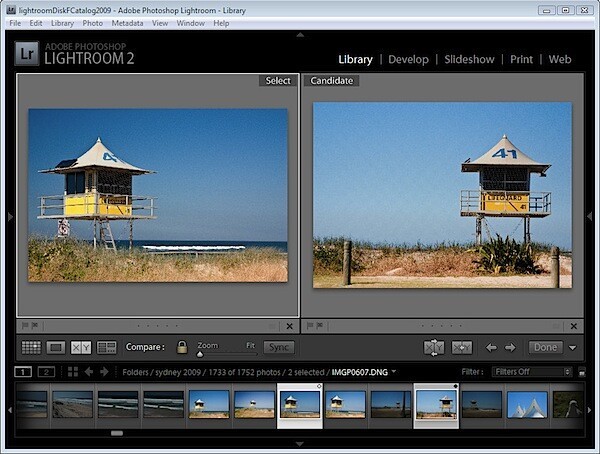 Lightroom Compare View interface showing select and candidate images for review
1.1. Why Compare Photos?
Comparing photos serves several essential purposes in a photographer’s workflow. It enables you to:
- Identify the Best Shots: By comparing similar images side-by-side, you can quickly identify the ones with the best focus, exposure, and composition.
- Eliminate Redundancy: In a photoshoot, it’s common to take multiple shots of the same subject. Comparing these photos helps you eliminate redundant images, reducing clutter and simplifying your editing process.
- Refine Your Editing: Comparing before-and-after versions of your edits allows you to assess the impact of your adjustments and refine your editing strategy.
- Maintain Consistency: When working on a series of images, comparison helps ensure consistency in style, tone, and overall aesthetic.
- Improve Your Skills: Regularly comparing your photos helps you develop a critical eye, allowing you to identify areas for improvement in your shooting and editing techniques.
Photo comparison in Lightroom CC is an essential process for identifying the best images, refining edits, and maintaining consistency, thus improving overall photographic skills.
1.2. Common Scenarios Where Photo Comparison Is Useful
Photo comparison is particularly useful in the following scenarios:
- Portrait Photography: Selecting the best pose, expression, and focus from a series of portrait shots.
- Landscape Photography: Comparing different compositions, lighting conditions, and perspectives to choose the most compelling landscape image.
- Event Photography: Sorting through numerous shots to identify the key moments and best captures of an event.
- Sports Photography: Selecting the sharpest and most impactful action shots from a sequence of images.
- Product Photography: Ensuring the best representation of a product’s features and details through careful comparison of different angles and lighting setups.
Lightroom CC simplifies tasks such as selecting ideal portraits, landscapes, event highlights, action-packed sports shots, and precise product representations through efficient photo comparison workflows.
2. Lightroom CC’s Compare View: An Overview
Lightroom CC offers a specialized feature called “Compare View” designed specifically for comparing two images side-by-side. This view provides a focused environment for analyzing the nuances between two photos, allowing you to make informed decisions about which one to select. Compare View offers tools for zooming, panning, and swapping images, providing a comprehensive comparison experience. Unlike Survey View, which displays multiple images simultaneously, Compare View focuses your attention on two images at a time, allowing for detailed scrutiny. It’s an invaluable tool for photographers looking to refine their selection process and choose the best images from a series. Lightroom CC’s Compare View offers a dedicated toolset, including zooming, panning, and image swapping, to facilitate meticulous analysis and informed image selection.
2.1. Accessing Compare View
To access Compare View in Lightroom CC, follow these steps:
- Open Lightroom CC: Launch the Lightroom CC application on your computer.
- Select Images: In the Library module, select the first image you want to compare.
- Enter Compare View: Click the “Compare View” icon in the toolbar (it looks like two overlapping squares) or press the “C” key on your keyboard.
This will open the Compare View interface, displaying the selected image alongside another image in your library. Lightroom CC simplifies the comparison process with easy access to Compare View via the toolbar icon or the “C” key.
2.2. Understanding the Interface
The Compare View interface in Lightroom CC is designed to be intuitive and efficient. Here’s a breakdown of the key elements:
- Select Image: This is the primary image you’re using as a reference point for comparison. It remains fixed on one side of the screen.
- Candidate Image: This is the image you’re comparing against the Select image. You can easily swap out the Candidate image to compare it with other images in your library.
- Navigation Arrows: These arrows allow you to cycle through the images in your library, replacing the Candidate image with each click.
- Swap Button: This button swaps the Select and Candidate images, allowing you to quickly change your reference point.
- Zoom Slider: This slider allows you to zoom in on both images simultaneously, enabling you to examine fine details.
- Sync Button: This button synchronizes the zoom and pan settings between the two images, ensuring that you’re comparing the same areas at the same magnification.
- Close Button: This button exits Compare View and returns you to the Library module.
2.3. Key Features of Compare View
Compare View offers several key features that enhance the photo comparison process:
- Side-by-Side Comparison: The primary feature, allowing you to view two images simultaneously for direct comparison.
- Zoom and Pan: The ability to zoom in and pan around both images, allowing you to examine fine details and critical areas.
- Synchronization: The Sync button ensures that both images are zoomed to the same level and panned to the same location, making it easier to compare specific areas.
- Swapping: The Swap button allows you to quickly change your reference point, making it easy to compare multiple images against each other.
- Navigation: The navigation arrows provide a simple way to cycle through images in your library, making it easy to find the best Candidate image.
Lightroom CC’s Compare View enhances photo comparison with features like synchronized zooming, easy image swapping, and intuitive navigation, facilitating precise assessment of fine details.
3. Step-by-Step Guide: How to Use Compare View
Using Compare View in Lightroom CC is a straightforward process. Follow these steps to effectively compare your photos:
3.1. Selecting the First Image
- Open Lightroom CC and Navigate to the Library Module: Launch Lightroom CC and navigate to the Library module where your photos are stored.
- Choose the First Image: Select the first image you want to use as your reference point. This will be the “Select” image in Compare View.
3.2. Entering Compare View
- Click the Compare View Icon: With the first image selected, click the Compare View icon in the toolbar (the two overlapping squares).
- Alternatively, Press the “C” Key: You can also enter Compare View by pressing the “C” key on your keyboard.
3.3. Navigating Through Candidate Images
- Use the Navigation Arrows: Once in Compare View, you’ll see the “Select” image on one side and the “Candidate” image on the other. Use the navigation arrows (left and right) to cycle through the images in your library and find potential Candidate images.
- Evaluate Each Candidate Image: As you cycle through the images, evaluate each one against the Select image. Consider factors such as sharpness, exposure, composition, and overall aesthetic appeal.
3.4. Zooming and Panning for Detailed Comparison
- Use the Zoom Slider: To examine fine details, use the Zoom slider to zoom in on both images simultaneously.
- Pan Around the Images: Click and drag on the images to pan around and examine different areas.
- Use the Sync Button: To ensure that you’re comparing the same areas at the same magnification, click the Sync button. This will synchronize the zoom and pan settings between the two images.
3.5. Swapping Images
- Click the Swap Button: If you find a Candidate image that you want to use as your new reference point, click the Swap button. This will swap the Select and Candidate images.
- Continue Comparing: Continue navigating through the images and swapping as needed until you find the best image. Lightroom CC streamlines photo selection by providing intuitive navigation, synchronized zoom, and quick image swapping within the Compare View.
3.6. Exiting Compare View
- Click the Done Button: Once you’ve selected the best image, click the Done button to exit Compare View and return to the Library module. The selected image will remain highlighted.
4. Advanced Techniques for Photo Comparison
While the basic steps for using Compare View are straightforward, there are several advanced techniques you can use to enhance your photo comparison process:
4.1. Using Flags and Ratings
Before entering Compare View, consider using flags and ratings to pre-sort your images. This can help you narrow down your selection and focus on the most promising candidates.
- Flags: Use flags (Pick or Reject) to quickly identify images that are definitely worth considering or definitely not worth considering.
- Ratings: Use star ratings to rank your images based on their overall quality or potential.
Applying flags and ratings in Lightroom CC prior to using Compare View streamlines the selection process by focusing attention on the most promising images.
4.2. Comparing Edited vs. Unedited Versions
Compare View can be used to compare edited versions of your photos against the original, unedited versions. This allows you to assess the impact of your edits and refine your editing strategy.
- Create a Virtual Copy: In the Library module, create a virtual copy of the image you want to edit.
- Edit the Virtual Copy: Make your edits to the virtual copy.
- Enter Compare View: Select both the original image and the edited virtual copy, and then enter Compare View.
- Compare the Images: Use the zoom and pan tools to compare the two versions and assess the impact of your edits. Lightroom CC enables photographers to refine their editing strategies by comparing edited and unedited versions of photos in Compare View.
4.3. Comparing Different Crops
If you’re unsure about the best crop for an image, Compare View can help you evaluate different cropping options.
- Create Virtual Copies: In the Library module, create multiple virtual copies of the image.
- Apply Different Crops: Apply different crops to each virtual copy.
- Enter Compare View: Select the virtual copies and enter Compare View.
- Compare the Crops: Use the zoom and pan tools to compare the different crops and determine which one is most visually appealing. By creating and comparing various crops in Lightroom CC’s Compare View, photographers can determine the most visually appealing option for their images.
4.4. Using Collections for Focused Comparison
Collections allow you to group specific images together, making it easier to focus on a subset of your library when comparing photos.
- Create a Collection: In the Library module, create a new collection and add the images you want to compare.
- Select the Collection: Select the collection you created.
- Enter Compare View: Select an image within the collection and enter Compare View. Only images within the selected collection will be available as Candidate images. Lightroom CC enhances photo comparison efficiency by allowing users to create collections for focused reviews within Compare View.
5. Optimizing Your Workflow for Efficient Photo Comparison
To make the most of Compare View and streamline your photo comparison process, consider the following workflow optimizations:
5.1. Cull Your Images Regularly
Culling is the process of selecting and removing unwanted images from your library. Regularly culling your images can help you reduce clutter and focus on the best shots.
- Set Aside Time for Culling: Schedule regular time slots for culling your images.
- Use Flags and Ratings: Use flags and ratings to quickly identify and sort your images.
- Be Ruthless: Don’t be afraid to reject images that are not up to your standards.
Regular culling, utilizing flags and ratings, helps photographers maintain organized libraries and concentrate on their best shots.
5.2. Use Keyboard Shortcuts
Lightroom CC offers a variety of keyboard shortcuts that can help you speed up your photo comparison process.
- “C” Key: Enters Compare View.
- Left and Right Arrow Keys: Navigates through Candidate images.
- “X” Key: Rejects an image.
- “P” Key: Picks an image.
- Number Keys (1-5): Applies star ratings.
Mastering keyboard shortcuts in Lightroom CC, such as “C” for Compare View and arrow keys for navigation, streamlines photo comparison workflows.
5.3. Customize Your Compare View Preferences
Lightroom CC allows you to customize certain aspects of Compare View to suit your preferences.
- Access Preferences: Go to Lightroom CC’s Preferences menu (Edit > Preferences on Windows, Lightroom CC > Preferences on Mac).
- Customize Interface: Explore the Interface tab to adjust settings such as the size of the thumbnails and the appearance of the toolbar.
Lightroom CC offers customizable preferences in Compare View, allowing users to tailor the interface and toolbar settings to suit their workflow.
5.4. Integrate Compare View Into Your Editing Process
Compare View is not just for selecting images; it can also be integrated into your editing process.
- Compare Before-and-After Edits: Use Compare View to compare your edited images against the original versions.
- Refine Your Edits: Based on your comparison, refine your edits to achieve the desired look and feel.
Photographers can refine their edits in Lightroom CC by comparing before-and-after versions within Compare View, optimizing their editing process.
6. Troubleshooting Common Issues in Compare View
While Compare View is generally reliable, you may encounter some issues from time to time. Here are some common problems and their solutions:
6.1. Images Not Displaying Properly
If images are not displaying properly in Compare View, try the following:
- Check Image Format: Ensure that the images are in a supported format (e.g., JPEG, TIFF, RAW).
- Update Lightroom CC: Make sure you’re using the latest version of Lightroom CC.
- Restart Lightroom CC: Restarting Lightroom CC can often resolve display issues.
6.2. Sync Button Not Working
If the Sync button is not working, try the following:
- Ensure Images Are Selected: Make sure that both the Select and Candidate images are selected before clicking the Sync button.
- Reset Preferences: Reset Lightroom CC’s preferences to their default settings.
6.3. Navigation Arrows Not Responding
If the navigation arrows are not responding, try the following:
- Check Image Selection: Ensure that you have selected an image before entering Compare View.
- Restart Lightroom CC: Restarting Lightroom CC can often resolve navigation issues.
6.4. Zoom Slider Not Working
If the zoom slider is not working, try the following:
- Check Image Selection: Make sure that the images are selected before using the zoom slider.
- Reset Preferences: Reset Lightroom CC’s preferences to their default settings.
To resolve issues such as images not displaying, Sync button malfunctions, unresponsive navigation arrows, or zoom slider problems, users can check image formats, update Lightroom CC, restart the application, ensure proper image selection, or reset preferences.
7. Compare View vs. Survey View: Which One to Use?
Lightroom CC offers two specialized views for comparing photos: Compare View and Survey View. While both serve a similar purpose, they operate differently and are best suited for different scenarios.
7.1. Compare View
- Focus: Detailed comparison of two images side-by-side.
- Best For: Making precise decisions between two similar images, refining edits, and evaluating different crops.
- Key Features: Zoom, pan, synchronization, swapping.
7.2. Survey View
- Focus: Overview and comparison of multiple images simultaneously.
- Best For: Quickly identifying the best shots from a large selection, eliminating unwanted images, and narrowing down your selection.
- Key Features: Displays multiple images, allows for quick rejection of images.
Lightroom CC provides Compare View for detailed side-by-side analysis of two images and Survey View for an overview and quick selection from multiple images.
7.3. When to Use Which
- Use Compare View When:
- You need to make a precise decision between two similar images.
- You want to refine your edits by comparing before-and-after versions.
- You want to evaluate different cropping options.
- Use Survey View When:
- You need to quickly identify the best shots from a large selection.
- You want to eliminate unwanted images.
- You want to narrow down your selection to a smaller subset. Lightroom CC’s Compare View is ideal for precise comparisons and edit refinements, while Survey View excels at quickly identifying top shots from large selections.
8. Real-World Examples of Using Compare View
To illustrate the practical applications of Compare View, let’s look at some real-world examples:
8.1. Portrait Selection
Imagine you’ve just finished a portrait photoshoot and have dozens of images to sort through. Using Compare View, you can:
- Select the First Image: Choose an image with a good pose and expression.
- Enter Compare View: Enter Compare View and use the navigation arrows to cycle through the other images.
- Evaluate Facial Expressions: Zoom in on the faces in each image and compare the facial expressions.
- Check Focus: Ensure that the focus is sharp on the eyes.
- Swap Images: If you find an image with a better expression or focus, swap it with the Select image.
- Repeat: Repeat the process until you’ve selected the best portrait.
Lightroom CC’s Compare View streamlines portrait selection by facilitating detailed comparisons of facial expressions and focus, ensuring the best image is chosen.
8.2. Landscape Photography
When shooting landscapes, you often capture multiple images with slight variations in composition and lighting. Compare View can help you choose the best landscape image by:
- Selecting the First Image: Choose an image with a pleasing composition.
- Entering Compare View: Enter Compare View and cycle through the other images.
- Comparing Composition: Evaluate the composition of each image, paying attention to elements such as leading lines, balance, and the placement of the horizon.
- Assessing Lighting: Compare the lighting conditions in each image, looking for the most dramatic or appealing light.
- Swap Images: Swap images as needed until you’ve selected the best landscape image.
Lightroom CC’s Compare View aids landscape photographers in selecting the best image by comparing compositions and lighting conditions across multiple shots.
8.3. Editing Refinement
Compare View can be invaluable for refining your edits. For example, you can:
- Create a Virtual Copy: Create a virtual copy of an image.
- Edit the Virtual Copy: Make your edits to the virtual copy.
- Enter Compare View: Enter Compare View with the original image and the edited virtual copy.
- Compare the Images: Evaluate the impact of your edits, paying attention to elements such as exposure, contrast, and color.
- Adjust Edits: If needed, adjust your edits to achieve the desired look and feel.
Lightroom CC’s Compare View enables photographers to refine their edits by comparing original images with edited versions, ensuring the desired aesthetic is achieved.
9. Leveraging Third-Party Plugins for Enhanced Comparison
While Lightroom CC’s built-in Compare View is powerful, there are also third-party plugins that can enhance your photo comparison capabilities. These plugins often offer additional features and customization options.
9.1. Top Lightroom Plugins for Photo Comparison
- Photo Mechanic: A fast and efficient photo browser and culling tool that integrates seamlessly with Lightroom CC.
- After Effects: Useful for motion graphics and video editing.
- Capture One: A professional photo editing software that offers advanced comparison tools.
Lightroom CC users can enhance photo comparison with plugins like Photo Mechanic for efficient culling, After Effects for motion graphics, and Capture One for advanced tools.
9.2. How Plugins Enhance the Comparison Process
- Additional Features: Plugins may offer features such as synchronized zooming and panning, side-by-side comparison of multiple images, and advanced sorting options.
- Customization: Plugins often allow you to customize the appearance and behavior of Compare View to suit your preferences.
- Integration: Plugins can integrate seamlessly with Lightroom CC, providing a more streamlined workflow.
10. Future Trends in Photo Comparison Technology
As technology continues to evolve, we can expect to see further advancements in photo comparison technology.
10.1. AI-Powered Comparison
Artificial intelligence (AI) is already playing a role in photo editing, and it’s likely to become more prevalent in photo comparison. AI-powered comparison tools could automatically analyze images and identify the best shots based on factors such as sharpness, exposure, and composition.
10.2. Enhanced Collaboration
Future photo comparison tools may offer enhanced collaboration features, allowing multiple users to compare and select images together in real-time. This could be particularly useful for teams of photographers and editors working on large projects.
10.3. Integration With Cloud Services
Integration with cloud services will likely become more seamless, allowing you to compare photos stored in the cloud directly from within Lightroom CC. This could simplify your workflow and make it easier to access your images from anywhere.
AI-powered comparison, enhanced collaboration tools, and seamless cloud integration are expected to drive future advancements in photo comparison technology.
11. Conclusion: Mastering Photo Comparison in Lightroom CC
Mastering photo comparison in Lightroom CC is essential for photographers who want to streamline their workflow, improve their skills, and ensure that their final portfolio represents their best work. By understanding the features of Compare View, optimizing your workflow, and leveraging advanced techniques, you can make informed decisions about which images to keep, edit, and share. Remember to regularly cull your images, use keyboard shortcuts, and customize Compare View to suit your preferences. And don’t be afraid to experiment with third-party plugins to enhance your photo comparison capabilities. With practice and dedication, you’ll become a master of photo comparison in Lightroom CC.
Ready to Elevate Your Photo Selection?
Are you struggling to choose the best photos from your collection? Do you find yourself spending hours comparing similar images? Let COMPARE.EDU.VN simplify the process for you. Visit our website at COMPARE.EDU.VN to discover in-depth comparisons, expert reviews, and practical tips that will help you make informed decisions and create stunning portfolios.
Contact us today:
- Address: 333 Comparison Plaza, Choice City, CA 90210, United States
- WhatsApp: +1 (626) 555-9090
- Website: compare.edu.vn
12. Frequently Asked Questions (FAQs)
1. What is Compare View in Lightroom CC?
Compare View is a specialized feature in Lightroom CC designed for comparing two images side-by-side, allowing you to analyze the nuances between them and make informed decisions about which one to select.
2. How do I access Compare View?
You can access Compare View by selecting an image in the Library module and then clicking the “Compare View” icon in the toolbar or pressing the “C” key on your keyboard.
3. What are the key features of Compare View?
Key features include side-by-side comparison, zoom and pan, synchronization of zoom and pan settings, swapping of images, and navigation arrows for cycling through images.
4. How can I optimize my workflow for efficient photo comparison?
To optimize your workflow, cull your images regularly, use keyboard shortcuts, customize your Compare View preferences, and integrate Compare View into your editing process.
5. What is the difference between Compare View and Survey View?
Compare View is for detailed comparison of two images, while Survey View is for an overview and comparison of multiple images simultaneously. Use Compare View for precise decisions and Survey View for quick identification of the best shots from a large selection.
6. Can I compare edited versions of my photos against the original in Compare View?
Yes, you can create a virtual copy of an image, edit the virtual copy, and then enter Compare View with the original image and the edited virtual copy.
7. How can I use Collections to focus my comparison?
Create a Collection in the Library module, add the images you want to compare, and then select the Collection. When you enter Compare View, only images within the selected Collection will be available as Candidate images.
8. What should I do if images are not displaying properly in Compare View?
Check the image format, update Lightroom CC, and restart Lightroom CC.
9. Are there third-party plugins that can enhance the comparison process?
Yes, plugins like Photo Mechanic, After Effects, and Capture One offer additional features and customization options for photo comparison.
10. How might AI impact photo comparison in the future?
AI could automate the analysis of images and identify the best shots based on factors such as sharpness, exposure, and composition, making the comparison process more efficient.