Working with multiple versions of Excel files is a common scenario, whether you’re tracking changes, consolidating data, or simply ensuring accuracy. Identifying differences between these files manually can be time-consuming and prone to error. Fortunately, Microsoft Excel provides a built-in tool called Spreadsheet Compare that simplifies this process, allowing you to quickly pinpoint discrepancies and understand the modifications made. This guide will walk you through how to effectively use Spreadsheet Compare to compare two Excel files and understand the results.
Understanding Spreadsheet Compare and Its Availability
Spreadsheet Compare is a powerful utility designed to highlight the differences between two Excel workbooks. It’s particularly useful for auditing, version control, and ensuring data integrity. This tool isn’t a standalone application but is included as part of specific Microsoft Office suites.
Important Note: Spreadsheet Compare is available with:
- Office Professional Plus 2013
- Office Professional Plus 2016
- Office Professional Plus 2019
- Microsoft 365 Apps for enterprise
If you are using a different version of Excel, you may not have access to this feature. However, for users with the compatible Office versions, Spreadsheet Compare offers a robust solution for comparing Excel files.
Step-by-Step Guide: Comparing Two Excel Workbooks
Let’s delve into the process of comparing two Excel files using Spreadsheet Compare. Follow these steps to identify differences efficiently:
Opening Spreadsheet Compare
First, you need to launch the Spreadsheet Compare tool. The method varies slightly depending on your Windows version:
-
For Windows 10 and later: Click the Start button, and in the search bar, type “Spreadsheet Compare”. The “Spreadsheet Compare” app should appear in the search results. Click on it to open.
-
Alternative Method (If you don’t see it in the Start Menu): Sometimes, it might not be directly listed. In this case, try typing the full phrase “Spreadsheet Compare” in the search bar. If it’s installed, it should appear as an option.
Once opened, Spreadsheet Compare presents a straightforward interface ready for file comparison.
Selecting the Excel Files for Comparison
The core function is to compare files. Here’s how to select the Excel workbooks you want to analyze:
-
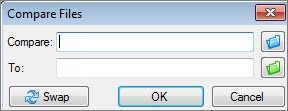
In the Spreadsheet Compare window, click Home > Compare Files. This action will open the Compare Files dialog box.
-
Choose the “Compare” File (Older Version): Click the blue folder icon located next to the Compare box. This prompts a file explorer window to open. Navigate to the location of the earlier version of your Excel workbook. Select the file and click Open.
-
Choose the “To” File (Newer Version): Next, click the green folder icon next to the To box. Again, a file explorer window will appear. Browse to the location of the more recent version of the Excel workbook that you wish to compare against the older version. Select this file and click Open. Click OK in the Compare Files dialog box to confirm your selections.
Tip: You can compare files even if they have the same name, as long as they are stored in different folders. Spreadsheet Compare differentiates them based on the file path. You can also input web addresses directly if your workbooks are saved on a SharePoint site or OneDrive.
Specifying Comparison Options
Before running the comparison, you can customize what aspects of the Excel files Spreadsheet Compare should analyze:
-
Select Comparison Criteria: In the left pane of the Compare Files dialog box (or directly in the main window if you’ve bypassed the dialog), you’ll see a list of options. These options determine what elements of the workbooks will be compared.
-
Choose from the following options:
- Formulas: Compares formulas in cells to identify changes in calculations.
- Macros: Checks for differences in VBA macros within the workbooks.
- Cell Format: Highlights changes in cell formatting, such as fonts, colors, and number formats.
- Comments: Detects added, deleted, or modified comments in cells.
- Sheet Name: Compares the names of worksheets.
- VBA Code: Compares the VBA code in modules and class modules.
- Select All / Clear All: Quickly select or deselect all comparison options.
-
Refine your Comparison: Check the boxes next to the options you want to include in the comparison. For a comprehensive comparison, you can simply click Select All.
Running the Comparison
With files selected and options chosen, you’re ready to initiate the comparison:
-
Click OK in the Compare Files dialog box (if applicable) or the Compare button in the main window. Spreadsheet Compare will begin analyzing the two Excel workbooks based on your selected criteria.
-
Password Protected Files: If either of the workbooks is password protected, you might encounter an “Unable to open workbook” message. Click OK on the message, and you will be prompted to enter the password for the protected workbook. Spreadsheet Compare needs the password to access and analyze the file content.
Interpreting the Comparison Results
After Spreadsheet Compare finishes its analysis, the results are presented in a clear, side-by-side grid layout. This visual representation makes it easy to understand the differences:
-
Side-by-Side Grid: The results are displayed in a two-pane grid.
- Left Pane: Represents the “Compare” file (typically the older version) you selected.
- Right Pane: Represents the “To” file (typically the newer version).
- Each pane displays the worksheets from the respective workbook. If there are multiple worksheets, you can navigate between them using the forward and back buttons on the horizontal scroll bar at the bottom of the grid. Even hidden worksheets are included in the comparison and shown in the results.
-
Color-Coded Highlights: Differences are visually highlighted using distinct colors within the grid. The color coding depends on the type of change detected.
-
Legend Pane: Located below the two grids, the legend pane explains the meaning of each color used in the highlighting. Common color indicators include:
- Green Fill: Typically indicates “entered values” (cells containing manually entered data, not formulas) that have changed. In the results list pane, these changes are often shown with green font.
- Blue-Green Fill: Often signifies “calculated values” that have changed. This usually occurs because input values used in formulas have been modified.
- Other colors may indicate changes in formulas, formatting, or other compared elements. Refer to the legend for a complete understanding of the color codes in your specific comparison.
-
Example Interpretation: Consider a scenario where you’re comparing sales data. If cells with quarterly sales figures (entered values) are highlighted in green, it means these figures have been updated between the two versions. Consequently, if the “Year-to-Date” (YTD) column (calculated value) also shows blue-green highlighting, it indicates that the updated quarterly sales figures have impacted the calculated YTD totals. Furthermore, formula changes are also highlighted, allowing you to identify if formulas themselves have been altered.
-
“Resize Cells to Fit” Option: If cell content is truncated due to narrow columns, click Resize Cells to Fit (usually found in the ribbon or context menu). This will automatically adjust column widths to display the full content of each cell, making it easier to read and interpret the differences.
Expanding Your Excel Analysis with the Inquire Add-in
Beyond Spreadsheet Compare, Excel offers another valuable tool called the Inquire add-in (available in Excel 2013 and later, often requiring activation). While Spreadsheet Compare focuses on file comparison, the Inquire add-in provides a broader suite of analytical capabilities directly within Excel.
Key Features of the Inquire Add-in:
- Workbook Analysis: Provides a comprehensive overview of a workbook’s structure, formulas, potential errors, and inconsistencies.
- Relationship Exploration: Visualizes relationships between cells, worksheets, and even external workbooks, helping you understand data dependencies and flows.
- Excess Formatting Cleanup: Helps to reduce file size and improve performance by identifying and removing unnecessary cell formatting.
If you have the Inquire add-in enabled (the “Inquire” tab will be visible in the Excel ribbon), you can access Spreadsheet Compare directly from Excel using the Compare Files command within the Inquire tab. This offers a convenient workflow for users who prefer to initiate comparisons from within the Excel environment.
To learn more about the Inquire add-in and how to activate it, refer to these resources:
- Turn on the Inquire add-in
- What you can do with Spreadsheet Inquire
Conclusion: Streamline Excel File Comparison
Spreadsheet Compare is an indispensable tool for anyone who regularly works with and manages multiple Excel files. By providing a visual and detailed comparison of workbooks, it significantly simplifies the process of identifying differences, tracking changes, and ensuring data accuracy. Whether you’re auditing financial reports, managing project data, or simply collaborating on spreadsheets, mastering Spreadsheet Compare can save you time and enhance the reliability of your Excel-based workflows. For organizations managing critical Excel and Access files, consider exploring Microsoft Audit and Control Management Server and Microsoft Discovery and Risk Assessment Server for advanced change management and risk mitigation.