Comparing cameras can be daunting, but COMPARE.EDU.VN offers a streamlined approach to making informed decisions. This guide provides a detailed methodology on camera comparison, ensuring you consider essential factors like signal-to-noise ratio and read noise for optimal image quality. Learn how to evaluate camera specifications and performance effectively.
1. Understanding the Basics of Camera Comparison
Comparing cameras involves a multifaceted approach that goes beyond just looking at specifications. It requires a deep dive into understanding how each camera performs under similar conditions and what factors influence image quality. This includes assessing the signal-to-noise ratio (SNR), read noise, quantum efficiency (QE), and other critical parameters. The goal is to provide a fair and accurate comparison to help you choose the best camera for your specific needs.
1.1. Defining the Purpose of Comparison
Before diving into the technical aspects, it’s essential to define the purpose of your camera comparison. Are you looking to improve low-light performance, capture high-resolution images, or achieve better color accuracy? Identifying your priorities will help you focus on the relevant specifications and performance metrics.
1.2. Identifying Key Camera Specifications
Key specifications to consider include:
- Sensor Size: Larger sensors generally capture more light, resulting in better image quality, especially in low-light conditions.
- Resolution (Megapixels): Higher resolution allows for more detailed images and larger prints without losing quality.
- ISO Range: A wider ISO range provides more flexibility in various lighting conditions, but higher ISO settings can introduce more noise.
- Frame Rate (FPS): Important for video recording, a higher frame rate allows for smoother motion.
- Lens Compatibility: The range of lenses available for a camera system can significantly impact its versatility.
- Image Stabilization: Reduces blur caused by camera shake, especially useful in low light or when using long focal lengths.
2. Signal-to-Noise Ratio (SNR) Explained
The signal-to-noise ratio (SNR) is a critical metric for evaluating camera performance. It quantifies the ratio of desired signal (light captured from the subject) to unwanted noise (random variations in the signal). A higher SNR indicates a cleaner image with less noise, resulting in better image quality.
2.1. Calculating SNR: A Quick Estimate
A quick and dirty estimate of SNR can be calculated as follows:
-
Signal: Determine the maximum or mean intensity of a region of interest with decent signal, then subtract the background (mean intensity of an area with minimal signal).
-
Noise: Estimate the noise as the standard deviation of a region with minimal signal.
Note: This is not strictly accurate because the region lacks Poisson noise (shot noise) intrinsic in the signal. However, it provides an estimate of noise due to read noise alone.
-
SNR: Divide the signal by the noise.
2.2. Factors Affecting SNR
Several factors can affect the SNR, including:
- Light Intensity: More light generally leads to a higher signal and better SNR.
- Exposure Time: Longer exposure times can increase the signal but may also increase noise.
- Sensor Quality: Sensors with lower read noise and higher quantum efficiency (QE) tend to have better SNR.
- Temperature: Higher temperatures can increase dark current, leading to more noise.
2.3. Challenges in Measuring SNR Accurately
Measuring SNR accurately can be challenging, especially with biological samples, due to factors like bleaching. To mitigate these challenges:
- Alternate Cameras: Switch up which camera you use for the first image to account for potential variations.
- Use Non-Bleaching Samples: Employ samples that barely bleach, such as beads or test slides.
- Maintain Light Path Consistency: Use the same filter sets and camera port for each camera.
3. Sampling and Pixel Size Considerations
Pixel size and sampling are crucial considerations when comparing cameras. Bigger pixels tend to have better SNR but at the expense of sampling finer details.
3.1. The Relationship Between Pixel Size and SNR
Larger pixels capture more light, leading to a higher signal and better SNR. This is particularly beneficial in low-light conditions where maximizing light capture is essential.
3.2. The Impact of Pixel Size on Image Resolution
While larger pixels improve SNR, they can also reduce image resolution. Smaller pixels allow for more detail to be captured, resulting in sharper images. Therefore, finding the right balance between pixel size and resolution is crucial.
3.3. Optimal Pixel Size for Different Applications
The optimal pixel size depends on the specific application. For example, astrophotography benefits from larger pixels to capture faint light, while landscape photography may prioritize smaller pixels for maximum detail.
4. Understanding Read Noise
Read noise is the random variation in signal introduced during the readout process. It’s a critical factor in determining the low-light performance of a camera.
4.1. How Read Noise Affects Image Quality
High read noise can obscure fine details and reduce the overall clarity of an image, especially in low-light conditions. Cameras with lower read noise perform better in challenging lighting situations.
4.2. Factors Influencing Read Noise
Several factors can influence read noise, including:
- Sensor Technology: Different sensor technologies, such as CMOS and CCD, have varying levels of read noise.
- Readout Speed: Faster readout speeds can sometimes increase read noise.
- Temperature: Lower temperatures can reduce read noise.
4.3. Comparing Read Noise Specifications
When comparing cameras, pay close attention to read noise specifications. Lower numbers indicate better performance. Be sure to check the readout mode used for the specifications, as different modes can affect read noise levels.
5. Dark Current: What You Need To Know
Dark current is the average number of random electrons thermally generated during exposure. While generally less significant than read noise, it can still impact image quality, especially in long exposures.
5.1. The Impact of Dark Current on Long Exposures
Dark current accumulates over time, so it becomes more noticeable in long exposures. This can result in increased noise and a reduction in image quality.
5.2. Factors Affecting Dark Current
Dark current is primarily influenced by temperature. Higher temperatures increase dark current, while lower temperatures reduce it.
5.3. Minimizing Dark Current
To minimize the impact of dark current, consider the following:
- Cooling: Using a cooled camera can significantly reduce dark current.
- Shorter Exposures: Whenever possible, use shorter exposure times to limit the accumulation of dark current.
- Calibration: Dark frame subtraction can help remove the effects of dark current from your images.
6. Noise and Gain Uniformity: Ensuring Consistent Performance
Noise and gain uniformity refer to how consistent the noise and gain characteristics are across the various amplifiers on the camera’s chip. This is crucial for ensuring consistent performance across the entire sensor.
6.1. Understanding Noise Uniformity
Noise uniformity ensures that the level of noise is consistent across the sensor. Inconsistent noise levels can result in uneven image quality, with some areas appearing noisier than others.
6.2. Understanding Gain Uniformity
Gain uniformity ensures that each pixel responds similarly to the same amount of light. Variations in gain can lead to inconsistencies in brightness and color across the image.
6.3. How to Assess Noise and Gain Uniformity
Assessing noise and gain uniformity can be challenging but is essential for ensuring consistent performance. Look for specifications like “readout noise distribution” and “pixel response non-uniformity” in the camera’s spec sheet.
7. The Role of Quantum Efficiency (QE)
Quantum efficiency (QE) is the percentage of photons that hit the sensor and are converted into electrons. It’s a crucial factor in determining the light sensitivity of a camera.
7.1. How QE Affects Light Sensitivity
A higher QE means the camera is more efficient at capturing light, resulting in brighter images with less noise. This is particularly important in low-light conditions.
7.2. Comparing QE Values
When comparing cameras, look for QE values across the spectrum of light you intend to capture. Some cameras may have high QE in certain wavelengths but lower QE in others.
7.3. The Importance of QE in Specific Applications
QE is especially important in applications like astrophotography, microscopy, and fluorescence imaging, where maximizing light capture is critical.
8. Evaluating Additional Camera Features
Beyond the core specifications, several additional camera features can impact performance and usability.
8.1. Image Stabilization
Image stabilization reduces blur caused by camera shake. This is especially useful in low light or when using long focal lengths. There are two main types of image stabilization:
- Optical Image Stabilization (OIS): Stabilizes the image by physically moving elements in the lens or sensor.
- Digital Image Stabilization (DIS): Stabilizes the image through software processing, which can sometimes reduce image quality.
8.2. Dynamic Range
Dynamic range is the range of light intensities a camera can capture, from the brightest highlights to the darkest shadows. A wider dynamic range allows for more detail to be captured in both bright and dark areas of the image.
8.3. Bit Depth
Bit depth refers to the number of bits used to represent each color channel in an image. Higher bit depths allow for more tonal gradations and smoother transitions between colors.
9. Avoiding Misleading Specifications and Marketing Terms
Camera manufacturers often use marketing terms that can be misleading. It’s important to understand what these terms mean and how they relate to actual performance.
9.1. Understanding “Prime Enhance” and Other Denoising Modes
Some cameras, like the Prime BSI, advertise “prime enhance” or other denoising modes. While these features can improve the appearance of images, they can also mask underlying issues and make it difficult to compare cameras fairly.
9.2. Identifying Genuine Improvements vs. Marketing Hype
Focus on objective specifications and performance metrics rather than relying solely on marketing claims. Look for independent reviews and comparisons to get a more accurate assessment of camera performance.
9.3. The Importance of Objective Testing
Objective testing involves measuring camera performance under controlled conditions. This can provide valuable insights into how a camera performs in real-world scenarios.
10. Practical Steps for Conducting a Camera Comparison
To conduct a thorough camera comparison, follow these practical steps:
10.1. Setting Up a Controlled Testing Environment
A controlled testing environment is essential for ensuring a fair comparison. This includes:
- Consistent Lighting: Use consistent lighting conditions to ensure that each camera receives the same amount of light.
- Stable Mounting: Mount the cameras on a stable tripod to eliminate camera shake.
- Identical Settings: Use identical settings on each camera, including aperture, shutter speed, and ISO.
10.2. Capturing Test Images
Capture a variety of test images to evaluate camera performance in different scenarios. This includes:
- Low-Light Images: Capture images in low-light conditions to assess noise performance.
- High-Contrast Images: Capture images with high contrast to evaluate dynamic range.
- Color Charts: Use color charts to assess color accuracy.
10.3. Analyzing Results
Analyze the results by:
- Examining Images Closely: Examine the test images closely to identify differences in noise, sharpness, and color accuracy.
- Measuring SNR: Measure the SNR of the test images to quantify noise performance.
- Comparing Specifications: Compare the specifications of the cameras to identify potential strengths and weaknesses.
11. Case Studies: Comparing Popular Camera Models
Let’s look at a couple of case studies for popular camera models to illustrate the comparison process.
11.1. Comparing the Photometrics Prime BSI and Hamamatsu Flash 4.0 LT
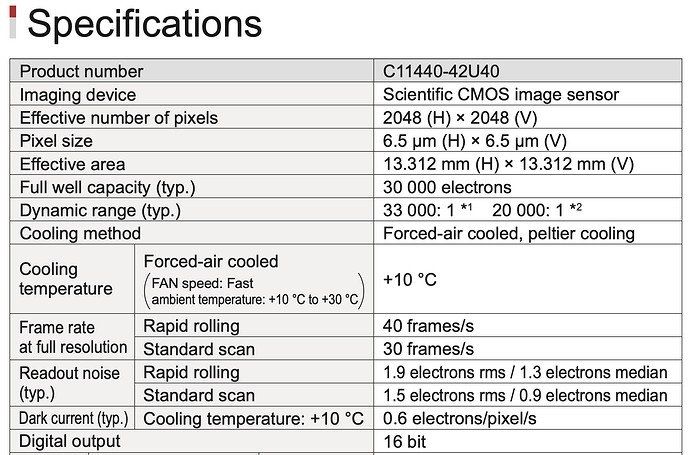
The Photometrics Prime BSI and Hamamatsu Flash 4.0 LT are both high-performance scientific cameras. Here’s a comparison based on their specifications:
| Feature | Photometrics Prime BSI | Hamamatsu Flash 4.0 LT |
|---|---|---|
| Sensor Size | 16 mm diagonal | 13.3 mm diagonal |
| Pixel Size | 6.5 µm | 6.5 µm |
| QE | 95% | 82% |
| Read Noise (rms) | 1.1 electrons | 1.5 electrons |
| Dark Current | 0.05 e/pix/s | 0.6 e/pix/s |
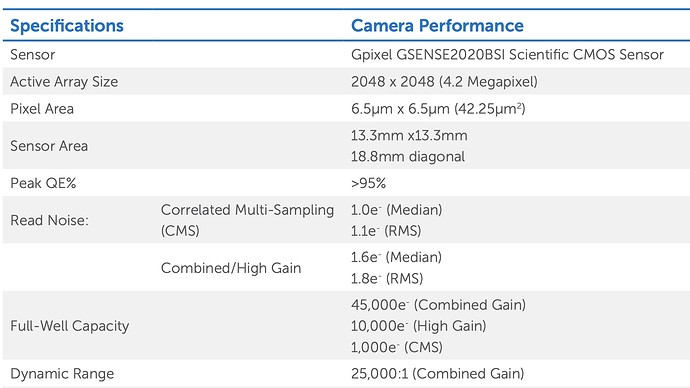
Based on these specifications, the Prime BSI has a higher QE and lower read noise, which should result in better low-light performance. However, the Flash 4.0 LT has a lower dark current.
11.2. Analyzing Real-World Performance
In real-world testing, the Prime BSI typically outperforms the Flash 4.0 LT in low-light conditions due to its higher QE and lower read noise. However, the Flash 4.0 LT may be preferable in situations where long exposures are required due to its lower dark current.
12. Tools and Resources for Camera Comparison
Several tools and resources can aid in the camera comparison process.
12.1. Websites with Camera Specification Databases
Websites like DPReview, Camera Decision, and Imaging Resource offer comprehensive camera specification databases, allowing you to compare cameras side-by-side.
12.2. Software for Image Analysis
Software like ImageJ, Fiji, and MATLAB can be used for image analysis, including measuring SNR and assessing image quality.
12.3. Online Forums and Communities
Online forums and communities like Reddit’s r/photography and specialized imaging forums can provide valuable insights and advice from experienced users.
13. Addressing Common Misconceptions About Camera Specifications
Several common misconceptions about camera specifications can lead to incorrect conclusions.
13.1. Megapixels Are Not Everything
While megapixels are important, they are not the only factor determining image quality. Sensor size, QE, read noise, and other factors also play a significant role.
13.2. Higher ISO Does Not Always Mean Better Low-Light Performance
While a wider ISO range provides more flexibility, higher ISO settings can introduce more noise. A camera with better noise performance at high ISO settings will generally outperform a camera with a higher maximum ISO but poorer noise performance.
13.3. Kit Lenses vs. Prime Lenses
Kit lenses are often included with cameras and are a good starting point. However, prime lenses (lenses with a fixed focal length) typically offer better image quality and wider apertures, allowing for better low-light performance and shallower depth of field.
14. Optimizing Your Camera Settings for Fair Comparisons
To ensure fair comparisons, it’s crucial to optimize your camera settings.
14.1. Setting the Correct White Balance
Setting the correct white balance ensures accurate color reproduction. Use a white balance target or set a custom white balance based on the lighting conditions.
14.2. Using Manual Mode for Consistent Exposure
Use manual mode to ensure consistent exposure across all cameras. This eliminates variations caused by automatic exposure settings.
14.3. Disabling Automatic Enhancements
Disable any automatic enhancements, such as denoising or sharpening, to ensure a fair comparison of the raw image data.
15. The Future of Camera Technology and Comparison
Camera technology is constantly evolving, with new sensors, processors, and features being introduced regularly. This makes it even more important to stay informed and adapt your comparison methods accordingly.
15.1. Emerging Sensor Technologies
Emerging sensor technologies, such as global shutter sensors and backside-illuminated (BSI) sensors, are improving image quality and performance.
15.2. Advances in Image Processing
Advances in image processing algorithms are enabling better noise reduction, dynamic range, and color accuracy.
15.3. The Role of AI in Camera Technology
Artificial intelligence (AI) is playing an increasingly important role in camera technology, enabling features like automatic scene recognition, object tracking, and computational photography.
16. Ethical Considerations in Camera Comparisons
Ethical considerations are important when conducting camera comparisons.
16.1. Transparency in Testing Methodology
Be transparent about your testing methodology, including the equipment used, settings, and analysis methods.
16.2. Avoiding Bias
Avoid bias by using objective metrics and presenting the results fairly.
16.3. Acknowledging Limitations
Acknowledge the limitations of your comparison and avoid making definitive statements that are not supported by the data.
17. Real-World Applications of Effective Camera Comparisons
Effective camera comparisons have numerous real-world applications.
17.1. Scientific Research
In scientific research, accurate camera comparisons are essential for selecting the best equipment for imaging experiments.
17.2. Professional Photography
Professional photographers rely on camera comparisons to choose the best cameras for their specific needs, whether it’s for portrait photography, landscape photography, or wildlife photography.
17.3. Consumer Choices
Consumers can use camera comparisons to make informed decisions when purchasing cameras for personal use.
18. How COMPARE.EDU.VN Simplifies the Camera Comparison Process
COMPARE.EDU.VN simplifies the camera comparison process by providing comprehensive and objective comparisons of various cameras. Our platform offers detailed specifications, test results, and user reviews, making it easy to find the best camera for your needs.
18.1. Objective and Detailed Comparisons
COMPARE.EDU.VN provides objective and detailed comparisons of cameras, focusing on key specifications and performance metrics.
18.2. User Reviews and Expert Opinions
Our platform includes user reviews and expert opinions, providing valuable insights into real-world performance.
18.3. Easy-to-Use Interface
COMPARE.EDU.VN features an easy-to-use interface, making it simple to compare cameras side-by-side and find the information you need.
19. Understanding Camera Lenses: A Critical Component
While camera bodies get much of the attention, the lens is arguably the most critical component in determining image quality.
19.1. Types of Lenses: Prime vs. Zoom
- Prime Lenses: Offer superior image quality and wider apertures but have a fixed focal length.
- Zoom Lenses: Provide versatility with variable focal lengths but may compromise on image quality and aperture.
19.2. Lens Aperture and Its Impact
The aperture of a lens determines how much light can enter the camera. Wider apertures (lower f-numbers) allow for better low-light performance and shallower depth of field.
19.3. Lens Quality and Sharpness
Lens quality and sharpness are critical for capturing detailed images. Look for lenses with high resolving power and minimal distortion.
20. The Importance of Firmware Updates
Firmware updates can significantly improve camera performance by fixing bugs, adding new features, and optimizing existing functions.
20.1. How Firmware Updates Improve Camera Performance
Firmware updates can address issues like:
- Improved Autofocus: Enhancements to autofocus algorithms can improve speed and accuracy.
- Enhanced Image Processing: Firmware updates can optimize image processing algorithms, resulting in better noise reduction and color accuracy.
- New Features: Firmware updates can add new features, such as new shooting modes or compatibility with new accessories.
20.2. Keeping Your Camera Up-to-Date
Check the manufacturer’s website regularly for firmware updates and install them promptly to ensure optimal performance.
20.3. Risks and Precautions
While firmware updates are generally safe, there is always a small risk of encountering issues. Follow the manufacturer’s instructions carefully and ensure your camera is fully charged before starting the update process.
21. Understanding Color Science
Color science is the study of how cameras capture and reproduce color. It’s a critical factor in determining the overall look and feel of your images.
21.1. Color Profiles and Their Impact
Color profiles define how colors are interpreted and reproduced by the camera. Different color profiles can result in different color renditions, with some being more accurate than others.
21.2. White Balance and Color Accuracy
Setting the correct white balance is crucial for achieving accurate color reproduction. Use a white balance target or set a custom white balance based on the lighting conditions.
21.3. Color Grading and Post-Processing
Color grading and post-processing can be used to fine-tune the colors in your images and achieve a desired look and feel.
22. Optimizing Dynamic Range
Dynamic range is the range of light intensities a camera can capture, from the brightest highlights to the darkest shadows. A wider dynamic range allows for more detail to be captured in both bright and dark areas of the image.
22.1. HDR Photography
High Dynamic Range (HDR) photography involves capturing multiple images with different exposures and combining them to create an image with a wider dynamic range.
22.2. Exposure Bracketing
Exposure bracketing involves capturing a series of images with different exposures, allowing you to choose the best exposure for each part of the scene.
22.3. In-Camera Dynamic Range Optimization
Some cameras offer in-camera dynamic range optimization features, such as Active D-Lighting or Highlight Tone Priority, which can help improve dynamic range.
23. The Significance of Shutter Type: Mechanical vs. Electronic
The shutter type in a camera plays a crucial role in how images are captured, influencing aspects like distortion, flash sync speed, and continuous shooting capabilities.
23.1. Mechanical Shutters
Mechanical shutters are physical barriers that control the exposure time by opening and closing in front of the sensor. They are known for:
- Accurate Exposure: Providing precise and consistent exposure times.
- Flash Sync: Allowing for flash photography at higher sync speeds, reducing ambient light interference.
- No Rolling Shutter Effect: Avoiding distortion of fast-moving objects, making them ideal for sports photography.
23.2. Electronic Shutters
Electronic shutters control exposure by turning the camera sensor on and off electronically. Advantages include:
- Silent Operation: Enabling completely silent shooting, crucial for wildlife or candid photography.
- High Shutter Speeds: Achieving extremely fast shutter speeds, beneficial for bright conditions or capturing high-speed motion.
- No Mechanical Wear: Eliminating wear and tear associated with mechanical parts, increasing the camera’s lifespan.
23.3. Hybrid Systems
Some advanced cameras utilize a hybrid system, combining both mechanical and electronic shutters to offer the benefits of each while mitigating their drawbacks.
24. Evaluating Continuous Shooting and Buffer Capacity
For action, sports, and wildlife photography, the continuous shooting speed and buffer capacity of a camera are crucial for capturing a sequence of moments.
24.1. Frames Per Second (FPS)
The frame rate, measured in frames per second (FPS), indicates how many images the camera can capture in one second during continuous shooting.
24.2. Buffer Capacity
The buffer capacity refers to the amount of data the camera can temporarily store while capturing a burst of images.
24.3. Factors Affecting Performance
Several factors can affect continuous shooting performance, including:
- Image Quality Settings: Shooting in JPEG format allows for faster continuous shooting than RAW format, due to smaller file sizes.
- Memory Card Speed: Using a faster memory card can increase buffer capacity and reduce write times.
- Processor Speed: A faster processor allows the camera to process and write images more quickly.
25. The Impact of Sensor Size: Crop Factor Explained
Sensor size significantly impacts the field of view and depth of field, affecting how images are framed and perceived.
25.1. Full-Frame Sensors
Full-frame sensors, mimicking the size of traditional 35mm film, offer a wide field of view, excellent low-light performance, and shallow depth of field, ideal for professional photography and artistic expression.
25.2. Crop Sensors
Crop sensors, smaller than full-frame, introduce a “crop factor,” effectively narrowing the field of view. Advantages include:
- Reduced Size and Cost: Making cameras and lenses more compact and affordable.
- Increased Reach: Providing greater magnification for telephoto shots, beneficial for wildlife and sports photography.
25.3. Implications for Lens Choice
When using crop sensors, it’s essential to consider the crop factor when selecting lenses to achieve the desired field of view.
26. Best Practices for Low-Light Photography
Mastering low-light photography requires strategic camera settings and techniques to capture clear, detailed images in challenging conditions.
26.1. Wide Aperture Lenses
Utilizing lenses with wide apertures (low f-numbers) allows maximum light to reach the sensor, brightening the image and enabling faster shutter speeds.
26.2. Stabilizing Equipment
Employing tripods or image-stabilized lenses reduces camera shake, ensuring sharpness during longer exposures.
26.3. Understanding ISO Settings
Increasing ISO boosts the camera’s sensitivity to light, but higher ISO settings introduce more noise. Balance ISO with aperture and shutter speed for optimal results.
27. The Art of Flash Photography: Techniques and Equipment
Flash photography provides controlled lighting for various scenarios, enhancing portraits, filling shadows, and freezing motion.
27.1. On-Camera vs. Off-Camera Flash
- On-Camera Flash: Convenient for quick snapshots and fill-flash, but can create harsh shadows.
- Off-Camera Flash: Offers greater control over lighting direction and intensity, ideal for professional results.
27.2. Flash Modes: TTL, Manual, and HSS
- TTL (Through-The-Lens): Automatically adjusts flash power for proper exposure, suitable for changing conditions.
- Manual: Grants full control over flash power and settings, ideal for consistent lighting scenarios.
- HSS (High-Speed Sync): Enables flash usage at high shutter speeds, overcoming sync limitations for creative effects.
27.3. Modifiers: Softboxes, Umbrellas, and Reflectors
Modifiers shape and diffuse flash light, reducing harshness and creating pleasing lighting effects.
28. Essential Video Features in Modern Cameras
For videographers, modern cameras offer a range of features that enhance video quality, ease of use, and creative possibilities.
28.1. Resolution and Frame Rate
Choose the resolution and frame rate that matches your video needs, whether it’s 4K for high-resolution footage or higher frame rates for slow-motion effects.
28.2. Codecs and Bitrates
Understand video codecs (compression algorithms) and bitrates, as they impact file size and video quality.
28.3. Image Stabilization
Effective image stabilization minimizes camera shake, ensuring smooth and professional-looking video footage.
29. Understanding Camera Histograms
A camera histogram is a graphical representation of the tonal distribution in an image.
29.1. Reading the Histogram
The horizontal axis represents tonal values from black to white, while the vertical axis represents the number of pixels at each tone.
29.2. Identifying Overexposure and Underexposure
A histogram that is skewed to the right indicates overexposure, while a histogram that is skewed to the left indicates underexposure.
29.3. Using the Histogram for Optimal Exposure
Adjust your camera settings until the histogram is evenly distributed across the tonal range to achieve optimal exposure.
30. Post-Processing Software: Enhancing Your Images
Post-processing software allows you to fine-tune your images, correct imperfections, and unleash your creative vision.
30.1. Adobe Lightroom
Adobe Lightroom is a comprehensive photo editing software that offers powerful tools for adjusting exposure, color, and detail.
30.2. Adobe Photoshop
Adobe Photoshop is a professional-grade image editing software that offers advanced tools for retouching, compositing, and special effects.
30.3. Free Alternatives
Free alternatives like GIMP and Darktable offer many of the same features as paid software.
FAQ: Common Questions About Camera Comparisons
Q1: What is the most important factor when comparing cameras?
A: The most important factor depends on your specific needs. However, sensor size, QE, and read noise are generally critical.
Q2: Are more megapixels always better?
A: No, more megapixels are not always better. Sensor size, QE, and other factors also play a significant role in image quality.
Q3: How can I compare cameras in low-light conditions?
A: Look for cameras with high QE and low read noise. Also, consider the lens aperture and image stabilization.
Q4: What is the best way to test camera performance?
A: Set up a controlled testing environment and capture a variety of test images. Analyze the results by examining the images closely and measuring SNR.
Q5: What is the role of the lens in camera performance?
A: The lens is a critical component in determining image quality. Look for lenses with high resolving power and wide apertures.
Q6: How important is dynamic range?
A: Dynamic range is important for capturing detail in both bright and dark areas of the image.
Q7: What are some common misconceptions about camera specifications?
A: Some common misconceptions include that megapixels are everything and that higher ISO always means better low-light performance.
Q8: How can I avoid misleading marketing terms?
A: Focus on objective specifications and performance metrics rather than relying solely on marketing claims.
Q9: What is the significance of sensor size?
A: Larger sensors generally capture more light, resulting in better image quality, especially in low-light conditions.
Q10: What is the impact of firmware updates on camera performance?
A: Firmware updates can improve camera performance by fixing bugs, adding new features, and optimizing existing functions.
Choosing the right camera requires careful consideration of various factors, from sensor size and SNR to read noise and QE. By understanding these concepts and following the practical steps outlined in this guide, you can make an informed decision and select the best camera for your specific needs. For more comprehensive comparisons and expert advice, visit COMPARE.EDU.VN at 333 Comparison Plaza, Choice City, CA 90210, United States, or contact us via Whatsapp at +1 (626) 555-9090. Let compare.edu.vn help you make the best choice.
This image displays camera specifications related to bit depth, pixel size, and sensor size, which are critical factors when evaluating camera performance.
The camera spec sheet visualises key parameters like the sensor type, pixel dimensions, and frame rate that affect image quality and overall camera capabilities.