How Do I Compare Two Excel Sheets For Differences? This is a common question, and COMPARE.EDU.VN offers an efficient solution for quickly identifying discrepancies between spreadsheets. Comparing Excel sheets for differences can be a time-consuming task, but with the right approach, it becomes manageable; exploring options for worksheet comparison and spreadsheet analysis is key to streamlining the process and ensuring data accuracy.
1. Introduction to Excel Sheet Comparison
Excel is a powerful tool for data management and analysis, widely used across various industries. However, dealing with multiple versions of spreadsheets can be challenging, especially when you need to identify differences between them. Whether you’re tracking changes, auditing data, or merging information, knowing how to compare two Excel sheets for differences efficiently is crucial. This article will explore various methods and tools to help you accomplish this task, ensuring accuracy and saving you valuable time with assistance from COMPARE.EDU.VN, located at 333 Comparison Plaza, Choice City, CA 90210, United States; or contact them via Whatsapp: +1 (626) 555-9090 or on their website: COMPARE.EDU.VN.
1.1. Why Compare Excel Sheets?
Comparing Excel sheets is essential for several reasons:
- Data Accuracy: Ensuring the accuracy of data across different versions of a spreadsheet is crucial for reliable analysis and decision-making.
- Change Tracking: Identifying changes made over time helps track updates, modifications, and potential errors.
- Auditing: Comparing sheets is a key part of auditing processes to verify data integrity and compliance.
- Collaboration: When multiple users work on the same data, comparing sheets helps merge changes and resolve conflicts.
- Error Detection: Identifying discrepancies can help uncover errors and inconsistencies that may affect the overall quality of the data.
1.2. Common Challenges in Comparing Excel Sheets
Despite its importance, comparing Excel sheets can be challenging:
- Large Datasets: Manually comparing large datasets is time-consuming and prone to errors.
- Complex Formulas: Differences in formulas can be hard to identify without the right tools.
- Formatting Issues: Changes in formatting can obscure actual data differences.
- Multiple Versions: Keeping track of and comparing multiple versions of the same spreadsheet can be confusing.
- Human Error: Manual comparison is susceptible to human error, especially with complex or lengthy sheets.
1.3. Overview of Comparison Methods
There are several methods to compare two Excel sheets for differences:
- Manual Comparison: This involves visually inspecting the sheets and noting differences.
- Conditional Formatting: Using Excel’s conditional formatting to highlight differences.
- Formulas: Employing Excel formulas to compare cell values.
- VBA Macros: Writing custom macros to automate the comparison process.
- Excel’s Built-in Tool: Spreadsheet Compare: A tool available in certain versions of Office Professional Plus.
- Third-Party Tools: Utilizing specialized software designed for Excel comparison.
2. Manual Comparison: A Detailed Guide
Manual comparison involves visually inspecting two Excel sheets side by side to identify differences. While this method is straightforward, it is best suited for small datasets and simple spreadsheets due to its time-consuming and error-prone nature.
2.1. When to Use Manual Comparison
- Small Datasets: When dealing with a limited number of rows and columns.
- Simple Spreadsheets: For sheets without complex formulas or intricate formatting.
- Occasional Use: When comparison is not a frequent task.
- No Specialized Tools: When you don’t have access to advanced comparison tools.
2.2. Step-by-Step Guide to Manual Comparison
- Open Both Sheets: Open the two Excel sheets you want to compare.
- Arrange Windows: Arrange the Excel windows side by side for easy viewing. You can do this by going to the “View” tab and clicking “Arrange All,” then selecting “Vertical” or “Horizontal.”
- Scroll Simultaneously: Synchronize scrolling to keep corresponding rows aligned. This can be done using the “Synchronous Scrolling” feature under the “View” tab.
- Visually Inspect: Manually compare each cell in one sheet with the corresponding cell in the other sheet.
- Note Differences: Record any differences you find in a separate document or highlight them directly in the sheets.
2.3. Tips for Effective Manual Comparison
- Stay Organized: Use a systematic approach to ensure you don’t miss any cells.
- Take Breaks: Avoid eye strain and maintain focus by taking regular breaks.
- Use Highlighting: Highlight or mark differences directly in the sheets as you find them.
- Double-Check: Verify any discrepancies to ensure they are actual differences and not just visual errors.
2.4. Limitations of Manual Comparison
- Time-Consuming: It can take a significant amount of time to compare even moderately sized sheets.
- Error-Prone: The risk of missing differences increases with the size and complexity of the sheets.
- Not Suitable for Complex Data: Inefficient for sheets with formulas, conditional formatting, or intricate data structures.
3. Using Conditional Formatting for Highlighting Differences
Conditional formatting in Excel allows you to automatically highlight cells that meet specific criteria. This method is useful for identifying differences between two sheets based on cell values or formulas.
3.1. When to Use Conditional Formatting
- Highlighting Value Differences: When you need to quickly see where cell values differ between two sheets.
- Simple Comparisons: For sheets where you are primarily interested in value differences.
- Visual Aid: As a visual aid to manual comparison.
3.2. Step-by-Step Guide to Using Conditional Formatting
- Open Both Sheets: Open the two Excel sheets you want to compare.
- Select the Data Range: Select the range of cells in the first sheet that you want to compare.
- Open Conditional Formatting: Go to the “Home” tab, click on “Conditional Formatting,” and select “New Rule.”
- Create a New Rule: Choose “Use a formula to determine which cells to format.”
- Enter the Formula: Enter a formula that compares the selected range with the corresponding range in the second sheet. For example, if you are comparing sheet1 and sheet2, and you’ve selected A1:C10 in sheet1, your formula would be
=A1<>Sheet2!A1. - Set the Formatting: Click on “Format” and choose the formatting style you want to apply to the cells that differ. For example, you can choose to fill the cells with a specific color.
- Apply the Rule: Click “OK” to apply the conditional formatting rule.
- Repeat for the Second Sheet (Optional): Repeat the process for the second sheet to highlight differences there as well.
3.3. Example Formulas for Conditional Formatting
- To highlight cells in Sheet1 that are different from Sheet2:
=A1<>Sheet2!A1 - To highlight cells in Sheet1 that are greater than the corresponding cells in Sheet2:
=A1>Sheet2!A1 - To highlight cells in Sheet1 that are less than the corresponding cells in Sheet2:
=A1<Sheet2!A1
3.4. Tips for Effective Use of Conditional Formatting
- Use Clear Formatting: Choose a formatting style that is easy to see, such as a bright fill color or bold text.
- Test the Formula: Before applying the rule to the entire range, test it on a small sample to ensure it works correctly.
- Manage Rules: Use the “Conditional Formatting Rules Manager” to edit or delete rules as needed.
3.5. Limitations of Conditional Formatting
- Performance Issues: Applying conditional formatting to large datasets can slow down Excel.
- Limited to Visual Highlighting: It only highlights differences; it doesn’t provide a detailed report or summary.
- Complexity: Setting up complex rules can be challenging for users unfamiliar with Excel formulas.
4. Utilizing Excel Formulas for Comparison
Excel formulas can be used to compare cell values between two sheets, providing a way to identify and quantify differences. This method is particularly useful when you need to perform calculations or derive specific information based on the comparison results.
4.1. When to Use Formulas for Comparison
- Detailed Analysis: When you need to not just see the differences, but also analyze them.
- Calculating Differences: When you want to calculate the magnitude of the differences between cells.
- Automated Reporting: When you need to generate reports or summaries based on the comparison results.
4.2. Step-by-Step Guide to Using Formulas
- Open Both Sheets: Open the two Excel sheets you want to compare.
- Create a Comparison Column: In one of the sheets, create a new column where you will enter the comparison formulas.
- Enter the Formula: In the first cell of the comparison column, enter a formula that compares the corresponding cells in the two sheets. For example, if you are comparing sheet1 and sheet2, and you want to compare cell A1 in both sheets, your formula would be
=IF(Sheet1!A1=Sheet2!A1,"Match","Mismatch"). - Copy the Formula: Copy the formula down the column to compare all the relevant cells.
- Analyze the Results: Review the results in the comparison column to identify matches and mismatches.
4.3. Example Formulas for Comparison
- To check if two cells are equal:
=IF(Sheet1!A1=Sheet2!A1,"Match","Mismatch") - To calculate the difference between two cells:
=Sheet1!A1-Sheet2!A1 - To check if a cell in Sheet1 is greater than a cell in Sheet2:
=IF(Sheet1!A1>Sheet2!A1,"Greater","Not Greater") - To check if a cell in Sheet1 is less than a cell in Sheet2:
=IF(Sheet1!A1<Sheet2!A1,"Less","Not Less")
4.4. Tips for Effective Use of Formulas
- Use Absolute References: Use absolute references (e.g.,
$A$1) when you want to keep a reference constant while copying the formula. - Combine with Conditional Formatting: Use conditional formatting to highlight the results of the formulas for easy visual identification.
- Error Handling: Use error handling functions like
IFERRORto manage potential errors in the formulas.
4.5. Limitations of Using Formulas
- Complexity: Creating and managing complex formulas can be challenging for some users.
- Manual Setup: Requires manual setup of the comparison column and formulas.
- Performance: Can slow down Excel with very large datasets and complex formulas.
5. Automating Comparison with VBA Macros
VBA (Visual Basic for Applications) macros can automate the process of comparing two Excel sheets, making it more efficient and less prone to errors. This method is particularly useful for complex comparisons or when you need to perform the same comparison repeatedly.
5.1. When to Use VBA Macros
- Complex Comparisons: When the comparison logic is intricate or involves multiple criteria.
- Repeated Tasks: When you need to perform the same comparison regularly.
- Large Datasets: When dealing with large datasets where manual comparison or formulas are too slow.
- Custom Reporting: When you need to generate custom reports based on the comparison results.
5.2. Step-by-Step Guide to Creating a VBA Macro
- Open the VBA Editor: Open the Excel workbook, press
Alt + F11to open the VBA editor. - Insert a New Module: In the VBA editor, go to “Insert” and select “Module.”
- Write the VBA Code: Write the VBA code to compare the two sheets. Here’s an example:
Sub CompareSheets()
    Dim ws1 As Worksheet, ws2 As Worksheet
    Dim lastRow As Long, i As Long
    Dim diffCount As Long

    ' Set the worksheets to compare
    Set ws1 = ThisWorkbook.Sheets("Sheet1")
    Set ws2 = ThisWorkbook.Sheets("Sheet2")

    ' Get the last row with data in Sheet1
    lastRow = ws1.Cells(Rows.Count, "A").End(xlUp).Row

    ' Initialize the difference counter
    diffCount = 0

    ' Loop through each row
    For i = 1 To lastRow
        ' Compare values in column A
        If ws1.Cells(i, "A").Value <> ws2.Cells(i, "A").Value Then
            Debug.Print "Difference found in row " & i & ", Column A"
            diffCount = diffCount + 1
            ' Highlight the differences (optional)
            ws1.Cells(i, "A").Interior.Color = vbYellow
            ws2.Cells(i, "A").Interior.Color = vbYellow
        End If
    Next i

    ' Display the total number of differences
    MsgBox "Total differences found: " & diffCount
End Sub- Run the Macro: Close the VBA editor and go back to Excel. Go to the “View” tab, click on “Macros,” select the macro you created, and click “Run.”
5.3. Example VBA Code for Comparison
Here is a more detailed VBA code example that compares all cells in two sheets and highlights the differences:
Sub CompareSheetsDetailed()
    Dim ws1 As Worksheet, ws2 As Worksheet
    Dim lastRow As Long, lastCol As Long, i As Long, j As Long
    Dim diffCount As Long

    ' Set the worksheets to compare
    Set ws1 = ThisWorkbook.Sheets("Sheet1")
    Set ws2 = ThisWorkbook.Sheets("Sheet2")

    ' Get the last row and column with data in Sheet1
    lastRow = ws1.Cells(Rows.Count, "A").End(xlUp).Row
    lastCol = ws1.Cells(1, Columns.Count).End(xlToLeft).Column

    ' Initialize the difference counter
    diffCount = 0

    ' Loop through each row and column
    For i = 1 To lastRow
        For j = 1 To lastCol
            ' Compare values
            If ws1.Cells(i, j).Value <> ws2.Cells(i, j).Value Then
                Debug.Print "Difference found in row " & i & ", Column " & Chr(64 + j)
                diffCount = diffCount + 1
                ' Highlight the differences (optional)
                ws1.Cells(i, j).Interior.Color = vbYellow
                ws2.Cells(i, j).Interior.Color = vbYellow
            End If
        Next j
    Next i

    ' Display the total number of differences
    MsgBox "Total differences found: " & diffCount
End Sub
5.4. Tips for Writing Effective VBA Macros
- Use Comments: Add comments to your code to explain what each part does.
- Error Handling: Implement error handling to manage potential issues during execution.
- Optimize Code: Use efficient coding practices to ensure the macro runs quickly, especially with large datasets.
5.5. Limitations of Using VBA Macros
- Programming Knowledge: Requires knowledge of VBA programming.
- Security Concerns: Macros can pose security risks if they contain malicious code.
- Maintenance: Macros need to be maintained and updated to work correctly with different versions of Excel.
6. Excel’s Built-in Tool: Spreadsheet Compare
Microsoft Spreadsheet Compare is a built-in tool designed for comparing Excel files, offering detailed reports on differences, including formulas, values, and formatting. This tool is available with Office Professional Plus 2013, Office Professional Plus 2016, Office Professional Plus 2019, or Microsoft 365 Apps for enterprise.
6.1. When to Use Spreadsheet Compare
- Detailed Comparison Reports: When you need comprehensive reports on all types of differences.
- Formula Analysis: When you need to analyze differences in formulas.
- Professional Auditing: For professional auditing and compliance purposes.
6.2. Step-by-Step Guide to Using Spreadsheet Compare
- Open Spreadsheet Compare: On the “Start” screen, click “Spreadsheet Compare.” If you don’t see it, type “Spreadsheet Compare” and select it.
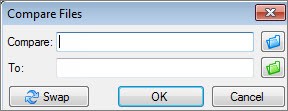
- Compare Files: Click “Home > Compare Files.” The “Compare Files” dialog box appears.
- Select Files:
- Click the blue folder icon next to the “Compare” box to browse to the earlier version of your workbook.
- Click the green folder icon next to the “To” box to browse to the later version of your workbook.
- Click “OK.”
- Choose Options: In the left pane, choose the options you want to see in the results, such as “Formulas,” “Macros,” or “Cell Format.” Or, just select “All.”
- Run the Comparison: Click “OK” to run the comparison.
6.3. Understanding the Results
- Side-by-Side Grid: The results appear in a two-pane grid, with the earlier version on the left and the later version on the right.
- Worksheet Navigation: If there are multiple worksheets, use the forward and back buttons on the horizontal scroll bar to navigate.
- Color-Coded Differences: Differences are highlighted by color, depending on the type of change. The lower-left pane is a legend that shows what the colors mean.
6.4. Tips for Effective Use of Spreadsheet Compare
- Password Protection: If you get an “Unable to open workbook” message, the workbook might be password protected. Enter the workbook’s password when prompted.
- Resize Cells: If the cells are too narrow to show the contents, click “Resize Cells to Fit.”
6.5. Limitations of Spreadsheet Compare
- Availability: Only available with specific versions of Office Professional Plus or Microsoft 365 Apps for enterprise.
- Complex Interface: Some users may find the interface complex and overwhelming.
- No Real-Time Comparison: It doesn’t offer real-time comparison or synchronization between sheets.
7. Third-Party Tools for Excel Comparison
Numerous third-party tools are available for comparing Excel sheets, offering advanced features and more user-friendly interfaces. These tools often provide additional functionalities like merging changes, detailed reporting, and integration with other applications.
7.1. Benefits of Using Third-Party Tools
- Advanced Features: Offer features beyond what Excel provides, such as merging changes and detailed reporting.
- User-Friendly Interface: Often have more intuitive interfaces compared to Excel’s built-in tools.
- Integration: Can integrate with other applications and systems.
- Support and Updates: Come with dedicated support and regular updates.
7.2. Popular Third-Party Tools
- Beyond Compare: A versatile tool for comparing files and folders, including Excel sheets. It offers features like syntax highlighting, session management, and script automation.
- Araxis Merge: A professional-grade tool for comparing and merging files, with excellent support for Excel sheets. It offers features like three-way merging, automatic merging, and detailed reporting.
- Diffchecker: An online tool for comparing text files, including Excel sheets. It’s easy to use and provides a quick way to identify differences.
- Synkronizer: An Excel add-in designed specifically for comparing and merging Excel workbooks. It offers features like automatic conflict resolution, change tracking, and version control.
- XL Comparator: A dedicated Excel comparison tool that highlights differences in data, formulas, and formatting.
7.3. Considerations When Choosing a Tool
- Features: Consider the specific features you need, such as merging, reporting, or integration.
- Ease of Use: Choose a tool with a user-friendly interface that is easy to learn.
- Performance: Ensure the tool can handle large datasets without slowing down.
- Cost: Compare the pricing models of different tools and choose one that fits your budget.
- Support: Look for a tool with good customer support and documentation.
7.4. Example: Using Beyond Compare
Beyond Compare is a powerful tool for comparing Excel sheets. Here’s how to use it:
- Install Beyond Compare: Download and install Beyond Compare from the official website.
- Open the Tool: Launch Beyond Compare.
- Select “Table Compare” Session: Choose the “Table Compare” session type.
- Load Excel Files: Load the two Excel files you want to compare.
- Adjust Settings: Adjust the settings as needed, such as specifying which columns to compare and how to handle differences.
- Compare: Click the “Compare” button to start the comparison.
- Review Results: Review the results, which are displayed in a side-by-side view with differences highlighted.
- Merge (Optional): If needed, merge the changes from one file to the other.
8. Best Practices for Excel Sheet Comparison
To ensure accurate and efficient Excel sheet comparison, follow these best practices:
8.1. Data Preparation
- Clean Data: Remove any unnecessary formatting, blank rows, or columns before comparing.
- Normalize Data: Ensure data is consistent across both sheets, such as using the same date formats and number formats.
- Sort Data: Sort the data in both sheets by a common column to ensure corresponding rows are aligned.
8.2. Choosing the Right Method
- Consider the Size and Complexity: Choose a method that is appropriate for the size and complexity of the sheets.
- Evaluate Your Skills: Choose a method that you are comfortable with and have the skills to implement.
- Test the Method: Test the method on a small sample before applying it to the entire dataset.
8.3. Documentation and Reporting
- Document the Process: Keep a record of the comparison process, including the methods used, the results, and any issues encountered.
- Generate Reports: Generate reports summarizing the differences found, including the number of differences, the types of differences, and the location of the differences.
- Share Results: Share the results with relevant stakeholders and discuss any necessary actions.
8.4. Regular Backups
- Backup Your Data: Always backup your data before making any changes.
- Version Control: Use version control to keep track of changes to your spreadsheets over time.
9. Addressing Specific Comparison Scenarios
Different comparison scenarios may require different approaches. Here are some common scenarios and how to address them:
9.1. Comparing Sheets with Different Layouts
- Identify Key Columns: Identify key columns that are common to both sheets.
- Rearrange Columns: Rearrange the columns in one or both sheets to match the layout.
- Use Formulas with INDEX and MATCH: Use formulas with
INDEXandMATCHto compare data based on the key columns, regardless of the layout.
9.2. Comparing Sheets with Missing Data
- Identify Missing Rows or Columns: Identify any rows or columns that are missing from one sheet.
- Insert Missing Rows or Columns: Insert the missing rows or columns into the sheet with the missing data.
- Use Formulas with ISBLANK: Use formulas with
ISBLANKto check for missing data and handle it accordingly.
9.3. Comparing Sheets with Different Data Types
- Convert Data Types: Convert the data types to be consistent across both sheets. For example, convert text to numbers or numbers to text.
- Use Formulas with VALUE and TEXT: Use formulas with
VALUEandTEXTto convert data types as needed.
9.4. Comparing Sheets with Errors
- Identify Errors: Identify any errors in the data, such as
#DIV/0!or#N/A. - Correct Errors: Correct the errors or handle them using error handling functions like
IFERROR. - Use Formulas with ISERROR: Use formulas with
ISERRORto check for errors and handle them accordingly.
10. FAQs About Comparing Excel Sheets
Q1: Can I compare two Excel files directly without opening them?
A: Yes, tools like Microsoft Spreadsheet Compare and Beyond Compare allow you to compare files directly without opening them in Excel.
Q2: How can I compare two Excel sheets online?
A: Several online tools, like Diffchecker, allow you to compare Excel sheets by uploading the files or pasting the data.
Q3: Is there a way to compare two Excel sheets and merge the differences?
A: Yes, tools like Synkronizer and Araxis Merge offer features to compare and merge differences between Excel sheets.
Q4: How can I compare two Excel sheets for duplicates?
A: You can use conditional formatting or formulas like COUNTIF to highlight or identify duplicate entries in two Excel sheets.
Q5: Can I compare Excel sheets on different devices or operating systems?
A: Yes, many comparison tools are available for different devices and operating systems, including Windows, macOS, and online platforms.
Q6: How do I compare multiple Excel sheets at once?
A: Some third-party tools, like Beyond Compare, allow you to compare multiple Excel sheets simultaneously by loading them into a session.
Q7: What is the best way to compare very large Excel files?
A: For very large files, using VBA macros or dedicated third-party tools is recommended, as they are optimized for performance and can handle large datasets more efficiently.
Q8: How can I compare two Excel sheets with different numbers of rows and columns?
A: You can use formulas with INDEX and MATCH to compare data based on key columns, regardless of the number of rows and columns, or use third-party tools that automatically handle such differences.
Q9: Can I compare password-protected Excel sheets?
A: Microsoft Spreadsheet Compare allows you to enter the password when prompted to compare password-protected Excel sheets.
Q10: How do I compare Excel sheets for differences in formatting only?
A: Microsoft Spreadsheet Compare allows you to select specific options, such as “Cell Format,” to focus on formatting differences only.
11. Conclusion: Making Informed Decisions with COMPARE.EDU.VN
Comparing two Excel sheets for differences is a crucial task for data accuracy, change tracking, and auditing. Whether you choose manual comparison, conditional formatting, formulas, VBA macros, Excel’s built-in tool, or third-party software, the right method depends on your specific needs and skills.
Remember, each approach has its strengths and limitations. Manual comparison is suitable for small datasets, while VBA macros and third-party tools are better for complex comparisons and large datasets. Excel’s built-in Spreadsheet Compare is a good option for detailed reports, but it’s only available in certain versions of Office Professional Plus.
By following the best practices outlined in this guide, you can ensure accurate and efficient Excel sheet comparison, leading to better data management and informed decisions.
For more comprehensive comparisons and assistance in making informed decisions, visit COMPARE.EDU.VN at 333 Comparison Plaza, Choice City, CA 90210, United States. You can also reach them via Whatsapp: +1 (626) 555-9090 or on their website: COMPARE.EDU.VN.
Let COMPARE.EDU.VN help you navigate the complexities of data comparison and make the best choices for your needs.
Remember, at COMPARE.EDU.VN, our mission is to empower you with the knowledge and tools you need to make confident decisions. Check out compare.edu.vn today and discover the difference.