When working with Microsoft Excel, you may often find yourself needing to compare two tabs (worksheets) to identify differences. Whether you’re tracking changes in data, auditing reports, or merging information, knowing how to effectively compare two Excel tabs is a valuable skill. This guide will explore various methods to compare two Excel tabs, ranging from simple built-in features to more advanced techniques.
Using “View Side by Side” to Compare Excel Tabs
If you need a quick visual comparison of two Excel tabs, the “View Side by Side” feature is an excellent starting point. This method allows you to display two Excel windows simultaneously, making it easy to spot differences with your own eyes. You can use this method to compare tabs within the same workbook or across different workbooks.
Compare Tabs in Different Excel Workbooks
Let’s say you have two separate Excel files, each containing a tab you want to compare. Here’s how to view them side by side:
-
Open both Excel workbooks that contain the tabs you wish to compare.
-
Go to the View tab on the Excel ribbon of either workbook.
-
In the Window group, click the View Side by Side button. Excel will automatically arrange the two open workbooks side by side.
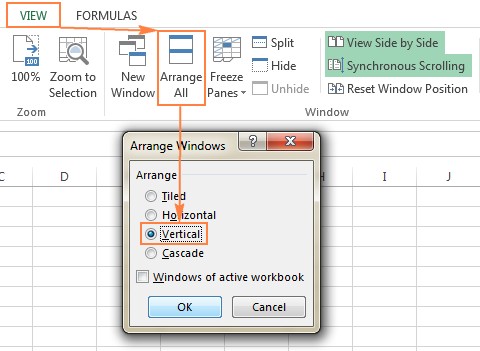
By default, Excel often arranges windows horizontally. If you prefer a vertical arrangement, which is often better for comparing data across columns, you can adjust this.
-
To arrange windows vertically, click the Arrange All button in the Window group, and in the Arrange Windows dialog, select Vertical and click OK.
With the workbooks side by side, you can now manually scroll through both tabs and compare the data visually. To enhance this visual comparison, Excel offers Synchronous Scrolling.
- Ensure Synchronous Scrolling is enabled. This feature is usually activated automatically when you use “View Side by Side”. You can verify if it’s on by looking at the Synchronous Scrolling button in the Window group of the View tab. When enabled, scrolling in one tab will simultaneously scroll the other, keeping corresponding rows aligned for easier comparison.
This method is straightforward and effective for a general overview, especially when dealing with smaller datasets or when you primarily need to identify broad differences.
Compare Tabs in the Same Excel Workbook
Sometimes, the two tabs you need to compare are located within the same Excel file. In this case, you can still use the “View Side by Side” feature by opening a new window for the same workbook.
- Open the Excel workbook containing the two tabs you want to compare.
- Go to the View tab > Window group, and click the New Window button. This action opens a second window displaying the same workbook. Effectively, you now have two independent windows showing the same Excel file.
- Enable View Side by Side mode by clicking the View Side by Side button in the Window group on the View tab in either of the new windows.
- In one of the windows, select the first tab you want to compare, and in the other window, select the second tab.
By following these steps, you will have two windows showing different tabs from the same workbook, arranged side by side, ready for visual comparison. You can again use synchronous scrolling to help in row-by-row examination.
Using Formulas to Highlight Differences Between Excel Tabs
For a more analytical approach, you can use Excel formulas to create a difference report directly within your spreadsheet. This method is particularly useful when you need to identify specific cells that contain different values across two tabs.
-
Open the Excel workbook containing the two tabs you want to compare (e.g., Sheet1 and Sheet2).
-
Create a new blank worksheet where you will generate the difference report.
-
In cell A1 of the new sheet, enter the following formula:
=IF(Sheet1!A1<>Sheet2!A1, "Sheet1:"&Sheet1!A1&" vs Sheet2:"&Sheet2!A1, "")This formula compares the value in cell A1 of ‘Sheet1’ with the value in cell A1 of ‘Sheet2’. If the values are different, it displays a text string showing the values from both sheets. If they are the same, it leaves the cell blank.
-
Copy the formula down and to the right to cover the entire range of data you need to compare. You can do this quickly by selecting cell A1, then dragging the fill handle (the small square at the bottom-right of the cell selection) across the rows and columns you need to compare.
The new sheet will now act as a difference report, highlighting cells where the values in the corresponding cells of Sheet1 and Sheet2 differ.
Limitations of Formula-Based Comparison:
While effective for comparing values, this formula-based method has limitations:
- Value Comparison Only: It only compares cell values. It does not identify differences in formulas or formatting.
- Row/Column Sensitivity: If rows or columns have been added or deleted in one tab compared to the other, the comparison will be misaligned from that point onwards, potentially marking subsequent rows/columns as different even if they are not inherently different in content.
- Sheet-Level Focus: This method works at the sheet level and does not detect workbook-level structural differences such as added, deleted, or renamed sheets.
Conditional Formatting for Visual Tab Comparison
To visually highlight differences directly within one of your tabs, you can use Excel’s conditional formatting feature. This method color-codes cells that are different between two tabs, making it easy to spot discrepancies.
-
Select the range of cells you want to compare in the worksheet where you wish to highlight the differences. Start by clicking the top-left cell of your data range, and then press
Ctrl + Shift + Endto extend the selection to the last used cell in your data range. -
Go to the Home tab on the Excel ribbon.
-
In the Styles group, click on Conditional Formatting and select New Rule.
-
In the New Formatting Rule dialog box, choose “Use a formula to determine which cells to format”.
-
In the “Format values where this formula is true” box, enter the following formula:
=A1<>Sheet2!A1Ensure you adjust
Sheet2to the actual name of the tab you are comparing against, andA1should correspond to the top-left cell of your selected range. Excel will adjustA1relatively for all other cells in your selection. -
Click the Format button to choose how you want the different cells to be highlighted. Select a fill color, font style, or any other formatting you prefer to visually distinguish the differences.
-
Click OK in the Format Cells dialog and then OK in the New Formatting Rule dialog to apply the conditional formatting.
Now, in your selected worksheet, any cell that has a different value compared to the corresponding cell in ‘Sheet2’ will be highlighted with the formatting you specified.
Advantages of Conditional Formatting:
- Visual Clarity: Quickly see differences directly within your data.
- Easy to Set Up: Conditional formatting rules are relatively simple to create and apply.
Limitations of Conditional Formatting:
Similar to formula-based comparison, conditional formatting also primarily compares values and is sensitive to structural differences like added or deleted rows and columns. It does not compare formulas or formatting.
Advanced Tab Comparison with Third-Party Tools
For more comprehensive and nuanced comparisons, especially when dealing with large datasets, complex workbooks, or when you need to identify differences beyond just values, third-party Excel comparison tools are invaluable. These tools often offer features that go beyond Excel’s built-in capabilities, such as:
- Formula Comparison: Identify changes in formulas, not just their results.
- Formatting Comparison: Detect differences in cell formatting.
- Structure Comparison: Recognize added or deleted rows, columns, and even entire sheets.
- Merge and Sync Capabilities: Merge differences or synchronize changes between tabs or workbooks.
- Detailed Reporting: Generate comprehensive reports of all identified differences.
While the original article mentioned several third-party tools, when focusing specifically on comparing two tabs, tools that offer robust worksheet comparison features are most relevant. Some tools like Ablebits Compare Sheets for Excel, and Synkronizer Excel Compare are designed to provide detailed comparisons and merging options specifically for Excel worksheets. These tools often provide a side-by-side view of the sheets with differences clearly marked and options to selectively merge changes.
When to Consider Third-Party Tools:
- Frequent Comparison Needs: If you regularly compare Excel tabs.
- Complex Comparisons: When you need to compare formulas, formatting, or structural elements.
- Large Datasets: For efficient handling of large volumes of data.
- Need for Merging: When you need to merge differences between tabs.
Example: Ablebits Compare Sheets for Excel
Ablebits’ tool, “Compare Sheets,” is specifically designed for detailed Excel worksheet comparison. It offers a step-by-step wizard to guide you through the comparison process, allows you to choose different comparison algorithms based on your data structure (like comparing by key columns or cell-by-cell), and presents the compared sheets in a “Review Differences” mode. This mode allows you to navigate through differences one by one and decide whether to merge or ignore each change, offering a highly controlled and detailed comparison and merge process.
Conclusion
Comparing two tabs in Excel is a common task with several effective methods available. For quick visual checks, “View Side by Side” is straightforward. For highlighting value differences, formulas and conditional formatting are useful built-in features. However, for more in-depth analysis, especially when you need to compare more than just values, or manage complex differences, third-party tools offer advanced capabilities that can significantly enhance your efficiency and accuracy.
Choosing the right method depends on your specific needs, the complexity of your data, and the level of detail required in your comparison. Whether you opt for Excel’s built-in features or explore third-party solutions, mastering these comparison techniques will undoubtedly improve your data handling skills in Excel.