In today’s data-driven world, Excel remains an indispensable tool for managing and analyzing information. Whether you’re tracking budgets, managing inventory, or analyzing sales figures, you often deal with multiple versions of spreadsheets. Identifying the differences between these versions can be a tedious and error-prone manual task. Fortunately, Microsoft offers a powerful, yet often overlooked tool: Spreadsheet Compare. This utility is designed to pinpoint changes between two Excel workbooks or worksheets, saving you time and ensuring accuracy. This guide will walk you through how to use Spreadsheet Compare to efficiently compare two Excel sheets for differences.
Spreadsheet Compare is a feature available with specific versions of Microsoft Office, including Office Professional Plus 2013, Office Professional Plus 2016, Office Professional Plus 2019, and Microsoft 365 Apps for enterprise. If you have one of these versions, you already have access to this valuable tool.
Getting Started with Spreadsheet Compare
To begin comparing your Excel sheets, you first need to open the Spreadsheet Compare application.
-
Accessing Spreadsheet Compare: Navigate to your Start menu and look for Spreadsheet Compare. If you don’t see it immediately, simply type “Spreadsheet Compare” and select the application from the search results.
Alt Text: Spreadsheet Compare application highlighted in the Windows Start Menu.
Alongside Spreadsheet Compare, you might also notice Database Compare for Access databases. Both tools are similarly designed for comparison within their respective Microsoft Office applications and are included in the same Office Professional Plus and Microsoft 365 Apps for enterprise suites.
Step-by-Step Guide: Comparing Two Excel Sheets
Once Spreadsheet Compare is open, follow these steps to compare your Excel workbooks:
-
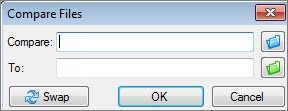
Initiate the Comparison: Click on Home > Compare Files. This action will open the Compare Files dialog box.
-
Select the Workbooks: In the Compare Files dialog box, you’ll see two boxes: Compare and To.
-
Click the blue folder icon next to the Compare box. This is where you’ll select the earlier version of your Excel workbook or the first sheet you want to compare. Browse to the file location, which can be on your local computer, a network drive, or even a website address where your workbooks are saved.
-
Next, click the green folder icon next to the To box. Here, you’ll select the more recent version of your workbook or the second sheet you’re comparing against the first one. Click OK after selecting the file.
Tip: Spreadsheet Compare allows you to compare two files even if they have the same name, as long as they are stored in different folders. This is particularly useful when you have versioned files saved in separate directories.
-
-
Choose Comparison Options: In the left pane of the Compare Files dialog, you’ll find a list of options to customize your comparison. You can choose to focus on specific elements like Formulas, Macros, Cell Format, and more. For a comprehensive comparison, you can simply click Select All.
-
Run the Comparison: Click OK to start the comparison process. Spreadsheet Compare will analyze the two selected workbooks based on your chosen options.
If you encounter an “Unable to open workbook” message, it’s likely that one of the Excel files is password protected. Click OK on the message and you will be prompted to enter the password for the protected workbook. Spreadsheet Compare can handle password-protected files, ensuring you can still compare them.
Understanding the Comparison Results
After running the comparison, the results are displayed in a clear, two-pane grid.
-
Side-by-Side Grid: The left pane displays the “Compare” file (typically the older version), and the right pane shows the “To” file (usually the newer version). Each worksheet from the compared workbooks is analyzed against its counterpart in the other file. If your workbooks contain multiple worksheets, you can navigate through them using the forward and back buttons on the horizontal scroll bar.
Note: Even hidden worksheets are included in the comparison and will be displayed in the results.
-
Color-Coded Differences: Spreadsheet Compare uses color highlighting to visually represent the types of differences found. Changes are indicated by cell fill colors or text font colors, making it easy to quickly identify modifications. For instance, cells containing “entered values” (data entered directly, not formulas) that have been modified are typically highlighted with a green fill color in the grid and a green font in the results list pane below.
-
Legend Pane: The lower-left pane of the Spreadsheet Compare window provides a legend explaining the color codes used in the comparison results. This legend is crucial for understanding the type of changes highlighted.
Alt Text: Comparison results in Spreadsheet Compare showing color-coded differences between two Excel workbook versions.
In the example result shown, you can see how Spreadsheet Compare highlights changes. Cells with direct value entries that have been altered are marked in green. Calculated values that changed as a result of these direct edits are marked with a blue-green fill. This visual distinction helps you differentiate between direct data changes and the ripple effects on calculated results. Furthermore, formula corrections are also readily apparent, ensuring you can catch and understand not just data changes, but also structural or logical improvements in your spreadsheets.
If cell content is truncated due to column width, simply click Resize Cells to Fit to automatically adjust column widths for better readability.
Leveraging Excel’s Inquire Add-in
Beyond Spreadsheet Compare, Excel itself offers the Inquire add-in, which provides a suite of analytical tools. If you are using Excel 2013 or later, you can activate the Inquire add-in to gain access to an “Inquire” tab in your Excel ribbon. This tab includes features for workbook analysis, visualizing relationships between cells and worksheets, and even cleaning up excessive formatting within a worksheet.
While Spreadsheet Compare is excellent for side-by-side file comparisons, the Inquire add-in offers deeper analytical capabilities within Excel itself. For instance, if you have two workbooks open in Excel and want to quickly launch Spreadsheet Compare, you can do so via the Compare Files command found within the Inquire add-in tab.
If you don’t see the Inquire tab in your Excel ribbon, you may need to enable it. You can find instructions on how to do this by searching for “Turn on the Inquire add-in” in Microsoft Office support. To further explore the tools available within the Inquire add-in, search for “What you can do with Spreadsheet Inquire“.
Taking it Further
For organizations that rely heavily on “mission critical” Excel workbooks and Access databases, Microsoft offers advanced management tools. Consider exploring Microsoft Audit and Control Management Server for robust change management features tailored for Excel and Access files. Complementing this, Microsoft Discovery and Risk Assessment Server provides inventory and in-depth analysis capabilities, helping to mitigate risks associated with user-developed tools in Excel and Access environments.
To get a broader overview of Spreadsheet Compare and its capabilities, you can also refer to “Overview of Spreadsheet Compare“.
By utilizing Spreadsheet Compare and Excel’s Inquire add-in, you can significantly enhance your efficiency and accuracy when working with multiple versions of Excel spreadsheets, ensuring data integrity and saving valuable time.