Comparing two Excel sheets to identify differences is a common task for professionals in various fields, from finance to data analysis. Whether you are auditing data, merging reports, or simply tracking changes between versions of a spreadsheet, efficiently pinpointing discrepancies is crucial. Microsoft Excel offers a powerful, yet often overlooked tool called Spreadsheet Compare that is specifically designed for this purpose. This guide will walk you through how to effectively use Spreadsheet Compare to analyze and highlight the variations between two Excel sheets, ensuring data accuracy and saving you valuable time.
Understanding Excel Sheet Comparison Needs
Before diving into the tool, let’s understand why comparing Excel sheets is so important. Imagine these common scenarios:
- Version Control: You have multiple versions of a financial report and need to quickly see what figures have been updated.
- Data Auditing: You want to verify the accuracy of data entry by comparing two independently created datasets.
- Merged Reports: You are combining data from different sources and need to ensure consistency and identify overlaps or conflicts.
- Formula and Logic Checks: You suspect errors in formulas or calculations and want to compare the logic between two sheets.
- Identifying Manual Overrides: You need to detect cells where manual entries might have replaced formulas, potentially leading to incorrect totals.
In these situations, manually going through each cell is time-consuming and prone to errors. Spreadsheet Compare automates this process, providing a clear, visual report of all the differences, from content changes to formatting variations.
Introducing Spreadsheet Compare Tool
Spreadsheet Compare is a utility from Microsoft designed to compare Excel workbooks and Access databases. It generates a detailed report highlighting the differences it finds. It’s particularly useful for identifying:
- Content Differences: Changes in values, text, and formulas within cells.
- Formula Changes: Modifications to formulas, including changes in cell references.
- Formatting Differences: Variations in cell formatting, like fonts, colors, and number formats.
- Structural Differences: Changes in macros or VBA code (though this guide will focus on sheet content comparison).
Availability: It’s important to note that Spreadsheet Compare is not available in all versions of Excel. It comes with:
- Office Professional Plus 2013
- Office Professional Plus 2016
- Office Professional Plus 2019
- Microsoft 365 Apps for enterprise
If you have one of these versions, you already have access to this powerful tool.
Step-by-Step Guide: Comparing Two Excel Sheets
Let’s walk through the process of using Spreadsheet Compare to compare two Excel sheets.
Opening Spreadsheet Compare
-
Accessing from the Start Menu: The easiest way to open Spreadsheet Compare is through the Start Menu in Windows.
-
Search for “Spreadsheet Compare”: Click on the Start button and begin typing “Spreadsheet Compare”.
-
Select the Application: The “Spreadsheet Compare” application should appear in the search results. Click on it to open.
If you can’t find it directly, ensure you have one of the Office Professional Plus or Microsoft 365 Apps for enterprise versions mentioned earlier.
Selecting Files for Comparison
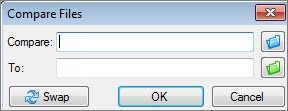
-
Click “Compare Files”: Once Spreadsheet Compare is open, navigate to the “Home” tab and click on the “Compare Files” button. This will open the “Compare Files” dialog box.
-
Choose the “Compare” File (Older Version): In the “Compare” box, click the blue folder icon. This allows you to browse your computer or network to locate the earlier version of your Excel workbook (the one you want to compare from). You can also enter a web address if your files are stored online.
-
Choose the “To” File (Newer Version): Next, click the green folder icon next to the “To” box. Browse to the location of the more recent version of your workbook (the one you want to compare to). Click “OK” after selecting the file.
Tip: You can compare two files even if they have the same name, as long as they are saved in different folders. This is useful for comparing versions saved in different directories.
Choosing Comparison Options
-
Select Comparison Criteria: In the left pane of the “Compare Files” dialog box, you’ll see a list of options. These options determine what aspects of the workbooks will be compared.
-
Choose What to Compare: You can select or deselect options such as:
- Formulas: Compares formulas in cells.
- Values: Compares the calculated values or entered values in cells.
- Cell Format: Compares formatting attributes like fonts, colors, borders, etc.
- Macros: Compares VBA macros (if present).
-
“Select All” Option: For a comprehensive comparison, you can simply check the “Select All” option. Choose the options that are relevant to your comparison needs. For most sheet content comparisons, “Formulas”, “Values”, and “Cell Format” are usually sufficient.
Running the Comparison
-
Click “OK” to Compare: Once you have selected your files and comparison options, click the “OK” button in the “Compare Files” dialog box.
-
Wait for the Report: Spreadsheet Compare will now analyze the two workbooks based on your selected criteria. This process may take a few moments depending on the size and complexity of your spreadsheets.
Handling Password-Protected Files
-
“Unable to Open Workbook” Message: If you encounter an “Unable to open workbook” message, it likely means one or both of your Excel files are password-protected.
-
Enter Password: Click “OK” on the message. Spreadsheet Compare will prompt you to enter the password for the protected workbook. Enter the correct password to proceed with the comparison.
Spreadsheet Compare can work with password-protected files, but you’ll need to provide the passwords to access their content.
Interpreting Comparison Results
After running the comparison, the results are displayed in a user-friendly, two-pane grid within Spreadsheet Compare.
Understanding the Two-Pane Grid
- Side-by-Side View: The results are presented in a side-by-side view, making it easy to visually compare the two sheets.
- Left Pane: “Compare” File: The workbook you selected as the “Compare” (older) file is displayed on the left.
- Right Pane: “To” File: The workbook you selected as the “To” (newer) file is on the right.
- Worksheet Navigation: If your workbooks contain multiple worksheets, you can navigate between them using the forward and back buttons on the horizontal scroll bar located below the grid.
- Hidden Sheets Included: Even if a worksheet is hidden in the original Excel file, Spreadsheet Compare will still compare it and display it in the results.
Understanding Color-Coding
Spreadsheet Compare uses color-coding to highlight different types of changes, making it quick to identify the variations:
- Cell Fill Color: A cell fill color often indicates a change in an entered value (non-formula cell).
- Text Font Color: A text font color can indicate a change in a calculated value or other types of differences.
- Legend Pane: The lower-left pane of the Spreadsheet Compare window contains a legend that clearly explains what each color represents. Refer to this legend to understand the type of change highlighted by each color.
Example Interpretation: In the example image, green fill in cells E2:E5 indicates that entered values have changed. Blue-green fill in cells F2:F6 indicates that calculated values have changed as a result of the changes in column E, or potentially due to formula updates.
Navigating the Results Grid
- Scroll and Compare: Scroll through the side-by-side grids to visually inspect the highlighted differences.
- Resize Cells to Fit: If cell contents are truncated due to narrow columns, click the “Resize Cells to Fit” option (usually found in the ribbon or context menu) to expand column widths and view the full content.
Exploring Excel Inquire Add-in
For users working directly within Excel, the Inquire add-in (available in Excel 2013 and later, also in Professional Plus and Microsoft 365 Apps for enterprise versions) offers some in-Excel comparison capabilities, although it’s not a direct replacement for Spreadsheet Compare.
- “Inquire” Tab: If enabled, the Inquire add-in adds an “Inquire” tab to the Excel ribbon.
- Workbook Analysis: The Inquire tab provides tools to analyze workbooks, visualize relationships between cells and sheets, and even clean up excessive formatting.
- Limited Comparison: While Inquire doesn’t have a direct “compare two sheets” feature as robust as Spreadsheet Compare, it offers features that can be helpful in understanding workbook structure and identifying potential issues before using Spreadsheet Compare for detailed difference analysis.
To enable the Inquire add-in, go to File > Options > Add-ins > Manage: COM Add-ins > Go… and check “Inquire”.
Conclusion
Spreadsheet Compare is an invaluable tool for anyone who regularly works with and needs to compare Excel sheets. It provides a detailed and visual way to identify differences, ensuring data accuracy, streamlining auditing processes, and simplifying version control. By following this guide, you can effectively leverage Spreadsheet Compare to enhance your Excel workflow and maintain the integrity of your spreadsheet data. Whether you are tracking financial changes, validating data entries, or merging reports, mastering Spreadsheet Compare will significantly improve your efficiency and accuracy in Excel.