Comparing two pivot tables allows for in-depth data analysis and informed decision-making, and COMPARE.EDU.VN is here to guide you through it. You can learn how to analyze, track trends, and derive comparative insights from your data using different comparison methods and visualization techniques. Understand pivot table comparison, data analysis techniques, and comparative reporting.
1. Understanding The Basics: What Is A Pivot Table?
A pivot table is a powerful tool in spreadsheet programs like Microsoft Excel, Google Sheets, and others, designed to summarize and analyze large datasets. It allows you to extract significant information from a large, detailed dataset. Pivot tables can quickly sort, count, total, or average the data stored in one spreadsheet or table. They can display these results in a way that’s easy to read and understand.
1.1. Core Components of a Pivot Table
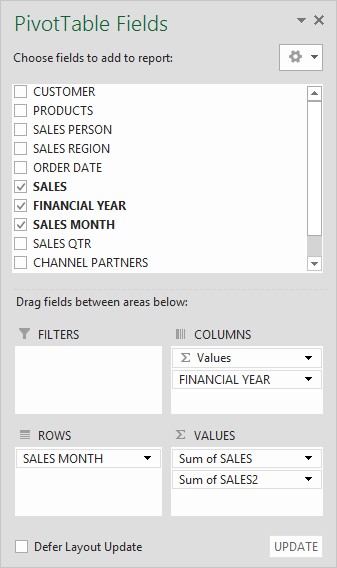
- Rows: These fields determine how the data is grouped vertically. For example, if you’re analyzing sales data, you might put ‘Product Category’ in the Rows area to see each category listed down the side.
- Columns: These fields group the data horizontally. Using the same sales data, you could put ‘Year’ in the Columns area to compare sales across different years.
- Values: This area contains the numerical data that you want to summarize. Common functions used here include Sum, Count, Average, Max, and Min. For instance, you would put ‘Sales Amount’ in the Values area and set it to ‘Sum’ to see the total sales for each product category and year.
- Filters: These fields allow you to narrow down the data being displayed. You might use a filter to focus on a specific region or product line, providing a more focused analysis.
1.2. Benefits of Using Pivot Tables
Pivot tables offer numerous advantages for data analysis:
- Summarization: They can quickly summarize large datasets, making it easier to identify trends and patterns.
- Flexibility: Pivot tables are highly customizable. You can easily rearrange the fields to view your data from different angles.
- Efficiency: They automate calculations and data manipulation, saving you time and effort.
- Interactivity: Pivot tables allow you to drill down into specific data points for a more detailed analysis.
- Decision Making: Pivot tables help in making decisions by providing summarized data that shows patterns, relationships, and exceptions.
1.3. Common Use Cases for Pivot Tables
Pivot tables are used across various industries and functions, including:
- Sales Analysis: Comparing sales performance across regions, products, and time periods.
- Financial Reporting: Summarizing financial data, such as income statements and balance sheets.
- Marketing Analysis: Analyzing campaign performance, customer demographics, and market trends.
- Inventory Management: Tracking inventory levels and identifying fast-moving and slow-moving items.
- Human Resources: Analyzing employee demographics, salaries, and performance metrics.
 Pivot Table Fields
2. Preparing Your Data for Pivot Table Comparisons
Before you can effectively compare two pivot tables, it’s essential to ensure that your data is properly prepared. Data preparation involves cleaning, organizing, and structuring your data in a way that makes it suitable for pivot table analysis.
2.1. Data Cleaning and Formatting
Data cleaning is the process of identifying and correcting errors, inconsistencies, and inaccuracies in your data. Common data cleaning tasks include:
- Removing Duplicates: Identifying and removing duplicate rows to avoid skewed results.
- Handling Missing Values: Deciding how to handle missing values, such as filling them with zeros, averages, or removing the affected rows.
- Correcting Inconsistencies: Standardizing data formats and correcting inconsistencies, such as different date formats or inconsistent naming conventions.
Data formatting involves structuring your data in a way that is easily readable and analyzable by pivot tables. Key formatting considerations include:
- Consistent Data Types: Ensuring that each column has a consistent data type, such as numbers, text, or dates.
- Proper Headers: Using clear and descriptive headers for each column.
- Avoiding Empty Rows and Columns: Removing any empty rows or columns that could interfere with pivot table calculations.
2.2. Structuring Data for Comparison
To compare two pivot tables effectively, your data needs to be structured in a way that allows for easy comparison. This typically involves:
- Common Fields: Ensuring that both datasets have common fields that can be used for comparison, such as dates, product IDs, or customer IDs.
- Consistent Categories: Using consistent categories and classifications across both datasets.
- Unique Identifiers: Having unique identifiers for each record to avoid ambiguity.
2.3. Combining Data Sources
In some cases, you may need to combine data from multiple sources to create a comprehensive dataset for comparison. This can be done using various techniques, such as:
- Merging Tables: Combining two or more tables based on a common field.
- Appending Data: Adding data from one table to the end of another table.
- Using VLOOKUP or INDEX-MATCH: Retrieving data from one table based on a lookup value in another table.
3. Methods for Comparing Two Pivot Tables
There are several methods for comparing two pivot tables, each with its own advantages and use cases. Here are some of the most common methods:
3.1. Visual Comparison
Visual comparison involves manually comparing the values in two pivot tables side-by-side. This method is simple and straightforward, but it can be time-consuming and prone to errors, especially when dealing with large datasets.
- Advantages:
- Simple and easy to understand.
- Requires no special tools or techniques.
- Disadvantages:
- Time-consuming and tedious.
- Prone to errors.
- Not suitable for large datasets.
3.2. Calculated Fields
Calculated fields allow you to create new fields in a pivot table based on formulas that reference other fields in the pivot table. This method can be used to calculate the difference between corresponding values in two pivot tables.
-
Steps to Use Calculated Fields:
- Create a pivot table for each dataset.
- In one of the pivot tables, go to
PivotTable Tools > Analyze > Fields, Items, & Sets > Calculated Field. - Enter a name for the calculated field (e.g., “Difference”).
- Enter a formula to calculate the difference between the corresponding values in the two pivot tables. For example, if your sales data is in the ‘Sales’ field, the formula might be
=Sales - 'PivotTable2'!Sales. - Add the calculated field to the Values area of the pivot table.
-
Advantages:
- Allows for direct comparison of values within the pivot table.
- Can be used to calculate various metrics, such as differences, percentages, and ratios.
-
Disadvantages:
- Requires careful setup of the formulas.
- Can be difficult to manage if the pivot tables have different structures.
3.3. Using GetPivotData Function
The GETPIVOTDATA function allows you to retrieve data from a pivot table based on specific criteria. This method can be used to extract data from two pivot tables and compare them in a separate table or worksheet.
-
Steps to Use GETPIVOTDATA:
- Create a pivot table for each dataset.
- In a separate table or worksheet, use the
GETPIVOTDATAfunction to retrieve the values you want to compare from each pivot table. - Create formulas to calculate the difference between the retrieved values.
-
Advantages:
- Allows for flexible comparison of data from multiple pivot tables.
- Can be used to create custom reports and dashboards.
-
Disadvantages:
- Requires a good understanding of the
GETPIVOTDATAfunction. - Can be cumbersome to set up for complex comparisons.
- Requires a good understanding of the
3.4. Power Query
Power Query (also known as Get & Transform Data) is a powerful data transformation and preparation tool available in Excel. It allows you to connect to multiple data sources, clean and transform your data, and load it into a single table for analysis.
-
Steps to Use Power Query:
- Import both datasets into Power Query using
Data > Get & Transform Data > From Table/Range. - Append the two datasets using
Home > Combine > Append Queries. - Load the combined data into a new worksheet.
- Create a pivot table from the combined data.
- Use the pivot table to compare the two datasets.
- Import both datasets into Power Query using
-
Advantages:
- Provides a flexible and powerful way to combine and transform data from multiple sources.
- Can handle large datasets and complex data transformations.
- Automates the data preparation process.
-
Disadvantages:
- Requires some knowledge of Power Query.
- Can be overkill for simple comparisons.
3.5. Power BI
Power BI is a business analytics tool from Microsoft that allows you to visualize and analyze data from various sources. It provides a more advanced and interactive way to compare two pivot tables than Excel.
-
Steps to Use Power BI:
- Import both datasets into Power BI using
Get Data. - Create relationships between the datasets based on common fields.
- Create visuals (charts, tables, etc.) to compare the data from the two datasets.
- Import both datasets into Power BI using
-
Advantages:
- Provides advanced visualization and interactive analysis capabilities.
- Can handle large datasets and complex data models.
- Allows you to create dashboards and reports that can be easily shared.
-
Disadvantages:
- Requires a Power BI license.
- Has a steeper learning curve than Excel.
4. Step-by-Step Examples of Comparing Pivot Tables
To illustrate the different methods of comparing two pivot tables, let’s consider a scenario where we want to compare the sales performance of two product lines (Product Line A and Product Line B) over two years (2022 and 2023).
4.1. Example 1: Visual Comparison
-
Steps:
- Create a pivot table for Product Line A with ‘Year’ in the Columns area, ‘Product’ in the Rows area, and ‘Sales’ in the Values area.
- Create a similar pivot table for Product Line B.
- Place the two pivot tables side-by-side on the same worksheet.
- Manually compare the sales values for each product and year.
-
Pros: Simple, no additional tools needed.
-
Cons: Time-consuming, error-prone, not suitable for large datasets.
4.2. Example 2: Calculated Fields
-
Steps:
- Create a pivot table for Product Line A with ‘Year’ in the Columns area, ‘Product’ in the Rows area, and ‘Sales’ in the Values area.
- Create a similar pivot table for Product Line B on a different worksheet.
- In the Product Line A pivot table, go to
PivotTable Tools > Analyze > Fields, Items, & Sets > Calculated Field. - Enter a name for the calculated field (e.g., “Sales Difference”).
- Enter a formula to calculate the difference between the sales values in the two pivot tables. For example, if the Product Line B pivot table is on ‘Sheet2’, the formula might be
=Sales - 'Sheet2'!GETPIVOTDATA("Sales", "Year", Year, "Product", Product). - Add the calculated field to the Values area of the Product Line A pivot table.
-
Pros: Direct comparison within the pivot table.
-
Cons: Requires careful formula setup, can be difficult to manage.
4.3. Example 3: Using GETPIVOTDATA Function
-
Steps:
- Create a pivot table for Product Line A with ‘Year’ in the Columns area, ‘Product’ in the Rows area, and ‘Sales’ in the Values area.
- Create a similar pivot table for Product Line B on a different worksheet.
- In a separate table or worksheet, use the
GETPIVOTDATAfunction to retrieve the sales values for each product and year from both pivot tables. For example:=GETPIVOTDATA("Sales", 'Sheet1'!$A$1, "Year", 2022, "Product", "Product X")(for Product Line A)=GETPIVOTDATA("Sales", 'Sheet2'!$A$1, "Year", 2022, "Product", "Product X")(for Product Line B)
- Create formulas to calculate the difference between the retrieved values.
-
Pros: Flexible comparison, can create custom reports.
-
Cons: Requires understanding of
GETPIVOTDATA, can be cumbersome.
4.4. Example 4: Power Query
-
Steps:
- Import the data for Product Line A into Power Query using
Data > Get & Transform Data > From Table/Range. - Add a column named “Product Line” with the value “A”.
- Import the data for Product Line B into Power Query.
- Add a column named “Product Line” with the value “B”.
- Append the two queries using
Home > Combine > Append Queries. - Load the combined data into a new worksheet.
- Create a pivot table from the combined data with ‘Year’ in the Columns area, ‘Product’ in the Rows area, ‘Sales’ in the Values area, and ‘Product Line’ in the Filters area.
- Import the data for Product Line A into Power Query using
-
Pros: Flexible, handles large datasets, automates data preparation.
-
Cons: Requires Power Query knowledge, can be overkill for simple comparisons.
4.5. Example 5: Power BI
-
Steps:
- Import the data for Product Line A into Power BI using
Get Data. - Add a column named “Product Line” with the value “A”.
- Import the data for Product Line B into Power BI.
- Add a column named “Product Line” with the value “B”.
- Create a relationship between the two datasets based on common fields (e.g., ‘Year’ and ‘Product’).
- Create visuals (e.g., bar charts, line charts) to compare the sales performance of the two product lines over time.
- Import the data for Product Line A into Power BI using
-
Pros: Advanced visualization, handles large datasets, interactive analysis.
-
Cons: Requires Power BI license, steeper learning curve.
5. Advanced Techniques for Enhanced Comparison
Once you’ve mastered the basic methods of comparing two pivot tables, you can explore some advanced techniques to enhance your analysis.
5.1. Calculating Percentage Differences
Calculating percentage differences can provide a more meaningful comparison than absolute differences, especially when dealing with datasets of different scales. To calculate percentage differences in a pivot table:
- Create a calculated field with the formula
=(Sales2 - Sales1) / Sales1, whereSales1andSales2are the fields containing the sales values from the two pivot tables. - Format the calculated field as a percentage.
5.2. Using Slicers for Dynamic Filtering
Slicers are visual filters that allow you to dynamically filter the data displayed in a pivot table. They can be used to quickly compare different subsets of data from two pivot tables. To use slicers:
- Select a pivot table.
- Go to
PivotTable Tools > Analyze > Insert Slicer. - Select the fields you want to use as slicers.
- Use the slicers to filter the data in the pivot table.
5.3. Conditional Formatting for Highlighting Differences
Conditional formatting allows you to automatically format cells based on specific criteria. It can be used to highlight significant differences between two pivot tables. To use conditional formatting:
- Select the cells you want to format.
- Go to
Home > Conditional Formatting. - Choose a formatting rule that highlights the differences between the cells. For example, you can use the “Data Bars” rule to visually represent the magnitude of the differences.
5.4. Creating Pivot Charts for Visual Analysis
Pivot charts are visual representations of pivot table data. They can be used to quickly identify trends and patterns in your data. To create a pivot chart:
- Select a pivot table.
- Go to
PivotTable Tools > Analyze > PivotChart. - Choose a chart type that is appropriate for your data.
- Customize the chart to make it more informative and visually appealing.
6. Common Challenges and Solutions
Comparing two pivot tables can sometimes be challenging, especially when dealing with complex datasets or different data structures. Here are some common challenges and their solutions:
6.1. Mismatched Data Structures
- Challenge: The two pivot tables have different row and column fields, making it difficult to compare corresponding values.
- Solution: Restructure the data to ensure that both pivot tables have the same row and column fields. You may need to use Power Query to transform the data into a consistent format.
6.2. Different Data Granularity
- Challenge: The two pivot tables have different levels of detail. For example, one pivot table may show monthly sales data, while the other shows quarterly sales data.
- Solution: Aggregate or disaggregate the data to match the desired level of granularity. You can use Power Query to group or ungroup the data as needed.
6.3. Missing Data
- Challenge: One or both pivot tables have missing data, making it difficult to compare values for certain categories or time periods.
- Solution: Handle the missing data appropriately. You can fill the missing values with zeros, averages, or estimates, or you can exclude the affected categories or time periods from the comparison.
6.4. Performance Issues
- Challenge: Comparing two large pivot tables can be slow and resource-intensive, especially when using calculated fields or complex formulas.
- Solution: Optimize the pivot tables to improve performance. You can disable automatic calculations, use the “Defer Layout Update” feature, and simplify the formulas. You can also consider using Power BI, which is better suited for handling large datasets.
7. Best Practices for Effective Pivot Table Comparisons
To ensure that your pivot table comparisons are accurate, reliable, and informative, follow these best practices:
- Plan Your Analysis: Before you start creating pivot tables, take the time to plan your analysis. Define your objectives, identify the key metrics you want to compare, and determine the best way to structure your data.
- Prepare Your Data: Clean and format your data to ensure that it is consistent, accurate, and suitable for pivot table analysis.
- Choose the Right Method: Select the method that is most appropriate for your data and your analysis objectives. Consider the size and complexity of your data, the level of detail you need, and your comfort level with the different tools and techniques.
- Validate Your Results: Double-check your formulas and calculations to ensure that they are correct. Compare your results to other sources of data to validate their accuracy.
- Document Your Analysis: Keep a record of your analysis steps, including the data sources you used, the transformations you applied, and the formulas you created. This will make it easier to reproduce your results and to share your analysis with others.
8. Conclusion: Leveraging Pivot Tables for Data-Driven Decisions
Comparing two pivot tables is a powerful technique for analyzing data, identifying trends, and making informed decisions. By mastering the different methods and best practices outlined in this guide, you can unlock the full potential of pivot tables and gain valuable insights from your data. Whether you’re a business analyst, a data scientist, or a student, pivot tables can help you make better decisions and achieve your goals.
COMPARE.EDU.VN can guide you through more insightful techniques and tools for efficient data comparison and analysis. We provide detailed comparisons, objective analysis, and user reviews to help you make informed decisions.
Ready to compare and conquer your data challenges? Visit COMPARE.EDU.VN today!
For further assistance, contact us at:
Address: 333 Comparison Plaza, Choice City, CA 90210, United States
Whatsapp: +1 (626) 555-9090
Website: COMPARE.EDU.VN
9. Frequently Asked Questions (FAQ)
9.1. Can I Compare Pivot Tables From Different Excel Files?
Yes, you can compare pivot tables from different Excel files. You can use the GETPIVOTDATA function to retrieve data from pivot tables in different files, or you can use Power Query to combine data from multiple files into a single table for analysis.
9.2. How Do I Handle Errors When Using GETPIVOTDATA?
When using GETPIVOTDATA, you may encounter errors if the specified criteria do not match any data in the pivot table. To handle these errors, you can use the IFERROR function to return a default value (e.g., zero) when an error occurs.
9.3. Is It Possible To Automate The Comparison Process?
Yes, it is possible to automate the comparison process using macros or VBA (Visual Basic for Applications). You can write code to automatically refresh the pivot tables, retrieve the data, calculate the differences, and format the results.
9.4. How Do I Update My Pivot Tables With New Data?
To update your pivot tables with new data, go to Data > Refresh All. This will refresh all the pivot tables in your workbook with the latest data from their respective data sources.
9.5. Can I Compare More Than Two Pivot Tables At Once?
Yes, you can compare more than two pivot tables at once. You can use Power Query to combine data from multiple pivot tables into a single table, or you can create a series of calculated fields to compare the values from multiple pivot tables.
9.6. What Is The Best Way To Share My Pivot Table Comparisons With Others?
The best way to share your pivot table comparisons with others depends on your audience and your objectives. You can share the Excel file with the pivot tables, or you can create a dashboard or report in Power BI and share it online.
9.7. How Do I Ensure That My Pivot Table Comparisons Are Accurate?
To ensure that your pivot table comparisons are accurate, follow these tips:
- Double-check your data for errors and inconsistencies.
- Verify that your formulas and calculations are correct.
- Validate your results against other sources of data.
- Document your analysis steps.
9.8. Can I Use Pivot Tables To Compare Data From Different Time Periods?
Yes, you can use pivot tables to compare data from different time periods. Simply add a date field to the Columns area of the pivot table and group the dates by year, quarter, month, or day.
9.9. What Are Some Common Mistakes To Avoid When Comparing Pivot Tables?
Some common mistakes to avoid when comparing pivot tables include:
- Comparing data with different units of measure.
- Comparing data with different levels of granularity.
- Ignoring missing data.
- Using incorrect formulas or calculations.
- Failing to validate your results.
9.10. Where Can I Find More Resources On Pivot Tables?
You can find more resources on pivot tables on the Microsoft Office website, in Excel books and tutorials, and on online forums and communities. You can also contact us at compare.edu.vn for expert advice and assistance.