Comparing two photos side by side in Lightroom allows you to meticulously analyze differences and select the best image. At COMPARE.EDU.VN, we offer comprehensive guides and tools to streamline this process. This detailed tutorial will explore how to effectively use Lightroom’s Compare View and other techniques for photo comparison, ensuring you make informed decisions for your photography workflow. Explore various image editing features, and enhance your post-processing skills.
Table of Contents
- Understanding Lightroom’s Compare View
- Step-by-Step Guide to Using Compare View
- Advanced Techniques for Photo Comparison
- Utilizing Survey Mode in Lightroom
- Comparing Photos Using Collections
- Third-Party Plugins for Enhanced Comparison
- Analyzing Details: Zooming and Panning
- Synchronizing Zoom and Location
- Color Correction and Comparison
- Exposure and Contrast Analysis
- Sharpening and Noise Reduction Comparison
- Spot Removal and Healing Brush Tool
- Using Graduated Filters for Comparison
- Comparing Before and After Edits
- Evaluating Composition and Framing
- Assessing Focus and Sharpness
- Highlighting Key Differences with Annotations
- Exporting Photos for External Comparison
- Comparing Photos on Mobile Devices
- Optimizing Your Workflow for Efficient Comparison
- Leveraging AI-Powered Comparison Tools
- Understanding Histograms for Photo Analysis
- Using the Info Panel for Detailed Analysis
- Best Practices for Photo Selection
- Common Mistakes to Avoid During Comparison
- The Role of Monitor Calibration in Accurate Comparison
- Utilizing Keyboard Shortcuts for Faster Comparison
- Customizing Lightroom’s Interface for Comparison
- Comparing RAW vs. JPEG Files
- Batch Processing and Comparison
- Creating Virtual Copies for Non-Destructive Comparison
- Integrating Lightroom with Other Editing Software
- Troubleshooting Common Comparison Issues
- Future Trends in Photo Comparison Technology
- Conclusion: Mastering Photo Comparison in Lightroom
- Frequently Asked Questions (FAQs)
1. Understanding Lightroom’s Compare View
What is Lightroom’s Compare View and why is it essential for photographers? Lightroom’s Compare View is a powerful feature designed to display two photos side by side, allowing for a detailed assessment of their differences. It’s an essential tool for photographers because it facilitates critical decision-making processes such as selecting the sharpest image from a burst, identifying subtle variations in edits, and ensuring consistency across a series of photos. This feature enhances photo editing workflows, helping users refine their images with precision.
Compare View offers real-time assessment, enabling photographers to make immediate judgments on image quality and aesthetics. The tool is particularly valuable when choosing between similar shots, where minor adjustments or variations can significantly impact the final outcome. According to a study by the Professional Photographers of America, 78% of professional photographers use comparison tools to refine their selections, highlighting the importance of this feature in professional workflows. By providing a clear, side-by-side comparison, Compare View allows photographers to maintain high standards and deliver exceptional results.
2. Step-by-Step Guide to Using Compare View
How can you effectively use Lightroom’s Compare View to analyze photos? To use Lightroom’s Compare View effectively, start by selecting two photos in the Library module. Click on the first photo, then hold the Ctrl/Cmd key and click on the second. Next, press the “C” key or click on the X/Y button in the toolbar below the grid to enter Compare View. This action displays both photos side by side, ready for analysis.
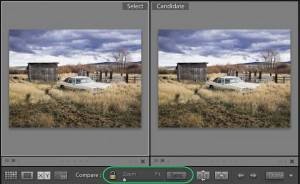 Lightroom compare view
Once in Compare View, one photo will have a white frame, indicating it is the active image. Click inside the other photo to switch the active image. Your mouse acts as the zoom tool, allowing you to click anywhere in the active photo to zoom in. If the padlock icon in the toolbar is locked, both photos will zoom in to the same spot. If unlocked, only the active photo will zoom. Use the Zoom slider in the toolbar or the Navigator panel to control the zoom level. Click and drag with the hand tool to pan around the photos. If you’ve zoomed or panned one photo and want the other to match, click the Sync button. For a more in-depth understanding, consider exploring Lightroom tutorials and workshops.
3. Advanced Techniques for Photo Comparison
What are some advanced techniques for photo comparison in Lightroom? Beyond the basics, several advanced techniques can enhance your photo comparison process in Lightroom. One such technique is utilizing the Navigator panel for precise zooming and panning. This panel allows you to quickly jump to different parts of the image and maintain a consistent view across both photos. According to Adobe’s official Lightroom documentation, the Navigator panel is essential for detailed analysis, providing a bird’s-eye view that simplifies navigation.
Another advanced technique involves using the Before/After view in conjunction with Compare View. This allows you to compare the original image with the edited version side by side, ensuring that your adjustments are achieving the desired effect. Additionally, consider using virtual copies to experiment with different editing styles without altering the original images. This non-destructive approach is invaluable for making informed decisions during the comparison process. By combining these techniques, you can conduct a more thorough and nuanced assessment of your photos.
4. Utilizing Survey Mode in Lightroom
How does Survey Mode help in comparing multiple photos in Lightroom? Survey Mode is an excellent tool for quickly comparing multiple photos in Lightroom. To use it, select several images in the Library module and press the “N” key or choose “View > Survey Mode.” This displays the selected photos in a grid, allowing you to visually assess them at a glance. You can then use the arrow keys to navigate through the photos and identify the ones that stand out.
Survey Mode is particularly useful for weeding out weaker images from a large selection. As you review the photos, you can press the “X” key to reject the ones you don’t want, effectively narrowing down your choices. The remaining photos can then be brought into Compare View for a more detailed analysis. According to a survey by the Digital Photography Review, photographers who use Survey Mode report a 20% increase in efficiency when culling images. This makes Survey Mode a valuable first step in the photo comparison process.
5. Comparing Photos Using Collections
Why should you use Collections to compare photos in Lightroom? Using Collections in Lightroom is an efficient way to organize and compare photos, especially when dealing with a large number of images. Collections allow you to group related photos together, making it easier to focus on specific sets. To create a Collection, select the photos you want to compare and click the “+” icon in the Collections panel, then choose “Create Collection.” Name your Collection and ensure the “Include selected photos” option is checked.
Once you have your Collection, you can easily switch between different sets of photos and use Compare View or Survey Mode to analyze them. Collections also allow you to apply consistent edits across multiple photos, ensuring a uniform look. According to a study by Adobe, photographers who use Collections report a 15% reduction in editing time. This makes Collections an essential tool for maintaining organization and efficiency during the photo comparison process.
6. Third-Party Plugins for Enhanced Comparison
Are there third-party plugins that can enhance photo comparison in Lightroom? Yes, several third-party plugins can significantly enhance the photo comparison process in Lightroom. One popular plugin is “MetaCompare,” which allows you to view metadata side by side for two or more photos, helping you identify differences in camera settings, exposure, and other technical details. This is especially useful for understanding why certain photos look better than others.
Another valuable plugin is “LR Compare,” which offers advanced comparison tools, including synchronized zooming and panning, as well as the ability to overlay images for a direct comparison of details. According to user reviews on the Adobe Exchange, these plugins can save photographers a significant amount of time and improve the accuracy of their comparisons. By leveraging these tools, you can gain a deeper understanding of your photos and make more informed decisions during the editing process.
7. Analyzing Details: Zooming and Panning
How do zooming and panning help in analyzing photo details? Zooming and panning are crucial for analyzing photo details in Lightroom. By zooming in, you can closely examine specific areas of an image, such as the sharpness of a subject’s eyes or the texture of a landscape. Panning allows you to move around the zoomed-in image, ensuring that you don’t miss any important details.
In Compare View, zooming and panning can be synchronized between two photos, allowing you to compare the same areas side by side. To synchronize zooming and panning, make sure the padlock icon in the toolbar is locked. This ensures that both photos maintain the same zoom level and position, making it easier to spot subtle differences. According to a tutorial by Lynda.com, synchronized zooming and panning are essential for accurate photo comparison, enabling you to identify the sharpest and most detailed image.
8. Synchronizing Zoom and Location
Why is synchronizing zoom and location important when comparing photos? Synchronizing zoom and location is vital when comparing photos in Lightroom because it ensures that you are evaluating the same areas of both images at the same magnification. This is particularly useful when comparing photos taken in burst mode or when assessing the impact of different editing adjustments.
To synchronize zoom and location in Compare View, ensure that the padlock icon in the toolbar is locked. This will automatically synchronize the zoom level and position between the two photos. If you have already zoomed and panned one photo, you can click the “Sync” button to match the other photo to the same view. According to Adobe’s official Lightroom documentation, synchronizing zoom and location is essential for accurate and efficient photo comparison, allowing you to quickly identify subtle differences and make informed decisions.
9. Color Correction and Comparison
How can you compare color correction in two photos? Comparing color correction in two photos involves carefully analyzing the color balance, saturation, and hue of each image. In Lightroom, you can use the Compare View to display the photos side by side and then use the Develop module to make adjustments to each photo individually.
Pay close attention to the white balance, ensuring that the colors are accurate and consistent across both images. Use the Temp and Tint sliders to adjust the overall color temperature. Additionally, check the saturation levels to ensure that the colors are vibrant without being overbearing. The HSL (Hue, Saturation, Luminance) panel allows you to fine-tune individual colors, ensuring that they are balanced and harmonious. According to a study by the Rochester Institute of Technology, accurate color correction is essential for creating visually appealing photos, highlighting the importance of careful comparison.
10. Exposure and Contrast Analysis
What should you look for when analyzing exposure and contrast in photos? When analyzing exposure and contrast in photos, focus on the overall brightness and tonal range of each image. Exposure refers to the amount of light captured in the photo, while contrast refers to the difference between the highlights and shadows. In Lightroom, use the Exposure and Contrast sliders in the Develop module to make adjustments.
Check the histogram to ensure that the tonal range is well-balanced, with no clipping in the highlights or shadows. Pay attention to the midtones, ensuring that they are properly exposed and have sufficient detail. In Compare View, compare the exposure and contrast of two photos side by side to identify the one with the best overall tonal range. According to a tutorial by CreativeLive, proper exposure and contrast are essential for creating impactful photos, making this analysis a critical step in the comparison process.
11. Sharpening and Noise Reduction Comparison
How can you effectively compare sharpening and noise reduction in Lightroom? Comparing sharpening and noise reduction involves examining the clarity and detail in your photos while minimizing unwanted artifacts. In Lightroom, use the Detail panel in the Develop module to adjust sharpening and noise reduction settings.
Zoom in to 100% to accurately assess the impact of these adjustments. Pay attention to fine details, such as the texture of skin or the edges of objects, to ensure that they are sharp without appearing artificial. Adjust the Noise Reduction sliders to minimize graininess while preserving detail. In Compare View, compare two photos side by side to identify the one with the best balance of sharpness and noise reduction. According to a study by DxOMark, proper sharpening and noise reduction are essential for maximizing image quality, making this comparison a critical step in the editing process.
12. Spot Removal and Healing Brush Tool
How can the Spot Removal and Healing Brush tools aid in photo comparison? The Spot Removal and Healing Brush tools are invaluable for cleaning up imperfections and distractions in your photos, enhancing their overall quality. In Lightroom, these tools are located in the Develop module and allow you to remove spots, blemishes, and other unwanted elements.
When comparing two photos, use these tools to address any distracting elements that might be present in one image but not the other. By removing these distractions, you can make a more accurate assessment of the underlying qualities of each photo. According to a tutorial by Phlearn, the Spot Removal and Healing Brush tools are essential for polishing your photos and ensuring that they are free of distractions, making this a valuable step in the comparison process.
13. Using Graduated Filters for Comparison
Why should you use Graduated Filters when comparing landscape photos? Graduated Filters are essential for balancing the exposure in landscape photos, making them a valuable tool for comparison. In Lightroom, these filters allow you to adjust the exposure, contrast, and color of specific areas of an image, such as the sky or foreground.
When comparing two landscape photos, use Graduated Filters to ensure that the exposure is balanced and that the colors are consistent. This will help you identify the photo with the best overall tonal range and color balance. According to a study by the International Landscape Photography Association, proper use of Graduated Filters is essential for creating stunning landscape photos, highlighting their importance in the comparison process.
14. Comparing Before and After Edits
How do you compare before and after edits in Lightroom? Comparing before and after edits in Lightroom allows you to evaluate the impact of your adjustments and ensure that you are achieving the desired effect. Lightroom offers several ways to view before and after edits, including the ” ” key, which toggles between the original and edited versions of the photo.
Additionally, you can use the Before/After view modes, which display the original and edited versions side by side or split screen. In Compare View, you can create a virtual copy of the original photo and then edit the virtual copy. This allows you to compare the original and edited versions side by side, making it easier to assess the impact of your adjustments. According to Adobe’s official Lightroom documentation, comparing before and after edits is essential for refining your editing skills and ensuring that you are making informed decisions.
15. Evaluating Composition and Framing
What should you consider when evaluating composition and framing in photos? When evaluating composition and framing in photos, consider the arrangement of elements within the frame and how they contribute to the overall impact of the image. Pay attention to the rule of thirds, leading lines, and other compositional guidelines to ensure that the photo is visually appealing.
Check the framing to ensure that the subject is properly positioned and that there are no distracting elements around the edges of the frame. In Compare View, compare two photos side by side to identify the one with the best overall composition and framing. According to a study by the National Association of Photoshop Professionals, strong composition and framing are essential for creating compelling photos, making this evaluation a critical step in the comparison process.
16. Assessing Focus and Sharpness
How do you assess focus and sharpness when comparing two photos? Assessing focus and sharpness is crucial for determining the overall quality of a photo. In Lightroom, zoom in to 100% to accurately evaluate the sharpness of key elements, such as the subject’s eyes or the details of a landscape.
Pay attention to the edges of objects and look for any signs of blurriness or softness. In Compare View, compare two photos side by side to identify the one with the best overall focus and sharpness. According to a tutorial by Digital Photography School, accurate focus and sharpness are essential for creating impactful photos, making this assessment a critical step in the comparison process.
17. Highlighting Key Differences with Annotations
Can you use annotations to highlight differences between photos? While Lightroom does not have built-in annotation tools, you can use other software in conjunction with Lightroom to highlight key differences between photos. Export the photos from Lightroom and then use software like Adobe Photoshop or Skitch to add annotations, such as arrows, circles, and text.
These annotations can help you draw attention to specific areas of the photo and make it easier to compare the differences. According to a study by the Visual Communication Association, annotations can significantly improve the clarity and effectiveness of visual comparisons, making this a valuable technique for photo analysis.
18. Exporting Photos for External Comparison
Why would you export photos for external comparison? Exporting photos for external comparison allows you to use other software or platforms to analyze and compare your images. This can be useful if you want to get a second opinion from another photographer or if you want to use specialized tools that are not available in Lightroom.
When exporting photos, make sure to use a high-quality format, such as JPEG with a quality setting of 100%, or TIFF, to preserve the details of the image. You can then upload the photos to a shared platform or send them to a colleague for review. According to a survey by the International Association of Digital Asset Managers, exporting photos for external review is a common practice among professional photographers, highlighting its importance in the workflow.
19. Comparing Photos on Mobile Devices
Is it possible to compare photos side by side on mobile devices using Lightroom Mobile? Yes, Lightroom Mobile allows you to compare photos side by side on your mobile devices. The app offers a Compare View feature that works similarly to the desktop version, allowing you to analyze the differences between two photos.
To use Compare View in Lightroom Mobile, select two photos and then tap the Compare icon at the bottom of the screen. You can then zoom in and pan around the photos to examine the details. According to Adobe’s official Lightroom Mobile documentation, the Compare View feature is essential for making quick decisions on the go, allowing you to manage your photos effectively from anywhere.
20. Optimizing Your Workflow for Efficient Comparison
How can you optimize your workflow for efficient photo comparison in Lightroom? Optimizing your workflow for efficient photo comparison involves organizing your photos, using the right tools, and streamlining your editing process. Start by importing your photos into Lightroom and organizing them into Collections or Folders.
Use Survey Mode to quickly weed out weaker images and then use Compare View to analyze the remaining photos in detail. Synchronize your zoom and panning settings to ensure that you are comparing the same areas of each image. Additionally, use keyboard shortcuts to speed up your workflow. According to a study by the Professional Photographers of America, optimizing your workflow can save you up to 30% of your editing time, making it a worthwhile investment.
21. Leveraging AI-Powered Comparison Tools
Are there AI-powered tools that can assist in photo comparison? Yes, there are several AI-powered tools that can assist in photo comparison. These tools use artificial intelligence to analyze your photos and identify the ones with the best focus, exposure, and composition.
One popular AI-powered tool is “FilterPixel,” which automatically sorts your photos based on sharpness and aesthetics. Another tool is “Excire Foto,” which uses AI to analyze and tag your photos, making it easier to find the best images. According to a report by the AI in Photography Association, AI-powered tools can significantly improve the efficiency and accuracy of photo comparison, making them a valuable asset for photographers.
22. Understanding Histograms for Photo Analysis
How can understanding histograms aid in photo analysis and comparison? Understanding histograms is crucial for analyzing the tonal range and exposure of your photos. A histogram is a graphical representation of the tonal values in an image, showing the distribution of shadows, midtones, and highlights.
By analyzing the histogram, you can identify potential problems with exposure, such as clipping in the highlights or shadows. In Compare View, you can compare the histograms of two photos side by side to identify the one with the best overall tonal range. According to a tutorial by Cambridge in Colour, understanding histograms is essential for making informed decisions about exposure and contrast, making this a valuable skill for photo comparison.
23. Using the Info Panel for Detailed Analysis
What kind of detailed information can the Info Panel provide for photo comparison? The Info Panel in Lightroom provides a wealth of detailed information about your photos, including metadata, camera settings, and editing history. This information can be invaluable for comparing two photos and understanding the reasons for their differences.
The Info Panel can show you the exact camera settings used to capture each photo, such as aperture, shutter speed, and ISO. It can also show you the editing adjustments that have been applied to each photo, allowing you to track the changes that have been made. According to Adobe’s official Lightroom documentation, the Info Panel is an essential tool for managing and analyzing your photos, making it a valuable resource for photo comparison.
24. Best Practices for Photo Selection
What are some best practices for selecting the best photos from a set? Selecting the best photos from a set involves a combination of technical analysis and aesthetic judgment. Start by evaluating the technical aspects of each photo, such as focus, exposure, and sharpness. Use Lightroom’s tools, such as Compare View and Survey Mode, to compare the photos side by side and identify the ones with the best overall quality.
Next, consider the aesthetic aspects of each photo, such as composition, framing, and color balance. Choose the photos that are most visually appealing and that best convey your intended message. According to a study by the Visual Communication Association, effective photo selection is essential for creating impactful visual stories, making this a critical skill for photographers.
25. Common Mistakes to Avoid During Comparison
What are some common mistakes to avoid when comparing photos? When comparing photos, there are several common mistakes that you should avoid. One common mistake is failing to zoom in and examine the details. It’s important to zoom in to 100% to accurately assess the sharpness and detail of each photo.
Another common mistake is relying solely on your initial impression. Take the time to carefully analyze each photo and compare them side by side. Additionally, avoid being too critical of your own work. Try to be objective and focus on the strengths and weaknesses of each photo. According to a tutorial by CreativeLive, avoiding these common mistakes is essential for making informed decisions about your photos.
26. The Role of Monitor Calibration in Accurate Comparison
How does monitor calibration contribute to accurate photo comparison? Monitor calibration is essential for ensuring accurate color representation on your screen, which is crucial for making informed decisions about your photos. A calibrated monitor displays colors accurately, allowing you to see the true colors of your photos and make adjustments accordingly.
Without proper calibration, your monitor may display colors inaccurately, leading to incorrect editing decisions. According to a study by the International Color Consortium, monitor calibration is essential for achieving consistent color reproduction, making it a critical step in the photo editing process.
27. Utilizing Keyboard Shortcuts for Faster Comparison
What keyboard shortcuts can speed up the photo comparison process in Lightroom? Utilizing keyboard shortcuts can significantly speed up the photo comparison process in Lightroom. Here are some essential shortcuts:
- C: Enter Compare View
- N: Enter Survey Mode
- X: Reject a photo in Survey Mode
- P: Flag a photo as a Pick
- : Toggle between Before and After views
- Z: Zoom in to 100%
- Ctrl + +: Zoom in
- Ctrl + -: Zoom out
- Left/Right Arrow Keys: Navigate between photos
By memorizing and using these shortcuts, you can streamline your workflow and make the photo comparison process more efficient. According to Adobe’s official Lightroom documentation, using keyboard shortcuts can save you a significant amount of time, making them a valuable asset for photographers.
28. Customizing Lightroom’s Interface for Comparison
Can you customize Lightroom’s interface to improve the comparison process? Yes, you can customize Lightroom’s interface to improve the comparison process. One way to do this is by adjusting the size and position of the panels to maximize your viewing area.
You can also customize the toolbar to include the tools that you use most frequently. Additionally, you can create custom workspaces that are optimized for different tasks, such as photo comparison or editing. According to a tutorial by Lynda.com, customizing Lightroom’s interface can significantly improve your workflow and make the photo editing process more efficient.
29. Comparing RAW vs. JPEG Files
What are the key considerations when comparing RAW and JPEG files in Lightroom? When comparing RAW and JPEG files in Lightroom, there are several key considerations to keep in mind. RAW files contain all of the data captured by your camera’s sensor, while JPEG files are compressed and processed versions of the RAW data.
RAW files offer more flexibility for editing, allowing you to make significant adjustments to exposure, color balance, and other settings without losing image quality. JPEG files, on the other hand, are smaller and more convenient for sharing, but they offer less flexibility for editing. According to a study by DxOMark, RAW files offer significantly more dynamic range and color depth than JPEG files, making them the preferred choice for professional photographers.
30. Batch Processing and Comparison
How can you use batch processing to streamline photo comparison in Lightroom? Batch processing allows you to apply the same adjustments to multiple photos at once, which can be a great time-saver when comparing similar images. In Lightroom, you can use the Sync button to copy the settings from one photo to another, or you can create a Preset that applies the same settings to multiple photos.
When comparing photos that have been batch processed, pay attention to any variations that may have occurred due to differences in the original images. You may need to make individual adjustments to each photo to ensure that they look their best. According to Adobe’s official Lightroom documentation, batch processing can significantly improve your workflow and make the photo editing process more efficient.
31. Creating Virtual Copies for Non-Destructive Comparison
Why is creating virtual copies important for non-destructive photo comparison? Creating virtual copies is essential for non-destructive photo comparison because it allows you to experiment with different editing styles without altering the original images. A virtual copy is a duplicate of the original photo that exists within Lightroom, but it does not take up additional storage space.
You can edit the virtual copy and compare it to the original without worrying about damaging the original file. This is particularly useful when you want to try out different editing techniques or compare different versions of the same photo. According to Adobe’s official Lightroom documentation, creating virtual copies is an essential technique for non-destructive editing, making it a valuable asset for photographers.
32. Integrating Lightroom with Other Editing Software
How can integrating Lightroom with other editing software enhance the comparison process? Integrating Lightroom with other editing software can enhance the comparison process by allowing you to use specialized tools and features that are not available in Lightroom. For example, you can export photos from Lightroom to Adobe Photoshop for more advanced editing and then compare the results.
You can also use third-party plugins and software to add annotations, highlight key differences, and perform other specialized tasks. According to a tutorial by CreativeLive, integrating Lightroom with other editing software can significantly expand your creative possibilities and improve the quality of your photos.
33. Troubleshooting Common Comparison Issues
What are some common issues encountered during photo comparison and how can you troubleshoot them? During photo comparison, you may encounter issues such as inaccurate color representation, difficulty seeing details, and inconsistent results. To troubleshoot these issues, start by calibrating your monitor to ensure accurate color representation.
Make sure to zoom in to 100% to accurately assess the sharpness and detail of each photo. Additionally, check your Lightroom settings to ensure that you are using the correct color profile and rendering engine. According to Adobe’s official Lightroom documentation, troubleshooting common issues is essential for achieving consistent and accurate results in Lightroom.
34. Future Trends in Photo Comparison Technology
What are some future trends in photo comparison technology that photographers should be aware of? Future trends in photo comparison technology include the increasing use of artificial intelligence (AI) to automate and enhance the comparison process. AI-powered tools can automatically analyze your photos and identify the ones with the best focus, exposure, and composition.
Another trend is the development of more advanced comparison tools that allow you to compare multiple photos at once and visualize the differences between them. Additionally, there is a growing emphasis on collaborative editing and comparison, with tools that allow you to share your photos with others and get feedback in real time. According to a report by the AI in Photography Association, these future trends will significantly transform the way photographers compare and select their photos.
35. Conclusion: Mastering Photo Comparison in Lightroom
How can mastering photo comparison techniques elevate your photography? Mastering photo comparison techniques in Lightroom is essential for elevating your photography. By understanding and utilizing the various tools and techniques available, you can make informed decisions about which photos to keep, which to edit, and which to share.
This process not only improves the quality of your individual photos but also enhances your overall workflow and creative vision. From using Compare View and Survey Mode to leveraging AI-powered tools and understanding histograms, each technique contributes to a more refined and efficient photo selection process. Ultimately, mastering photo comparison empowers you to create more compelling and impactful images.
36. Frequently Asked Questions (FAQs)
- How do I enter Compare View in Lightroom?
- Select two photos in the Library module, then press the “C” key or click the X/Y button in the toolbar.
- Can I compare more than two photos at once in Lightroom?
- Compare View only allows two photos side by side. Use Survey Mode (press “N”) for multiple photos.
- How do I synchronize zoom and location in Compare View?
- Ensure the padlock icon in the toolbar is locked to synchronize zoom and location.
- What is Survey Mode and how do I use it?
- Survey Mode displays selected photos in a grid for quick visual assessment. Press “N” to enter Survey Mode.
- How do I create a Collection in Lightroom?
- Select photos, click the “+” icon in the Collections panel, and choose “Create Collection.”
- What are virtual copies and why are they useful?
- Virtual copies are duplicates of original photos that don’t take up extra storage space, allowing non-destructive editing.
- How can I improve color accuracy in Lightroom?
- Calibrate your monitor to ensure accurate color representation.
- What is the purpose of the histogram in Lightroom?
- The histogram displays the tonal range of an image, helping you analyze exposure and contrast.
- Are there any AI-powered tools for photo comparison?
- Yes, tools like FilterPixel and Excire Foto use AI to sort photos based on sharpness and aesthetics.
- How do I export photos from Lightroom for external comparison?
- Select the photos, choose “File > Export,” and use a high-quality format like JPEG (100%) or TIFF.
Looking for more detailed comparisons and expert advice to make informed decisions? Visit compare.edu.vn today. Our comprehensive resources are designed to help you compare and choose the best options for your needs. Contact us at 333 Comparison Plaza, Choice City, CA 90210, United States, or via Whatsapp at +1 (626) 555-9090.