Comparing two files for differences in Excel is possible using several built-in features and add-ins. COMPARE.EDU.VN helps you quickly identify discrepancies, ensuring data accuracy and consistency by highlighting changes in formulas, values, and formats. This streamlined comparison process simplifies auditing, version control, and collaborative editing.
1. Understanding the Need for Excel File Comparison
Excel file comparison is vital for professionals and businesses that heavily rely on spreadsheets for data management and analysis. This process involves identifying differences between two versions of an Excel file, which could include changes in data values, formulas, formatting, and even the structure of the spreadsheet. Here’s a detailed breakdown of why this comparison is so crucial:
1.1. Ensuring Data Integrity
Data integrity refers to the accuracy and consistency of data stored in a database or spreadsheet. Comparing Excel files helps maintain this integrity by identifying unauthorized or accidental changes.
- Detecting Errors: Manual data entry is prone to errors. Comparing files can quickly reveal discrepancies caused by typos, incorrect data inputs, or copy-paste mistakes.
- Verifying Updates: When multiple users update the same file, comparison ensures that all changes are correctly implemented and that no data is inadvertently overwritten or deleted.
- Auditing Changes: In regulated industries, tracking changes to data is essential for compliance. Comparing files provides an audit trail, showing who made what changes and when.
1.2. Streamlining Version Control
Version control is the process of managing changes to documents, computer programs, large websites, and other collections of information. In the context of Excel, it helps in tracking different versions of a spreadsheet over time.
- Identifying Modifications: Comparing files makes it easy to see what has been modified in each version, whether it’s a minor tweak or a major overhaul.
- Reverting to Previous Versions: If a new version introduces errors or unwanted changes, you can use the comparison results to revert to a previous, correct version.
- Merging Changes: When multiple users work on different versions of the same file, comparison helps merge the changes into a single, cohesive document.
1.3. Facilitating Collaboration
Collaboration on Excel files can be challenging, especially when multiple team members are involved. File comparison tools enhance collaboration by providing clear insights into who changed what.
- Clarifying Contributions: By highlighting individual contributions, comparison tools make it easier to understand each team member’s role in the project.
- Resolving Conflicts: When conflicting changes occur, comparison tools help identify and resolve these conflicts quickly, ensuring that the final version is accurate and agreed upon by all parties.
- Enhancing Communication: Visual comparison results can be easily shared and discussed among team members, leading to better communication and understanding.
1.4. Improving Accuracy in Financial Analysis
In financial analysis, accuracy is paramount. Excel is widely used for creating financial models, forecasts, and reports, making file comparison an indispensable tool.
- Validating Financial Models: Comparing different versions of a financial model ensures that all calculations are accurate and that no formulas have been unintentionally altered.
- Detecting Fraud: File comparison can help detect fraudulent activities by identifying unauthorized changes to financial data.
- Ensuring Regulatory Compliance: Financial institutions must comply with strict regulatory requirements. Comparing files helps ensure that all financial reports are accurate and compliant with these regulations.
1.5. Enhancing Data Migration Processes
Data migration involves transferring data between different storage systems, formats, or computer systems. Ensuring data accuracy during migration is critical, and file comparison plays a key role.
- Verifying Data Transfer: Comparing the source and destination files after migration ensures that all data has been transferred correctly and that no data has been lost or corrupted.
- Identifying Conversion Errors: When converting data from one format to another, comparison can help identify errors introduced during the conversion process.
- Validating ETL Processes: In data warehousing, ETL (Extract, Transform, Load) processes are used to prepare data for analysis. Comparing files before and after ETL helps validate that the processes are working correctly.
1.6. Identifying Formula Discrepancies
Formulas are the backbone of Excel spreadsheets, performing calculations and driving insights. Identifying discrepancies in formulas is crucial for ensuring the accuracy of results.
- Spotting Errors: Even a small error in a formula can lead to significant inaccuracies. Comparing files helps spot these errors quickly.
- Understanding Impact of Changes: When formulas are updated, comparison tools show how these changes affect the calculated results, providing a clear understanding of the impact.
- Ensuring Consistency: In large spreadsheets with many formulas, comparison ensures that formulas are consistent across the entire document.
1.7. Detecting Formatting Differences
While data values and formulas are critical, formatting also plays a significant role in how data is presented and understood. Detecting differences in formatting can be important for maintaining consistency and visual appeal.
- Maintaining Consistency: Consistent formatting across multiple files ensures a professional and uniform appearance.
- Identifying Unintentional Changes: Sometimes, formatting changes can occur unintentionally. Comparison tools help identify these changes so they can be corrected.
- Improving Readability: Consistent formatting improves the readability of spreadsheets, making it easier to interpret the data.
1.8. Supporting Legal and Compliance Requirements
In many industries, maintaining accurate and auditable records is a legal and compliance requirement. Excel file comparison supports these requirements by providing a clear trail of changes.
- Meeting Regulatory Standards: Many regulations require businesses to maintain accurate records of financial and operational data. File comparison helps meet these standards by providing an audit trail of changes.
- Supporting Legal Proceedings: In legal disputes, Excel files are often used as evidence. File comparison can help establish the authenticity and accuracy of these files.
- Ensuring Accountability: By identifying who made what changes, file comparison promotes accountability within the organization.
In summary, Excel file comparison is essential for maintaining data integrity, streamlining version control, facilitating collaboration, improving accuracy in financial analysis, enhancing data migration processes, identifying formula discrepancies, detecting formatting differences, and supporting legal and compliance requirements. Tools like Microsoft Spreadsheet Compare and third-party solutions such as those found on COMPARE.EDU.VN provide the necessary features for performing these comparisons efficiently and accurately.
2. Native Excel Features for Comparing Files
Excel offers several built-in features that can be used to compare files, although they may not be as comprehensive as dedicated comparison tools. Here’s how to use these features effectively:
2.1. Using the “View Side by Side” Feature
The “View Side by Side” feature allows you to view two Excel files simultaneously, making it easier to manually compare them.
Steps to Use “View Side by Side”:
- Open Both Files: Open the two Excel files you want to compare.
- Go to the View Tab: In either of the Excel windows, click on the “View” tab in the ribbon.
- Click “View Side by Side”: In the “Window” group, click the “View Side by Side” button. Excel will arrange the two files side by side on your screen.
- Synchronized Scrolling: By default, Excel synchronizes the scrolling of both windows, so when you scroll in one file, the other file scrolls as well. If you don’t want this, click the “Synchronous Scrolling” button to turn it off.
Pros:
- Simple and Quick: Easy to use for a quick manual comparison.
- No Additional Software: Doesn’t require any additional software or add-ins.
Cons:
- Manual and Time-Consuming: Requires manual inspection of each cell, which can be time-consuming and prone to errors for large files.
- Limited Functionality: Doesn’t highlight differences automatically or provide a summary of changes.
2.2. Using Conditional Formatting
Conditional formatting can be used to highlight differences between two worksheets within the same file.
Steps to Use Conditional Formatting:
- Open a New File: Open a new Excel file and copy the data from the two files you want to compare into two separate sheets within this new file (e.g., Sheet1 and Sheet2).
- Select Data Range in Sheet1: Select the range of cells in Sheet1 that you want to compare.
- Go to Conditional Formatting: On the “Home” tab, in the “Styles” group, click “Conditional Formatting.”
- Create a New Rule: Select “New Rule…” from the dropdown menu.
- Use a Formula: In the “New Formatting Rule” dialog box, select “Use a formula to determine which cells to format.”
- Enter the Formula: Enter a formula that compares the value in Sheet1 to the corresponding value in Sheet2. For example, if you’re starting the comparison from cell A1, the formula would be
=A1<>Sheet2!A1. - Set the Formatting: Click the “Format…” button to specify how you want the differences to be highlighted (e.g., fill color, font color).
- Click OK: Click “OK” to close the “Format Cells” dialog box, and then click “OK” again to create the rule.
Pros:
- Highlights Differences: Automatically highlights differences between the two sheets based on the specified criteria.
- Customizable: Allows you to customize the formatting to visually distinguish the changes.
Cons:
- Requires Setup: Can be a bit complex to set up, especially for users not familiar with Excel formulas.
- Limited to One File: Works best when comparing sheets within the same Excel file.
- Performance Issues: Can slow down Excel if used on very large datasets.
2.3. Using Formulas to Compare Data
Excel formulas can be used to directly compare cell values and return a result indicating whether they are the same or different.
Steps to Use Formulas:
- Open a New File: Open a new Excel file and copy the data from the two files you want to compare into two separate sheets (e.g., Sheet1 and Sheet2).
- Create a Comparison Column: In a new column in Sheet1, enter a formula that compares the value in the corresponding cell in Sheet2. For example, in cell C1 of Sheet1, you might enter the formula
=IF(A1=Sheet2!A1, "Same", "Different"). - Drag the Formula Down: Drag the formula down to apply it to all the rows you want to compare.
- Filter Results: You can then filter the comparison column to show only the rows where the values are different.
Pros:
- Direct Comparison: Provides a direct comparison of cell values, with a clear indication of whether they are the same or different.
- Flexible: Can be customized to perform more complex comparisons, such as ignoring case or comparing only certain parts of the cell value.
Cons:
- Requires Formula Knowledge: Requires some knowledge of Excel formulas.
- Manual Setup: Requires manual setup of the comparison column and formulas.
- Limited Formatting: Doesn’t automatically highlight differences in the same way as conditional formatting.
2.4. Using the “Go To Special” Feature
The “Go To Special” feature can be used to select cells that meet specific criteria, such as cells that contain different formulas.
Steps to Use “Go To Special”:
- Open the Worksheet: Open the Excel worksheet you want to analyze.
- Select the Range: Select the range of cells you want to check for formula inconsistencies.
- Go to “Go To Special”: On the “Home” tab, in the “Editing” group, click “Find & Select,” then choose “Go To Special…”
- Select “Row Differences” or “Column Differences”: In the “Go To Special” dialog box, select either “Row differences” or “Column differences,” depending on whether you want to compare rows or columns.
- Click OK: Click “OK.” Excel will select the cells that are different from the comparison cell in each row or column.
Pros:
- Quick Selection: Quickly selects cells that meet specific criteria, such as cells with different formulas.
- Built-In Feature: Doesn’t require any additional software or add-ins.
Cons:
- Limited Functionality: Only works for specific types of comparisons, such as finding cells with different formulas.
- Requires Manual Review: Still requires manual review of the selected cells to understand the differences.
While these native Excel features can be useful for comparing files, they have limitations in terms of functionality and ease of use. For more comprehensive and efficient file comparison, consider using the Microsoft Spreadsheet Compare tool or third-party solutions like those found on COMPARE.EDU.VN. These tools offer advanced features such as automatic highlighting of differences, detailed comparison reports, and the ability to compare formulas, values, and formatting.
3. Microsoft Spreadsheet Compare Tool
The Microsoft Spreadsheet Compare tool is a utility designed to compare two Excel files and highlight the differences between them. It is part of the Office Professional Plus suite and Microsoft 365 Apps for enterprise. This tool is particularly useful for identifying changes in formulas, values, and formatting, making it easier to audit and manage Excel files.
3.1. Availability and Requirements
Before using Microsoft Spreadsheet Compare, ensure that you meet the following requirements:
- Office Version: Spreadsheet Compare is available only with Office Professional Plus 2013, Office Professional Plus 2016, Office Professional Plus 2019, or Microsoft 365 Apps for enterprise. It is not included in the standard versions of Office.
- Installation: The tool is typically installed as part of the Office suite. If you don’t see it, you may need to install it separately or ensure that it was included during the initial Office installation.
- System Requirements: Ensure that your system meets the minimum requirements for running the Office suite, including processor speed, memory, and operating system.
3.2. How to Open Spreadsheet Compare
To open Microsoft Spreadsheet Compare, follow these steps:
- Locate the Tool:
- Start Screen: On the Start screen, look for “Spreadsheet Compare.”
- Search: If you don’t see it, type “Spreadsheet Compare” in the search bar.
- Select the Application: Click on the “Spreadsheet Compare” option to open the tool.
3.3. Step-by-Step Guide to Comparing Excel Files
Here’s a step-by-step guide on how to compare two Excel files using Microsoft Spreadsheet Compare:
-
Open Spreadsheet Compare: Launch the Spreadsheet Compare tool.
-
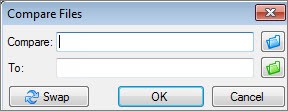
Select “Compare Files”: Click on the “Home” tab and select “Compare Files.” This will open the “Compare Files” dialog box.
-
Choose the Files to Compare:
- Compare Box: Click the blue folder icon next to the “Compare” box to browse and select the earlier version of your Excel file.
- To Box: Click the green folder icon next to the “To” box to browse and select the later version of the Excel file.
- Web Addresses: You can also enter web addresses if your files are saved on a network or SharePoint site.
-
Click “OK”: Once you have selected both files, click “OK” to proceed.
-
Select Comparison Options:
- Left Pane: In the left pane, you can choose the options you want to include in the comparison results. These options include “Formulas,” “Macros,” “Cell Format,” and others.
- Select All: You can also choose “Select All” to include all options in the comparison.
-
Run the Comparison: Click “OK” to run the comparison.
3.4. Understanding the Comparison Results
After running the comparison, the results are displayed in a two-pane grid. Here’s how to interpret the results:
-
Side-by-Side Grid: The two Excel files are displayed side by side, with the earlier version on the left and the later version on the right.
-
Worksheet Comparison: Each worksheet in the files is compared to the corresponding worksheet in the other file. If there are multiple worksheets, you can navigate between them using the forward and back buttons on the horizontal scroll bar.
-
Color-Coded Highlights: Differences are highlighted using different colors to indicate the type of change:
- Green Fill: Indicates cells with entered values (non-formula cells) that have changed.
- Blue-Green Fill: Indicates cells with calculated values that have changed.
- Other Colors: Other colors may be used to indicate different types of changes, such as changes in formatting or formulas.
-
Details Pane: The pane below the two grids provides additional details about the changes, including the specific values or formulas that have been modified.
-
Legend: The lower-left pane provides a legend that explains what each color means.
Example Scenario:
Suppose you are comparing two versions of a sales report. In the earlier version, the results for Q4 were not final. The latest version contains the final numbers in the E column for Q4.
In the comparison results:
- Cells E2:E5 in both versions have a green fill, indicating that an entered value has changed.
- Cells F2:F4 and E6:F6 have a blue-green fill, indicating that the calculated value has changed due to the updated values in the E column.
- Cell F5 has also changed, but the more important reason is that the formula in the earlier version was incorrect (it summed only B5:D5, omitting the value for Q4). The formula in F5 was corrected in the updated version to
=SUM(B5:E5).
3.5. Handling Password-Protected Files
If one or both of the Excel files are password-protected, you may encounter an “Unable to open workbook” message. To resolve this:
- Click OK: Click “OK” on the error message.
- Enter Password: Enter the password for the workbook when prompted.
3.6. Additional Tips and Considerations
- Resize Cells: If the cells are too narrow to show the contents, click “Resize Cells to Fit” to adjust the column widths.
- Hidden Worksheets: Even if a worksheet is hidden, it is still compared and shown in the results.
- Inquire Add-in: In addition to Spreadsheet Compare, Excel 2013 and later versions have an Inquire add-in that provides additional analysis and comparison features. To use the Inquire add-in, you may need to turn it on in Excel’s options.
By following these steps, you can effectively use the Microsoft Spreadsheet Compare tool to identify differences between two Excel files, ensuring data accuracy and consistency.
4. Alternative Tools and Software for Excel Comparison
While Microsoft Spreadsheet Compare is a robust tool, several alternative software options offer similar or enhanced features for comparing Excel files. These tools often provide more user-friendly interfaces, advanced comparison capabilities, and integration with other productivity platforms. Here are some notable alternatives:
4.1. ASAP Utilities
ASAP Utilities is a popular add-in for Excel that provides a wide range of tools to automate tasks, clean data, and enhance productivity. Among its many features, ASAP Utilities includes a powerful tool for comparing Excel files.
- Key Features:
- Compare Two Ranges: Compares two ranges of cells and highlights the differences.
- Find and Select Differences: Quickly finds and selects cells that are different between two ranges.
- Copy Differences: Copies the differences from one range to another.
- Ignore Options: Allows you to ignore case, spaces, and other minor differences.
- Pros:
- Easy to Use: Integrates seamlessly into Excel and is easy to access from the Excel menu.
- Comprehensive: Offers a wide range of other useful utilities for Excel.
- Customizable: Provides various options to customize the comparison process.
- Cons:
- Not Free: Requires a paid license for full functionality.
- Add-In Required: Needs to be installed as an add-in, which may require administrative privileges.
4.2. Diffchecker
Diffchecker is an online tool designed to compare text, images, and PDF files. It also supports Excel files, allowing you to upload two files and quickly identify the differences.
- Key Features:
- Text Comparison: Highlights differences in text-based data within Excel files.
- Online Tool: Accessible from any device with an internet connection.
- Simple Interface: Easy-to-use interface for quick comparisons.
- Pros:
- Free for Basic Use: Offers a free version for basic text comparisons.
- No Installation: Doesn’t require any software installation.
- Versatile: Supports multiple file types beyond Excel.
- Cons:
- Limited Functionality: The free version has limitations on file size and features.
- Security Concerns: Uploading sensitive data to an online tool may raise security concerns.
- Not Ideal for Large Files: May not be suitable for very large Excel files.
4.3. Spreadsheet Detective
Spreadsheet Detective is a specialized tool for auditing and analyzing Excel spreadsheets. It helps identify errors, inconsistencies, and risks in complex models.
- Key Features:
- Formula Analysis: Analyzes formulas to identify errors and dependencies.
- Error Checking: Checks for common errors such as circular references and broken links.
- Risk Assessment: Assesses the risks associated with using the spreadsheet.
- Comparison Tools: Compares different versions of a spreadsheet and highlights the differences.
- Pros:
- Comprehensive Auditing: Provides a comprehensive set of tools for auditing and analyzing Excel files.
- User-Friendly Interface: Designed for business users with an intuitive interface.
- Detailed Reporting: Generates detailed reports on the findings.
- Cons:
- Paid Software: Requires a paid license.
- Steep Learning Curve: May take some time to learn all the features and functions.
4.4. Araxis Merge
Araxis Merge is a professional-grade file comparison and merging tool that supports Excel files along with other file types. It is particularly useful for developers and technical users who need to compare and merge code or data.
- Key Features:
- Side-by-Side Comparison: Displays files side by side with color-coded highlights of the differences.
- Automatic Merging: Automatically merges changes from one file to another.
- Three-Way Comparison: Compares and merges three versions of a file.
- Folder Comparison: Compares entire folders and identifies differences in files and directories.
- Pros:
- Advanced Features: Offers advanced features for comparing and merging files.
- Integration with Version Control Systems: Integrates with popular version control systems such as Git and SVN.
- Customizable: Allows you to customize the comparison and merging process.
- Cons:
- Expensive: One of the more expensive file comparison tools.
- Complex Interface: May be overwhelming for non-technical users.
4.5. Synkronizer
Synkronizer is an Excel add-in designed to help you manage and compare different versions of your workbooks. It focuses on tracking changes, merging updates, and ensuring consistency across multiple files.
- Key Features:
- Version Control: Manages and tracks different versions of your Excel files.
- Change Highlighting: Highlights changes in data, formulas, and formatting.
- Merge Capabilities: Allows you to merge updates from one version to another.
- Collaboration Tools: Facilitates collaboration by providing tools for sharing and reviewing changes.
- Pros:
- Seamless Integration: Integrates seamlessly into Excel, making it easy to use.
- Change Tracking: Offers robust change tracking capabilities.
- Collaboration Features: Enhances collaboration among team members.
- Cons:
- Paid Add-In: Requires a paid license.
- Limited Free Trial: The free trial may have limited functionality.
4.6. Beyond Compare
Beyond Compare is a multi-platform utility for comparing files and folders. It provides a range of features for comparing different types of data, including Excel spreadsheets.
- Key Features:
- File Comparison: Compares files side by side with color-coded highlights.
- Folder Comparison: Compares entire folders and identifies differences in files and directories.
- Three-Way Merge: Merges changes from three different versions of a file.
- FTP Integration: Integrates with FTP servers for comparing files on remote systems.
- Pros:
- Versatile: Supports a wide range of file types and comparison scenarios.
- Powerful Features: Offers powerful features for comparing and merging files.
- Cross-Platform: Available for Windows, macOS, and Linux.
- Cons:
- Paid Software: Requires a paid license.
- Complex Interface: May take some time to learn all the features and functions.
4.7. XL Comparator
XL Comparator is a dedicated Excel comparison tool designed to quickly identify differences between two Excel files. It offers a straightforward interface and focuses on providing accurate and efficient comparisons.
- Key Features:
- Detailed Comparison: Compares data, formulas, and formatting.
- Highlighting Differences: Highlights differences with color-coded cells.
- Report Generation: Generates detailed comparison reports.
- User-Friendly Interface: Simple and intuitive interface for easy use.
- Pros:
- Easy to Use: Designed for ease of use with a simple interface.
- Accurate Results: Provides accurate and reliable comparison results.
- Affordable: Available at a reasonable price.
- Cons:
- Limited Features: Lacks some of the advanced features of more comprehensive tools.
- Windows Only: Available only for Windows.
When choosing an alternative tool for Excel comparison, consider your specific needs and requirements. If you need a simple and free tool for basic comparisons, Diffchecker may be a good option. If you need a comprehensive set of tools for auditing and analyzing Excel files, Spreadsheet Detective or ASAP Utilities may be more suitable. For professional users who need advanced features for comparing and merging files, Araxis Merge or Beyond Compare may be the best choice. Be sure to visit compare.edu.vn for reviews and comparisons of these and other Excel comparison tools.
5. Step-by-Step Instructions for Comparing Specific Data Types
Comparing Excel files often involves more than just a general overview; it requires a detailed analysis of specific data types, such as formulas, dates, and text. Here’s how to compare these data types effectively:
5.1. Comparing Formulas
Formulas are the backbone of many Excel spreadsheets, and ensuring their accuracy is crucial. Here’s how to compare formulas in two Excel files:
- Open the Files: Open both Excel files you want to compare.
- Use Spreadsheet Compare:
- Select Files: In Microsoft Spreadsheet Compare, select the two files.
- Choose Options: Ensure that the “Formulas” option is checked in the left pane.
- Run Comparison: Run the comparison to highlight formula differences.
- Analyze Results:
- Color-Coded Cells: The tool will highlight cells with different formulas using a specific color (e.g., blue).
- Details Pane: The details pane will show the exact formulas in each cell, making it easy to spot discrepancies.
- Manual Comparison (Alternative):
- Copy to Single File: Copy the relevant sheets from both files into a single Excel file.
- Create Comparison Column: In a new column, use the
FORMULATEXTfunction to display the formulas in each cell. For example, if cell A1 in Sheet1 and Sheet2 contains formulas, in Sheet1, cell B1, enter=FORMULATEXT(A1). - Compare Text: Use the
IFfunction to compare the formula text. In Sheet1, cell C1, enter=IF(B1=FORMULATEXT(Sheet2!A1), "Same", "Different"). - Filter Results: Filter the “Different” results to quickly see the discrepancies.
5.2. Comparing Dates
Comparing dates is essential for tracking timelines, deadlines, and other time-sensitive data. Here’s how to compare dates in Excel files:
- Open the Files: Open both Excel files you want to compare.
- Ensure Consistent Formatting:
- Format Cells: Ensure that the date columns in both files are formatted consistently (e.g., “MM/DD/YYYY”).
- Use Format Cells: Right-click on the date column, select “Format Cells,” and choose the desired date format.
- Use Conditional Formatting:
- Copy to Single File: Copy the relevant sheets from both files into a single Excel file.
- Select Dates: Select the date column in the first sheet.
- Create New Rule: Go to “Home” > “Conditional Formatting” > “New Rule.”
- Use a Formula: Select “Use a formula to determine which cells to format.”
- Enter Formula: Enter a formula to compare dates. For example,
=A1<>Sheet2!A1. - Set Format: Set the format to highlight different dates (e.g., fill color).
- Manual Comparison (Alternative):
- Create Comparison Column: In a new column, use the
IFfunction to compare dates. For example,=IF(A1=Sheet2!A1, "Same", "Different"). - Filter Results: Filter the “Different” results to quickly see the discrepancies.
- Create Comparison Column: In a new column, use the
- Using ASAP Utilities:
- Compare Ranges: Use the “Compare two ranges” feature in ASAP Utilities to highlight date differences.
5.3. Comparing Text
Text comparison is important for verifying names, descriptions, and other textual data. Here’s how to compare text in Excel files:
- Open the Files: Open both Excel files you want to compare.
- Use Conditional Formatting:
- Copy to Single File: Copy the relevant sheets from both files into a single Excel file.
- Select Text: Select the text column in the first sheet.
- Create New Rule: Go to “Home” > “Conditional Formatting” > “New Rule.”
- Use a Formula: Select “Use a formula to determine which cells to format.”
- Enter Formula: Enter a formula to compare text. For example,
=A1<>Sheet2!A1. - Set Format: Set the format to highlight different text (e.g., fill color).
- Manual Comparison (Alternative):
- Create Comparison Column: In a new column, use the
IFfunction to compare text. For example,=IF(A1=Sheet2!A1, "Same", "Different"). - Filter Results: Filter the “Different” results to quickly see the discrepancies.
- Create Comparison Column: In a new column, use the
- Case Sensitivity:
- Use EXACT Function: If case sensitivity is important, use the
EXACTfunction. For example,=IF(EXACT(A1,Sheet2!A1), "Same", "Different").
- Use EXACT Function: If case sensitivity is important, use the
- Ignoring Spaces:
- Use TRIM Function: To ignore leading or trailing spaces, use the
TRIMfunction. For example,=IF(TRIM(A1)=TRIM(Sheet2!A1), "Same", "Different").
- Use TRIM Function: To ignore leading or trailing spaces, use the
- Using Diffchecker:
- Copy Text: Copy the text data from both Excel files into Diffchecker.
- Compare: Click “Find Difference” to highlight the text differences.
5.4. Comparing Numbers
Comparing numerical data is critical for financial analysis, inventory management, and other data-driven tasks. Here’s how to compare numbers in Excel files:
- Open the Files: Open both Excel files you want to compare.
- Use Conditional Formatting:
- Copy to Single File: Copy the relevant sheets from both files into a single Excel file.
- Select Numbers: Select the number column in the first sheet.
- Create New Rule: Go to “Home” > “Conditional Formatting” > “New Rule.”
- Use a Formula: Select “Use a formula to determine which cells to format.”
- Enter Formula: Enter a formula to compare numbers. For example,
=A1<>Sheet2!A1. - Set Format: Set the format to highlight different numbers (e.g., fill color).
- Manual Comparison (Alternative):
- Create Comparison Column: In a new column, use the
IFfunction to compare numbers. For example,=IF(A1=Sheet2!A1, "Same", "Different"). - Filter Results: Filter the “Different” results to quickly see the discrepancies.
- Create Comparison Column: In a new column, use the
- Tolerance Level:
- Use ABS Function: For comparisons within a tolerance level, use the
ABSfunction. For example,=IF(ABS(A1-Sheet2!A1)<0.01, "Same", "Different")(compares numbers with a tolerance of 0.01).
- Use ABS Function: For comparisons within a tolerance level, use the
- Data Visualization:
- Create Charts: Create charts to visualize the numerical data and identify trends or discrepancies.
5.5. Comparing Blank Cells
Sometimes, the presence or absence of data in blank cells is significant. Here’s how to compare blank cells in Excel files:
- Open the Files: Open both Excel files you want to compare.
- Use Conditional Formatting:
- Copy to Single File: Copy the relevant sheets from both files into a single Excel file.
- Select Range: Select the range of cells you want to compare.
- Create New Rule: Go to “Home” > “Conditional Formatting” > “New Rule.”
- Use a Formula: Select “Use a formula to determine which cells to format.”
- Enter Formula for Blank Cells: Use the
ISBLANKfunction to check for blank cells.- Highlight Blank Cells in Sheet1:
=AND(ISBLANK(A1),NOT(ISBLANK(Sheet2!A1))) - Highlight Blank Cells in Sheet2:
=AND(ISBLANK(Sheet2!A1),NOT(ISBLANK(A1)))
- Highlight Blank Cells in Sheet1:
- Set Format: Set the format to highlight blank cells (e.g., fill color).
- Manual Comparison (Alternative):
- Create Comparison Column: Use the
IFandISBLANKfunctions to compare blank cells.=IF(AND(ISBLANK(A1),NOT(ISBLANK(Sheet2!A1))), "Blank in Sheet1", IF(AND(ISBLANK(Sheet2!A1),NOT(ISBLANK(A1))), "Blank in Sheet2", "Same"))
- Filter Results: Filter the results to quickly see the discrepancies in blank cells.
- Create Comparison Column: Use the
- Using COUNTBLANK Function:
- Count Blank Cells: Use the
COUNTBLANKfunction
- Count Blank Cells: Use the