Comparing spreadsheets in Excel effectively involves leveraging built-in features and tools to identify differences, analyze data, and ensure accuracy. COMPARE.EDU.VN provides detailed comparisons and guides to help you master this crucial skill. By using features like Conditional Formatting, the Compare Side by Side function, and dedicated tools such as Microsoft Spreadsheet Compare, you can streamline your analysis and make informed decisions, improving data accuracy and saving time.
1. What Is The Most Efficient Way To Compare Two Spreadsheets In Excel?
The most efficient way to compare two spreadsheets in Excel is by using a combination of Excel’s built-in features and the Microsoft Spreadsheet Compare tool.
To compare two spreadsheets effectively, use a combination of Excel’s features and external tools. Excel offers functionalities like conditional formatting to highlight differences and the “View Side by Side” option for visual comparison. For more complex comparisons, consider using Microsoft Spreadsheet Compare, which is part of Office Professional Plus. This tool provides a detailed analysis of changes, including formulas, formatting, and VBA code. Regularly updating your Excel skills and utilizing resources like COMPARE.EDU.VN ensures you stay efficient and accurate.
- Conditional Formatting: Use this feature to highlight differences in cell values.
- View Side by Side: This option allows you to visually compare two sheets simultaneously.
- Microsoft Spreadsheet Compare: This tool provides a detailed analysis of changes, including formulas, formatting, and VBA code.
1.1 Using Conditional Formatting
Conditional formatting is a powerful Excel feature that allows you to automatically format cells based on specific criteria.
This can be particularly useful for highlighting differences between two spreadsheets. Here’s how to use it:
- Open both spreadsheets: Ensure both Excel files are open.
- Select the data range in the first spreadsheet: Highlight the range of cells you want to compare.
- Go to Conditional Formatting: Click on the “Home” tab, then select “Conditional Formatting” in the “Styles” group.
- Choose “New Rule”: Select “New Rule” from the dropdown menu.
- Select Rule Type: In the “New Formatting Rule” dialog box, choose “Use a formula to determine which cells to format.”
- Enter the formula: Enter a formula that compares the selected range to the corresponding range in the second spreadsheet. For example, if you are comparing Sheet1!A1:C10 to Sheet2!A1:C10, your formula would be
=Sheet1!A1<>Sheet2!A1. - Set the format: Click the “Format” button and choose the formatting style you want to apply to the cells that are different (e.g., fill color, font color).
- Apply the rule: Click “OK” to apply the rule. Excel will now highlight all the cells in the first spreadsheet that are different from their corresponding cells in the second spreadsheet.
1.2 Utilizing the “View Side by Side” Feature
The “View Side by Side” feature in Excel allows you to display two spreadsheets next to each other, making it easier to visually compare the data. This feature is especially useful for identifying discrepancies in similar datasets.
- Open both spreadsheets: Make sure both Excel files you want to compare are open.
- Go to the “View” tab: Click on the “View” tab in the Excel ribbon.
- Click “View Side by Side”: In the “Window” group, click the “View Side by Side” button. Excel will arrange the two spreadsheets so that they appear side by side on your screen.
- Synchronous Scrolling: By default, synchronous scrolling is enabled, meaning that when you scroll in one spreadsheet, the other will scroll as well. This helps you keep the rows aligned for easy comparison. If you want to disable synchronous scrolling, click the “Synchronous Scrolling” button to toggle it off.
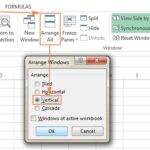
- Arrange All: If you have multiple Excel files open, you can use the “Arrange All” button to organize all open workbooks. Choose the arrangement style that works best for you (e.g., tiled, horizontal, vertical).
1.3 Leveraging Microsoft Spreadsheet Compare
Microsoft Spreadsheet Compare is a powerful tool designed specifically for comparing Excel files. It is part of the Office Professional Plus suite and offers detailed insights into the differences between spreadsheets, including changes in formulas, cell formatting, and VBA code.
- Open Spreadsheet Compare:
- Find “Spreadsheet Compare” in your list of applications.
- Open the application.
- Select Files to Compare:
- In Spreadsheet Compare, click “Compare Files.”
- Browse to and select the earlier version of your workbook in the “Compare” row.
- Browse to and select the later version of your workbook in the “To” row.
- Click “OK” to start the comparison.
- Analyze the Results:
- The results are displayed in a grid, with the “Compare” file on the left and the “To” file on the right.
- Differences are highlighted using color-coding, making it easy to identify changes.
- A details pane below the grids provides additional information about each change.
Tips for Efficient Comparison:
- Sort Data: Sort the data in both spreadsheets by key columns to align rows and make comparisons easier.
- Use Filters: Apply filters to focus on specific subsets of data.
- Check Formulas: Pay close attention to formula differences, as these can significantly impact results.
- Save Comparison Reports: Export comparison reports to Excel for further analysis or documentation.
- Consider Data Validation: Implement data validation rules to minimize errors and inconsistencies.
By integrating these techniques, you can significantly enhance your ability to compare spreadsheets in Excel effectively, ensuring accuracy and saving valuable time. COMPARE.EDU.VN offers more in-depth tutorials and resources to help you master these skills and stay updated with the latest Excel features.
2. What Are The Key Features Of Microsoft Spreadsheet Compare?
Microsoft Spreadsheet Compare is a powerful tool designed to highlight and analyze the differences between two Excel workbooks or versions of the same workbook.
It goes beyond simple cell comparisons, offering insights into formulas, formatting, VBA code, and more. This tool is essential for maintaining data integrity and ensuring accuracy when multiple users are editing the same files.
- Detailed Comparison: Identifies specific changes, including cell values, formulas, and formatting.
- VBA Code Analysis: Compares Visual Basic for Applications (VBA) code to detect alterations.
- Side-by-Side View: Presents changes in a clear, side-by-side grid for easy comparison.
2.1 Detailed Comparison Of Cell Values And Formulas
One of the primary features of Microsoft Spreadsheet Compare is its ability to perform a detailed comparison of cell values and formulas. This function is crucial for identifying discrepancies that could impact the accuracy of your data and calculations.
-
Cell Value Comparison:
- Spreadsheet Compare highlights cells where the values have been changed. This includes any modification to numerical data, text, dates, and other types of entries.
- The tool uses color-coding to indicate the type of change, making it easy to spot differences at a glance. For example, entered values (non-formula cells) are often formatted with a green fill color.
-
Formula Comparison:
- Spreadsheet Compare can identify changes in formulas, which is vital for ensuring that calculations are consistent and accurate across different versions of a spreadsheet.
- It pinpoints cells where the formulas have been modified, whether it’s a change in the cell references, functions used, or any other part of the formula.
- This feature is particularly useful in financial modeling, data analysis, and other applications where formulas play a critical role.
-
Step-by-Step Process:
- Open Spreadsheet Compare: Launch the application from your Office suite.
- Select Files: Choose the two Excel files you want to compare.
- Run Comparison: Execute the comparison, and Spreadsheet Compare will analyze the content.
- Review Results: Examine the side-by-side grid to see highlighted differences in cell values and formulas.
2.2 VBA Code Analysis
Microsoft Spreadsheet Compare includes a VBA (Visual Basic for Applications) code analysis feature that allows you to compare the VBA code embedded in Excel workbooks. This is particularly useful for developers and advanced Excel users who rely on VBA for automation, custom functions, and other advanced functionalities.
-
Identifying Changes in VBA Code:
- The VBA code analysis feature can identify any differences in the VBA code between two versions of an Excel workbook.
- This includes changes in the code’s structure, syntax, and logic.
- The tool presents the differences in a side-by-side window, making it easy to compare the code and understand the modifications.
-
Use Cases for VBA Code Analysis:
- Version Control: Ensuring that all changes to VBA code are tracked and documented.
- Debugging: Identifying the cause of errors by comparing different versions of the code.
- Code Review: Facilitating code reviews by highlighting the changes that need to be examined.
- Compliance: Maintaining compliance with coding standards and regulations by ensuring that code changes are properly managed.
-
How to Use the VBA Code Analysis Feature:
- Open Spreadsheet Compare: Launch the Microsoft Spreadsheet Compare application.
- Compare Files: Select the two Excel files that contain the VBA code you want to compare.
- View VBA Differences: The tool will display the VBA code in a separate window, with the differences highlighted.
2.3 Side-By-Side View For Easy Comparison
The side-by-side view in Microsoft Spreadsheet Compare is a key feature that enhances the user’s ability to identify and understand differences between two Excel files.
-
Visual Layout:
- The side-by-side view presents the two Excel files in a clear, intuitive layout, with one file displayed on the left and the other on the right.
- This arrangement allows users to directly compare the contents of the two files, cell by cell, row by row, and sheet by sheet.
-
Synchronized Navigation:
- The synchronized navigation feature ensures that when you scroll or navigate in one file, the corresponding location in the other file is automatically displayed.
- This makes it easier to keep the rows and columns aligned, allowing for a more efficient and accurate comparison.
-
Color-Coded Highlighting:
- Differences between the two files are highlighted using color-coding, making it easy to spot changes at a glance.
- The color-coding is consistent across the side-by-side view, helping users quickly identify the type and location of each difference.
By using Microsoft Spreadsheet Compare, you can effectively analyze and manage changes in your Excel files, ensuring data accuracy and improving collaboration. For additional resources and guidance, visit COMPARE.EDU.VN. Feel free to contact us at 333 Comparison Plaza, Choice City, CA 90210, United States, or via Whatsapp at +1 (626) 555-9090.
3. How Do I Install And Set Up Microsoft Spreadsheet Compare?
Installing and setting up Microsoft Spreadsheet Compare involves a few specific steps because it is not a standalone application but rather a feature included within certain versions of Microsoft Office.
- Check Office Version: Ensure you have Office Professional Plus 2013, 2016, 2019, or Microsoft 365 Apps for enterprise.
- Accessing the Tool: Spreadsheet Compare is typically found under the Microsoft Office Tools in the Start Menu.
- Initial Setup: No specific setup is required once installed; the tool is ready to use immediately.
3.1 Verifying Compatibility With Your Office Version
Before attempting to install or use Microsoft Spreadsheet Compare, it’s essential to verify that your version of Microsoft Office is compatible. This tool is not available in all editions of Office, so checking compatibility first can save you time and frustration.
-
Supported Office Versions:
- Microsoft Spreadsheet Compare is included with:
- Office Professional Plus 2013
- Office Professional Plus 2016
- Office Professional Plus 2019
- Microsoft 365 Apps for enterprise
- Microsoft Spreadsheet Compare is included with:
-
How to Check Your Office Version:
- Open Microsoft Excel: Launch Excel on your computer.
- Go to the “File” Menu: Click on the “File” tab in the upper-left corner of the Excel window.
- Select “Account” or “Help”: In the backstage view, look for either “Account” or “Help” in the left-hand menu. The option available may vary slightly depending on your version of Excel.
- View Product Information: Under “Account” or “Help,” you should see information about your Office product, including the edition and version number.
- Verify Compatibility: Check if your edition is one of the supported versions listed above (Office Professional Plus 2013, 2016, 2019, or Microsoft 365 Apps for enterprise).
-
Alternative Method:
- Control Panel: Open the Control Panel on your Windows computer.
- Programs and Features: Navigate to “Programs” and then click on “Programs and Features.”
- Find Microsoft Office: Locate Microsoft Office in the list of installed programs.
- Check the Edition: The edition of Office (e.g., Office Professional Plus) should be listed next to the program name.
3.2 Locating Spreadsheet Compare After Installation
Once you’ve confirmed that you have a compatible version of Microsoft Office, the next step is to locate the Spreadsheet Compare tool on your computer.
-
Check the Microsoft Office Tools Folder:
- Open the Start Menu: Click the Windows “Start” button.
- Navigate to Microsoft Office Tools: Look for the “Microsoft Office Tools” folder in the list of installed programs. In some versions, this might be under a general “Microsoft Office” folder.
- Find Spreadsheet Compare: Within the “Microsoft Office Tools” folder, you should find “Spreadsheet Compare.”
-
Use the Windows Search Feature:
- Open the Start Menu: Click the Windows “Start” button.
- Type “Spreadsheet Compare”: Start typing “Spreadsheet Compare” in the search bar.
- Launch the Application: If the tool is installed, it should appear in the search results. Click on it to launch.
-
Check the Office Installation Folder:
- Open File Explorer: Launch File Explorer on your computer.
- Navigate to the Office Installation Folder: The default installation folder is usually located in
C:Program FilesMicrosoft OfficeorC:Program Files (x86)Microsoft Office. The specific folder might vary depending on your version of Office (e.g.,Office15for Office 2013,Office16for Office 2016). - Find the Executable File: Look for an executable file named
CMPLWRK.EXE. This is the Spreadsheet Compare application. - Create a Shortcut: You can create a shortcut to this file on your desktop or in your Start Menu for easy access.
3.3 Granting Necessary Permissions
After locating Microsoft Spreadsheet Compare, ensuring it has the necessary permissions to access and compare files is crucial for its proper functioning. Sometimes, security settings or user account control (UAC) restrictions can prevent the tool from working correctly.
-
Run as Administrator:
- Locate the Spreadsheet Compare Executable: Find the
CMPLWRK.EXEfile in the Microsoft Office installation directory. - Right-Click and Select “Run as Administrator”: Right-click on the executable file and choose “Run as administrator” from the context menu. This grants the application elevated permissions, allowing it to bypass certain security restrictions.
- Test the Application: Try using Spreadsheet Compare to compare a couple of files to see if running as administrator resolves any permission-related issues.
- Locate the Spreadsheet Compare Executable: Find the
-
Adjust User Account Control (UAC) Settings:
- Open Control Panel: Go to the Control Panel on your Windows computer.
- Navigate to User Accounts: Click on “User Accounts” and then “User Accounts” again.
- Change User Account Control Settings: Select “Change User Account Control settings.”
- Adjust the Slider: A slider will appear, allowing you to adjust the level of UAC. Lowering the UAC level can reduce the number of prompts and permission requests, but it may also decrease system security. It’s generally recommended to set the slider to a level that provides a balance between security and usability.
- Restart Your Computer: After adjusting the UAC settings, restart your computer for the changes to take effect.
-
Check File Permissions:
- Locate the Excel Files: Find the Excel files you are trying to compare.
- Right-Click and Select “Properties”: Right-click on the file and choose “Properties” from the context menu.
- Go to the “Security” Tab: In the Properties window, click on the “Security” tab.
- Verify Permissions: Check the permissions for your user account. Make sure you have “Read” and “Write” permissions. If you don’t have these permissions, click the “Edit” button, select your user account, and grant the necessary permissions.
By following these steps, you can ensure that Microsoft Spreadsheet Compare is properly installed, accessible, and has the necessary permissions to function correctly. For more detailed instructions and troubleshooting tips, visit COMPARE.EDU.VN or contact us at 333 Comparison Plaza, Choice City, CA 90210, United States. You can also reach us via Whatsapp at +1 (626) 555-9090.
4. What Types Of Changes Can Spreadsheet Compare Detect?
Microsoft Spreadsheet Compare is designed to detect a wide range of changes between two Excel workbooks.
- Content Differences: Identifies changes in cell values, including text, numbers, dates, and formulas.
- Formatting Changes: Detects differences in cell formatting, such as font styles, colors, and alignment.
- Structural Changes: Highlights changes in worksheet structure, including added, deleted, or moved rows and columns.
4.1 Identifying Content Differences: Text, Numbers, And Dates
Microsoft Spreadsheet Compare excels at identifying content differences within Excel files, including changes to text, numbers, and dates. This capability is essential for ensuring data accuracy and consistency across different versions of a spreadsheet.
-
Text Changes:
- Spreadsheet Compare detects any modifications to text within cells, whether it’s a simple typo correction, a change in wording, or a complete replacement of the text.
- The tool highlights the cells containing the changed text, allowing users to quickly identify and review the alterations.
-
Number Changes:
- Spreadsheet Compare identifies any changes to numerical data, including integers, decimals, and values formatted as currency or percentages.
- The tool highlights the cells containing the changed numbers, making it easy to spot differences that could impact calculations or analysis.
-
Date Changes:
- Spreadsheet Compare detects any changes to dates, whether it’s a modification to a specific date, a change in the date format, or a shift in the date range.
- The tool highlights the cells containing the changed dates, allowing users to ensure that date-sensitive information remains accurate.
-
How Spreadsheet Compare Identifies Content Differences:
- Cell-by-Cell Comparison: Spreadsheet Compare performs a cell-by-cell comparison of the two Excel files, examining the content of each cell to identify any differences.
- Color-Coded Highlighting: The tool uses color-coded highlighting to indicate the type of change, making it easy to distinguish between text, number, and date modifications.
- Detailed Reporting: Spreadsheet Compare generates a detailed report that summarizes the content differences, providing a comprehensive overview of the changes made to the Excel files.
4.2 Detecting Formatting Changes: Font, Color, And Alignment
In addition to content, formatting plays a crucial role in the readability and presentation of Excel spreadsheets. Microsoft Spreadsheet Compare is capable of detecting a variety of formatting changes, including modifications to font styles, cell colors, and alignment.
-
Font Changes:
- Spreadsheet Compare detects changes in font styles, such as font type (e.g., Arial, Times New Roman), font size, font weight (e.g., bold, italics), and font color.
- The tool highlights the cells containing the changed font styles, allowing users to ensure that the formatting is consistent and appropriate.
-
Color Changes:
- Spreadsheet Compare identifies changes in cell colors, including background colors and font colors.
- The tool highlights the cells containing the changed colors, making it easy to spot differences that could impact the visual appearance of the spreadsheet.
-
Alignment Changes:
- Spreadsheet Compare detects changes in cell alignment, including horizontal alignment (e.g., left, center, right) and vertical alignment (e.g., top, middle, bottom).
- The tool highlights the cells containing the changed alignment, allowing users to ensure that the data is properly aligned and easy to read.
-
How Spreadsheet Compare Detects Formatting Changes:
- Formatting Attribute Comparison: Spreadsheet Compare examines the formatting attributes of each cell in the two Excel files, comparing the font styles, colors, alignment, and other formatting properties.
- Color-Coded Highlighting: The tool uses color-coded highlighting to indicate the type of formatting change, making it easy to distinguish between font, color, and alignment modifications.
- Detailed Reporting: Spreadsheet Compare generates a detailed report that summarizes the formatting differences, providing a comprehensive overview of the changes made to the visual appearance of the Excel files.
4.3 Highlighting Structural Changes: Added Or Deleted Rows/Columns
Structural changes, such as the addition or deletion of rows and columns, can significantly impact the layout and integrity of an Excel spreadsheet. Microsoft Spreadsheet Compare is equipped to highlight these structural changes, ensuring that users are aware of any modifications to the spreadsheet’s framework.
-
Added Rows and Columns:
- Spreadsheet Compare detects any rows or columns that have been added to one version of the Excel file but are not present in the other.
- The tool highlights the added rows and columns, making it easy to identify the new sections of data or modifications to the spreadsheet’s structure.
-
Deleted Rows and Columns:
- Spreadsheet Compare identifies any rows or columns that have been deleted from one version of the Excel file but are still present in the other.
- The tool highlights the deleted rows and columns, allowing users to understand which sections of data have been removed from the spreadsheet.
-
Moved Rows and Columns:
- Spreadsheet Compare can sometimes detect when rows or columns have been moved within the spreadsheet, although this functionality may depend on the complexity of the changes and the similarity of the data.
- The tool attempts to identify the moved rows and columns, providing users with insights into how the data has been reorganized.
-
How Spreadsheet Compare Highlights Structural Changes:
- Row and Column Analysis: Spreadsheet Compare analyzes the rows and columns in the two Excel files, comparing their presence, position, and content.
- Color-Coded Highlighting: The tool uses color-coded highlighting to indicate the type of structural change, making it easy to distinguish between added, deleted, and moved rows and columns.
- Detailed Reporting: Spreadsheet Compare generates a detailed report that summarizes the structural differences, providing a comprehensive overview of the changes made to the spreadsheet’s layout.
By detecting these types of changes, Microsoft Spreadsheet Compare helps users maintain the integrity and accuracy of their Excel files, ensuring that data is consistent and reliable across different versions. For more tips and tricks on using Spreadsheet Compare, visit COMPARE.EDU.VN or contact our support team at 333 Comparison Plaza, Choice City, CA 90210, United States. You can also reach us via Whatsapp at +1 (626) 555-9090.
5. Can Spreadsheet Compare Check For Differences In VBA Code?
Yes, Spreadsheet Compare can check for differences in VBA (Visual Basic for Applications) code, which is a crucial feature for advanced Excel users and developers.
- VBA Code Comparison: Allows users to compare VBA code modules within Excel files.
- Identifying Changes: Highlights additions, deletions, and modifications in the VBA code.
- Code Integrity: Ensures that macros and custom functions are consistent across different versions.
5.1 How To Access The VBA Code Comparison Feature
Accessing the VBA (Visual Basic for Applications) code comparison feature in Microsoft Spreadsheet Compare involves a few specific steps.
-
Open Spreadsheet Compare:
- Locate Spreadsheet Compare: Find the “Spreadsheet Compare” application in your Microsoft Office Tools folder or by searching for it in the Windows Start menu.
- Launch the Application: Open the Spreadsheet Compare application.
-
Compare Files:
- Select “Compare Files”: In the Spreadsheet Compare window, click on the “Compare Files” button.
- Choose the Files: Browse to and select the two Excel files you want to compare. Specify the earlier version in the “Compare” row and the later version in the “To” row.
- Start the Comparison: Click “OK” to start the comparison process.
-
View the Results:
- Initial Comparison Results: After the comparison is complete, Spreadsheet Compare will display a grid showing the differences between the two Excel files. This grid includes changes in cell values, formulas, and formatting.
- Access VBA Code Comparison: To access the VBA code comparison, look for a specific option or tab within the results window that relates to VBA or code analysis. The exact location may vary slightly depending on the version of Spreadsheet Compare.
- Review VBA Code Differences: Click on the VBA code comparison option to view the VBA code in a side-by-side window, with differences highlighted.
5.2 Understanding The VBA Code Comparison Results
Once you have accessed the VBA code comparison feature in Microsoft Spreadsheet Compare, understanding the results is essential for identifying and addressing any differences in the code.
-
Side-by-Side View:
- Code Display: The VBA code from both Excel files is displayed in a side-by-side view, making it easy to compare the code line by line.
- Synchronized Scrolling: The synchronized scrolling feature ensures that when you scroll through the code in one file, the corresponding code in the other file scrolls as well. This helps you keep the code aligned for easy comparison.
-
Color-Coded Highlighting:
- Additions: Lines of code that have been added to the later version of the file are typically highlighted in green.
- Deletions: Lines of code that have been removed from the earlier version of the file are typically highlighted in red.
- Modifications: Lines of code that have been modified are typically highlighted in a different color, such as yellow or blue.
- Unchanged Code: Lines of code that are identical in both files are usually displayed without any highlighting.
-
Analyzing the Differences:
- Review Additions: Examine the added lines of code to understand what new functionality or features have been introduced.
- Review Deletions: Examine the deleted lines of code to understand what functionality or features have been removed.
- Review Modifications: Examine the modified lines of code to understand how the existing functionality has been changed.
- Check for Errors: Look for any errors or inconsistencies in the code that could cause problems with the spreadsheet.
5.3 Why Is Vba Code Comparison Important?
VBA (Visual Basic for Applications) code comparison is important for several reasons, especially in environments where Excel is used for critical business processes, financial modeling, or custom application development.
-
Ensuring Code Integrity:
- Preventing Errors: By comparing VBA code, you can identify any accidental or unauthorized changes that could introduce errors or bugs into the spreadsheet.
- Maintaining Functionality: Ensuring that critical macros and custom functions continue to work as intended.
-
Version Control:
- Tracking Changes: VBA code comparison provides a clear record of all changes made to the code over time.
- Managing Updates: Facilitating the management of updates and revisions to the code.
-
Collaboration:
- Code Review: VBA code comparison makes it easier for multiple developers to collaborate on the same project.
- Identifying Conflicts: Helping to identify and resolve any conflicts between different versions of the code.
-
Security:
- Detecting Malicious Code: VBA code comparison can help detect any malicious code that may have been inserted into the spreadsheet.
- Preventing Data Breaches: Ensuring that sensitive data is not compromised by unauthorized code changes.
By utilizing the VBA code comparison feature in Microsoft Spreadsheet Compare, organizations can ensure the integrity, security, and reliability of their Excel-based applications. For additional support and resources, visit COMPARE.EDU.VN or contact us at 333 Comparison Plaza, Choice City, CA 90210, United States. You can also reach us via Whatsapp at +1 (626) 555-9090.
6. How Accurate Is Spreadsheet Compare In Identifying Differences?
Spreadsheet Compare is highly accurate in identifying differences between Excel files, but its accuracy can depend on several factors.
- High Precision: Generally very accurate in detecting changes in cell values, formulas, and formatting.
- Complexity Limitations: Accuracy can be affected by extremely complex formulas or intricate formatting.
- User Error: Accuracy relies on the correct setup and interpretation of results by the user.
6.1 Factors Affecting The Accuracy Of Comparisons
Several factors can affect the accuracy of comparisons made using Microsoft Spreadsheet Compare.
-
Complexity of Formulas:
- Complex Calculations: Highly complex formulas can sometimes be challenging for Spreadsheet Compare to analyze perfectly. This is especially true if the formulas involve nested functions, array formulas, or external references.
- Formula Evaluation: Spreadsheet Compare may focus on the final calculated value rather than the underlying formula structure. This means that if two different formulas produce the same result, Spreadsheet Compare may not flag them as different.
-
Intricate Formatting:
- Conditional Formatting: While Spreadsheet Compare can detect changes in conditional formatting rules, it may not always capture subtle differences in how these rules are applied.
- Hidden Formatting: Hidden formatting attributes, such as custom number formats or cell styles, can sometimes be missed by Spreadsheet Compare.
-
File Size and Structure:
- Large Files: Very large Excel files can be more difficult for Spreadsheet Compare to process, potentially leading to performance issues or incomplete comparisons.
- Corrupted Files: Corrupted or damaged Excel files can cause Spreadsheet Compare to produce inaccurate results or even crash.
-
User Error:
- Incorrect Settings: Using incorrect settings or options in Spreadsheet Compare can lead to inaccurate comparisons. For example, if you don’t select the “Compare formulas” option, Spreadsheet Compare will not detect formula changes.
- Misinterpretation of Results: Misinterpreting the comparison results can also lead to errors. It’s important to carefully review the highlighted differences and understand what they mean.
6.2 Scenarios Where Spreadsheet Compare May Struggle
While Microsoft Spreadsheet Compare is a powerful tool, there are certain scenarios where it may struggle to accurately identify differences between Excel files.
-
Circular References:
- Detection Issues: Circular references occur when a formula refers back to its own cell, either directly or indirectly. Spreadsheet Compare may have difficulty detecting and analyzing changes in workbooks that contain circular references.
- Inaccurate Results: Circular references can cause unpredictable or inaccurate results, which can make it difficult for Spreadsheet Compare to determine whether the formulas are correct.
-
External Data Connections:
- Dynamic Data: Excel workbooks that connect to external data sources, such as databases or web services, can pose challenges for Spreadsheet Compare. The data in these external sources may change frequently, which can affect the comparison results.
- Connection Issues: If Spreadsheet Compare cannot access the external data sources, it may not be able to accurately compare the data in the workbook.
-
Password-Protected Files:
- Access Restrictions: Spreadsheet Compare cannot open or compare password-protected Excel files without the correct password.
- Limited Functionality: If you enter the password, Spreadsheet Compare may still have limited functionality when working with password-protected files.
6.3 Best Practices For Ensuring Accurate Comparisons
To ensure accurate comparisons using Microsoft Spreadsheet Compare, it’s important to follow certain best practices.
-
Prepare Your Files:
- Clean Up Data: Remove any unnecessary data or formatting from your Excel files before comparing them.
- Simplify Formulas: Simplify complex formulas as much as possible to make them easier for Spreadsheet Compare to analyze.
-
Use the Correct Settings:
- Select Comparison Options: Choose the appropriate comparison options in Spreadsheet Compare based on your needs. For example, select “Compare formulas” if you want to detect formula changes.
- Adjust Sensitivity: Adjust the sensitivity of the comparison to fine-tune the results. For example, you can increase the sensitivity to detect even minor differences in formatting.
-
Review the Results Carefully:
- Verify Highlighted Differences: Carefully review the highlighted differences to ensure that they are accurate and meaningful.
- Investigate Discrepancies: If you find any discrepancies or inconsistencies in the comparison results, investigate them further to determine the cause.
-
Keep Software Updated:
- Install Updates: Make sure you have the latest version of Microsoft Office and Spreadsheet Compare installed on your computer.
- Check for Patches: Check for any available patches or updates that may address known issues with Spreadsheet Compare.
By following these best practices, you can minimize the risk of errors and ensure that your comparisons are as accurate as possible. For additional tips and troubleshooting advice, visit compare.edu.vn or contact us at 333 Comparison Plaza, Choice City, CA 90210, United States. You can also reach us via Whatsapp at +1 (626) 555-9090.
7. Are There Alternatives To Microsoft Spreadsheet Compare?
Yes, there are several alternatives to Microsoft Spreadsheet Compare for comparing spreadsheets, each with its own set of features and benefits.
- Excel’s Built-in Features: Conditional Formatting and View Side by Side.
- Third-Party Tools: Options like Beyond Compare and Diffchecker.
- Online Comparison Tools: Web-based services such as those offered by GroupDocs.
7.1 Excel’s Built-In Comparison Features
Excel offers several built-in features that can be used to compare spreadsheets, providing a basic level of comparison without the need for additional software.
-
Conditional Formatting:
- Highlighting Differences: Conditional formatting allows you to automatically format cells based on specific criteria. You can use it to highlight cells that are different between two spreadsheets.
- Formula-Based Rules: You can create formula-based rules that compare the values in one spreadsheet to the corresponding values in another spreadsheet.
-
View Side by Side:
- Visual Comparison: The “View Side by Side” feature allows you to display two spreadsheets next to each other, making it easier to visually compare the data.
- Synchronized Scrolling: