Choosing the best photo from a batch can be challenging. COMPARE.EDU.VN provides you with the methods on How To Compare In Lightroom effectively, using both Compare and Survey modes to focus on the details and select the best image. Learn to compare photos in Lightroom to make informed choices, enhancing your post-processing workflow, and refining your photographic vision.
1. What Is The Lightroom Compare Mode And How Do I Use It?
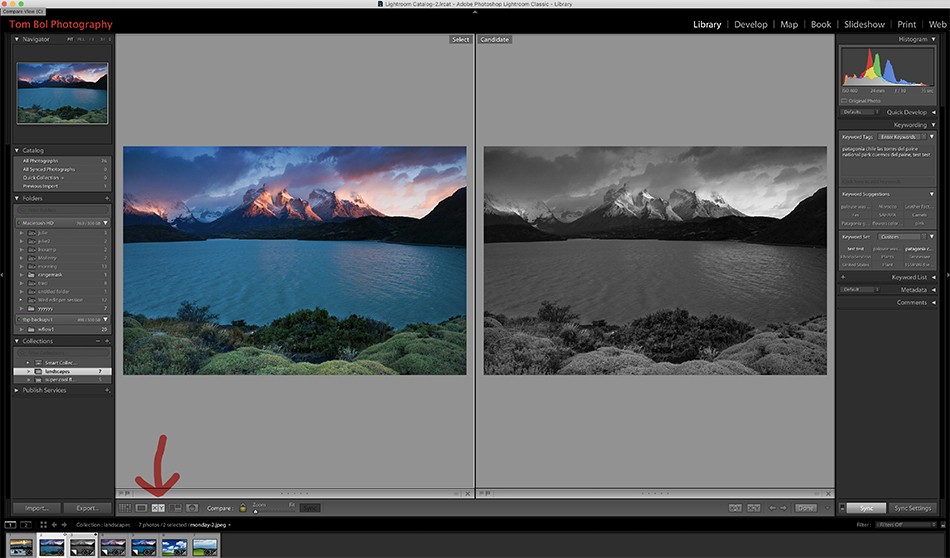
Lightroom’s Compare mode is a feature that allows you to view two photos side-by-side for detailed comparison. To use it, select an image as your base comparison, then enter Compare mode by pressing the “C” key. Navigate through other images using the arrow keys to directly compare them to your selected base image.
Compare mode in Lightroom is designed to make the selection process more efficient and precise. It enables you to assess subtle differences between similar images, which is particularly useful when you have multiple shots of the same subject with minor variations. By viewing two images side-by-side, you can quickly identify the superior shot based on focus, composition, and other key elements.
Benefits of Using Compare Mode:
- Detailed Assessment: Allows for a close examination of details such as sharpness, noise levels, and color accuracy.
- Efficient Workflow: Streamlines the selection process by presenting images in a focused, comparative view.
- Objective Decision-Making: Helps in making unbiased decisions by highlighting the specific differences between images.
Step-by-Step Guide to Using Compare Mode:
- Select a Base Image: Choose the image you want to use as your reference point. This should ideally be an image that you believe is already strong or close to your desired outcome.
- Enter Compare Mode: Press the “C” key on your keyboard to switch to Compare mode. Your selected base image will appear on one side of the screen.
- Navigate Through Images: Use the left and right arrow keys to cycle through the other images in your selection. Each image will be displayed alongside your base image for direct comparison.
- Swap Images: If you find an image that you prefer over your base image, click the “Swap” icon (XY with reverse arrows) at the bottom right of the window. This will replace your base image with the currently viewed image.
- Evaluate and Select: Continue comparing images, swapping as necessary, until you have identified the best shot.
Tips for Effective Comparison:
- Zoom In: Use the zoom tool to inspect critical areas of the image, such as faces or fine details.
- Use the Loupe Tool: This tool allows you to examine specific parts of the image at 100% magnification for precise evaluation.
- Consider Metadata: Pay attention to metadata such as aperture, shutter speed, and ISO to understand why certain images may be sharper or better exposed than others.
2. What Is Lightroom Survey Mode and When Should I Use It?
Survey mode in Lightroom displays multiple selected images in a contact sheet format, allowing you to view and compare several images at once. Use it when you want to quickly eliminate weaker images from a large selection, narrowing down your choices to the best ones. Press the “N” key to enter Survey mode.
Survey mode is particularly useful after a photoshoot where you have numerous similar shots. It allows you to efficiently weed out the less desirable images, focusing only on the strongest contenders. This mode is ideal for quickly identifying and removing blurry, poorly composed, or otherwise flawed images.
Benefits of Using Survey Mode:
- Quick Elimination: Enables rapid removal of unwanted images, streamlining the selection process.
- Overview of Options: Provides a comprehensive view of multiple images, making it easier to identify the strongest shots.
- Time-Saving: Significantly reduces the time spent sifting through large numbers of photos.
Step-by-Step Guide to Using Survey Mode:
- Select Multiple Images: In the Library module, select all the images you want to compare. You can do this by holding down the Shift or Ctrl/Cmd key while clicking on the images.
- Enter Survey Mode: Press the “N” key to switch to Survey mode. All selected images will be displayed in a grid.
- Eliminate Images: Use the “X” key in the lower right corner of each image to mark it for removal. Alternatively, you can press the Delete key to remove the image immediately.
- Refine Your Selection: Continue eliminating images until you have narrowed down your selection to the best shots.
- Exit Survey Mode: Once you have made your selections, you can exit Survey mode to further refine your chosen images in the Develop module.
Tips for Effective Surveying:
- Start Broad: Initially, focus on eliminating the most obvious flaws, such as blurriness, poor exposure, or incorrect composition.
- Look for Consistency: Identify images that consistently exhibit the qualities you are looking for, such as sharpness, good lighting, and compelling subject matter.
- Use Flags and Ratings: Assign flags (Pick/Reject) or star ratings to quickly identify and filter your best images.
3. How Can I Use Virtual Copies to Compare Different Editing Styles?
Virtual copies in Lightroom allow you to create multiple versions of the same image with different edits, without duplicating the original file. To compare different editing styles, create virtual copies, apply different adjustments to each, and then use Compare or Survey mode to evaluate the results.
Virtual copies are a powerful tool for experimenting with different editing techniques and styles. By creating multiple versions of an image, you can explore various looks and determine which one best suits your vision. This method is particularly useful for landscape and portrait photography, where subtle adjustments can significantly impact the final result.
Benefits of Using Virtual Copies:
- Non-Destructive Editing: Preserves the original image while allowing for unlimited experimentation.
- Multiple Versions: Enables the creation of several different edits of the same image.
- Easy Comparison: Facilitates direct comparison of different editing styles using Compare or Survey mode.
Step-by-Step Guide to Using Virtual Copies for Comparison:
- Select an Image: Choose the image you want to experiment with.
- Create Virtual Copies: Right-click on the image and select “Create Virtual Copy.” Repeat this process to create as many versions as you need.
- Apply Different Edits: Edit each virtual copy with a different style or technique. For example, you might try a black and white conversion, a high-contrast look, or a soft, pastel-toned edit.
- Compare the Versions: Select all the virtual copies and enter either Compare mode (for detailed side-by-side comparison) or Survey mode (for an overview of all versions).
- Evaluate and Choose: Determine which editing style you prefer and proceed with further refining that version.
Tips for Effective Comparison of Virtual Copies:
- Document Your Edits: Keep track of the adjustments you make to each virtual copy so you can easily replicate the style later.
- Focus on Key Elements: Pay attention to how different editing styles affect the key elements of your image, such as color, contrast, and sharpness.
- Get Feedback: Share your virtual copies with others and ask for their opinions. Fresh perspectives can help you make a more informed decision.
4. What Are Some Keyboard Shortcuts to Speed Up the Comparison Process in Lightroom?
Using keyboard shortcuts can significantly speed up the comparison process in Lightroom. Key shortcuts include “C” for Compare mode, “N” for Survey mode, arrow keys for navigating images, “X” for rejecting images in Survey mode, and the “Swap” icon for changing the base image in Compare mode.
Keyboard shortcuts are essential for optimizing your workflow in Lightroom. By memorizing and using these shortcuts, you can reduce the time spent navigating menus and increase your efficiency. This is particularly helpful when you are working with large numbers of images and need to make quick decisions.
Essential Keyboard Shortcuts for Comparison:
- C: Enters Compare mode, allowing you to view two images side-by-side.
- N: Enters Survey mode, displaying multiple images in a contact sheet format.
- Arrow Keys (Left/Right): Navigates through images in both Compare and Survey modes.
- X: Marks an image for rejection in Survey mode.
- P: Flags an image as a “Pick,” indicating it is a strong contender.
- U: Removes the “Pick” flag from an image.
- Number Keys (1-5): Assigns star ratings to images, allowing you to quickly rank your photos.
- Ctrl/Cmd + Z: Undo the last action, useful for quickly reverting changes.
- Ctrl/Cmd + Shift + Z: Redo the last undone action.
Tips for Mastering Keyboard Shortcuts:
- Start with the Basics: Focus on learning the most frequently used shortcuts first, such as those for Compare and Survey modes.
- Create a Cheat Sheet: Keep a list of the shortcuts you use most often and refer to it regularly until you have memorized them.
- Practice Regularly: Incorporate keyboard shortcuts into your daily workflow to reinforce your learning.
5. How Do Flags And Ratings Help In Comparing Photos In Lightroom?
Flags and ratings in Lightroom are organizational tools that help you categorize and prioritize your photos. Use flags (Pick/Reject) to quickly identify images to keep or discard, and use star ratings to rank your photos based on their quality and potential.
Flags and ratings are essential for managing and organizing your photo library in Lightroom. By using these tools, you can quickly identify your best images and filter out the ones you no longer need. This is particularly useful when you have a large number of photos and need to streamline your workflow.
Benefits of Using Flags and Ratings:
- Efficient Organization: Helps you categorize and prioritize your photos.
- Quick Identification: Allows you to quickly identify your best and worst images.
- Streamlined Workflow: Simplifies the process of selecting and editing photos.
How to Use Flags and Ratings Effectively:
- Flags (Pick/Reject): Use the “P” key to flag an image as a “Pick,” indicating that it is a strong contender. Use the “X” key to flag an image as a “Reject,” indicating that it should be discarded. You can then filter your library to show only the “Pick” flags or hide the “Reject” flags.
- Star Ratings: Use the number keys (1-5) to assign star ratings to your images. A rating of 1 star indicates a low-quality image, while a rating of 5 stars indicates a high-quality image. You can then filter your library to show only the images with a certain star rating.
Tips for Effective Flagging and Rating:
- Be Consistent: Develop a consistent system for flagging and rating your photos and stick to it.
- Use Multiple Passes: Make multiple passes through your library, first flagging the obvious rejects, then rating the remaining images.
- Revisit Your Ratings: Periodically revisit your ratings to ensure they still reflect your current opinion of the images.
6. What Are The Best Practices For Comparing Portrait Photos In Lightroom?
When comparing portrait photos in Lightroom, focus on facial expressions, sharpness of the eyes, posing, and lighting. Use Compare mode to assess subtle differences in expressions and Survey mode to quickly eliminate poorly lit or unflattering poses.
Portrait photography requires a keen eye for detail. Small variations in expression, pose, and lighting can make a significant difference in the final result. By using Lightroom’s comparison tools effectively, you can ensure that you select the best possible portrait from a series of shots.
Key Considerations for Comparing Portrait Photos:
- Facial Expression: Look for natural and engaging expressions that convey the desired emotion.
- Sharpness of the Eyes: Ensure that the eyes are sharp and in focus, as they are the focal point of the portrait.
- Posing: Evaluate the pose for its overall composition and how it flatters the subject.
- Lighting: Assess the lighting for its quality, direction, and how it illuminates the subject’s face.
Step-by-Step Guide to Comparing Portrait Photos:
- Initial Selection: Start by using Survey mode to eliminate any obviously flawed images, such as those with closed eyes, poor lighting, or distracting backgrounds.
- Detailed Comparison: Switch to Compare mode to assess the remaining images in detail. Focus on the key elements mentioned above: facial expression, sharpness of the eyes, posing, and lighting.
- Zoom In: Use the zoom tool to inspect the eyes and other critical areas of the face at 100% magnification.
- Consider Cropping: Experiment with different crops to see how they affect the overall composition and impact of the portrait.
- Get Feedback: Share your shortlisted portraits with others and ask for their opinions. Fresh perspectives can help you make a more informed decision.
7. How Do You Compare Landscape Photos Using Lightroom Effectively?
When comparing landscape photos in Lightroom, pay attention to composition, sharpness, dynamic range, and color. Use virtual copies to experiment with different editing styles and Compare mode to evaluate the impact of each style on the overall image.
Landscape photography often involves capturing vast scenes with intricate details. Selecting the best landscape photo from a series of shots requires careful consideration of various factors, including composition, sharpness, dynamic range, and color. By using Lightroom’s comparison tools effectively, you can ensure that you choose the most visually compelling and technically sound landscape image.
Key Considerations for Comparing Landscape Photos:
- Composition: Evaluate the overall composition of the image, paying attention to elements such as leading lines, the rule of thirds, and the placement of key subjects.
- Sharpness: Ensure that the image is sharp throughout, with particular attention to the foreground and any key focal points.
- Dynamic Range: Assess the dynamic range of the image, ensuring that there is detail in both the highlights and the shadows.
- Color: Evaluate the colors for their accuracy, vibrancy, and overall impact on the mood of the image.
Step-by-Step Guide to Comparing Landscape Photos:
- Initial Selection: Start by using Survey mode to eliminate any obviously flawed images, such as those with blurriness, poor exposure, or distracting elements.
- Detailed Comparison: Switch to Compare mode to assess the remaining images in detail. Focus on the key elements mentioned above: composition, sharpness, dynamic range, and color.
- Experiment with Virtual Copies: Create virtual copies of your best images and experiment with different editing styles. For example, you might try a high-contrast look, a HDR-style edit, or a soft, pastel-toned edit.
- Compare the Versions: Use Compare mode to evaluate the impact of each editing style on the overall image. Pay attention to how the different styles affect the mood, detail, and impact of the landscape.
- Choose the Best: Select the version that best conveys your vision and proceed with further refining that image.
8. Can I Compare Photos From Different Shoots In Lightroom?
Yes, you can compare photos from different shoots in Lightroom by importing them into the same catalog and using collections to organize them. Then, use Compare or Survey mode to view and compare images across different shoots.
Lightroom’s catalog system allows you to manage and organize all your photos in one central location. By importing photos from different shoots into the same catalog, you can easily compare them side-by-side, regardless of when or where they were taken. This is particularly useful for identifying your best work across different projects or for comparing your progress over time.
Step-by-Step Guide to Comparing Photos from Different Shoots:
- Import Photos: Import the photos from each shoot into your Lightroom catalog.
- Create Collections: Create a collection for each shoot to keep your photos organized.
- Combine Photos (Optional): If you want to compare photos from different shoots more directly, you can create a new collection and add selected images from each shoot to that collection.
- Enter Comparison Mode: Select the images you want to compare and enter either Compare mode (for detailed side-by-side comparison) or Survey mode (for an overview of multiple images).
- Evaluate and Choose: Determine which images are the strongest and proceed with further editing or organization.
9. How Do I Synchronize Settings Between Compared Photos In Lightroom?
To synchronize settings between compared photos in Lightroom, select the source photo with the desired settings, then select the target photos and click the “Sync” button. Choose the settings you want to synchronize and click “Synchronize.”
Synchronizing settings in Lightroom is a powerful tool for applying the same adjustments to multiple photos. This is particularly useful when you have a series of images that were shot under similar conditions and require the same basic edits. By synchronizing settings, you can save time and ensure consistency across your photos.
Step-by-Step Guide to Synchronizing Settings:
- Select Source Photo: Choose the photo that has the settings you want to copy. This should be an image that you have already edited to your liking.
- Select Target Photos: Select the other photos to which you want to apply the settings. You can do this by holding down the Shift or Ctrl/Cmd key while clicking on the images.
- Click the “Sync” Button: Click the “Sync” button at the bottom of the Develop module.
- Choose Settings: In the Synchronize Settings dialog box, choose the settings you want to synchronize. You can select individual settings or choose from presets such as “Basic Tone,” “Color,” or “Detail.”
- Click “Synchronize”: Click the “Synchronize” button to apply the settings to the selected photos.
Tips for Effective Synchronization:
- Be Selective: Only synchronize settings that are relevant to the target photos. Avoid synchronizing settings that might negatively impact the images, such as exposure or white balance.
- Use Presets: Create and use presets to quickly synchronize common settings across multiple photos.
- Review and Adjust: After synchronizing settings, review each photo to ensure that the adjustments look good. Make any necessary tweaks to fine-tune the images.
10. What Are The Limitations Of Using Lightroom For Photo Comparison?
While Lightroom offers robust comparison tools, it may not be ideal for pixel-level comparisons or for evaluating extremely subtle differences. Dedicated image analysis software may be necessary for highly technical or scientific applications.
Lightroom is primarily designed for photo editing and organization, and its comparison tools are optimized for these tasks. While it offers excellent features for comparing images, it may not be the best choice for highly specialized applications that require precise pixel-level analysis or the ability to measure subtle differences in color or detail.
Limitations of Lightroom for Photo Comparison:
- Pixel-Level Analysis: Lightroom does not offer the ability to zoom in to the pixel level for detailed analysis.
- Measurement Tools: Lightroom lacks measurement tools for quantifying differences in color, brightness, or detail.
- Specialized Applications: For highly technical or scientific applications, dedicated image analysis software may be necessary.
Alternatives to Lightroom for Specialized Comparison:
- ImageJ: A free, open-source image processing program widely used in scientific research.
- Photoshop: Offers more advanced analysis tools, such as histograms and color samplers.
- Dedicated Image Analysis Software: Specialized software designed for specific applications, such as medical imaging or materials science.
FAQ: Comparing Photos in Lightroom
-
Q1: How do I enter Compare mode in Lightroom?
- To enter Compare mode, select an image and press the “C” key on your keyboard.
-
Q2: What is the shortcut for Survey mode in Lightroom?
- The shortcut for Survey mode is the “N” key.
-
Q3: How do I select multiple images for Survey mode?
- Hold down the Shift or Ctrl/Cmd key while clicking on the images you want to select.
-
Q4: How do I reject an image in Survey mode?
- Press the “X” key in the lower right corner of the image to mark it for rejection.
-
Q5: Can I compare photos from different folders in Lightroom?
- Yes, you can compare photos from different folders by importing them into the same catalog and using collections to organize them.
-
Q6: How do I synchronize settings between two photos in Lightroom?
- Select the source photo, then select the target photo and click the “Sync” button. Choose the settings you want to synchronize and click “Synchronize.”
-
Q7: What are virtual copies in Lightroom?
- Virtual copies are multiple versions of the same image with different edits, without duplicating the original file.
-
Q8: How do I create a virtual copy in Lightroom?
- Right-click on the image and select “Create Virtual Copy.”
-
Q9: Can I use flags and ratings to compare photos in Lightroom?
- Yes, use flags (Pick/Reject) to quickly identify images to keep or discard, and use star ratings to rank your photos based on their quality and potential.
-
Q10: What should I focus on when comparing portrait photos in Lightroom?
- Focus on facial expressions, sharpness of the eyes, posing, and lighting.
By mastering these techniques for how to compare in Lightroom, you’ll significantly enhance your photo selection process, leading to better final images and a more refined portfolio. Whether you’re a professional photographer or a hobbyist, these tips will help you make the most of Lightroom’s powerful comparison tools.
If you’re still struggling to make the right choices, don’t worry! At COMPARE.EDU.VN, we specialize in providing detailed, objective comparisons to help you make informed decisions. Whether it’s software, gadgets, or services, we’ve got you covered. Visit our website at COMPARE.EDU.VN today and make your decision with confidence! Our team is available to help.
Contact Us:
- Address: 333 Comparison Plaza, Choice City, CA 90210, United States
- WhatsApp: +1 (626) 555-9090
- Website: compare.edu.vn