Comparing differences in Excel sheets can be a complex task, but with the right tools and techniques, it becomes manageable. compare.edu.vn provides a comprehensive guide to help you efficiently identify and analyze discrepancies between Excel files, including how to pinpoint changes in formulas, values, and formatting. By mastering these methods, you can ensure data accuracy and streamline your workflow using effective spreadsheet comparison and data validation strategies.
1. Understanding the Need for Comparing Excel Sheets
Why is comparing Excel sheets important? This is crucial for data validation, auditing, and ensuring consistency across different versions of a document.
Comparing Excel sheets helps you maintain data integrity, especially when dealing with large datasets or collaborative projects. Data accuracy is vital for making informed decisions, whether in business, research, or personal finance.
- Data Validation: Ensures accuracy by identifying discrepancies between datasets.
- Auditing: Tracks changes and identifies potential errors in financial or operational data.
- Version Control: Manages different versions of a document to prevent data loss or inconsistencies.
- Collaboration: Facilitates teamwork by highlighting modifications made by different contributors.
Comparing Excel sheets allows you to pinpoint exactly what has changed, whether it’s a simple value update or a more complex formula modification. This level of detail is essential for maintaining accurate records and making informed decisions based on reliable data.
2. Key Scenarios Where Excel Sheet Comparison is Essential
In what situations is comparing Excel sheets most beneficial? This is particularly useful in financial analysis, project management, and data migration.
Understanding when to compare Excel sheets can significantly improve your workflow and accuracy. Here are some key scenarios:
- Financial Analysis: Detecting discrepancies in financial reports to ensure accuracy and compliance. Comparing monthly sales data can reveal trends and anomalies that need further investigation.
- Project Management: Tracking changes in project timelines, budgets, and resource allocation. Comparing project plans from different phases helps identify delays or cost overruns.
- Data Migration: Verifying data integrity during migration from one system to another. Comparing pre- and post-migration datasets ensures that no data is lost or corrupted.
- Auditing: Ensuring compliance with regulatory requirements by comparing different versions of audit trails. Comparing records before and after an audit helps identify unauthorized changes.
- Sales Reporting: Analyzing sales performance by comparing data across different periods or regions. Comparing sales figures from different quarters can highlight growth areas or underperforming regions.
- Inventory Management: Monitoring stock levels and identifying discrepancies between inventory records. Comparing physical stock counts with system records helps identify discrepancies and prevent losses.
These scenarios highlight the importance of having robust methods for comparing Excel sheets, ensuring that data is accurate, consistent, and reliable.
3. Tools Available for Comparing Excel Sheets
What tools can you use to compare Excel sheets? Options range from built-in Excel features to specialized third-party software.
Several tools are available to help you compare Excel sheets efficiently:
- Microsoft Excel’s Built-in Features: Excel offers basic comparison capabilities through conditional formatting and formula auditing. While limited, these features can be useful for simple comparisons.
- Microsoft Spreadsheet Compare: A dedicated tool included in Office Professional Plus, designed for detailed comparisons of Excel files. It provides comprehensive reports on differences, including formulas, values, and formatting.
- Third-Party Software: Various software solutions offer advanced comparison features, such as cell-by-cell analysis and detailed reporting. Examples include DiffEngineX, XL Comparator, and Beyond Compare.
- Online Comparison Tools: Web-based services that allow you to upload and compare Excel files without installing software. These tools often provide a quick and easy way to identify differences.
- VBA Scripts: Custom scripts written in Visual Basic for Applications (VBA) can automate the comparison process, especially for repetitive tasks.
Choosing the right tool depends on your specific needs and the complexity of the comparison task. For simple comparisons, Excel’s built-in features may suffice. However, for more detailed analysis, dedicated software or VBA scripts may be necessary.
 Compare Files command
4. Using Microsoft Spreadsheet Compare
How do you use Microsoft Spreadsheet Compare? This tool provides detailed reports on differences between Excel files, including formulas, values, and formatting.
Microsoft Spreadsheet Compare is a powerful tool for identifying differences between Excel files. Here’s how to use it:
- Open Spreadsheet Compare:
- On the Start screen, type Spreadsheet Compare and select the option. This tool is available with Office Professional Plus 2013, 2016, 2019, or Microsoft 365 Apps for enterprise.
- Compare Two Excel Workbooks:
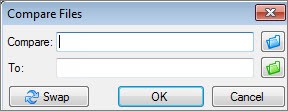
- Click Home > Compare Files. The Compare Files dialog box appears.
- Click the blue folder icon next to the Compare box to select the earlier version of your workbook. You can browse files saved on your computer, network, or enter a web address.
- Click the green folder icon next to the To box to select the workbook you want to compare, then click OK.
- Choose the options you want to see in the results, such as Formulas, Macros, or Cell Format. You can also select Select All.
- Click OK to run the comparison.
- Understanding the Results:
- The results are displayed in a two-pane grid, with the earlier version on the left and the newer version on the right. Details of the changes appear in a pane below the grids.
- Changes are highlighted by color, indicating the type of difference. For example, cells with “entered values” (non-formula cells) are formatted with a green fill color in the side-by-side grid, and with a green font in the pane results list.
Spreadsheet Compare provides a comprehensive overview of the differences between Excel files, making it easier to identify and address any discrepancies.
4.1. Step-by-Step Guide to Using Spreadsheet Compare
Can you walk through a detailed example of using Spreadsheet Compare? This will help users understand the process from start to finish.
To effectively use Microsoft Spreadsheet Compare, follow these detailed steps:
- Launch Spreadsheet Compare:
- Locate the Spreadsheet Compare application on your computer. It is typically found in the Microsoft Office suite if you have Office Professional Plus installed.
- Open the application to start the comparison process.
- Select Files for Comparison:
- In the Spreadsheet Compare window, click on the Compare Files button. This will open a dialog box where you can select the two Excel files you want to compare.
- Click the Browse button next to the Compare field to select the older version of the Excel file. Navigate to the file location and click Open.
- Click the Browse button next to the To field to select the newer version of the Excel file. Navigate to the file location and click Open.
- Once both files are selected, click OK to proceed.
- Configure Comparison Options:
- Before running the comparison, you can choose specific options to focus on certain types of differences.
- In the left pane, you will see a list of options such as Formulas, Values, Cell Formatting, Macros, and Comments.
- Check the boxes next to the options you want to include in the comparison. If you want to compare all aspects of the files, select Select All.
- Click OK to save your settings and start the comparison.
- Analyze Comparison Results:
- After the comparison is complete, the results will be displayed in a two-pane grid. The older version of the file is shown on the left, and the newer version is on the right.
- Differences between the files are highlighted with different colors. A legend in the lower-left pane explains what each color represents.
- Click on a highlighted cell to view detailed information about the change in the lower pane. This will show you the original value and the changed value.
- Use the navigation buttons to move through the different worksheets and identify all the changes.
- Interpreting Color Codes:
- Green Fill: Indicates that the value in the cell has been changed. This is common for manually entered values.
- Blue-Green Fill: Indicates that the calculated value in the cell has been changed, usually due to changes in the formulas or input values.
- Other Colors: Spreadsheet Compare uses different colors to highlight other types of changes, such as changes in formatting, formulas, or comments. Refer to the legend for a complete list.
- Addressing Password Protected Files:
- If one or both of the Excel files are password protected, Spreadsheet Compare will prompt you to enter the password.
- Enter the correct password for each file when prompted to allow the comparison to proceed.
- Saving the Comparison Report:
- Spreadsheet Compare does not directly offer a feature to save the comparison report. However, you can take screenshots of the results or manually document the differences.
By following these steps, you can effectively use Microsoft Spreadsheet Compare to identify and analyze differences between Excel files, ensuring data accuracy and consistency.
4.2. Troubleshooting Common Issues in Spreadsheet Compare
What are some common problems encountered while using Spreadsheet Compare, and how can they be resolved?
When using Microsoft Spreadsheet Compare, you may encounter certain issues. Here are some common problems and their solutions:
- Unable to Open Workbook:
- Problem: This message often appears if one or both workbooks are password protected.
- Solution: Click OK on the message and enter the password for the workbook when prompted. Ensure you have the correct password for each file.
- Spreadsheet Compare Not Found:
- Problem: You cannot find Spreadsheet Compare in your Office suite.
- Solution: Spreadsheet Compare is only available with Office Professional Plus 2013, 2016, 2019, or Microsoft 365 Apps for enterprise. If you have a different version, you will need to use alternative comparison methods or upgrade your Office suite.
- Comparison Results Not Displaying Correctly:
- Problem: The comparison results are not highlighting the differences as expected.
- Solution: Ensure that you have selected the appropriate comparison options (e.g., Formulas, Values, Cell Formatting). Also, verify that the files are not corrupted. Try closing and reopening the files before running the comparison again.
- Slow Comparison Process:
- Problem: Comparing large Excel files takes a long time.
- Solution: Close any unnecessary applications to free up system resources. If possible, reduce the size of the Excel files by removing irrelevant data or splitting them into smaller files.
- Incompatible File Format:
- Problem: Spreadsheet Compare does not support the file format of one or both Excel files.
- Solution: Ensure that both files are saved in a compatible format, such as .xlsx or .xls. If necessary, convert the files to a supported format using Excel.
- Incorrect Highlighting:
- Problem: The highlighting of differences seems inaccurate or inconsistent.
- Solution: Double-check the formulas and values in the highlighted cells to ensure that the differences are correctly identified. Sometimes, minor formatting differences can cause incorrect highlighting.
- Unexpected Errors:
- Problem: The application encounters an unexpected error and crashes.
- Solution: Restart Spreadsheet Compare. If the problem persists, try reinstalling the application or repairing your Office installation.
By addressing these common issues, you can improve your experience with Microsoft Spreadsheet Compare and ensure accurate and efficient Excel file comparisons.
5. Alternative Methods for Comparing Excel Sheets
What are some other ways to compare Excel sheets besides using dedicated software? These methods include manual comparison and using Excel’s built-in features.
Besides using dedicated software like Microsoft Spreadsheet Compare, you can also use alternative methods to compare Excel sheets:
- Manual Comparison:
- Method: Open both Excel files side by side and manually compare the data, cell by cell.
- Pros: No additional software required.
- Cons: Time-consuming and prone to human error, especially with large datasets.
- Conditional Formatting:
- Method: Use Excel’s conditional formatting feature to highlight differences between two sheets.
- Pros: Visual identification of differences within Excel.
- Cons: Limited to highlighting simple differences and requires careful setup.
- Formula Auditing:
- Method: Use Excel’s formula auditing tools to trace precedents and dependents, helping identify discrepancies in formulas.
- Pros: Useful for identifying formula-related issues.
- Cons: Not suitable for comparing large datasets or non-formula-related differences.
- Using VBA Scripts:
- Method: Write custom VBA scripts to automate the comparison process.
- Pros: Highly customizable and can handle complex comparisons.
- Cons: Requires programming knowledge and can be time-consuming to develop.
- Online Comparison Tools:
- Method: Upload your Excel files to an online comparison tool and view the differences.
- Pros: Convenient and requires no software installation.
- Cons: May have limitations on file size and security concerns regarding data privacy.
- Using Excel’s
IFFunction:- Method: Create a new column that uses the
IFfunction to compare corresponding cells in two sheets. - Pros: Simple and effective for basic comparisons.
- Cons: Can become cumbersome with large datasets or complex comparisons.
- Method: Create a new column that uses the
Each method has its own advantages and disadvantages, so choose the one that best fits your specific needs and technical skills.
5.1. Manual Comparison Techniques
How can you effectively compare Excel sheets manually? Techniques include using the “View Side by Side” feature and color-coding.
Manual comparison of Excel sheets can be tedious, but these techniques can make the process more efficient:
- View Side by Side:
- Method: Open both Excel files and use the “View Side by Side” feature in Excel to display them on the screen simultaneously.
- Steps:
- Open both Excel files.
- Go to the View tab.
- Click on View Side by Side.
- Arrange the windows for optimal viewing.
- Pros: Allows for direct visual comparison of data.
- Cons: Time-consuming and prone to errors, especially with large datasets.
- Synchronous Scrolling:
- Method: Enable synchronous scrolling to scroll both sheets simultaneously, ensuring that you are comparing corresponding rows.
- Steps:
- In the View Side by Side mode, click on Synchronous Scrolling in the View tab.
- Scroll in one sheet, and the other sheet will scroll accordingly.
- Pros: Helps maintain alignment while comparing data.
- Cons: Can be disorienting if the sheets have different structures.
- Color-Coding:
- Method: Use different background colors to highlight cells that have been compared.
- Steps:
- Select the cells you have compared.
- Apply a background color using the Fill Color option in the Home tab.
- Use different colors for different types of comparisons (e.g., green for matching cells, red for discrepancies).
- Pros: Provides a visual record of the comparison progress.
- Cons: Time-consuming to apply and may obscure existing formatting.
- Using a Checklist:
- Method: Create a checklist of key data points to verify in both sheets.
- Steps:
- Create a list of important data points (e.g., totals, key values).
- Check off each item as you compare it in both sheets.
- Pros: Helps ensure that all critical data is reviewed.
- Cons: Requires careful planning and can be time-consuming to create.
- Zooming In:
- Method: Zoom in on specific sections of the sheets to improve readability.
- Steps:
- Use the zoom slider in the bottom-right corner of the Excel window to adjust the zoom level.
- Zoom in to focus on specific areas of interest.
- Pros: Enhances clarity and reduces eye strain.
- Cons: Requires frequent adjustment of the zoom level.
- Freezing Panes:
- Method: Freeze the top row and/or first column to keep headers visible while scrolling through the data.
- Steps:
- Select the row below the headers or the column to the right of the labels.
- Go to the View tab and click on Freeze Panes.
- Choose the appropriate option (e.g., Freeze Top Row, Freeze First Column).
- Pros: Keeps headers and labels visible, making it easier to understand the data.
- Cons: Requires setting up the frozen panes before starting the comparison.
By using these manual comparison techniques, you can improve the accuracy and efficiency of your Excel sheet comparisons.
5.2. Using Conditional Formatting for Comparisons
How can conditional formatting be used to highlight differences between two Excel sheets? This method provides a visual way to identify discrepancies.
Conditional formatting is a powerful Excel feature that can be used to highlight differences between two sheets. Here’s how to use it for comparisons:
- Open Both Excel Sheets:
- Ensure that both Excel sheets you want to compare are open.
- Select the Data Range in the First Sheet:
- Select the range of cells in the first sheet that you want to compare with the second sheet.
- Open Conditional Formatting:
- Go to the Home tab in Excel.
- Click on Conditional Formatting in the Styles group.
- Create a New Rule:
- Select New Rule… from the dropdown menu.
- Use a Formula to Determine Which Cells to Format:
- In the New Formatting Rule dialog box, select Use a formula to determine which cells to format.
- Enter the Formula:
- Enter a formula that compares the selected range in the first sheet with the corresponding range in the second sheet.
- For example, if you are comparing Sheet1!A1 with Sheet2!A1, the formula would be:
=Sheet1!A1<>Sheet2!A1. - Make sure to adjust the sheet names and cell references to match your specific scenario.
- Set the Formatting:
- Click on the Format… button to set the formatting that will be applied to the cells that meet the formula criteria (i.e., the cells that are different).
- In the Format Cells dialog box, you can set the font, border, and fill color. For example, you might choose to fill the cells with a red color to highlight the differences.
- Click OK to save the formatting settings.
- Apply the Rule:
- Click OK in the New Formatting Rule dialog box to apply the rule to the selected range.
- Repeat for Other Sheets:
- Repeat these steps for other sheets or ranges that you want to compare.
Example:
Comparing Sheet1 and Sheet2:
- Select the data range in Sheet1 (e.g., A1:C10).
- Go to Conditional Formatting > New Rule > Use a formula to determine which cells to format.
- Enter the formula:
=A1<>Sheet2!A1. - Set the format to fill the cell with red.
- Apply the rule.
Now, any cell in Sheet1 that is different from the corresponding cell in Sheet2 will be highlighted in red, providing a visual way to identify discrepancies.
Pros of Using Conditional Formatting:
- Visual identification of differences.
- No need for additional software.
Cons of Using Conditional Formatting:
- Can be time-consuming to set up for large datasets.
- May slow down Excel if applied to too many cells.
- Limited to highlighting simple differences.
5.3. Leveraging Excel’s Formula Auditing Tools
How can Excel’s formula auditing tools help in comparing sheets? These tools can trace precedents and dependents to identify discrepancies in formulas.
Excel’s formula auditing tools are useful for identifying discrepancies in formulas between two sheets. Here’s how you can leverage them:
- Open Both Excel Sheets:
- Ensure that both Excel sheets you want to compare are open.
- Navigate to the Formulas Tab:
- In Excel, go to the Formulas tab.
- Access Formula Auditing Tools:
- In the Formula Auditing group, you will find several tools that can help you analyze and compare formulas.
- Trace Precedents:
- Select a cell containing a formula in the first sheet.
- Click on Trace Precedents. This will draw arrows showing which cells are used in the formula.
- Repeat this process for the corresponding cell in the second sheet.
- Compare the arrows to see if the formulas in both sheets are using the same input cells.
- Trace Dependents:
- Select a cell containing a formula in the first sheet.
- Click on Trace Dependents. This will draw arrows showing which cells are affected by the formula.
- Repeat this process for the corresponding cell in the second sheet.
- Compare the arrows to see if the formulas in both sheets are affecting the same output cells.
- Show Formulas:
- Click on Show Formulas in the Formula Auditing group. This will display all formulas in the sheet instead of their calculated values.
- Compare the formulas in both sheets to identify any differences.
- Error Checking:
- Click on Error Checking to identify any errors in the formulas. Excel will guide you through any errors and suggest possible solutions.
- Evaluate Formula:
- Select a cell containing a formula.
- Click on Evaluate Formula. This will open the Evaluate Formula dialog box, which allows you to step through the calculation of the formula.
- Use this tool to compare how the formula is calculated in both sheets and identify any discrepancies.
Example:
Comparing Formulas in Sheet1 and Sheet2:
- In Sheet1, cell D1 contains the formula
=A1+B1+C1. - In Sheet2, cell D1 contains the formula
=A1+B1. - Using Trace Precedents, you can see that in Sheet1, the formula depends on A1, B1, and C1, while in Sheet2, it only depends on A1 and B1.
- Using Show Formulas, you can directly compare the formulas and identify the missing C1 in Sheet2.
Pros of Using Formula Auditing Tools:
- Helps identify formula-related issues.
- Useful for understanding the relationships between cells and formulas.
Cons of Using Formula Auditing Tools:
- Not suitable for comparing large datasets or non-formula-related differences.
- Requires manual comparison and analysis.
6. VBA for Advanced Excel Sheet Comparison
How can VBA (Visual Basic for Applications) be used for advanced Excel sheet comparison? VBA allows for custom automation of the comparison process.
VBA (Visual Basic for Applications) can be used for advanced Excel sheet comparison, allowing you to automate the comparison process and create custom solutions. Here’s how:
- Open the VBA Editor:
- Press
Alt + F11to open the VBA editor in Excel.
- Press
- Insert a New Module:
- In the VBA editor, go to Insert > Module to insert a new module where you will write your VBA code.
- Write the VBA Code:
- Write a VBA code to compare the two Excel sheets. Here’s an example of a VBA code that compares two sheets and highlights the differences:
Sub CompareSheets()

    Dim Sheet1 As Worksheet, Sheet2 As Worksheet
    Dim i As Long, j As Long
    Dim LastRow As Long, LastCol As Long

    ' Set the sheet names
    Set Sheet1 = ThisWorkbook.Sheets("Sheet1")
    Set Sheet2 = ThisWorkbook.Sheets("Sheet2")

    ' Get the last row and column
    LastRow = Sheet1.Cells.Find("*", SearchOrder:=xlByRows, SearchDirection:=xlPrevious).Row
    LastCol = Sheet1.Cells.Find("*", SearchOrder:=xlByColumns, SearchDirection:=xlPrevious).Column

    ' Loop through each cell and compare
    For i = 1 To LastRow
        For j = 1 To LastCol
            If Sheet1.Cells(i, j).Value <> Sheet2.Cells(i, j).Value Then
                ' Highlight the differences
                Sheet1.Cells(i, j).Interior.Color = RGB(255, 0, 0) ' Red
                Sheet2.Cells(i, j).Interior.Color = RGB(255, 0, 0) ' Red
            End If
        Next j
    Next i

    MsgBox "Comparison complete. Differences highlighted in red."

End Sub- Modify the Code as Needed:
- Adjust the sheet names, range, and comparison criteria as needed for your specific scenario.
- Run the VBA Code:
- Press
F5or click on the Run button to execute the VBA code.
- Press
- Analyze the Results:
- The VBA code will highlight the differences between the two sheets in red.
- Save the Excel File:
- Save the Excel file as a macro-enabled workbook (.xlsm) to preserve the VBA code.
Explanation of the VBA Code:
Sub CompareSheets(): Starts the subroutine.Dim Sheet1 As Worksheet, Sheet2 As Worksheet: Declares the worksheet variables.Dim i As Long, j As Long: Declares the loop counters.Dim LastRow As Long, LastCol As Long: Declares variables to store the last row and column.Set Sheet1 = ThisWorkbook.Sheets("Sheet1"): Sets the first worksheet.Set Sheet2 = ThisWorkbook.Sheets("Sheet2"): Sets the second worksheet.LastRow = Sheet1.Cells.Find("*", SearchOrder:=xlByRows, SearchDirection:=xlPrevious).Row: Finds the last row with data.LastCol = Sheet1.Cells.Find("*", SearchOrder:=xlByColumns, SearchDirection:=xlPrevious).Column: Finds the last column with data.- The nested
Forloops iterate through each cell in the specified range. If Sheet1.Cells(i, j).Value <> Sheet2.Cells(i, j).Value Then: Compares the values of the cells.Sheet1.Cells(i, j).Interior.Color = RGB(255, 0, 0): Highlights the different cells in red.MsgBox "Comparison complete. Differences highlighted in red.": Displays a message box when the comparison is complete.
Customizing the VBA Code:
- Change the sheet names in the
Setstatements to match the names of your sheets. - Adjust the range of cells being compared by modifying the
LastRowandLastColvariables. - Modify the highlighting color by changing the
RGBvalues. - Add additional criteria for comparison, such as ignoring case or whitespace.
Pros of Using VBA:
- Highly customizable and can handle complex comparisons.
- Automates the comparison process, saving time and reducing errors.
Cons of Using VBA:
- Requires programming knowledge.
- Can be time-consuming to develop and debug the code.
By using VBA, you can create custom solutions for comparing Excel sheets that meet your specific needs and requirements.
7. Online Excel Comparison Tools
What online tools are available for comparing Excel sheets? These tools allow you to upload and compare files without installing software.
Several online tools are available for comparing Excel sheets, allowing you to upload and compare files without installing any software. Here are some popular options:
- DiffNow:
- Description: DiffNow is an online file comparison tool that supports Excel files. It highlights the differences between the files in a side-by-side view.
- Pros: Easy to use, supports multiple file formats, highlights differences visually.
- Cons: May have limitations on file size, requires an internet connection.
- GroupDocs Comparison:
- Description: GroupDocs Comparison is an online document comparison tool that supports Excel files. It provides detailed reports on the differences between the files.
- Pros: Supports multiple file formats, provides detailed reports, offers a free trial.
- Cons: May have limitations on file size, requires an internet connection.
- Aspose.Cells Comparison:
- Description: Aspose.Cells Comparison is an online tool specifically designed for comparing Excel files. It highlights the differences between the files and provides a summary of the changes.
- Pros: Specifically designed for Excel files, highlights differences clearly, offers a free trial.
- Cons: May have limitations on file size, requires an internet connection.
- Draftable:
- Description: Draftable is an online document comparison tool that supports Excel files. It highlights the differences between the files in a clear and intuitive way.
- Pros: Easy to use, supports multiple file formats, highlights differences clearly.
- Cons: May have limitations on file size, requires an internet connection, free version has limitations.
How to Use Online Excel Comparison Tools:
- Choose an Online Tool:
- Select an online Excel comparison tool from the list above or find one that meets your specific needs.
- Upload the Excel Files:
- Go to the website of the chosen online tool and upload the two Excel files you want to compare.
- Start the Comparison:
- Click on the button to start the comparison process.
- Analyze the Results:
- The online tool will display the differences between the two Excel files, highlighting the changes in a side-by-side view or providing a detailed report.
Pros of Using Online Excel Comparison Tools:
- Convenient and requires no software installation.
- Easy to use.
Cons of Using Online Excel Comparison Tools:
- May have limitations on file size.
- Requires an internet connection.
- Potential security concerns regarding data privacy.
8. Best Practices for Excel Sheet Comparison
What are some best practices to follow when comparing Excel sheets? These include preparing the data and using consistent formatting.
To ensure accurate and efficient Excel sheet comparisons, follow these best practices:
- Prepare the Data:
- Clean the Data: Remove any unnecessary formatting, blank rows, or columns that could interfere with the comparison process.
- Sort the Data: Sort the data in both sheets by a common column to ensure that corresponding rows are aligned.
- Standardize the Data: Ensure that the data is consistent in both sheets. For example, use the same date format, number format, and text case.
- Use Consistent Formatting:
- Apply Consistent Formatting: Ensure that both sheets use consistent formatting, such as font, font size, and cell alignment.
- Remove Conditional Formatting: Remove any conditional formatting that could interfere with the comparison process.
- Backup the Files:
- Create Backups: Before making any changes to the Excel files, create backups to prevent data loss.
- Use a Structured Approach:
- Define the Scope: Clearly define the scope of the comparison. What data do you need to compare? What types of differences are you looking for?
- Document the Process: Document the comparison process, including the steps you took, the tools you used, and the results you found.
- Automate the Process:
- Use VBA Scripts: Use VBA scripts to automate the comparison process, especially for repetitive tasks.
- Use Online Tools: Use online Excel comparison tools to quickly and easily compare files without installing any software.
- Verify the Results:
- Double-Check the Results: Double-check the comparison results to ensure that they are accurate.
- Use Multiple Methods: Use multiple comparison methods to verify the results. For example, use both manual comparison and conditional formatting.
- Address Password Protected Files:
- Remove Password Protection: If possible, remove password protection from the Excel files before comparing them.
- Provide Passwords: If password protection cannot be removed, make sure to provide the correct passwords when prompted by the comparison tool.
- Handle Large Datasets:
- Split the Data: If you are comparing large datasets, consider splitting the data into smaller files to improve performance.
- Use Efficient Tools: Use efficient comparison tools that are designed to handle large datasets.
By following these best practices, you can improve the accuracy and efficiency of your Excel sheet comparisons and ensure that you are making informed decisions based on reliable data.
9. Advanced Techniques for Complex Comparisons
What advanced techniques can be used for more complex Excel sheet comparisons? This includes comparing data across multiple sheets and using advanced filtering.
For more complex Excel sheet comparisons, consider using these advanced techniques:
- Comparing Data Across Multiple Sheets:
- Consolidate Data: Consolidate data from multiple sheets into a single sheet using formulas or VBA.
- Use 3D References: Use 3D references to compare data across multiple sheets.
- Use Power Query: Use Power Query to combine and transform data from multiple sheets.
- Using Advanced Filtering:
- Filter Data: Use advanced filtering to focus on specific subsets of data.
- Use Multiple Criteria: Use multiple criteria in your filters to narrow down the results.
- Use Custom Filters: Use custom filters to create complex filtering rules.
- Comparing Data with Different Structures:
- Use Lookup Functions: Use lookup functions like
VLOOKUPorINDEX/MATCHto compare data with different structures. - Use Pivot Tables: Use pivot tables to summarize and compare data with different structures.
- Use Lookup Functions: Use lookup functions like
- Using Array Formulas:
- Create Array Formulas: Use array formulas to perform complex comparisons on multiple cells at once.
- Use
SUMPRODUCT: Use theSUMPRODUCTfunction to count the number of differences between two ranges.
- Using Helper Columns:
- Create Helper Columns: Create helper columns to perform intermediate calculations that make the comparison process easier.
- Use Formulas in Helper Columns: Use formulas in helper columns to extract relevant data or perform calculations.
- Comparing Data with Different Granularity:
- Aggregate Data: Aggregate data to a common level of granularity before comparing.
- Use Grouping: Use grouping to group data by common categories.
- Using Data Validation:
- Apply Data Validation: Apply data validation rules to ensure that the data is consistent and accurate.
- Use Error Alerts: Use error alerts to notify users when invalid data is entered.
Example:
Comparing Data Across Multiple Sheets Using 3D References:
- Suppose you have three sheets: Sheet1, Sheet2, and Sheet3, each containing sales data for a different month.
- You want to compare the total sales for a specific product across all three months.
- In a summary sheet, you can use a 3D reference to sum the sales data from all
