Comparing data in pivot tables to identify differences is a crucial skill for data analysis. COMPARE.EDU.VN shows you how to effectively compare data within pivot tables, revealing insights and patterns that drive informed decisions. Learn how to leverage pivot table features for data comparison, analyze variances, and visualize data differences for impactful presentations. Master pivot table analysis, data visualization, and trend analysis.
1. Understanding the Power of Pivot Table Comparisons
Pivot tables are invaluable tools for summarizing and analyzing large datasets. However, their true power shines when you need to compare data across different categories, time periods, or scenarios. Comparing data in pivot tables allows you to identify trends, outliers, and significant differences that might otherwise go unnoticed. This is essential for making informed decisions in various fields, from business analysis to scientific research. The ability to quickly slice and dice data and then compare these different views is what makes pivot tables a cornerstone of data analysis. Pivot table proficiency, data interpretation, and comparative analysis are all important.
2. Identifying Your Comparison Goals
Before diving into the mechanics of comparing data in pivot tables, it’s crucial to define your comparison goals clearly. Ask yourself:
- What specific questions are you trying to answer?
- What variables are most important for your comparison?
- What type of differences are you looking for (e.g., absolute differences, percentage changes)?
Clearly defining your objectives will guide your pivot table design and analysis, ensuring that you extract the most relevant and meaningful insights from your data. Defining your objectives helps you focus your pivot table design, ensuring you extract relevant and meaningful insights from your data. Consider what specific questions you aim to answer, which variables are most crucial, and the type of differences you’re investigating (absolute, percentage changes, etc.). With clear objectives, your analysis will be more focused and efficient, guiding you toward actionable business intelligence.
3. Setting Up Your Pivot Tables for Comparison
The foundation of any successful pivot table comparison lies in the proper setup of your pivot tables. This involves carefully selecting the data source, arranging the fields, and applying appropriate filters.
3.1. Choosing Your Data Source
Your data source can be an Excel worksheet, an external database, or even another pivot table. Ensure that your data is clean and well-structured, with consistent formatting and accurate entries. This will prevent errors and ensure the integrity of your analysis. Consistent formatting and accuracy are essential for reliable pivot table results.
3.2. Arranging Your Fields
The arrangement of fields in your pivot table (Rows, Columns, Values, and Filters) will determine how your data is summarized and displayed. Experiment with different arrangements to find the one that best suits your comparison goals.
- Rows: Use rows to display categories or groups that you want to compare.
- Columns: Use columns to display different time periods, scenarios, or other dimensions that you want to compare across.
- Values: Use values to display the numerical data that you want to compare (e.g., sales figures, profit margins, website traffic).
- Filters: Use filters to narrow down your data and focus on specific subsets that are relevant to your comparison.
3.3. Applying Filters
Filters allow you to isolate specific subsets of your data for comparison. For example, you might filter your data to compare sales performance in different regions or product categories. Using filters effectively can help you focus your analysis and identify the most significant differences.
4. Calculating Differences Between Pivot Tables
Excel offers several built-in features for calculating differences between pivot tables. These include:
4.1. Using the “Show Values As” Feature
The “Show Values As” feature allows you to display values as percentages, differences from a base item, or running totals. This is a powerful tool for comparing data across different categories or time periods.
- % of Grand Total: Shows each value as a percentage of the overall total.
- % of Column Total: Shows each value as a percentage of the column total.
- % of Row Total: Shows each value as a percentage of the row total.
- Difference From: Shows the difference between each value and a base item.
- % Difference From: Shows the percentage difference between each value and a base item.
- Running Total In: Shows the cumulative total of values in a row or column.
- % Running Total In: Shows the cumulative percentage of values in a row or column.
- Rank Smallest to Largest: Shows the rank of each value from smallest to largest.
- Rank Largest to Smallest: Shows the rank of each value from largest to smallest.
- Index: Calculates an index value based on the row and column totals.
To use the “Show Values As” feature, right-click on a value in your pivot table, select “Show Values As,” and then choose the desired calculation.
4.2. Creating Calculated Fields
Calculated fields allow you to create custom formulas within your pivot table. This is useful for calculating more complex differences or ratios that are not available through the “Show Values As” feature.
To create a calculated field, go to the “Analyze” tab in the PivotTable Tools ribbon, click on “Fields, Items, & Sets,” and then select “Calculated Field.” In the Insert Calculated Field dialog box, enter a name for your field and then enter the formula using the available fields from your data source.
4.3. Using Excel Formulas Outside the Pivot Table
You can also use regular Excel formulas outside the pivot table to calculate differences. This approach is useful when you need more flexibility in your calculations or when you want to combine data from multiple pivot tables.
To use Excel formulas, simply reference the cells containing the values you want to compare and then apply the appropriate formula (e.g., =A2-B2 for absolute difference, =(A2-B2)/B2 for percentage difference).
5. Visualizing Data Differences
Visualizing data differences can make it easier to identify trends, outliers, and significant variations. Excel offers several chart types that are well-suited for visualizing pivot table data, including:
5.1. Column Charts
Column charts are effective for comparing values across different categories or time periods. You can use clustered column charts to compare multiple series of data side-by-side or stacked column charts to show the contribution of each series to the total.
5.2. Line Charts
Line charts are ideal for visualizing trends over time. You can use multiple line charts to compare the performance of different categories or scenarios over a period.
5.3. Bar Charts
Bar charts are similar to column charts but display the data horizontally. They are useful for comparing values across categories when the category names are long.
5.4. Scatter Plots
Scatter plots are used to show the relationship between two variables. You can use scatter plots to identify correlations or clusters in your data.
5.5. Pivot Charts
Pivot charts are directly linked to pivot tables and automatically update when the pivot table data changes. This makes them a convenient way to visualize your pivot table data and explore different comparisons. To create a pivot chart, simply select your pivot table and then go to the “Insert” tab in the Excel ribbon and choose the desired chart type. Pivot charts are great for dynamic data exploration and comparison.
6. Practical Examples of Pivot Table Data Comparison
To illustrate the power of pivot table data comparison, let’s look at some practical examples:
6.1. Comparing Sales Performance by Region
Imagine you’re a sales manager responsible for multiple regions. You can use a pivot table to compare sales performance across these regions and identify which regions are performing well and which need improvement.
- Data Source: Your sales data, including region, product, and sales amount.
- Pivot Table Setup:
- Rows: Region
- Values: Sum of Sales Amount
- Comparison: Use the “Show Values As” feature to calculate the “% of Grand Total” to see each region’s contribution to overall sales.
- Visualization: Create a column chart to visually compare sales performance across regions.
6.2. Analyzing Year-over-Year Revenue Growth
Year-over-year revenue growth is a critical metric for businesses. You can use a pivot table to analyze your company’s revenue growth over time and identify trends.
- Data Source: Your revenue data, including date and revenue amount.
- Pivot Table Setup:
- Rows: Year
- Columns: Month
- Values: Sum of Revenue Amount
- Comparison: Use the “Show Values As” feature to calculate the “% Difference From” the previous year.
- Visualization: Create a line chart to visualize the year-over-year revenue growth trend.
6.3. Comparing Budget vs. Actual Expenses
Tracking budget vs. actual expenses is essential for financial management. You can use a pivot table to compare your budgeted expenses to your actual expenses and identify any variances.
- Data Source: Your budget and expense data, including category, budgeted amount, and actual amount.
- Pivot Table Setup:
- Rows: Category
- Values: Sum of Budgeted Amount, Sum of Actual Amount
- Comparison: Create a calculated field to calculate the variance (Actual Amount – Budgeted Amount).
- Visualization: Create a bar chart to compare budgeted and actual expenses for each category.
7. Advanced Pivot Table Techniques for Deeper Insights
Once you’ve mastered the basics of pivot table comparisons, you can explore some advanced techniques to gain even deeper insights from your data.
7.1. Using Slicers for Interactive Filtering
Slicers provide a visual and interactive way to filter your pivot table data. They allow you to quickly select different categories or time periods and see how your comparisons change.
To insert a slicer, select your pivot table and then go to the “Analyze” tab in the PivotTable Tools ribbon and click on “Insert Slicer.” In the Insert Slicers dialog box, select the fields you want to use as slicers.
7.2. Grouping Data for Higher-Level Comparisons
Grouping allows you to combine multiple categories or time periods into higher-level groups. This can be useful for simplifying your analysis and identifying broader trends.
For example, you might group your sales data by quarter instead of month or group your product categories into broader product lines. To group data, right-click on a value in your pivot table and select “Group.” In the Grouping dialog box, specify the grouping criteria.
7.3. Using Timelines for Time-Based Analysis
Timelines provide a visual way to filter your pivot table data by date. They allow you to quickly select different time periods and see how your comparisons change over time.
To insert a timeline, select your pivot table and then go to the “Analyze” tab in the PivotTable Tools ribbon and click on “Insert Timeline.” In the Insert Timelines dialog box, select the date field you want to use as a timeline.
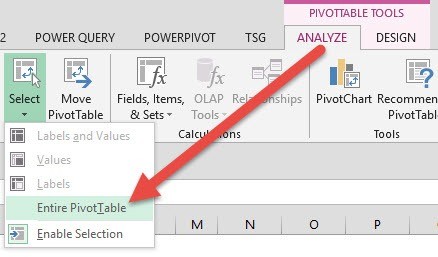 Analyze Tab
8. Common Mistakes to Avoid
When comparing data in pivot tables, it’s important to be aware of some common mistakes that can lead to inaccurate or misleading results:
8.1. Using Unclean Data
As mentioned earlier, using clean and well-structured data is essential for accurate pivot table analysis. Make sure your data is free of errors, inconsistencies, and missing values.
8.2. Misinterpreting the Results
Pivot tables can be powerful tools, but they are only as good as the data you put into them. Be careful not to over-interpret the results or draw conclusions that are not supported by the data.
8.3. Not Considering External Factors
When comparing data, it’s important to consider external factors that might have influenced the results. For example, changes in the market, economic conditions, or competitor activities can all impact your sales performance.
9. How COMPARE.EDU.VN Can Help You Make Better Comparisons
At COMPARE.EDU.VN, we understand the importance of making informed decisions based on data-driven insights. That’s why we’re committed to providing you with the tools and resources you need to effectively compare data and make the best choices for your business or personal life.
We offer a wide range of comparison tools and resources, including:
- Detailed product comparisons: We provide in-depth comparisons of various products and services, highlighting their key features, pros, and cons.
- Side-by-side feature comparisons: Our side-by-side feature comparisons make it easy to see the differences between competing products or services.
- User reviews and ratings: We provide user reviews and ratings to give you a balanced perspective on different products and services.
- Expert opinions and analysis: Our team of experts provides in-depth analysis and insights to help you make informed decisions.
10. Conclusion: Mastering Pivot Table Comparisons for Data-Driven Decisions
Comparing data in pivot tables is a valuable skill for anyone who wants to make informed decisions based on data-driven insights. By mastering the techniques and strategies outlined in this guide, you can unlock the full potential of pivot tables and gain a deeper understanding of your data.
Remember to:
- Define your comparison goals clearly.
- Set up your pivot tables properly.
- Use the “Show Values As” feature, calculated fields, or Excel formulas to calculate differences.
- Visualize data differences with appropriate chart types.
- Explore advanced pivot table techniques to gain deeper insights.
- Avoid common mistakes that can lead to inaccurate results.
By following these guidelines, you can confidently use pivot tables to compare data, identify trends, and make data-driven decisions that lead to success.
Ready to take your data comparison skills to the next level? Visit COMPARE.EDU.VN today to explore our comparison tools and resources and start making better decisions!
Need help making informed decisions? Visit COMPARE.EDU.VN today!
Address: 333 Comparison Plaza, Choice City, CA 90210, United States
Whatsapp: +1 (626) 555-9090
Website: COMPARE.EDU.VN
Frequently Asked Questions (FAQ)
Here are some frequently asked questions about comparing data in pivot tables:
1. How do I compare data from two different data sources in a pivot table?
You can compare data from two different data sources by creating a relationship between them using the Data Model feature in Excel. This allows you to combine data from multiple tables and create pivot tables that span across different data sources.
2. How do I handle missing values when comparing data in a pivot table?
Missing values can distort your comparisons and lead to inaccurate results. You can handle missing values by using the IFERROR function in your calculated fields or by using the “Replace Missing Values” option in the pivot table settings.
3. How do I compare data across different currencies in a pivot table?
To compare data across different currencies, you need to convert all values to a common currency. You can do this by creating a calculated field that multiplies each value by the appropriate exchange rate.
4. How do I compare data with different units of measurement in a pivot table?
Similar to currencies, you need to convert all values to a common unit of measurement before comparing them. You can do this by creating a calculated field that multiplies each value by the appropriate conversion factor.
5. Can I compare data in pivot tables using Power BI?
Yes, Power BI offers even more advanced features for comparing data than Excel pivot tables. Power BI allows you to create interactive dashboards, drill down into your data, and share your insights with others.
6. How do I show both the absolute difference and the percentage difference in a pivot table?
You can achieve this by adding the same value field twice to the “Values” area of your pivot table. Then, configure one to show the absolute difference and the other to show the percentage difference using the “Show Values As” feature.
7. How can I highlight the largest differences in a pivot table?
Use conditional formatting to highlight the largest differences. Select the cells in your pivot table, then go to the “Home” tab, click on “Conditional Formatting,” and choose a rule that highlights the top or bottom values based on your criteria.
8. What are some alternatives to pivot tables for comparing data?
Alternatives include using regular Excel formulas, creating custom charts, or using more advanced data analysis tools like Power BI or Tableau.
9. How do I ensure my pivot table comparisons are accurate and reliable?
- Double-check your data source for errors and inconsistencies.
- Verify your pivot table formulas and calculations.
- Test your pivot table with sample data to ensure it produces the expected results.
- Consult with a data analysis expert to review your pivot table setup and analysis.
10. Where can I find more resources and tutorials on comparing data in pivot tables?
compare.edu.vn offers a variety of resources and tutorials on data analysis and pivot tables. You can also find helpful information on the Microsoft Excel website and other data analysis blogs and forums.