Comparing 2 sheets in Excel for differences is easy with the right methods. At COMPARE.EDU.VN, we provide comprehensive guides to help you identify discrepancies efficiently. Discover various techniques to compare Excel sheets, from simple visual comparisons to advanced conditional formatting, and choose the best method for your needs.
This article explores formulas, conditional formatting, and specialized tools for effective worksheet comparison. Learn how to highlight discrepancies and merge data seamlessly with advanced comparison techniques and Excel add-ins.
1. Visually Comparing Two Excel Files Side by Side
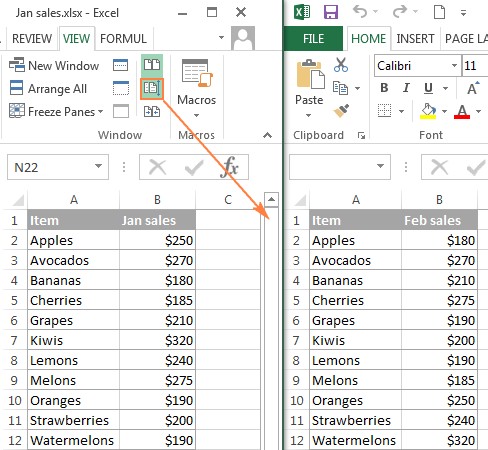
Do you want to see two Excel files at the same time? Viewing Excel files side by side offers a quick and easy way to compare data visually, especially useful for smaller workbooks. Excel’s View Side by Side mode allows you to arrange two Excel windows simultaneously, enabling you to compare two workbooks or two sheets within the same workbook.
1.1. Comparing Two Excel Workbooks Visually
If you have two separate Excel files that you want to compare, use the following steps:
- Open the Workbooks: Open the two Excel files you wish to compare.
- Enable View Side by Side: Go to the View tab in the Excel ribbon. In the Window group, click the View Side by Side button.
This setup will display the two Excel windows horizontally by default.
For a vertical arrangement:
- Click the Arrange All button.
- Select Vertical.
This will place the two Excel windows side by side, allowing for easy visual comparison.
To scroll through both worksheets simultaneously:
- Ensure the Synchronous Scrolling option is enabled. This feature is located on the View tab in the Window group, directly under the View Side by Side button.
1.2. Arranging Multiple Excel Windows
Need to compare more than two Excel files at once? Follow these steps:
- Open All Workbooks: Open all the Excel files you want to compare.
- Enable View Side by Side: Click the View Side by Side button.
- Select Files: In the Compare Side by Side dialog box, choose the files you want to view alongside the active workbook.
To see all open Excel files at once:
- Click the Arrange All button on the View tab.
- Choose your preferred arrangement: Tiled, Horizontal, Vertical, or Cascade.
1.3. Comparing Two Sheets in the Same Workbook
What if the sheets you need to compare are in the same workbook? Here’s how to view them side by side:
- Open the Workbook: Open the Excel file containing the sheets you want to compare.
- Open a New Window: Go to the View tab, Window group, and click the New Window button. This opens another instance of the same Excel file.
- Enable View Side by Side: Click the View Side by Side button on the ribbon.
- Select Sheets: Choose the first sheet in one window and the second sheet in the other window.
This method allows you to visually compare two sheets within the same workbook, side by side.
2. Using Formulas to Compare Data in Excel
Want to find the exact differences in values between two Excel sheets? Using formulas to compare data is a simple yet effective method for identifying cells with different values. This creates a difference report in a new worksheet, highlighting discrepancies.
To compare two Excel worksheets for differences:
-
Open a New Sheet: Open a new, empty sheet in your Excel workbook.
-
Enter the Formula: In cell A1, enter the following formula:
=IF(Sheet1!A1<>Sheet2!A1, "Sheet1:"&Sheet1!A1&" vs Sheet2:"&Sheet2!A1, "") -
Copy the Formula: Drag the fill handle (the small square at the bottom-right of the cell) down and to the right to apply the formula to all relevant cells.
The formula compares corresponding cells in Sheet1 and Sheet2. If the values differ, it displays the values from both sheets in the format “Sheet1:value1 vs Sheet2:value2”. If the values are the same, the cell remains blank.
3. Highlighting Differences with Conditional Formatting
Want a visual way to spot differences? Conditional formatting helps you highlight cells with different values in two sheets using colors.
To highlight differences between two sheets with conditional formatting:
-
Select the Range: In the worksheet where you want to highlight differences, select all the cells you want to compare. Start by clicking the upper-left cell of your data range (usually A1) and press
Ctrl + Shift + Endto extend the selection to the last used cell. -
Open Conditional Formatting: On the Home tab, in the Styles group, click Conditional Formatting and select New Rule.
-
Create a New Rule: In the New Formatting Rule dialog box, select Use a formula to determine which cells to format.
-
Enter the Formula: Enter the following formula in the formula box:
=A1<>Sheet2!A1Replace
Sheet2with the name of the other sheet you are comparing. -
Set Formatting: Click the Format button, go to the Fill tab, and choose a color to highlight the differences. Click OK to close the Format Cells dialog box, then click OK again to create the rule.
Now, all cells with different values between the two sheets will be highlighted with the color you chose. This provides a clear, visual representation of the discrepancies.
4. Comparing and Merging Shared Workbooks
Do you have multiple users editing the same workbook? The Compare and Merge feature is useful for merging different versions of a shared Excel file. This is especially helpful when several users collaborate on the same workbook, allowing you to view changes and comments from all users at once.
To use this feature, make sure to:
- Share your Excel workbook before making it available to other users.
- Each person who edits the shared workbook must save a copy with a unique file name.
4.1. Enabling the Compare and Merge Workbooks Feature
The Compare and Merge Workbooks feature is available in all versions of Excel 2010 through Excel 365, but it is not displayed by default. To add it to the Quick Access Toolbar:
- Open Excel Options: Click the File tab, then click Options.
- Customize Quick Access Toolbar: In the Excel Options dialog box, select Quick Access Toolbar.
- Choose Commands: Under Choose commands from, select All Commands.
- Add the Command: Scroll down to Compare and Merge Workbooks, select it, and click the Add button to move it to the right-hand section.
- Confirm: Click OK to save the changes.
4.2. Comparing and Merging Workbooks
To merge copies of a shared workbook after all users have finished editing:
- Open the Primary Workbook: Open the original, shared version of the Excel workbook.
- Click Compare and Merge Workbooks: Click the Compare and Merge Workbooks command on the Quick Access Toolbar.
- Select Copies to Merge: In the dialog box, select the copies of the shared workbook that you want to merge. You can select multiple copies by holding down the
Shiftkey while clicking the file names. - Confirm Merge: Click OK to start the merge process.
Excel will merge the changes from each copy into the primary workbook.
4.3. Reviewing the Changes
To see all the edits made by different users at a glance:
- Open Track Changes: Go to the Review tab, in the Changes group, and click Track Changes.
- Highlight Changes: Select Highlight Changes.
- Configure Highlighting: In the Highlight Changes dialog, select All in the When box, Everyone in the Who box, clear the Where box, and select the Highlight changes on screen box.
- Confirm: Click OK to apply the highlighting.
Excel will highlight the column letters and row numbers with differences in a dark red color. At the cell level, edits from different users are marked with different colors. To see who made a specific change, simply hover over the cell.
5. Third-Party Tools for Advanced Excel Comparison
Want to go beyond basic comparisons? Third-party tools provide advanced features for comparing, updating, and merging Excel sheets and workbooks, offering a more comprehensive solution.
5.1. Synkronizer Excel Compare: A Comprehensive Tool
The Synkronizer Excel Compare add-in offers a 3-in-1 solution to compare, merge, and update Excel files efficiently. It saves you the hassle of manual searching for differences.
Key features include:
- Identifying differences between two Excel sheets.
- Combining multiple Excel files into a single version without duplicates.
- Highlighting differences in both sheets.
- Showing only the relevant differences.
- Merging and updating sheets.
- Providing detailed and easy-to-read difference reports.
Comparing Two Excel Files with Synkronizer
To compare two Excel files using Synkronizer Excel Compare:
-
Run Synkronizer: Go to the Add-ins tab in Excel and click the Synkronizer icon.
-
Select Workbooks: In the Synkronizer pane, select the two workbooks you want to compare.
-
Select Sheets: Choose the sheets to compare. If the workbooks have sheets with the same names, they will be automatically matched and selected.
-
Select Comparison Options: Choose one of the following options:
- Compare as normal worksheets
- Compare with link options
- Compare as database
- Compare selected ranges
-
Choose Content Types: On the Select tab, in the Compare group, select the content types to compare, such as comments, names, cell values, formulas, and formats.
-
Start the Comparison: Click the Start button to begin the comparison.
Visualizing and Analyzing Differences with Synkronizer
Synkronizer generates two summary reports on the Results tab:
- A summary report showing all difference types at a glance.
- A detailed difference report, accessible by clicking a specific difference type on the summary report.
Clicking on a difference in the detailed report selects the corresponding cells on both sheets, allowing you to view and analyze the discrepancies.
Comparing All Sheets in Two Workbooks
If the Excel files you are comparing contain multiple sheets, Synkronizer will present all matching worksheet pairs in the summary report.
Highlighting Differences Between Sheets
Synkronizer highlights all found differences by default:
- Yellow: Differences in cell values.
- Lilac: Differences in cell formats.
- Green: Inserted rows.
Updating and Merging Sheets with Synkronizer
The merge function allows you to transfer individual cells or move different columns/rows from the source to the target sheet.
To update one or more differences, select them on the Synkronizer pane and click one of the four update buttons to transfer the changes in the desired direction.
5.2. Ablebits Compare Sheets for Excel
The Ultimate Suite by Ablebits includes Compare Sheets, a tool designed to compare worksheets in Excel intuitively and efficiently.
Key features include:
- A step-by-step wizard to guide you through the comparison process.
- A choice of comparison algorithms suited for different data sets.
- A Review Differences mode for viewing and managing differences one-by-one.
Comparing Two Sheets with Ablebits Compare Sheets
To compare two sheets using Ablebits Compare Sheets:
-
Open Compare Sheets: Click the Compare Sheets button on the Ablebits Data tab.
-
Select Worksheets: Choose the two worksheets you want to compare. You can select entire sheets, current tables, or specific ranges.
-
Select Comparison Algorithm: Choose one of the following algorithms:
- No key columns (best for sheet-based documents)
- By key columns (appropriate for column-organized sheets with unique identifiers)
- Cell-by-cell (best for spreadsheets with the same layout and size)
-
Specify Differences: Select which differences to highlight and which to ignore, and how to mark the differences.
-
Compare: Click the Compare button to start the process.
Reviewing and Merging Differences with Ablebits
The worksheets are opened side-by-side in Review Differences mode, with differences highlighted:
- Blue rows: Rows that exist only in Sheet 1.
- Red rows: Rows that exist only in Sheet 2.
- Green cells: Difference cells in partially matching rows.
Use the toolbar to navigate through the differences and decide whether to merge or ignore them.
5.3. xlCompare: Comprehensive Comparison and Merging
xlCompare allows you to compare Excel files, worksheets, names, and VBA projects. It identifies added, deleted, and changed data and provides options to quickly merge differences. Additional features include:
- Finding and removing duplicate records.
- Updating existing records with values from another sheet.
- Adding unique rows and columns.
- Merging updated records.
- Sorting data by key columns.
- Filtering comparison results.
- Highlighting comparison results with colors.
5.4. Change pro for Excel: Desktop and Mobile Comparison
Change pro for Excel enables you to compare two sheets in desktop Excel and on mobile devices. Key features:
- Finding differences in formulas and values.
- Identifying layout changes.
- Recognizing embedded objects.
- Creating difference reports.
- Filtering, sorting, and searching the difference report.
- Comparing files directly from Outlook or document management systems.
- Supporting all languages.
6. Online Services for Quick Excel Comparison
Need a quick, software-free solution? Online services allow you to compare two Excel sheets for differences without installing any software. While security is a consideration, these services can provide immediate results for non-sensitive data.
Services like XLComparator and CloudyExcel allow you to upload two Excel workbooks and highlight the differences in the active sheets.
7. FAQs About Comparing Sheets in Excel
Here are some frequently asked questions about comparing sheets in Excel:
7.1. How can I compare two sheets in Excel to find the differences?
You can use Excel formulas, conditional formatting, or third-party tools to compare two sheets. Formulas like =IF(Sheet1!A1<>Sheet2!A1, "Different", "") can identify cell differences. Conditional formatting can highlight differing cells with color. Tools like Synkronizer Excel Compare and Ablebits Compare Sheets offer advanced comparison features.
7.2. What is the easiest way to compare two Excel files for differences?
The easiest way is using the “View Side by Side” feature under the View tab. This lets you visually compare two workbooks or sheets in the same workbook, making it easy to spot differences with your eyes.
7.3. Can I highlight the differences between two sheets automatically?
Yes, you can use conditional formatting to automatically highlight differences. Create a new rule using a formula to compare cell values between the two sheets, and then set a formatting style (like a fill color) to highlight the differing cells.
7.4. Is there a built-in feature in Excel to merge changes from multiple users?
Yes, the “Compare and Merge Workbooks” feature allows you to merge changes from different copies of a shared workbook. This feature is especially useful when multiple users collaborate on the same Excel file.
7.5. Are there any limitations to using Excel formulas for comparing sheets?
Yes, Excel formulas are limited in that they primarily find differences in values and cannot compare formulas or cell formatting. They also struggle with identifying added or deleted rows and columns.
7.6. What types of third-party tools are available for comparing Excel files?
Third-party tools like Synkronizer Excel Compare, Ablebits Compare Sheets, xlCompare, and Change pro for Excel offer advanced features for comparing, updating, and merging Excel sheets and workbooks. These tools can identify differences in values, formulas, and formatting, and provide detailed comparison reports.
7.7. Can I compare Excel files online without installing any software?
Yes, online services like XLComparator and CloudyExcel allow you to upload two Excel workbooks and compare them directly in your browser. These services are suitable for quick comparisons of non-sensitive data.
7.8. How do I enable the “Compare and Merge Workbooks” feature in Excel?
To enable the feature, go to File > Options > Quick Access Toolbar, choose “All Commands,” and add “Compare and Merge Workbooks” to the Quick Access Toolbar.
7.9. What should I do if the “Compare and Merge Workbooks” command is greyed out?
If the command is greyed out, ensure that you are trying to merge copies of the same shared workbook. The feature only works with copies of a shared workbook, not with different Excel files.
7.10. How can I review changes made by different users in a merged workbook?
To review changes, go to the Review tab, click “Track Changes,” and select “Highlight Changes.” This will highlight the column letters and row numbers with differences, and edits from different users will be marked with different colors.
Navigating the complexities of Excel comparison can be daunting, but with the right tools and techniques, you can efficiently identify and manage differences between sheets. Whether you opt for Excel’s built-in features or explore third-party solutions, the key is to choose the method that best aligns with your specific needs.
At COMPARE.EDU.VN, we understand the challenges in comparing data, which is why we offer comprehensive comparisons to help you make informed decisions.
Ready to simplify your Excel comparisons and make informed decisions? Visit compare.edu.vn at 333 Comparison Plaza, Choice City, CA 90210, United States, or contact us via WhatsApp at +1 (626) 555-9090. Let us help you find the best solutions tailored to your needs. Explore our detailed comparisons and reviews today!