Are you struggling with comparing data across two Excel sheets? At COMPARE.EDU.VN, we provide a comprehensive guide on How To Compare 2 Columns In 2 Different Excel Sheets, offering various methods to identify discrepancies and streamline your data analysis. Discover efficient comparison techniques, including side-by-side viewing, formula-based analysis, and conditional formatting, all designed to help you make informed decisions. Leverage tools for Excel difference analysis, spreadsheet auditing, and data validation.
1. Why Compare Columns in Different Excel Sheets?
Comparing columns in different Excel sheets is essential for several reasons.
- Data Validation: Verifying data consistency across different sources.
- Error Detection: Identifying discrepancies and errors in data entry or calculations.
- Change Tracking: Monitoring changes made over time or by different users.
- Decision Making: Making informed decisions based on accurate and consistent data.
- Reporting: Ensuring the accuracy of reports by comparing data from different sources.
2. What Are User’s Search Intent?
- Methods: Finding various techniques to compare columns.
- Formulas: Identifying specific Excel formulas for comparison.
- Highlighting: Understanding how to highlight differences between columns.
- Automation: Learning about tools that automate the comparison process.
- Troubleshooting: Resolving common issues encountered during comparison.
3. Comparing Two Excel Files Side by Side
A simple yet effective way to compare two Excel files is by viewing them side by side.
3.1. Opening Workbooks for Comparison
- Open the Excel Files: Launch both Excel workbooks you want to compare.
- Navigate to the View Tab: Click on the “View” tab in the Excel ribbon.
- Select View Side by Side: In the “Window” group, click the “View Side by Side” button.
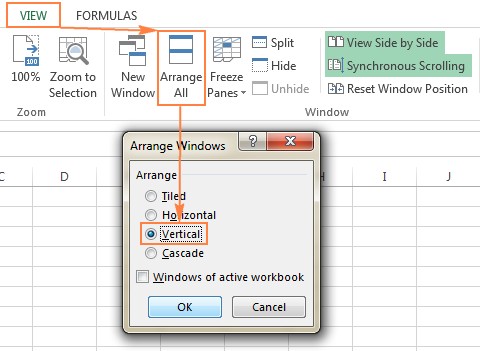
3.2. Arranging Excel Windows
- Horizontal Arrangement: By default, Excel displays the windows horizontally.
- Vertical Arrangement: To arrange them vertically, click “Arrange All” and select “Vertical.”
3.3. Synchronous Scrolling
- Enable Synchronous Scrolling: Ensure that “Synchronous Scrolling” is enabled to scroll through both worksheets simultaneously.
- Locate the Option: This option is found on the “View” tab in the “Window” group, right under the “View Side by Side” button.
3.4. Comparing Sheets in the Same Workbook
- Open a New Window: Open the Excel file and go to “View” > “Window” > “New Window.”
- Enable View Side by Side: Click the “View Side by Side” button on the ribbon.
- Select Sheets: Choose the sheets you want to compare in each window.
4. Using Excel Formulas to Compare Columns
Excel formulas can be used to create a difference report, highlighting cells with different values.
4.1. Creating a Difference Report
-
Open a New Sheet: Create a new, empty sheet in your Excel workbook.
-
Enter the Formula: In cell A1, enter the following formula:
=IF(Sheet1!A1<>Sheet2!A1, "Sheet1:"&Sheet1!A1&" vs Sheet2:"&Sheet2!A1, "") -
Copy the Formula: Drag the fill handle (the small square at the bottom-right of the cell) down and to the right to apply the formula to all relevant cells.
4.2. Understanding the Formula
- IF Function: The
IFfunction checks if the value inSheet1!A1is different from the value inSheet2!A1. - Sheet References:
Sheet1!A1andSheet2!A1refer to cell A1 in Sheet1 and Sheet2, respectively. - Difference Display: If the values are different, the formula displays the values from both sheets; otherwise, it displays an empty string.
5. Conditional Formatting to Highlight Differences
Conditional formatting can be used to highlight cells with different values using color-coding.
5.1. Applying Conditional Formatting
-
Select the Range: In the worksheet where you want to highlight differences, select all used cells. Click the upper-left cell (usually A1) and press
Ctrl + Shift + Endto extend the selection to the last used cell. -
Open Conditional Formatting: On the “Home” tab, in the “Styles” group, click “Conditional Formatting” > “New Rule.”
-
Create a New Rule: Select “Use a formula to determine which cells to format.”
-
Enter the Formula: Enter the following formula:
=A1<>Sheet2!A1 -
Set the Format: Click the “Format” button, choose a color, and click “OK.”
5.2. Understanding the Rule
- Formula Logic: The formula
A1<>Sheet2!A1checks if the value in the current cell of the active sheet is different from the corresponding cell in Sheet2. - Highlighting: If the values are different, the conditional format is applied, highlighting the cell with the chosen color.
6. Advanced Comparison Techniques
For more complex comparisons, consider advanced techniques and third-party tools.
6.1. Using the COMPARE Function
The COMPARE function can be utilized to find differences by comparing text strings in two columns. This is particularly useful when looking for subtle variations in text data.
- Formula:
=IF(EXACT(A1,Sheet2!A1), "Match", "No Match")This formula checks if the text in cell A1 of the current sheet exactly matches the text in cell A1 of Sheet2. If they match, it returns “Match”; otherwise, it returns “No Match”.
6.2. Identifying Added or Deleted Rows
To identify rows that exist in one sheet but not in another, you can use a combination of COUNTIF and IF functions.
- Formula:
=IF(COUNTIF(Sheet2!A:A,A1)>0, "Exists", "Missing")This formula checks if the value in cell A1 of the current sheet exists in column A of Sheet2. If it exists, it returns “Exists”; otherwise, it returns “Missing”.
This method requires careful consideration of the key identifier column (e.g., an ID number or unique name).
6.3. Auditing Features
Excel provides auditing features that can help trace formulas and identify errors. This can be useful when comparing complex calculations across different sheets.
- Accessing Formula Auditing:
Go to the “Formulas” tab and find the “Formula Auditing” group. From here, you can use tools like “Trace Precedents” and “Trace Dependents” to understand the relationships between cells and formulas. - Example Use Case:
If you have a formula in one sheet that references cells in another, these tools can help you verify that the references are correct and that the calculations are consistent.
7. Third-Party Tools for Excel Comparison
For more robust and comprehensive comparison, consider using third-party tools.
7.1. Synkronizer Excel Compare
The Synkronizer Excel Compare add-in compares, merges, and updates Excel files.
- Key Features:
- Identifying differences between Excel sheets.
- Combining multiple Excel files without duplicates.
- Highlighting differences.
- Merging and updating sheets.
- Detailed difference reports.
7.2. Ablebits Compare Sheets for Excel
The Compare Sheets tool in Ablebits Ultimate Suite compares worksheets.
- Key Features:
- Step-by-step wizard.
- Comparison algorithm selection.
- Review Differences mode.
7.3. xlCompare
The xlCompare utility compares files, worksheets, names, and VBA projects.
- Key Features:
- Identifying added, deleted, and changed data.
- Merging differences.
- Finding and removing duplicate records.
7.4. Change pro for Excel
The Change pro for Excel compares sheets on desktop and mobile devices.
- Key Features:
- Finding differences in formulas and values.
- Identifying layout changes.
- Recognizing embedded objects.
- Creating difference reports.
8. Online Services for Excel Comparison
Online services can quickly compare Excel sheets without installing software.
8.1. XLComparator
XLComparator is an online tool for comparing Excel files.
8.2. CloudyExcel
CloudyExcel highlights differences in two active sheets.
9. Step-by-Step Comparison Process
To effectively compare two columns in different Excel sheets, follow these steps:
9.1. Preparing the Data
- Open the Workbooks: Open both Excel workbooks containing the columns you want to compare.
- Identify Columns: Determine which columns in each sheet need to be compared.
- Ensure Data Consistency: Check for inconsistencies in data types, formatting, and spelling.
9.2. Choosing a Comparison Method
- Visual Comparison: If the data sets are small, use the “View Side by Side” method.
- Formula-Based Comparison: For a detailed difference report, use the
IFformula. - Conditional Formatting: To highlight differences visually, use conditional formatting rules.
- Third-Party Tools: For advanced features and large data sets, consider third-party tools like Synkronizer or Ablebits.
9.3. Implementing the Comparison
- Side-by-Side Viewing:
- Open both workbooks.
- Click “View” > “View Side by Side.”
- Enable “Synchronous Scrolling.”
- Manually compare the columns.
- Using Formulas:
- Open a new sheet.
- Enter the
IFformula in cell A1. - Copy the formula to all relevant cells.
- Review the difference report.
- Conditional Formatting:
- Select the range of cells.
- Click “Home” > “Conditional Formatting” > “New Rule.”
- Create a new rule with the appropriate formula.
- Set the format (color).
- Apply the rule.
- Third-Party Tools:
- Install and open the tool.
- Select the workbooks and sheets to compare.
- Configure comparison options.
- Run the comparison.
- Review the results.
9.4. Reviewing and Merging Differences
- Identify Discrepancies: Locate cells, rows, or columns highlighted as different.
- Verify Accuracy: Ensure that the identified differences are genuine errors and not intentional variations.
- Merge Changes: If necessary, merge the correct values from one sheet to another.
- Document Changes: Keep a record of all changes made during the comparison process.
10. Troubleshooting Common Issues
When comparing columns in Excel, you may encounter some common issues.
10.1. Data Type Mismatches
- Issue: Excel may not recognize differences due to data type mismatches (e.g., number vs. text).
- Solution: Ensure that the data types are consistent across both columns. Use the
VALUEorTEXTfunctions to convert data types if necessary.
10.2. Formatting Differences
- Issue: Differences in formatting (e.g., date formats, number of decimal places) may cause incorrect comparisons.
- Solution: Standardize the formatting of both columns before comparison. Use the “Format Cells” dialog box to apply consistent formatting.
10.3. Hidden Rows or Columns
- Issue: Hidden rows or columns may be overlooked during visual comparison.
- Solution: Unhide all rows and columns before starting the comparison. Right-click on the row or column headers and select “Unhide.”
10.4. Formula Errors
- Issue: Errors in formulas may lead to incorrect comparison results.
- Solution: Double-check all formulas for accuracy. Use Excel’s auditing tools to trace formula dependencies and identify errors.
10.5. Large Data Sets
- Issue: Comparing large data sets can be time-consuming and resource-intensive.
- Solution: Use third-party tools designed for handling large data sets. Consider breaking down the comparison into smaller, more manageable chunks.
11. Optimizing Your Comparison Process
To enhance the efficiency and accuracy of your Excel column comparisons, consider these optimization tips:
11.1. Use Named Ranges
- Tip: Assign names to the columns or ranges you want to compare. This makes formulas easier to read and maintain.
- How to: Select the range, click in the name box (left of the formula bar), and type a name.
11.2. Leverage Excel Tables
- Tip: Convert your data ranges into Excel tables. Tables automatically expand when you add new data, and you can refer to columns by name in formulas.
- How to: Select your data, click “Insert” > “Table,” and ensure “My table has headers” is checked.
11.3. Automate with VBA
- Tip: If you frequently perform the same comparison tasks, write a VBA macro to automate the process.
- How to: Press
Alt + F11to open the VBA editor, insert a module, and write your code.
11.4. Use Array Formulas
- Tip: For complex comparisons, array formulas can perform multiple calculations at once.
- How to: Enter the formula, then press
Ctrl + Shift + Enterto make it an array formula.
11.5. Regular Data Validation
- Tip: Implement data validation rules to prevent errors from being entered in the first place.
- How to: Select the range, click “Data” > “Data Validation,” and set your rules.
12. Common Mistakes to Avoid
To ensure accurate and reliable comparisons, be aware of these common pitfalls:
12.1. Ignoring Case Sensitivity
By default, Excel formulas are not case-sensitive. This can lead to inaccurate comparisons when dealing with text data where case matters.
- Solution:
Use the EXACT function to perform a case-sensitive comparison:=IF(EXACT(A1,Sheet2!A1), "Match", "No Match")This formula will only return “Match” if the text in A1 of the current sheet exactly matches the text in A1 of Sheet2, including the case.
12.2. Overlooking Blank Cells
Blank cells can cause issues when comparing data, especially if they are treated differently in each sheet.
- Solution:
Use the ISBLANK function to handle blank cells explicitly in your formulas:=IF(AND(ISBLANK(A1), ISBLANK(Sheet2!A1)), "Both Blank", IF(A1=Sheet2!A1, "Match", "No Match"))This formula checks if both cells are blank and returns “Both Blank”. If not, it compares the cells as usual.
12.3. Neglecting Trailing Spaces
Trailing spaces in text data can cause comparisons to fail, even if the text appears identical.
- Solution:
Use the TRIM function to remove leading and trailing spaces from the text before comparing:=IF(TRIM(A1)=TRIM(Sheet2!A1), "Match", "No Match")This ensures that any extra spaces are removed before the comparison is made.
12.4. Using Incorrect Cell References
Incorrect cell references are a common source of errors in Excel formulas. Always double-check your references to ensure they are pointing to the correct cells.
- Solution:
Use named ranges to make your formulas more readable and less prone to errors. For example, instead of usingSheet2!A1, define a named range for that cell and use the name in your formula.
12.5. Not Validating Results
Always validate the results of your comparison to ensure they are accurate. This is especially important when dealing with large data sets.
- Solution:
Manually review a sample of the comparison results to ensure they are correct. Use conditional formatting to highlight differences and make them easier to spot.
13. Conclusion
Comparing columns in different Excel sheets is a fundamental task for data validation, error detection, and informed decision-making. By using the methods outlined in this guide, you can efficiently compare data, highlight differences, and ensure the accuracy of your reports. Whether you choose to use built-in Excel features or third-party tools, the key is to understand the strengths and limitations of each method and select the one that best suits your specific needs.
Are you looking for more detailed comparisons and assistance in making informed decisions? Visit compare.edu.vn today! Our comprehensive comparison tools and expert insights will help you navigate complex choices and make the best decisions for your needs. Contact us at 333 Comparison Plaza, Choice City, CA 90210, United States, or via WhatsApp at +1 (626) 555-9090.
14. FAQs
1. How can I compare two columns in different Excel sheets without using formulas?
You can use the “View Side by Side” feature to visually compare the columns. Open both workbooks, go to the “View” tab, and click “View Side by Side.”
2. What is the best formula to compare two columns in Excel?
The best formula depends on your specific needs. A common formula is =IF(Sheet1!A1<>Sheet2!A1, "Different", "Same"), which checks if the values in two cells are different.
3. How can I highlight differences between two columns in Excel automatically?
Use conditional formatting. Select the column, go to “Home” > “Conditional Formatting” > “New Rule,” and create a rule with a formula like =A1<>Sheet2!A1.
4. Can I compare multiple columns at once?
Yes, you can use formulas and conditional formatting across multiple columns by adjusting the cell references in the formulas.
5. How do I compare two columns if the data is not in the same order?
Use the VLOOKUP function to find matching values and compare them, or use third-party tools that can handle unordered data.
6. What are some common issues when comparing columns in Excel?
Common issues include data type mismatches, formatting differences, and hidden rows or columns. Ensure data consistency before comparing.
7. How can third-party tools help in comparing Excel sheets?
Third-party tools offer advanced features such as automatic comparison, detailed difference reports, and the ability to merge changes easily.
8. Is it possible to compare Excel files online without installing software?
Yes, there are online services like XLComparator and CloudyExcel that allow you to upload and compare Excel files directly in your browser.
9. How do I ensure that my comparison results are accurate?
Double-check your formulas, standardize data formats, and manually verify a sample of the comparison results.
10. What should I do if I encounter errors during the comparison process?
Troubleshoot common issues such as data type mismatches, formatting differences, and formula errors. Use Excel’s auditing tools to identify and fix problems.