Compare at price in Shopify is crucial for highlighting discounts and influencing purchasing decisions, and COMPARE.EDU.VN offers insights into mastering this feature. Understanding how to effectively adjust this setting can significantly impact your sales strategy and customer perception. Find comprehensive guides and comparisons to optimize your Shopify store’s pricing strategy with dynamic pricing, competitive analysis, and conversion optimization at COMPARE.EDU.VN.
1. What Is The ‘Compare At’ Price In Shopify And Why Use It?
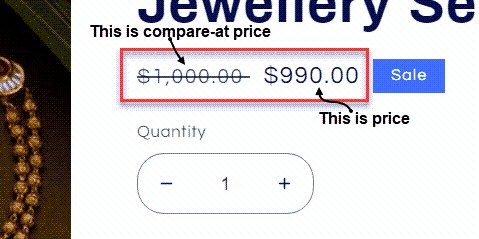
The ‘Compare At’ price in Shopify is the original or regular price of a product, displayed alongside the actual selling price to showcase a discount. Utilizing this feature effectively communicates value to customers, encouraging purchases by highlighting savings and creating a sense of urgency.
The ‘Compare At’ price in Shopify is a powerful tool that can significantly impact your sales strategy. It allows you to display the original price of a product alongside its discounted price, immediately highlighting the savings for potential customers. This visual cue can be incredibly effective in influencing purchasing decisions. According to a study by behavioral economics expert Dan Ariely, the perception of value is a crucial factor in consumer behavior. By showing a higher ‘Compare At’ price, you create an anchor point that makes the discounted price appear more attractive.
Here are several compelling reasons to use the ‘Compare At’ price feature:
- Highlight Discounts: Clearly display the savings customers receive, making the offer more appealing.
- Increase Conversions: Attract buyers with the perception of a good deal.
- Create Urgency: Encourage immediate purchases by suggesting a limited-time offer.
- Boost Perceived Value: Enhance the perceived value of your products, even if the actual price is competitive.
- Competitive Advantage: Stand out from competitors by showcasing better deals.
To further illustrate the effectiveness of this strategy, consider research from the University of Pennsylvania’s Wharton School, which found that displaying a ‘before’ price alongside the ‘current’ price can increase sales by as much as 24%. This underscores the psychological impact of showing customers what they are saving.
In essence, the ‘Compare At’ price is more than just a pricing tool; it’s a psychological strategy that leverages the principles of value perception and scarcity. By mastering its use, you can significantly enhance your Shopify store’s ability to attract and convert customers. To explore more advanced pricing strategies and how they compare, visit COMPARE.EDU.VN for detailed comparisons and expert advice.
2. Where Do I Find The ‘Compare At’ Price Field In Shopify?
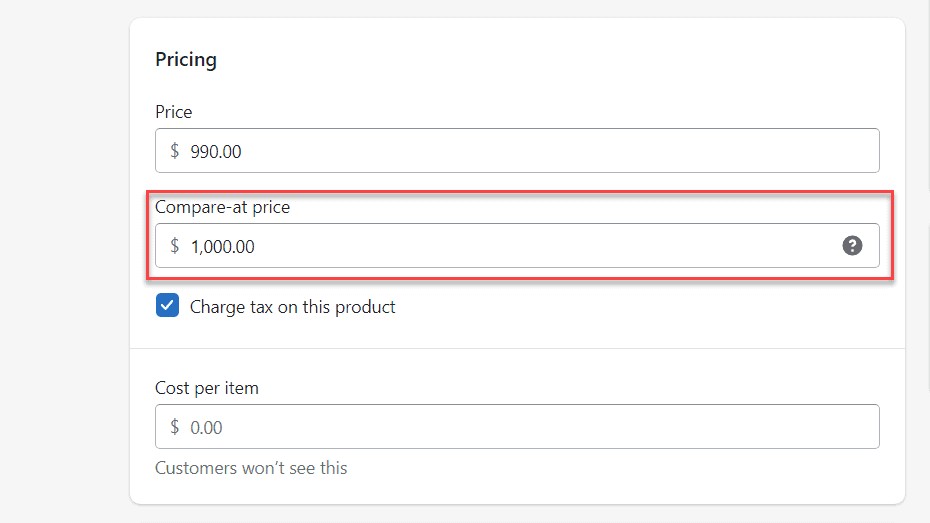
The ‘Compare At’ price field is located within the product details page in your Shopify admin panel. Navigate to ‘Products,’ select the product you want to edit, and you’ll find the ‘Price’ and ‘Compare at price’ fields under the ‘Pricing’ section.
Accessing and locating the ‘Compare At’ price field in Shopify is straightforward, ensuring you can quickly implement this impactful pricing strategy. The field is intuitively placed within the product details, making it easily accessible.
Here’s a step-by-step guide to find the ‘Compare At’ price field:
- Log in to your Shopify admin panel: Start by logging into your Shopify account. This is your central hub for managing all aspects of your online store.
- Navigate to ‘Products’: On the left-hand sidebar, find and click on the ‘Products’ tab. This will take you to a list of all the products in your store.
- Select the product you want to edit: Browse through the list of products and click on the name of the product you wish to modify. This will open the product details page.
- Locate the ‘Pricing’ section: Scroll down the product details page until you find the ‘Pricing’ section. Here, you will see two fields: ‘Price’ and ‘Compare at price’.
- ‘Price’ vs. ‘Compare at price’: The ‘Price’ field is where you enter the actual selling price of the product. The ‘Compare at price’ field is where you enter the original, higher price that you want to display as crossed out, showcasing the discount.
Tips for Efficient Navigation:
- Use the search bar: If you have a large number of products, use the search bar at the top of the ‘Products’ page to quickly find the product you need.
- Filter products: You can also filter products by status, vendor, or collection to narrow down your search.
- Keyboard shortcuts: Familiarize yourself with Shopify’s keyboard shortcuts for faster navigation.
Once you’ve located the ‘Compare At’ price field, you’re ready to start leveraging this powerful pricing strategy. Remember, the key is to set the ‘Compare At’ price higher than the ‘Price’ to effectively showcase the discount. For more insights on optimizing your Shopify store and comparing different strategies, visit COMPARE.EDU.VN.
3. How To Manually Change The ‘Compare At’ Price For A Single Product?
To manually change the ‘Compare At’ price for a single product, go to the product details page in your Shopify admin, locate the ‘Compare at price’ field, enter the desired original price, and save the changes. Ensure this price is higher than the ‘Price’ to display the discount effectively.
Manually adjusting the ‘Compare At’ price for individual products is a fundamental skill for any Shopify store owner. This allows you to fine-tune your pricing strategy on a product-by-product basis, ensuring you’re always offering the most compelling deals to your customers.
Here’s a detailed, step-by-step guide on how to manually change the ‘Compare At’ price:
- Access the Product Details Page: As outlined in the previous section, start by logging into your Shopify admin panel, navigating to the ‘Products’ tab, and selecting the specific product you want to edit.
- Locate the ‘Pricing’ Section: Scroll down the product details page until you find the ‘Pricing’ section. This is where you’ll find the ‘Price’ and ‘Compare at price’ fields.
- Enter the Desired ‘Compare At’ Price: In the ‘Compare at price’ field, enter the original, higher price that you want to display as crossed out. This should be the price the product was previously sold at, or the price you want customers to perceive as the regular price.
- Ensure the ‘Compare At’ Price is Higher Than the ‘Price’: This is a critical step. The ‘Compare At’ price must be higher than the actual selling price (‘Price’) for the discount to be displayed correctly on your storefront. If the ‘Compare At’ price is lower or the same as the ‘Price’, no discount will be shown.
- Save the Changes: Once you’ve entered the desired ‘Compare At’ price and ensured it’s higher than the ‘Price’, click the ‘Save’ button located at the top-right corner of the product details page.
- Verify the Changes on Your Storefront: After saving, it’s always a good idea to visit your storefront and view the product page to ensure the changes are displayed correctly. Check that the ‘Compare At’ price is crossed out and the ‘Price’ is displayed prominently next to it.
Best Practices for Setting ‘Compare At’ Prices:
- Research Competitor Pricing: Before setting your ‘Compare At’ price, research the prices of similar products offered by your competitors. This will help you determine a realistic and attractive ‘Compare At’ price.
- Consider Your Profit Margins: Ensure that the ‘Price’ you set still allows for a healthy profit margin, even when factoring in the discount.
- Regularly Review and Update Prices: Market conditions and competitor pricing can change, so it’s important to regularly review and update your ‘Compare At’ prices to stay competitive.
By following these steps and best practices, you can effectively use the ‘Compare At’ price feature to attract customers, increase conversions, and boost sales in your Shopify store. For more advanced strategies and comparative analysis, visit COMPARE.EDU.VN.
4. Can I Change The ‘Compare At’ Price In Bulk For Multiple Products?
Yes, you can change the ‘Compare At’ price in bulk for multiple products in Shopify using either the Shopify Admin Bulk Editor or by exporting and importing a CSV file. These methods allow you to efficiently update prices across your product catalog.
Managing a large inventory on Shopify requires efficient tools for making widespread changes. Fortunately, Shopify offers two primary methods for changing the ‘Compare At’ price in bulk, saving you valuable time and effort.
Method 1: Shopify Admin Bulk Editor
The Shopify Admin Bulk Editor is a built-in tool that allows you to directly edit product data within your Shopify admin panel. This method is ideal for applying a single ‘Compare At’ price to multiple products.
Here’s how to use the Shopify Admin Bulk Editor:
- Navigate to ‘Products’: Log in to your Shopify admin panel and click on the ‘Products’ tab.
- Select the Products: Use the checkboxes on the left side of the product list to select all the products you want to edit.
- Click ‘Bulk Edit’: Once you’ve selected the products, click on the ‘Bulk edit’ option that appears on the screen.
- Add the ‘Compare At Price’ Column: If the ‘Compare At Price’ column is not visible, click ‘Add fields’ and select ‘Compare At Price’.
- Enter the Desired ‘Compare At’ Price: In the first cell of the ‘Compare At Price’ column, enter the desired price.
- Apply to All Selected Products: Select the first cell and drag it down to apply the same ‘Compare At Price’ to all the selected products. This works similarly to how you would use Excel or Google Sheets.
- Save the Changes: Click on the ‘Save’ button in the top-right corner to save the changes.
Method 2: Export and Import CSV File
This method involves exporting your product data into a CSV file, editing the ‘Compare At Price’ column in a spreadsheet program like Excel or Google Sheets, and then importing the updated CSV file back into Shopify. This is particularly useful for making more complex changes, such as applying percentage discounts.
Here’s how to use the Export and Import CSV File method:
- Export Products: In your Shopify admin, go to ‘Products’ and click on the ‘Export’ button in the top-right corner. Choose the products you want to export and select ‘CSV’ as the export format.
- Edit the CSV File: Open the CSV file in Excel or Google Sheets. Locate the ‘Variant Compare At Price’ column. Edit the prices as needed. You can use formulas to calculate discounts or apply consistent pricing rules.
- Save the CSV File: Save the edited CSV file in CSV format.
- Import Products: In your Shopify admin, go to ‘Products’ and click on the ‘Import’ button. Upload the edited CSV file.
- Review and Confirm: Review the import details and confirm the changes.
Tips for Bulk Editing ‘Compare At’ Prices:
- Backup Your Data: Before making any bulk changes, always export a backup of your product data. This will allow you to easily revert to the previous state if something goes wrong.
- Use Formulas Wisely: When using Excel or Google Sheets, take advantage of formulas to automate the process of calculating ‘Compare At’ prices based on discounts or other criteria.
- Test Your Changes: After importing the CSV file, review a sample of your products to ensure the changes have been applied correctly.
By using these bulk editing methods, you can efficiently manage your ‘Compare At’ prices and keep your product catalog competitive. For more advanced strategies and comparative analysis, visit COMPARE.EDU.VN.
5. What Is The Correct Way To Format The ‘Compare At’ Price?
The correct way to format the ‘Compare At’ price is to enter it as a numerical value without currency symbols or commas. Shopify automatically formats the price according to your store’s settings. Always ensure it is higher than the actual ‘Price’ to effectively showcase the discount.
Proper formatting of the ‘Compare At’ price is essential for ensuring that your discounts are displayed correctly and consistently across your Shopify store. Incorrect formatting can lead to confusion for customers and may even result in errors in your pricing display.
Here are the key guidelines for formatting the ‘Compare At’ price:
- Numerical Value Only: Enter the price as a numerical value only. Do not include currency symbols (e.g., $, €, £) or commas. Shopify will automatically format the price according to your store’s currency settings.
- Decimal Separator: Use a period (.) as the decimal separator. For example, if the ‘Compare At’ price is $100.50, enter it as 100.50.
- No Thousands Separator: Do not use commas or other characters as thousands separators. For example, if the ‘Compare At’ price is $1,000.00, enter it as 1000.00.
- Ensure It’s Higher Than the ‘Price’: The ‘Compare At’ price must always be higher than the actual selling price (‘Price’) for the discount to be displayed correctly. If the ‘Compare At’ price is lower or the same as the ‘Price’, no discount will be shown.
Example of Correct and Incorrect Formatting:
| Scenario | Correct Formatting | Incorrect Formatting | Reason for Incorrectness |
|---|---|---|---|
| ‘Compare At’ price is $50.00 | 50.00 | $50.00, 50,00, 50 | Including currency symbols or using commas as decimal separators can cause errors. |
| ‘Compare At’ price is €1,200.50 | 1200.50 | €1,200.50, 1200,50, 1 200.50 | Currency symbols and incorrect decimal separators can lead to misinterpretation of the price. |
| ‘Compare At’ price is £75.99 | 75.99 | £75.99, 75,99 | Currency symbols are automatically added by Shopify based on your store’s settings. |
| ‘Price’ is $40.00, ‘Compare At’ is $35.00 | Price: 40.00, Compare At: 35.00 | Price: 40.00, Compare At: 45.00 | ‘Compare At’ price must be higher than the ‘Price’ to showcase a discount. |
By following these formatting guidelines, you can ensure that your ‘Compare At’ prices are displayed accurately and effectively, enhancing the shopping experience for your customers. For more tips on optimizing your Shopify store and comparing different strategies, visit COMPARE.EDU.VN.
6. What Happens If The ‘Compare At’ Price Is Lower Than The Actual Price?
If the ‘Compare At’ price is lower than the actual price, Shopify will not display a discount. Instead, it will only show the actual price, as there is no perceived saving for the customer. Ensure the ‘Compare At’ price is always higher to showcase a discount.
The ‘Compare At’ price feature in Shopify is designed to highlight savings and create a sense of value for customers. However, if the ‘Compare At’ price is set incorrectly—specifically, if it’s lower than the actual selling price (‘Price’)—the system will not display a discount. This can lead to missed opportunities to attract customers and potentially reduce conversions.
Here’s a detailed explanation of what happens when the ‘Compare At’ price is lower than the ‘Price’:
- No Discount Displayed: Shopify’s system is programmed to recognize a discount only when the ‘Compare At’ price is higher than the ‘Price’. If the ‘Compare At’ price is lower, the storefront will simply display the actual selling price (‘Price’) without any indication of a discount or savings.
- Missed Opportunity to Attract Customers: The primary purpose of the ‘Compare At’ price is to catch the customer’s eye and entice them to make a purchase by showcasing a significant saving. When no discount is displayed, you miss out on this opportunity to attract potential buyers.
- Potential Confusion for Customers: In some cases, if customers are familiar with your products or have seen them advertised elsewhere with a higher ‘Compare At’ price, they may become confused or skeptical if they don’t see the expected discount on your Shopify store.
- Reduced Conversions: The absence of a visible discount can directly impact your conversion rates. Customers are more likely to make a purchase when they perceive they are getting a good deal, and the ‘Compare At’ price is a key element in creating that perception.
Example Scenario:
Let’s say you have a product that you want to sell for $50.00, and you want to show a discount from an original price of $75.00.
- Correct Setting: ‘Price’ = 50.00, ‘Compare At’ price = 75.00 – This will display the product as being discounted from $75.00 to $50.00.
- Incorrect Setting: ‘Price’ = 50.00, ‘Compare At’ price = 45.00 – This will only display the product at $50.00, with no indication of a discount.
How to Avoid This Issue:
- Double-Check Your Prices: Always double-check your ‘Compare At’ prices to ensure they are higher than your actual selling prices.
- Regularly Review Your Pricing: Set a schedule to regularly review your pricing and ‘Compare At’ prices to ensure they are accurate and competitive.
- Use Bulk Editing Tools Carefully: When using bulk editing tools to update prices, be extra cautious to avoid accidentally setting ‘Compare At’ prices lower than your actual prices.
By understanding the importance of setting the ‘Compare At’ price correctly and taking steps to avoid errors, you can maximize the effectiveness of this feature and drive more sales in your Shopify store. For more insights on optimizing your Shopify store and comparing different strategies, visit COMPARE.EDU.VN.
7. Can I Schedule Changes To The ‘Compare At’ Price For Sales And Promotions?
While Shopify doesn’t natively offer a direct scheduling feature for ‘Compare At’ prices, you can use third-party apps or manual CSV imports to schedule changes for sales and promotions. These methods allow you to automate price updates for specific periods.
Running successful sales and promotions often involves changing prices for a limited time. While Shopify’s built-in functionality doesn’t allow you to schedule changes to the ‘Compare At’ price directly, there are several effective workarounds to automate this process and ensure your promotions run smoothly.
Method 1: Using Third-Party Apps
Shopify’s App Store offers a variety of apps that provide advanced pricing features, including the ability to schedule changes to the ‘Compare At’ price. These apps often come with additional benefits, such as dynamic pricing, tiered pricing, and integration with marketing tools.
Here’s how to use third-party apps to schedule ‘Compare At’ price changes:
- Browse the Shopify App Store: Visit the Shopify App Store and search for apps that offer scheduled pricing changes. Look for apps with good reviews and features that meet your specific needs.
- Install the App: Once you’ve found a suitable app, install it in your Shopify store.
- Configure the App: Follow the app’s instructions to configure your pricing rules and schedule the changes to the ‘Compare At’ price for your desired products.
- Set Start and End Dates: Most apps will allow you to set specific start and end dates for your promotions, ensuring that the price changes are automatically applied and removed at the scheduled times.
- Test the Configuration: Before the promotion goes live, test the configuration to ensure that the price changes are applied correctly.
Popular Apps for Scheduled Pricing Changes:
- Bold Discounts: This app allows you to schedule sitewide sales and discounts, including changes to the ‘Compare At’ price.
- Automatic Discount: This app offers a range of discount options, including the ability to schedule discounts for specific products or collections.
- Price Manager: This app provides advanced pricing management features, including the ability to schedule price changes and track the performance of your promotions.
Method 2: Manual CSV Imports
If you prefer not to use a third-party app, you can manually schedule changes to the ‘Compare At’ price using CSV imports. This method requires more manual effort, but it can be a cost-effective solution for smaller stores.
Here’s how to use manual CSV imports to schedule ‘Compare At’ price changes:
- Export Your Product Data: Export your product data from Shopify in CSV format, as described in Section 4.
- Create a Scheduled CSV File: Create a separate CSV file with the updated ‘Compare At’ prices for the products included in your promotion. Set the ‘Variant Compare At Price’ column to the desired promotional prices.
- Schedule the Import: Set a reminder to import the scheduled CSV file on the start date of your promotion.
- Create a Reset CSV File: After the promotion ends, create another CSV file with the original ‘Compare At’ prices.
- Schedule the Reset Import: Set a reminder to import the reset CSV file on the end date of your promotion.
Tips for Scheduling ‘Compare At’ Price Changes:
- Plan Ahead: Plan your sales and promotions well in advance to allow sufficient time for scheduling price changes and testing configurations.
- Set Reminders: Use a calendar or task management tool to set reminders for importing and resetting CSV files.
- Test Your Configuration: Always test your configuration before the promotion goes live to ensure that the price changes are applied correctly.
By using these methods, you can effectively schedule changes to the ‘Compare At’ price for your sales and promotions, maximizing their impact and ensuring a seamless shopping experience for your customers. For more insights on optimizing your Shopify store and comparing different strategies, visit COMPARE.EDU.VN.
8. How Can I Use Conditional Logic To Change The ‘Compare At’ Price?
Shopify doesn’t support conditional logic for ‘Compare At’ prices natively. However, you can achieve this functionality using custom code or specialized apps that allow dynamic pricing based on factors like customer location, order quantity, or time of day.
Implementing conditional logic to dynamically adjust the ‘Compare At’ price based on various factors can significantly enhance your pricing strategy and improve customer experience. While Shopify’s core features don’t directly support conditional logic for ‘Compare At’ prices, there are several workarounds to achieve this functionality.
Method 1: Using Custom Code
If you have coding knowledge or access to a developer, you can use custom code to implement conditional logic for ‘Compare At’ prices. This method involves modifying your Shopify theme’s code to dynamically adjust the ‘Compare At’ price based on specific conditions.
Here’s a general outline of how to use custom code:
- Access Your Theme’s Code: In your Shopify admin panel, go to ‘Online Store’ > ‘Themes’. Click on the ‘Actions’ button and select ‘Edit code’.
- Locate the Product Template: Find the template file that controls the display of product pages (usually
product.liquidor a similar file). - Implement Conditional Logic: Use Shopify’s Liquid templating language to implement conditional logic. This will involve writing code that checks for specific conditions (e.g., customer location, order quantity, time of day) and adjusts the ‘Compare At’ price accordingly.
- Update the ‘Compare At’ Price: Use the Liquid
assigntag to update the ‘Compare At’ price variable based on the conditional logic. - Test the Code: Thoroughly test the code to ensure that the ‘Compare At’ price is adjusted correctly under different conditions.
Example of Conditional Logic:
{% if customer.location.country == "United States" %}
  {% assign compare_at_price = product.compare_at_price | times: 1.1 %}
  {% else %}
  {% assign compare_at_price = product.compare_at_price %}
{% endif %}
This code snippet increases the ‘Compare At’ price by 10% for customers in the United States.
Method 2: Using Specialized Apps
Several apps in the Shopify App Store offer advanced pricing features, including the ability to implement conditional logic for ‘Compare At’ prices. These apps often provide a user-friendly interface for creating pricing rules without requiring coding knowledge.
Here’s how to use specialized apps:
- Browse the Shopify App Store: Visit the Shopify App Store and search for apps that offer conditional pricing features.
- Install the App: Install the app in your Shopify store.
- Configure the App: Follow the app’s instructions to create pricing rules based on your desired conditions.
- Set Conditions and Actions: Define the conditions that will trigger the price changes (e.g., customer location, order quantity, time of day) and the corresponding actions (e.g., adjust the ‘Compare At’ price by a certain percentage).
- Test the Configuration: Test the configuration to ensure that the ‘Compare At’ price is adjusted correctly under different conditions.
Popular Apps for Conditional Pricing:
- Dynamic Pricing by OptiMonk: This app allows you to create personalized pricing experiences based on customer behavior, location, and other factors.
- Price Rules by Bold: This app provides advanced pricing rule options, including the ability to adjust prices based on customer groups, order quantities, and more.
- Product Discount by Booster Apps: This app allows you to create targeted discounts based on various conditions, including customer location and purchase history.
Tips for Using Conditional Logic:
- Define Your Pricing Strategy: Clearly define your pricing strategy and the conditions that will trigger price changes before implementing conditional logic.
- Test Thoroughly: Thoroughly test your code or app configuration to ensure that the ‘Compare At’ price is adjusted correctly under different conditions.
- Monitor Performance: Monitor the performance of your conditional pricing rules to ensure that they are achieving your desired results.
By using custom code or specialized apps, you can effectively implement conditional logic for ‘Compare At’ prices, creating a more personalized and engaging shopping experience for your customers. For more insights on optimizing your Shopify store and comparing different strategies, visit COMPARE.EDU.VN.
9. How Does The ‘Compare At’ Price Affect My Shopify Store’s SEO?
The ‘Compare At’ price doesn’t directly affect your Shopify store’s SEO. However, it can indirectly improve SEO by increasing conversion rates and sales, which signal to search engines that your store offers valuable products and a positive user experience.
While the ‘Compare At’ price itself is not a direct ranking factor for search engines like Google, it can indirectly influence your Shopify store’s SEO performance by impacting key metrics that search engines consider when evaluating a website’s quality and relevance.
Here’s how the ‘Compare At’ price can indirectly affect your SEO:
- Improved Click-Through Rate (CTR): A well-crafted ‘Compare At’ price can make your product listings more appealing in search engine results pages (SERPs). When users see a clear discount or savings, they are more likely to click on your listing, which can improve your CTR. A higher CTR signals to search engines that your listing is relevant and valuable to users.
- Increased Conversion Rates: By showcasing discounts and savings, the ‘Compare At’ price can encourage more visitors to make a purchase. Higher conversion rates indicate that your store offers a positive user experience and valuable products, which can indirectly improve your SEO.
- Higher Sales Volume: Increased sales volume can lead to more positive reviews and customer feedback, which can enhance your store’s reputation and credibility. Positive reviews and feedback can improve your store’s SEO by signaling to search engines that your store is trustworthy and reliable.
- Reduced Bounce Rate: When users find compelling discounts on your product pages, they are more likely to stay on your site and explore other products. This can reduce your store’s bounce rate, which is the percentage of visitors who leave your site after viewing only one page. A lower bounce rate signals to search engines that your store is engaging and relevant to users.
- Improved User Engagement: By creating a sense of value and urgency, the ‘Compare At’ price can encourage users to spend more time on your site, view more pages, and interact with your content. Increased user engagement can improve your store’s SEO by signaling to search engines that your site is interesting and valuable to users.
Best Practices for Using ‘Compare At’ Price to Enhance SEO:
- Optimize Product Titles and Descriptions: Use relevant keywords in your product titles and descriptions to improve your store’s visibility in search engine results.
- Use High-Quality Images: Use high-quality images to showcase your products and attract potential customers.
- Ensure Mobile-Friendliness: Make sure your Shopify store is mobile-friendly to provide a seamless experience for mobile users.
- Improve Site Speed: Optimize your store’s loading speed to reduce bounce rates and improve user engagement.
- Encourage Reviews and Feedback: Encourage your customers to leave reviews and feedback to enhance your store’s reputation and credibility.
By focusing on these SEO best practices and using the ‘Compare At’ price strategically, you can improve your store’s visibility in search engine results, attract more customers, and drive more sales. For more insights on optimizing your Shopify store and comparing different strategies, visit COMPARE.EDU.VN.
10. What Are Some Common Mistakes To Avoid When Using ‘Compare At’ Price?
Common mistakes to avoid when using ‘Compare At’ price include setting it lower than the actual price, using unrealistic or inflated prices, not updating prices regularly, and failing to A/B test different pricing strategies. These mistakes can undermine customer trust and reduce conversions.
The ‘Compare At’ price is a powerful tool for attracting customers and driving sales, but it’s essential to use it correctly to avoid undermining customer trust and damaging your brand’s reputation. Here are some common mistakes to avoid when using the ‘Compare At’ price:
- Setting ‘Compare At’ Price Lower Than Actual Price: This is a fundamental error that will prevent the discount from being displayed and can confuse or frustrate customers. Always ensure that the ‘Compare At’ price is higher than the actual selling price.
- Using Unrealistic or Inflated Prices: Setting the ‘Compare At’ price too high can make your discounts seem disingenuous and erode customer trust. Use realistic prices that reflect the actual value of your products.
- Not Updating Prices Regularly: Market conditions and competitor pricing can change, so it’s important to regularly review and update your ‘Compare At’ prices to stay competitive.
- Failing to A/B Test Different Pricing Strategies: A/B testing involves creating two versions of a product page with different ‘Compare At’ prices and measuring which version performs better. This can help you optimize your pricing strategy and maximize conversions.
- Ignoring Profit Margins: Ensure that the actual selling price allows for a healthy profit margin, even when factoring in the discount.
- Not Considering Customer Perception: Be mindful of how your pricing strategy will be perceived by your customers. Avoid using tactics that may be seen as deceptive or manipulative.
Here are some additional mistakes to avoid:
- Displaying ‘Compare At’ Price on Products That Were Never Sold at That Price: This is misleading and can damage your brand’s reputation. Only use the ‘Compare At’ price if the product was actually sold at that price in the past.
- Using the Same ‘Compare At’ Price for All Products: This can make your discounts seem generic and less appealing. Tailor your ‘Compare At’ prices to each product based on its value and market conditions.
- Not Clearly Communicating the Savings: Make sure the discount is clearly displayed and easy to understand. Use visual cues like strikethrough text and bold fonts to highlight the savings.
- Neglecting Mobile Optimization: Ensure that your ‘Compare At’ prices are displayed correctly on mobile devices. Mobile optimization is crucial for providing a seamless shopping experience for mobile users.
- Not Monitoring Customer Feedback: Pay attention to customer feedback and reviews to identify any issues with your pricing strategy. Address any concerns promptly and make adjustments as needed.
By avoiding these common mistakes, you can use the ‘Compare At’ price effectively to attract customers, increase conversions, and build a strong brand reputation. For more insights on optimizing your Shopify store and comparing different strategies, visit COMPARE.EDU.VN.
FAQ: Frequently Asked Questions About Shopify ‘Compare At’ Price
1. What is the ‘Compare At’ price in Shopify?
The ‘Compare At’ price in Shopify is the original or regular price of a product, displayed alongside the actual selling price to showcase a discount and highlight savings for customers.
2. Where can I find the ‘Compare At’ price field in Shopify?
The ‘Compare At’ price field is located within the product details page in your Shopify admin panel, under the ‘Pricing’ section.
3. How do I manually change the ‘Compare At’ price for a single product?
To manually change the ‘Compare At’ price, go to the product details page, locate the ‘Compare at price’ field, enter the desired price, and save the changes, ensuring it’s higher than the actual ‘Price’.
4. Can I change the ‘Compare At’ price in bulk for multiple products?
Yes, you can change the ‘Compare At’ price in bulk using the Shopify Admin Bulk Editor or by exporting and importing a CSV file.
5. What is the correct way to format the ‘Compare At’ price?
The correct way to format the ‘Compare At’ price is to enter it as a numerical value without currency symbols or commas.
6. What happens if the ‘Compare At’ price is lower than the actual price?
If the ‘Compare At’ price is lower than the actual price, Shopify will not display a discount, and only the actual price will be shown.
7. Can I schedule changes to the ‘Compare At’ price for sales and promotions?
While Shopify doesn’t natively offer a direct scheduling feature, you can use third-party apps or manual CSV imports to schedule changes for sales and promotions.
8. How can I use conditional logic to change the ‘Compare At’ price?
Shopify doesn’t support conditional logic natively, but you can achieve this functionality using custom code or specialized apps that allow dynamic pricing.
9. How does the ‘Compare At’ price affect my Shopify store’s SEO?
The ‘Compare At’ price doesn’t directly affect SEO but can indirectly improve it by increasing conversion rates and sales, signaling to search engines that your store offers valuable products.
10. What are some common mistakes to avoid when using ‘Compare At’ price?
Common mistakes include setting it lower than the actual price, using unrealistic prices, not updating prices regularly, and failing to A/B test different pricing strategies.
Understanding and effectively utilizing the ‘Compare At’ price feature in Shopify can significantly enhance your store’s ability to attract customers and drive sales. By avoiding common mistakes and following best practices, you can create a compelling shopping experience that builds trust and encourages conversions. For more insights on optimizing your Shopify store and comparing different strategies, visit COMPARE.EDU.VN.
Ready to optimize your Shopify store and make informed decisions? Visit compare.edu.vn now for comprehensive comparisons and expert advice. Our resources will help you navigate the complexities of eCommerce and achieve your business goals. Don’t miss out on the opportunity to enhance your online presence and drive sales. Contact us at 333 Comparison Plaza, Choice City, CA 90210, United States or via Whatsapp at +1 (626) 555-9090. We’re here to help you succeed!