Do students get the compare feature on Microsoft Word? Yes, students typically have access to the Compare feature in Microsoft Word, allowing them to effectively analyze differences between document versions; to find a better service, COMPARE.EDU.VN provide comprehensive comparisons and resources for students to help them make informed decisions. This functionality proves invaluable for collaborative projects, revisions, and academic integrity checks, enhancing their writing and research processes, with features like document comparison tools, version control systems, and collaborative writing platforms.
1. Understanding the Compare Feature in Microsoft Word
The Compare feature in Microsoft Word is a powerful tool designed to identify and highlight the differences between two versions of a document. This functionality is incredibly useful in various scenarios, from tracking changes in collaborative projects to ensuring accuracy in legal documents. By understanding how the Compare feature works, students can leverage its capabilities to streamline their workflow and improve the quality of their work.
1.1. What is the Compare Feature?
The Compare feature in Microsoft Word is a tool that analyzes two documents and identifies insertions, deletions, formatting changes, and moved text. It presents these differences in a clear and concise manner, allowing users to review and accept or reject each change. This feature is particularly valuable when multiple people are working on the same document or when comparing revisions of a document over time.
1.2. How Does It Work?
When you use the Compare feature, Word creates a new document that displays the original document alongside the revisions from the second document. The changes are typically marked with different colors and symbols, making it easy to see what has been added, deleted, or modified. You can then review each change individually and decide whether to accept or reject it, effectively merging the two documents into a final version.
1.3. Key Benefits for Students
For students, the Compare feature offers several key benefits:
- Collaborative Projects: Facilitates seamless collaboration by clearly showing each team member’s contributions.
- Revision Tracking: Simplifies the process of reviewing and incorporating feedback on assignments.
- Academic Integrity: Helps ensure originality by comparing drafts against source material.
- Time Efficiency: Saves time by quickly identifying and addressing changes, rather than manually reviewing entire documents.
2. Availability of the Compare Feature to Students
The availability of the Compare feature to students largely depends on the type of Microsoft Word license they have access to. Generally, if students have a full or subscription-based version of Microsoft Word, they should have no trouble accessing and using the Compare feature.
2.1. Microsoft 365 Education Plans
Most educational institutions offer Microsoft 365 Education plans to their students. These plans typically include access to the full suite of Microsoft Office applications, including Word, Excel, PowerPoint, and more. The Compare feature is a standard component of Microsoft Word and is therefore available to students using these educational plans.
2.2. Perpetual Licenses vs. Subscription Models
Students might also have access to Microsoft Word through a perpetual license (a one-time purchase) or a subscription model (like Microsoft 365). In both cases, the Compare feature should be included in the standard functionality of the software. However, it’s always a good idea to verify that the specific version of Word being used includes this feature.
2.3. Access Through Educational Institutions
Many universities and schools provide Microsoft Office to their students as part of their enrollment benefits. This access usually comes in the form of a Microsoft 365 Education subscription, which includes the full version of Word with all its features, including Compare.
2.4. Checking Your Version of Microsoft Word
To ensure that you have access to the Compare feature, you can check your version of Microsoft Word:
- Open Microsoft Word.
- Click on “File” in the top left corner.
- Select “Account” or “Help” (depending on your version).
- Look for “About Word” or “Product Information” to see the details of your license and the features included.
3. Step-by-Step Guide: Using the Compare Feature in Microsoft Word
Using the Compare feature in Microsoft Word is straightforward. Follow these steps to effectively compare two documents:
3.1. Opening the Compare Tool
- Open Microsoft Word.
- Click on the “Review” tab in the ribbon.
- In the “Compare” group, click on the “Compare” button.
- Select “Compare” from the dropdown menu.
3.2. Selecting the Documents to Compare
- In the “Compare Documents” dialog box, you’ll see two dropdown menus: “Original document” and “Revised document.”
- Click the dropdown menu for “Original document” and select the original version of the document. You can browse your files to find it if it’s not listed.
- Repeat this process for the “Revised document,” selecting the version with the changes you want to compare.
3.3. Adjusting Comparison Settings
- Before running the comparison, you can adjust the settings to customize how Word identifies and displays changes.
- Click on the “More” button in the “Compare Documents” dialog box.
- Here, you can specify what types of changes to compare (e.g., moves, formatting, comments) and how detailed the comparison should be.
- You can also choose whether to show changes at the character level or the word level, which can be useful for fine-tuning the results.
3.4. Running the Comparison
- Once you’ve selected your documents and adjusted the settings, click “OK” to run the comparison.
- Word will open a new document that displays the results of the comparison.
3.5. Interpreting the Results
The new document will typically be divided into three sections:
- Revised Document: Shows the combined document with changes marked.
- Original Document: Displays the original document.
- Revised Document: Displays the revised document.
- Revisions Pane: Lists all the changes that were identified.
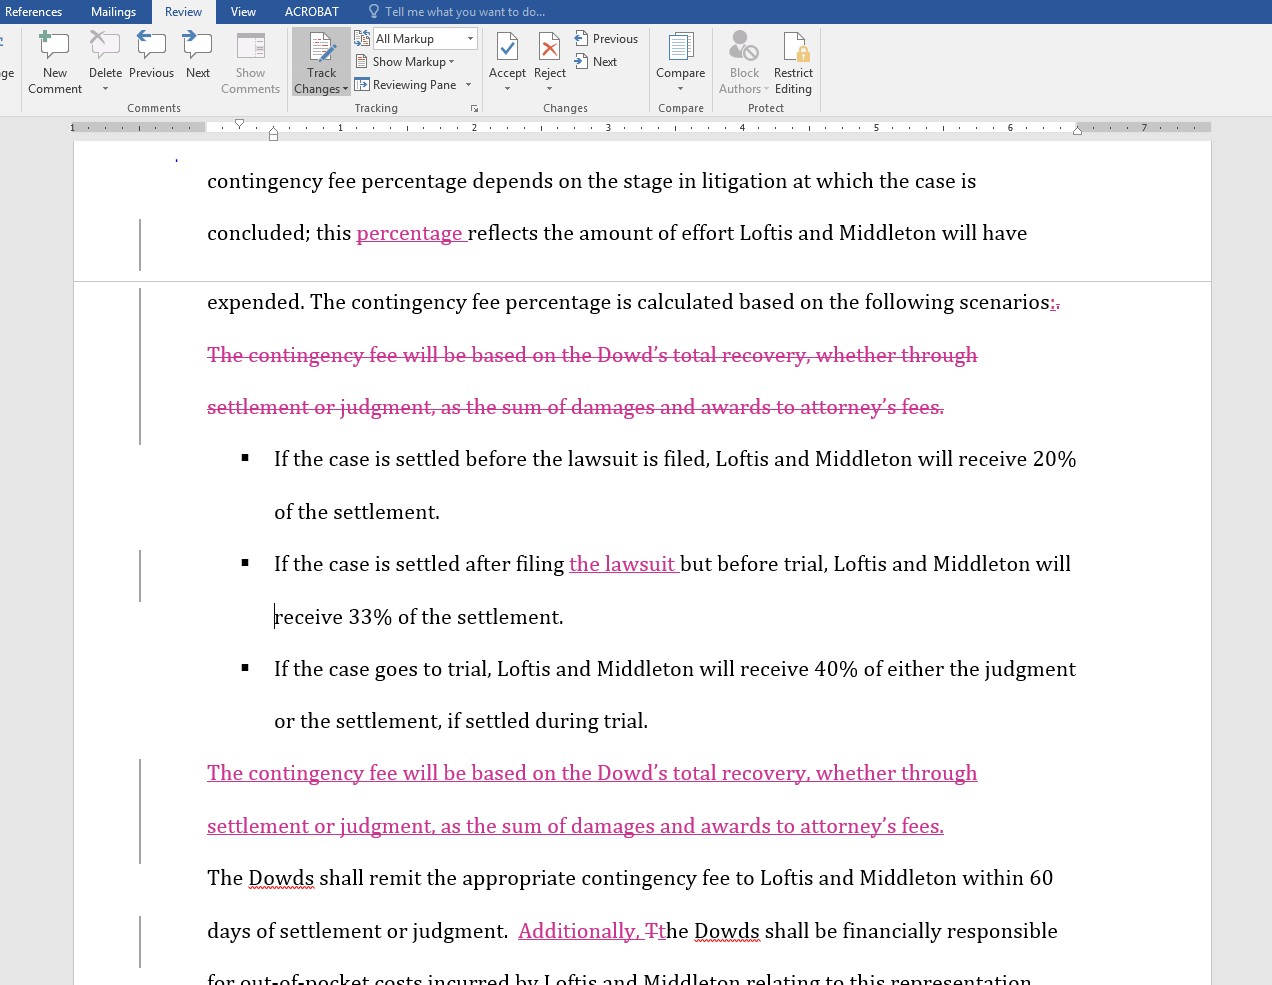
Changes are usually marked with different colors and symbols:
- Insertions: Text that was added is often displayed in a different color with an underline.
- Deletions: Text that was removed is often displayed with a strikethrough.
- Formatting Changes: Changes to font, spacing, or other formatting elements are indicated in the Revisions pane.
3.6. Accepting or Rejecting Changes
- To accept or reject a change, click on the “Review” tab.
- In the “Changes” group, you’ll find buttons for “Accept” and “Reject.”
- Click “Accept” to incorporate the change into the document, or “Reject” to discard it.
- You can navigate through the changes using the “Previous” and “Next” buttons in the “Changes” group.
3.7. Saving the Final Document
- Once you’ve reviewed and accepted or rejected all the changes, save the final document.
- Click on “File” and select “Save As.”
- Give the document a new name to distinguish it from the original and revised versions.
4. Scenarios Where the Compare Feature is Useful for Students
The Compare feature in Microsoft Word is a versatile tool that can be applied in numerous academic and collaborative scenarios. Here are some specific examples of how students can benefit from using this feature:
4.1. Collaborative Writing Projects
In group projects, students often need to combine contributions from multiple team members into a single document. The Compare feature makes it easy to see who added what, allowing for seamless integration and revision of the content.
- Identifying Contributions: Students can quickly identify which parts of the document were written by each team member.
- Resolving Conflicts: If team members have conflicting ideas or edits, the Compare feature helps visualize these conflicts and facilitate discussion and resolution.
- Ensuring Consistency: The feature helps maintain a consistent writing style and format throughout the document by highlighting discrepancies.
4.2. Receiving and Incorporating Feedback
When students submit assignments for review, instructors often provide feedback and suggestions for improvement. The Compare feature allows students to easily see these changes and incorporate them into their work.
- Tracking Instructor Edits: Students can quickly see the specific changes made by their instructor, such as corrections, additions, or deletions.
- Understanding Suggestions: The Compare feature provides context for the instructor’s feedback, helping students understand the rationale behind each change.
- Improving Future Work: By reviewing the tracked changes, students can learn from their mistakes and improve their writing and research skills for future assignments.
4.3. Tracking Changes in Revised Drafts
As students revise their work, they often make multiple drafts of the same document. The Compare feature allows them to track changes between these drafts, ensuring that they don’t accidentally lose important information or introduce errors.
- Monitoring Progress: Students can see how their work has evolved over time, tracking improvements and identifying areas that still need attention.
- Recovering Deleted Content: If a student accidentally deletes a section of text, they can use the Compare feature to retrieve it from an earlier draft.
- Ensuring Accuracy: By comparing drafts, students can ensure that their final document is accurate and complete.
4.4. Checking for Plagiarism
Academic integrity is paramount, and students must ensure that their work is original. The Compare feature can be used to compare drafts against source material, helping students identify instances of unintentional plagiarism.
- Comparing Against Sources: Students can compare their work against articles, books, and other sources to ensure that they have properly cited all borrowed information.
- Identifying Similarities: The Compare feature highlights similarities between the student’s work and the source material, making it easy to identify potential plagiarism issues.
- Promoting Academic Honesty: By using the Compare feature, students can take proactive steps to ensure that their work is original and adheres to academic standards.
4.5. Legal and Research Documents
For students in law or research-intensive fields, the Compare feature is invaluable for analyzing and managing complex documents.
- Analyzing Legal Contracts: Law students can use the Compare feature to analyze different versions of legal contracts, identifying changes in terms and conditions.
- Managing Research Papers: Researchers can track changes in their papers as they revise and update their findings, ensuring that their work is accurate and current.
- Ensuring Compliance: The Compare feature helps students ensure that their legal and research documents comply with relevant regulations and guidelines.
 Collaborative Writing Projects
5. Troubleshooting Common Issues with the Compare Feature
While the Compare feature in Microsoft Word is generally reliable, users may encounter some issues. Here are common problems and how to troubleshoot them:
5.1. Compare Feature Not Found
If you can’t find the Compare feature in the Review tab, it may be due to a few reasons:
- Incorrect Version of Word: Ensure you are using a version of Microsoft Word that includes the Compare feature. Older or very basic versions may not have this functionality.
- Customized Ribbon: The ribbon might be customized, and the Compare feature may have been removed or moved. To reset the ribbon:
- Right-click on the ribbon.
- Select “Customize the Ribbon.”
- Click “Reset” at the bottom of the dialog box.
- Add-ins Interference: Sometimes, add-ins can interfere with Word’s functionality. Try running Word in Safe Mode to disable add-ins:
- Press
Windows key + Rto open the Run dialog box. - Type
winword /safeand press Enter. - If the Compare feature works in Safe Mode, disable add-ins one by one to identify the culprit.
- Press
5.2. Comparison Results Not Accurate
Inaccurate comparison results can occur due to various factors:
- Different File Formats: Ensure both documents are in the same file format (preferably .docx). Converting documents between formats can sometimes introduce discrepancies.
- Hidden Formatting: Hidden formatting codes can affect the comparison. To reveal hidden formatting:
- Click on “File.”
- Select “Options.”
- Go to “Display.”
- Check the box for “Show all formatting marks.”
- Track Changes Enabled: If Track Changes is enabled in either document, it can interfere with the Compare feature. Turn off Track Changes before comparing:
- Go to the “Review” tab.
- In the “Tracking” group, ensure “Track Changes” is turned off.
- Comparison Settings: Check the comparison settings to ensure they are appropriate for your needs. Click on “More” in the Compare dialog box to adjust settings like comparing moves, formatting, and comments.
5.3. Slow Comparison Process
Comparing large documents can be time-consuming. Here are some tips to speed up the process:
- Close Unnecessary Programs: Close other applications to free up system resources.
- Increase Memory Allocation: Ensure Word has enough memory allocated to it. This is typically managed by the operating system, but you can close other memory-intensive programs.
- Simplify Documents: Remove unnecessary images or complex formatting from the documents before comparing.
- Compare Sections: If possible, break the documents into smaller sections and compare them separately.
5.4. Unable to Accept or Reject Changes
If you are unable to accept or reject changes, consider the following:
- Document Protection: The document may be protected, preventing you from making changes. Check if the document is password-protected or restricted:
- Go to the “Review” tab.
- In the “Protect” group, check if the document is protected. If so, you may need to enter a password or request permission to make changes.
- Permissions: Ensure you have the necessary permissions to edit the document. If the document is stored on a shared drive, you may need to request edit access.
- Corrupted Document: The document may be corrupted. Try opening it on a different computer or using Word’s built-in repair tool:
- Click on “File.”
- Select “Open.”
- Browse to the location of the document.
- Click the dropdown arrow next to the “Open” button.
- Select “Open and Repair.”
5.5. Display Issues
Sometimes, the comparison results may not be displayed correctly:
- Screen Resolution: Ensure your screen resolution is set appropriately. Low resolution can make it difficult to see the changes clearly.
- Graphics Card: An outdated or faulty graphics card can cause display issues. Update your graphics card drivers or try using a different computer.
- Word Settings: Adjust Word’s display settings:
- Click on “File.”
- Select “Options.”
- Go to “Advanced.”
- Under the “Display” section, adjust settings like “Show picture placeholders” or “Disable hardware graphics acceleration.”
6. Alternatives to the Compare Feature in Microsoft Word
While the Compare feature in Microsoft Word is a robust tool, several alternatives offer similar or enhanced functionalities. These alternatives can be particularly useful for students working on complex projects or requiring more advanced comparison capabilities.
6.1. Google Docs Compare Tool
Google Docs also offers a built-in comparison tool that allows users to compare two versions of a document. This feature is particularly useful for collaborative projects, as Google Docs is designed for real-time collaboration.
- Accessibility: Google Docs is accessible from any device with an internet connection, making it easy to compare documents on the go.
- Collaboration: The real-time collaboration features of Google Docs make it easy for multiple users to review and discuss changes.
- Integration: Google Docs integrates seamlessly with other Google services, such as Google Drive and Google Meet, facilitating efficient workflow.
To use the Compare tool in Google Docs:
- Open the original document in Google Docs.
- Click on “Tools” in the menu.
- Select “Compare documents.”
- Choose the revised document from your Google Drive.
- Click “Compare.”
- Google Docs will create a new document showing the differences between the two versions.
6.2. Draftable
Draftable is a dedicated document comparison tool that offers a range of advanced features. It is known for its accuracy and speed, making it a popular choice for professionals and students alike.
- Accuracy: Draftable uses sophisticated algorithms to identify even the smallest changes between documents.
- Speed: Draftable can quickly compare large and complex documents, saving time and effort.
- User-Friendly Interface: The intuitive interface makes it easy to use, even for those who are not tech-savvy.
Draftable is available as a web-based tool and as a desktop application. It supports a variety of file formats, including Word, PDF, and plain text.
6.3. Beyond Compare
Beyond Compare is a powerful comparison tool that supports not only documents but also folders, files, and even websites. It offers a range of advanced features, such as three-way merging and syntax highlighting.
- Versatility: Beyond Compare can be used to compare a wide range of file types, making it a versatile tool for various tasks.
- Three-Way Merging: The three-way merging feature allows users to merge changes from two different versions of a document into a single version.
- Syntax Highlighting: Syntax highlighting makes it easier to compare code files, identifying changes in syntax and structure.
Beyond Compare is available for Windows, macOS, and Linux.
6.4. ExamDiff Pro
ExamDiff Pro is a visual file comparison tool that offers a range of advanced features, such as directory comparison and binary file comparison. It is particularly useful for software developers and engineers.
- Visual Comparison: ExamDiff Pro uses visual cues to highlight differences between files, making it easy to identify changes.
- Directory Comparison: The directory comparison feature allows users to compare entire folders, identifying added, deleted, and modified files.
- Binary File Comparison: ExamDiff Pro can compare binary files, such as executable files and image files, identifying changes at the binary level.
ExamDiff Pro is available for Windows.
6.5. DiffNow
DiffNow is a web-based comparison tool that allows users to compare text files, Word documents, and PDF files. It is a simple and easy-to-use tool that is suitable for basic comparison tasks.
- Ease of Use: DiffNow is designed to be easy to use, even for those who are not familiar with comparison tools.
- Accessibility: As a web-based tool, DiffNow is accessible from any device with an internet connection.
- Cost-Effective: DiffNow offers a free version for basic comparison tasks, making it a cost-effective solution for students.
7. Tips for Effective Document Comparison
To make the most of the Compare feature in Microsoft Word or any of its alternatives, consider these tips:
7.1. Prepare Documents Properly
Before comparing documents, ensure they are properly formatted and free of unnecessary elements that could interfere with the comparison process.
- Remove Comments: Remove comments from both documents, as they can clutter the comparison results.
- Simplify Formatting: Simplify the formatting of both documents, removing unnecessary styles and formatting elements.
- Standardize Layout: Ensure both documents have a consistent layout, with the same margins, font sizes, and spacing.
7.2. Choose the Right Comparison Settings
Adjust the comparison settings to suit the specific task at hand.
- Compare Moves: If you are interested in tracking moved text, enable the “Compare moves” option.
- Compare Formatting: If you are interested in tracking formatting changes, enable the “Compare formatting” option.
- Adjust Detail Level: Adjust the detail level to control how granular the comparison is. For example, you can choose to compare at the character level or the word level.
7.3. Review Changes Carefully
Take the time to review each change carefully, ensuring that you understand the context and implications of each modification.
- Read the Surrounding Text: Read the text surrounding each change to understand the context of the modification.
- Consider the Impact: Consider the impact of each change on the overall document, ensuring that it aligns with your goals.
- Seek Clarification: If you are unsure about a change, seek clarification from the author or other stakeholders.
7.4. Use Track Changes in Conjunction
Use the Track Changes feature in Microsoft Word in conjunction with the Compare feature to manage changes effectively.
- Track Changes for New Edits: Use Track Changes to record new edits as you make them, allowing others to review and approve your changes.
- Compare to See Previous Edits: Use the Compare feature to see how the document has evolved over time, tracking previous edits and modifications.
- Combine for Comprehensive Review: Combine Track Changes and Compare to conduct a comprehensive review of the document, ensuring that all changes are accounted for and properly managed.
7.5. Save Multiple Versions
Save multiple versions of the document as you make changes, allowing you to revert to earlier versions if necessary.
- Versioning System: Implement a versioning system to keep track of different versions of the document.
- Descriptive Filenames: Use descriptive filenames to identify each version, including the date, time, and a brief description of the changes.
- Backup Regularly: Backup your documents regularly to protect against data loss.
8. Advanced Tips and Tricks for Microsoft Word’s Compare Feature
To truly master the Compare feature in Microsoft Word, consider these advanced tips and tricks:
8.1. Ignoring Specific Elements
Sometimes, you might want to ignore certain elements during the comparison process, such as headers, footers, or specific styles. While Word doesn’t offer a direct way to exclude these elements, you can work around it:
- Remove Temporarily: Create a copy of each document and temporarily remove the elements you want to ignore. Compare these modified copies, then manually review the original documents for changes in the ignored elements.
- Styles: If the elements you want to ignore are defined by specific styles, you can use Find and Replace to temporarily remove the style from the copies before comparing.
8.2. Comparing Tables Effectively
Comparing tables can be tricky, especially if they have complex structures. Here’s how to do it effectively:
- Convert to Text: Convert the tables to text before comparing. This will allow Word to compare the content row by row.
- Select the table.
- Go to the “Layout” tab under “Table Tools.”
- Click “Convert to Text.”
- Choose a separator (e.g., tabs or commas).
- Compare the resulting text.
- Manual Review: For complex tables, a manual review might be necessary. Use the Compare feature to highlight overall changes, then manually inspect the tables for structural differences.
8.3. Using the “Combine” Feature
In addition to “Compare,” Word offers a “Combine” feature that merges changes from multiple documents into one. This can be useful in collaborative scenarios:
- Go to the “Review” tab.
- Click on “Compare.”
- Select “Combine.”
- Choose the original and revised documents.
- Word will create a new document with all changes marked, allowing you to accept or reject them.
8.4. Customizing Comparison Display
Customize how changes are displayed to make the comparison results easier to understand:
- Change Colors: Change the colors used to mark insertions, deletions, and formatting changes. Go to “File” > “Options” > “Track Changes” to customize these settings.
- Show/Hide Comments: Show or hide comments to focus on content changes. Go to the “Review” tab and use the “Show Comments” button.
- Simple Markup: Use the “Simple Markup” view to get a clean overview of the changes without seeing every detail. Click on the markup options in the “Tracking” group and select “Simple Markup.”
8.5. Keyboard Shortcuts
Use keyboard shortcuts to speed up the review process:
Alt + Right Arrow: Go to the next change.Alt + Left Arrow: Go to the previous change.Alt + A: Accept the current change.Alt + R: Reject the current change.
9. Real-World Examples of Students Using the Compare Feature
To illustrate the practical benefits of the Compare feature, here are some real-world examples of how students can use it:
9.1. Law Student Analyzing Contracts
A law student is analyzing two versions of a contract to identify changes in the terms and conditions. She uses the Compare feature to quickly see what has been added, deleted, or modified. This allows her to focus on the critical changes and understand their implications.
- Identifying Key Changes: The Compare feature highlights changes in clauses, deadlines, and other important terms.
- Ensuring Compliance: The student can ensure that the contract complies with relevant laws and regulations.
- Negotiation Preparation: By identifying changes, the student can prepare for negotiations and advocate for her client’s interests.
9.2. Engineering Student Collaborating on a Project
An engineering student is working with a team on a design project. Each team member has contributed to the project report, and the student needs to integrate their contributions into a single document. The Compare feature helps him see who added what, allowing for seamless integration and revision of the content.
- Combining Contributions: The student can easily combine contributions from multiple team members into a single document.
- Resolving Conflicts: If team members have conflicting ideas or edits, the Compare feature helps visualize these conflicts and facilitate discussion and resolution.
- Ensuring Consistency: The feature helps maintain a consistent writing style and format throughout the document.
9.3. Medical Student Reviewing Research Papers
A medical student is reviewing several research papers for a literature review. He uses the Compare feature to compare the papers and identify key findings, methodologies, and conclusions.
- Identifying Key Findings: The Compare feature helps the student quickly identify the main points of each paper.
- Comparing Methodologies: The student can compare the research methods used in each paper, identifying strengths and weaknesses.
- Synthesizing Information: By comparing the papers, the student can synthesize the information and draw conclusions for his literature review.
9.4. History Student Analyzing Historical Documents
A history student is analyzing two versions of a historical document to understand how it has changed over time. The Compare feature helps her identify changes in wording, tone, and content.
- Tracking Changes Over Time: The student can track how the document has evolved over time, gaining insights into the historical context and influences.
- Identifying Bias: The Compare feature can help identify biases or agendas that may have influenced the changes.
- Understanding Historical Context: By comparing the documents, the student can gain a deeper understanding of the historical context and significance of the document.
9.5. English Student Revising Essays
An English student is revising an essay based on feedback from her professor. The Compare feature allows her to easily see the changes made by her professor and incorporate them into her work.
- Tracking Instructor Edits: The student can quickly see the specific changes made by her professor, such as corrections, additions, or deletions.
- Understanding Suggestions: The Compare feature provides context for the professor’s feedback, helping the student understand the rationale behind each change.
- Improving Future Work: By reviewing the tracked changes, the student can learn from her mistakes and improve her writing skills for future assignments.
10. Conclusion: Empowering Students with the Compare Feature
In conclusion, the Compare feature in Microsoft Word is an invaluable tool for students across various disciplines. Its ability to efficiently track and highlight changes between documents streamlines collaborative projects, simplifies revision processes, and promotes academic integrity. By understanding how to use this feature effectively, students can enhance their productivity, improve the quality of their work, and develop essential skills for academic and professional success.
Whether it’s for collaborative writing, incorporating feedback, tracking revisions, or checking for plagiarism, the Compare feature offers a versatile solution for managing and analyzing documents. While alternatives like Google Docs, Draftable, and Beyond Compare offer additional functionalities, the built-in Compare feature in Microsoft Word remains a powerful and accessible tool for most students.
By following the tips and tricks outlined in this article, students can master the Compare feature and leverage its full potential. From preparing documents properly to choosing the right comparison settings and reviewing changes carefully, these best practices will help students make the most of this valuable tool.
Remember, COMPARE.EDU.VN is here to assist you in making informed decisions, whether it’s about educational tools or other important aspects of student life. Visit our website at COMPARE.EDU.VN for more comparisons and resources. Our commitment is to provide you with the information you need to succeed. If you have any questions or need further assistance, feel free to contact us at 333 Comparison Plaza, Choice City, CA 90210, United States, or reach out via WhatsApp at +1 (626) 555-9090. Let compare.edu.vn be your partner in making the best choices for your future.
FAQ: Frequently Asked Questions About the Compare Feature in Microsoft Word
1. Is the Compare feature available in all versions of Microsoft Word?
The Compare feature is available in most modern versions of Microsoft Word, including those offered through Microsoft 365 Education plans. However, older or very basic versions may not include this functionality.
2. How do I access the Compare feature in Microsoft Word?
To access the Compare feature, open Microsoft Word, click on the “Review” tab in the ribbon, and then click on the “Compare” button in the “Compare” group. Select “Compare” from the dropdown menu.
3. Can I compare documents with different file formats using the Compare feature?
It’s best to compare documents in the same file format (preferably .docx) to ensure accurate results. Converting documents between formats can sometimes introduce discrepancies.
4. How do I interpret the results of the document comparison?
The comparison results are typically displayed in a new document with changes marked using different colors and symbols. Insertions are often underlined, deletions are displayed with a strikethrough, and formatting changes are indicated in the Revisions pane.
5. Can I accept or reject changes individually?
Yes, you can accept or reject changes individually by clicking on the “Review” tab and using the “Accept” and “Reject” buttons in the “Changes” group.
6. What are some common issues with the Compare feature and how can I troubleshoot them?
Common issues include the Compare feature not being found, inaccurate comparison results, a slow comparison process, and the inability to accept or reject changes. Troubleshooting steps include checking your version of Word, ensuring the documents are in the same file format, adjusting comparison settings, and checking for document protection or permissions.
7. Are there any alternatives to the Compare feature in Microsoft Word?
Yes, alternatives include Google Docs Compare Tool, Draftable, Beyond Compare, ExamDiff Pro, and DiffNow. These tools offer similar or enhanced functionalities for comparing documents.
8. How can I improve the accuracy of the document comparison?
To improve accuracy, prepare documents properly by removing comments, simplifying formatting, and standardizing the layout. Also, choose the right comparison settings and review changes carefully.
9. Can I customize how changes are displayed in the comparison results?
Yes, you can customize the display by changing the colors used to mark insertions, deletions, and formatting changes. You can also show or hide comments and use the “Simple Markup” view for a clean overview.
10. Is the Compare feature useful for checking plagiarism?
Yes, the Compare feature can be used to compare drafts against source material, helping students identify instances of unintentional plagiarism and ensure academic integrity.