Can You Compare Two Excel Documents? Yes, you absolutely can. Using tools like Microsoft Spreadsheet Compare or features within Excel itself, COMPARE.EDU.VN can help you identify differences between two versions of a spreadsheet, track changes, and ensure data integrity. This comprehensive guide will explore the various methods and tools available to compare Excel documents, providing a detailed, step-by-step approach to streamline your workflow and enhance accuracy.
1. Understanding the Need to Compare Excel Documents
Comparing two Excel documents is essential in many scenarios. Whether you’re tracking changes in a financial report, verifying data accuracy, or merging information from different sources, the ability to effectively compare Excel files is crucial. This process ensures consistency, reduces errors, and provides a clear audit trail of modifications.
1.1 Why Compare Excel Documents?
There are several compelling reasons to compare Excel documents:
- Track Changes: Identify modifications made between different versions of a document.
- Ensure Accuracy: Verify data consistency and integrity across files.
- Merge Data: Combine information from multiple sources into a single, coherent file.
- Audit Trail: Maintain a record of changes for compliance and accountability.
- Error Reduction: Minimize the risk of errors by identifying discrepancies early.
1.2 Common Scenarios for Comparing Excel Files
Here are some typical scenarios where comparing Excel documents is beneficial:
- Financial Reporting: Comparing monthly or quarterly reports to identify discrepancies.
- Budgeting: Verifying budget changes and tracking expenses.
- Sales Analysis: Comparing sales data across different periods or regions.
- Project Management: Tracking project progress and resource allocation.
- Data Validation: Ensuring data accuracy when importing or exporting data.
2. Using Microsoft Spreadsheet Compare
Microsoft Spreadsheet Compare is a dedicated tool designed specifically for comparing Excel files. It offers detailed reports on the differences between two workbooks, highlighting changes in data, formulas, and formatting.
2.1 Availability and Requirements
Spreadsheet Compare is available with specific versions of Microsoft Office:
- Office Professional Plus 2013
- Office Professional Plus 2016
- Office Professional Plus 2019
- Microsoft 365 Apps for enterprise
If you have one of these versions, you can access Spreadsheet Compare.
2.2 Opening Spreadsheet Compare
To open Spreadsheet Compare, follow these steps:
- Start Screen: Click on Spreadsheet Compare in the Start menu.
- Search: If you don’t see it, type Spreadsheet Compare and select the option when it appears.
2.3 Step-by-Step Guide to Comparing Files
Here’s how to compare two Excel workbooks using Microsoft Spreadsheet Compare:
- Open the Tool: Launch Spreadsheet Compare.
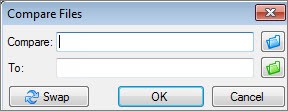
- Compare Files: Click Home > Compare Files. This opens the Compare Files dialog box.
- Select Files:
- Click the blue folder icon next to the Compare box to select the older version of the workbook.
- Click the green folder icon next to the To box to select the newer version of the workbook.
- You can enter a web address if the files are saved online.
- Choose Options: In the left pane, select the options you want to include in the comparison, such as Formulas, Macros, and Cell Format. You can also click Select All.
- Run Comparison: Click OK to start the comparison.
- Password Protection: If a workbook is password-protected, you’ll be prompted to enter the password.
2.4 Understanding the Comparison Results
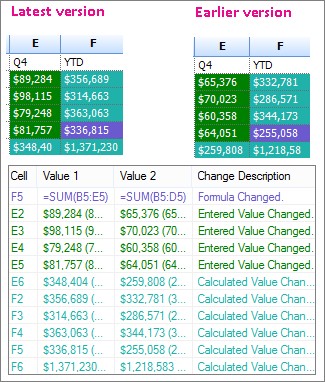
The results are displayed in a two-pane grid. The left pane shows the “Compare” file (older version), and the right pane shows the “To” file (newer version). A pane below the grids provides detailed information about the changes.
- Worksheet Comparison: Each worksheet is compared to the corresponding worksheet in the other file. Use the horizontal scroll bar to navigate between worksheets.
- Highlighting: Differences are highlighted with color-coded cell fills or text fonts. The legend in the lower-left pane explains the color codes.
2.5 Interpreting Color Codes
Here’s a breakdown of common color codes:
| Color | Meaning |
|---|---|
| Green Fill | Entered value (non-formula cell) changed |
| Green Font | Entered value (non-formula cell) changed |
| Blue-Green Fill | Calculated value changed |
2.6 Example Scenario: Analyzing Quarterly Results
Consider a scenario where you’re comparing Q4 results between an earlier and a later version of a workbook. The earlier version had preliminary numbers, while the latest version contains final figures.
- Entered Values: Cells E2:E5 in both versions have a green fill, indicating that the entered values have changed.
- Calculated Results: Cells F2:F4 and E6:F6 have a blue-green fill, indicating that the calculated values have changed due to the updated entered values.
- Formula Correction: In cell F5, the formula was corrected in the updated version (from =SUM(B5:D5) to =SUM(B5:E5)).
3. Using Excel’s Built-In Comparison Features
Excel also provides built-in features that, while not as comprehensive as Spreadsheet Compare, can be useful for basic comparisons.
3.1 Viewing Workbooks Side-by-Side
Excel allows you to view two workbooks side-by-side, making it easier to manually compare data.
3.1.1 Steps to View Side-by-Side
- Open Workbooks: Open both Excel workbooks you want to compare.
- View Tab: Go to the View tab on the Excel ribbon.
- View Side by Side: Click the View Side by Side button in the Window group.
Excel will arrange the two workbooks so they appear next to each other on the screen.
3.1.2 Synchronous Scrolling
To synchronize scrolling between the two workbooks, click the Synchronous Scrolling button, also in the Window group. This ensures that when you scroll in one workbook, the other scrolls simultaneously, allowing you to compare corresponding rows and columns easily.
3.2 Using Conditional Formatting to Highlight Differences
Conditional formatting can be used to highlight differences between two sets of data within the same worksheet or across different worksheets.
3.2.1 Steps to Use Conditional Formatting
- Select Data Range: Select the data range in the first worksheet you want to compare.
- Conditional Formatting: Go to the Home tab and click Conditional Formatting in the Styles group.
- New Rule: Select New Rule… from the dropdown menu.
- Use a Formula: Choose Use a formula to determine which cells to format.
- Enter Formula: Enter a formula that compares the selected range to the corresponding range in the second worksheet. For example, if you are comparing cells A1:A10 in Sheet1 to cells A1:A10 in Sheet2, the formula would be
=A1<>Sheet2!A1. - Format: Click the Format… button to choose a formatting style to highlight the differences (e.g., fill color, font color).
- Apply: Click OK to apply the conditional formatting rule.
Now, any cells in the first worksheet that differ from their corresponding cells in the second worksheet will be highlighted.
3.3 Using Formulas to Compare Data
Excel formulas can be used to compare data and return specific results based on the comparison.
3.3.1 Using the IF Function
The IF function is a versatile tool for comparing data. It allows you to specify a condition and return one value if the condition is true and another value if the condition is false.
Example:
=IF(A1=Sheet2!A1, "Match", "Mismatch")
This formula compares the value in cell A1 of the current sheet to the value in cell A1 of Sheet2. If the values match, the formula returns “Match”; otherwise, it returns “Mismatch”.
3.3.2 Using the EXACT Function
The EXACT function compares two text strings and returns TRUE if they are exactly the same (case-sensitive) and FALSE otherwise.
Example:
=EXACT(A1, Sheet2!A1)
This formula compares the text in cell A1 of the current sheet to the text in cell A1 of Sheet2. If the text is identical, the formula returns TRUE; otherwise, it returns FALSE.
3.4 Limitations of Excel’s Built-In Features
While Excel’s built-in features are useful, they have limitations:
- Manual Setup: Conditional formatting and formulas require manual setup and can be time-consuming for large datasets.
- Limited Reporting: Excel does not provide a comprehensive report of all differences like Spreadsheet Compare.
- Complexity: Complex comparisons may require advanced formula knowledge.
4. Third-Party Excel Comparison Tools
In addition to Microsoft Spreadsheet Compare and Excel’s built-in features, several third-party tools are available for comparing Excel documents. These tools often offer additional features and enhanced functionality.
4.1 Overview of Third-Party Tools
Here are some popular third-party Excel comparison tools:
- Araxis ExcelDiff: A powerful tool for comparing Excel files, offering detailed reports and change tracking.
- Spreadsheet Detective: Identifies errors, inconsistencies, and risks in Excel workbooks.
- XL Comparator: Compares Excel files and highlights differences in data, formulas, and formatting.
- Synkronizer: A comprehensive tool for comparing, merging, and synchronizing Excel workbooks.
4.2 Features of Third-Party Tools
Third-party tools often provide advanced features such as:
- Detailed Reporting: Comprehensive reports that highlight all differences between files.
- Change Tracking: Ability to track changes and revert to previous versions.
- Merge Functionality: Tools for merging data from multiple workbooks into a single file.
- Error Detection: Identification of errors, inconsistencies, and risks in workbooks.
- User-Friendly Interface: Intuitive interfaces that make it easy to compare files.
4.3 Choosing the Right Tool
When choosing a third-party Excel comparison tool, consider the following factors:
- Features: Determine which features are most important for your needs (e.g., reporting, change tracking, merge functionality).
- Ease of Use: Look for a tool with an intuitive interface that is easy to learn and use.
- Compatibility: Ensure the tool is compatible with your version of Excel and operating system.
- Price: Consider the cost of the tool and whether it fits within your budget.
- Reviews: Read reviews and testimonials from other users to get an idea of the tool’s performance and reliability.
5. Best Practices for Comparing Excel Documents
To ensure accurate and efficient comparisons, follow these best practices:
5.1 Preparing Your Files
- Backup: Always create a backup of your files before comparing them. This ensures that you can revert to the original versions if necessary.
- Consistency: Ensure that the files you are comparing have a consistent structure and format. This makes it easier to identify differences and reduces the risk of errors.
- Clear Naming: Use clear and descriptive names for your files to make it easier to identify the different versions.
5.2 Structuring Your Data
- Consistent Layout: Maintain a consistent layout for your data, including the same column headers and data types.
- Avoid Merged Cells: Avoid using merged cells, as they can complicate comparisons and lead to errors.
- Use Tables: Use Excel tables to organize your data. Tables automatically adjust to changes in data and make it easier to reference data ranges.
5.3 Using Formulas and Functions
- Consistent Formulas: Use consistent formulas across your workbooks to ensure that calculations are performed correctly.
- Error Checking: Use Excel’s error checking features to identify and correct errors in your formulas.
- Named Ranges: Use named ranges to make your formulas more readable and easier to maintain.
5.4 Documenting Changes
- Change Log: Maintain a change log to document all modifications made to your workbooks.
- Comments: Use comments to explain the reasons for changes and provide additional context.
- Version Control: Use version control software to track changes and manage different versions of your files.
6. Advanced Techniques for Excel Comparison
For more complex comparisons, consider these advanced techniques:
6.1 Using VBA for Custom Comparisons
VBA (Visual Basic for Applications) can be used to create custom macros for comparing Excel documents. This allows you to automate complex comparison tasks and tailor the comparison to your specific needs.
6.1.1 Example VBA Code
Here’s an example of VBA code that compares two worksheets and highlights the differences:
Sub CompareSheets()

    Dim Sheet1 As Worksheet
    Dim Sheet2 As Worksheet
    Dim Cell1 As Range
    Dim Cell2 As Range
    Dim LastRow As Long
    Dim LastCol As Long

    ' Set the worksheets to compare
    Set Sheet1 = ThisWorkbook.Sheets("Sheet1")
    Set Sheet2 = ThisWorkbook.Sheets("Sheet2")

    ' Get the last row and column
    LastRow = Sheet1.Cells.Find("*", SearchOrder:=xlByRows, SearchDirection:=xlPrevious).Row
    LastCol = Sheet1.Cells.Find("*", SearchOrder:=xlByColumns, SearchDirection:=xlPrevious).Column

    ' Loop through each cell and compare
    For i = 1 To LastRow
        For j = 1 To LastCol
            Set Cell1 = Sheet1.Cells(i, j)
            Set Cell2 = Sheet2.Cells(i, j)

            ' Compare the values
            If Cell1.Value <> Cell2.Value Then
                ' Highlight the differences
                Cell1.Interior.Color = RGB(255, 0, 0) ' Red
                Cell2.Interior.Color = RGB(255, 0, 0) ' Red
            End If
        Next j
    Next i

    MsgBox "Comparison complete!"

End Sub
This code compares the values in each cell of Sheet1 to the corresponding cell in Sheet2 and highlights any differences in red.
6.2 Using Power Query for Data Comparison
Power Query is a powerful data transformation and integration tool that can be used to compare data from multiple sources.
6.2.1 Steps to Use Power Query
- Get Data: Open Excel and go to the Data tab. Click Get Data and select the data source for your first workbook.
- Load Data: Load the data into the Power Query Editor.
- Repeat: Repeat the process for your second workbook.
- Merge Queries: In the Power Query Editor, select Merge Queries from the Combine group.
- Select Tables: Choose the tables you want to merge and select the columns to use for the merge.
- Join Kind: Choose the join kind that is appropriate for your comparison (e.g., Left Outer, Right Outer, Full Outer).
- Expand Columns: Expand the columns from the second table that you want to compare.
- Compare Columns: Add a custom column to compare the values in the corresponding columns. For example, you can use a formula like
=[Column1] = [Column2]to compare the values in Column1 and Column2. - Load Data: Load the transformed data back into Excel.
You can now analyze the data and identify the differences between the two workbooks.
6.3 Using PivotTables for Summarizing Differences
PivotTables can be used to summarize and analyze differences between Excel documents. By creating a PivotTable that compares data from multiple sources, you can quickly identify discrepancies and trends.
6.3.1 Steps to Use PivotTables
- Consolidate Data: Consolidate the data from your Excel documents into a single worksheet or table.
- Create PivotTable: Select the data range and go to the Insert tab. Click PivotTable to create a new PivotTable.
- Add Fields: Add the fields you want to analyze to the PivotTable. For example, you can add the columns you want to compare to the Rows area and the values you want to summarize to the Values area.
- Filter Data: Use filters to focus on specific differences or trends.
- Analyze Results: Analyze the PivotTable to identify discrepancies and patterns in the data.
7. Integrating Data from Different Excel Files
In many cases, you may need to integrate data from different Excel files rather than just comparing them. Here are some techniques for integrating data:
7.1 Using VLOOKUP and HLOOKUP
VLOOKUP (Vertical Lookup) and HLOOKUP (Horizontal Lookup) are functions that allow you to search for a value in one column or row (the “lookup range”) and return a value from another column or row in the same range.
7.1.1 VLOOKUP Example
Suppose you have two Excel files:
- File 1: Contains a list of product IDs and their corresponding prices.
- File 2: Contains a list of product IDs and the quantity sold.
You want to add the price information from File 1 to File 2.
-
Open File 2: Open the Excel file where you want to add the price information.
-
Enter VLOOKUP Formula: In a new column (e.g., “Price”), enter the following formula:
=VLOOKUP(A2, '[File1.xlsx]Sheet1'!$A$2:$B$100, 2, FALSE)A2: The product ID you want to look up.'[File1.xlsx]Sheet1'!$A$2:$B$100: The lookup range in File 1 (adjust the range as needed).2: The column number in the lookup range that contains the price information.FALSE: Specifies an exact match.
-
Copy Formula: Copy the formula down to apply it to all rows.
Now, File 2 will display the price information from File 1 based on the product ID.
7.2 Using INDEX and MATCH
INDEX and MATCH are a powerful combination for performing lookups. MATCH returns the position of a value in a range, and INDEX returns the value at a specific position in a range.
7.2.1 INDEX and MATCH Example
Using the same scenario as above, here’s how to use INDEX and MATCH:
-
Open File 2: Open the Excel file where you want to add the price information.
-
Enter INDEX and MATCH Formula: In a new column (e.g., “Price”), enter the following formula:
=INDEX('[File1.xlsx]Sheet1'!$B$2:$B$100, MATCH(A2, '[File1.xlsx]Sheet1'!$A$2:$A$100, 0))'[File1.xlsx]Sheet1'!$B$2:$B$100: The range containing the price information in File 1.MATCH(A2, '[File1.xlsx]Sheet1'!$A$2:$A$100, 0): Finds the position of the product ID in File 1.A2: The product ID you want to look up.
-
Copy Formula: Copy the formula down to apply it to all rows.
This formula combines INDEX and MATCH to retrieve the price information from File 1 based on the product ID.
7.3 Using Power Query for Data Integration
Power Query can also be used to integrate data from multiple Excel files.
7.3.1 Steps to Use Power Query for Data Integration
- Get Data: Open Excel and go to the Data tab. Click Get Data and select the data source for your first workbook.
- Load Data: Load the data into the Power Query Editor.
- Repeat: Repeat the process for your second workbook.
- Append Queries: In the Power Query Editor, select Append Queries from the Combine group.
- Select Tables: Choose the tables you want to append.
- Load Data: Load the transformed data back into Excel.
Power Query will combine the data from the two workbooks into a single table.
8. Common Issues and Troubleshooting
When comparing Excel documents, you may encounter some common issues. Here’s how to troubleshoot them:
8.1 “Unable to Open Workbook” Error
This error typically occurs when one of the workbooks is password-protected.
Solution
- Enter the password when prompted.
- Ensure that you have the necessary permissions to access the workbook.
- If you don’t know the password, contact the owner of the workbook.
8.2 Differences Not Highlighted
Sometimes, differences between workbooks may not be highlighted correctly.
Solution
- Ensure that you have selected the appropriate comparison options in Spreadsheet Compare (e.g., Formulas, Macros, Cell Format).
- Check that the data types are consistent across the workbooks.
- Verify that there are no hidden rows or columns that are affecting the comparison.
8.3 Incorrect Results
Incorrect results can occur due to errors in formulas or data inconsistencies.
Solution
- Double-check your formulas to ensure that they are correct.
- Use Excel’s error checking features to identify and correct errors in your formulas.
- Verify that the data in both workbooks is accurate and consistent.
8.4 Slow Performance
Comparing large Excel files can be slow and resource-intensive.
Solution
- Close any unnecessary applications to free up system resources.
- Reduce the size of the workbooks by removing unnecessary data or formatting.
- Use a more powerful computer with more memory and processing power.
9. Real-World Applications of Excel Comparison
Excel comparison techniques are used in a wide range of industries and applications.
9.1 Finance and Accounting
- Financial Reporting: Comparing financial statements to identify discrepancies and ensure accuracy.
- Budgeting: Verifying budget changes and tracking expenses.
- Auditing: Auditing financial data to ensure compliance with regulations.
9.2 Project Management
- Project Tracking: Tracking project progress and resource allocation.
- Variance Analysis: Analyzing variances between planned and actual project costs.
- Risk Management: Identifying and managing project risks.
9.3 Sales and Marketing
- Sales Analysis: Comparing sales data across different periods or regions.
- Marketing Campaigns: Analyzing the effectiveness of marketing campaigns.
- Customer Relationship Management: Managing customer data and tracking customer interactions.
9.4 Human Resources
- Employee Data Management: Managing employee data and tracking employee performance.
- Compensation Analysis: Analyzing compensation data to ensure fair and equitable pay.
- Training and Development: Tracking employee training and development activities.
9.5 Data Analysis
- Data Validation: Ensuring data accuracy when importing or exporting data.
- Data Cleansing: Identifying and correcting errors and inconsistencies in data.
- Data Mining: Analyzing large datasets to identify trends and patterns.
10. Future Trends in Excel Comparison
The field of Excel comparison is constantly evolving, with new tools and techniques being developed to improve efficiency and accuracy.
10.1 Artificial Intelligence (AI)
AI-powered tools can automate complex comparison tasks and identify subtle differences that may be missed by manual comparison methods.
10.2 Machine Learning (ML)
ML algorithms can be used to learn from past comparisons and improve the accuracy of future comparisons.
10.3 Cloud-Based Solutions
Cloud-based Excel comparison tools offer several advantages, including scalability, accessibility, and collaboration.
10.4 Integration with Other Tools
Integration with other data analysis and visualization tools can provide a more comprehensive view of the data and facilitate better decision-making.
FAQ: Comparing Excel Documents
Q1: Can I compare two Excel files without Microsoft Office?
Yes, there are several online and open-source tools available that allow you to compare Excel files without Microsoft Office. Some popular options include Google Sheets, LibreOffice Calc, and various online comparison tools.
Q2: How do I compare two Excel sheets for differences?
You can use Microsoft Spreadsheet Compare, Excel’s built-in features like conditional formatting, or third-party tools to compare two Excel sheets for differences. These tools highlight the differences in data, formulas, and formatting.
Q3: What is the best way to compare two Excel files?
The best way to compare two Excel files depends on your specific needs. For detailed and comprehensive comparisons, Microsoft Spreadsheet Compare or third-party tools like Araxis ExcelDiff are recommended. For basic comparisons, Excel’s built-in features like View Side by Side and conditional formatting can be sufficient.
Q4: How can I highlight differences between two Excel columns?
You can use conditional formatting with a formula to highlight differences between two Excel columns. Select the first column, go to Conditional Formatting, choose New Rule, and use a formula like =A1<>B1 to highlight differences between column A and column B.
Q5: Is there a way to track changes in Excel?
Yes, Excel has a Track Changes feature that allows you to track changes made to a workbook. However, this feature is limited and not as robust as using Microsoft Spreadsheet Compare or third-party tools for detailed change tracking.
Q6: Can I compare Excel files with different structures?
Comparing Excel files with different structures can be challenging but is possible. You may need to use advanced techniques like Power Query to transform the data into a consistent format before comparing it.
Q7: How do I merge data from two Excel files into one?
You can use functions like VLOOKUP, HLOOKUP, INDEX, and MATCH, or Power Query to merge data from two Excel files into one. Power Query is particularly useful for complex data integration tasks.
Q8: What are the limitations of Excel’s built-in comparison features?
Excel’s built-in comparison features are limited in terms of reporting, change tracking, and the ability to handle complex comparisons. They also require manual setup and may be time-consuming for large datasets.
Q9: Can I use VBA to compare Excel files?
Yes, you can use VBA to create custom macros for comparing Excel files. This allows you to automate complex comparison tasks and tailor the comparison to your specific needs.
Q10: Are there any cloud-based Excel comparison tools?
Yes, several cloud-based Excel comparison tools are available. These tools offer advantages such as scalability, accessibility, and collaboration.
Comparing two Excel documents is a critical task in many professional settings. Whether you’re tracking changes, ensuring accuracy, or merging data, having the right tools and techniques can save you time and reduce errors. From using Microsoft Spreadsheet Compare to leveraging Excel’s built-in features and exploring third-party tools, there are numerous ways to effectively compare Excel files. By following the best practices and advanced techniques outlined in this guide, you can streamline your workflow and enhance the accuracy of your data analysis.
Ready to make data-driven decisions with confidence? Visit COMPARE.EDU.VN today to discover comprehensive comparisons and find the perfect solutions for your needs. Our expert insights and detailed analyses will empower you to choose the best options and achieve your goals.
Address: 333 Comparison Plaza, Choice City, CA 90210, United States
Whatsapp: +1 (626) 555-9090
Website: compare.edu.vn