Comparing spreadsheets in Excel 2010 can be a crucial task for data analysis, reconciliation, and decision-making. COMPARE.EDU.VN provides a comprehensive guide on how to effectively compare spreadsheets, ensuring accurate results and streamlined workflows. Discover expert techniques and tools to enhance your spreadsheet comparison capabilities. Dive into the world of side-by-side comparisons, data reconciliation, and efficient data analysis, empowering you to make informed decisions with confidence.
1. What Are The Methods To Compare Spreadsheets In Excel 2010?
Excel 2010 offers several methods to compare spreadsheets, including manual comparison, using the View Side by Side feature, conditional formatting, and specialized add-ins. These methods cater to different comparison needs, from simple visual checks to in-depth data reconciliation.
- Manual Comparison: This involves visually inspecting two spreadsheets side-by-side, which is suitable for small datasets but becomes impractical for larger ones.
- View Side by Side: A built-in feature in Excel 2010 that allows you to view two worksheets or workbooks simultaneously, facilitating visual comparison and synchronous scrolling.
- Conditional Formatting: Use formulas to highlight differences or similarities between two ranges, making it easier to identify discrepancies or matches.
- Specialized Add-ins: Third-party tools that offer advanced comparison capabilities, such as identifying cell-level differences, generating comparison reports, and handling large datasets.
2. How Do You Use The View Side By Side Feature To Compare Spreadsheets In Excel 2010?
The View Side by Side feature in Excel 2010 is a quick and easy way to visually compare two open worksheets or workbooks. It automatically arranges the windows for simultaneous viewing and offers synchronous scrolling for seamless comparison.
- Open the Workbooks: Start by opening the two Excel workbooks you want to compare. Ensure that each workbook displays the worksheet you want to compare.
- Access the View Tab: Click on the “View” tab in the Excel ribbon.
- Click View Side by Side: In the “Window” group, click the “View Side by Side” button.
- Select Workbooks (if necessary): If you have more than two workbooks open, Excel will display the “Compare Side by Side” dialog box. Select the name of the workbook you want to compare with the currently active one and click “OK”.
- Scroll and Compare: The two selected worksheets will now be displayed side by side. By default, synchronous scrolling is enabled, meaning that scrolling in one worksheet will also scroll the other.
- Disable Synchronous Scrolling (Optional): If you prefer to scroll through each worksheet independently, click the “Synchronous Scrolling” button in the “Window” group to toggle it off.
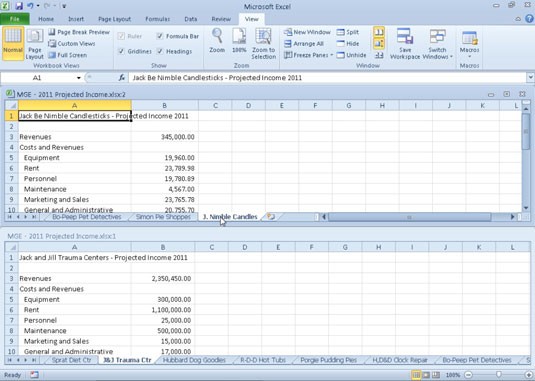 Comparing two worksheet windows side by side.
3. What Is Synchronous Scrolling, And How Does It Aid Spreadsheet Comparison In Excel 2010?
Synchronous scrolling is a feature in Excel 2010’s View Side by Side mode that links the scrolling of two worksheets, allowing you to simultaneously scroll through both and maintain alignment for easy comparison. This is particularly useful when comparing large datasets where you need to ensure that corresponding rows and columns are always visible together.
- Enabling/Disabling: Synchronous scrolling is enabled by default when you use the View Side by Side feature. You can toggle it on or off by clicking the “Synchronous Scrolling” button in the “Window” group of the “View” tab.
- Benefits:
- Time-Saving: Eliminates the need to manually scroll each worksheet individually, saving time and effort.
- Accuracy: Ensures that you are always comparing corresponding data points, reducing the risk of errors.
- Efficiency: Simplifies the comparison process, making it easier to identify differences and similarities.
4. How Can Conditional Formatting Be Used To Highlight Differences In Excel 2010?
Conditional formatting in Excel 2010 can be used to automatically highlight cells that meet specific criteria, making it a powerful tool for identifying differences between two spreadsheets. By using formulas in conditional formatting, you can compare corresponding cells in two ranges and highlight those that do not match.
- Select the Range: Select the range of cells in the first spreadsheet that you want to compare.
- Open Conditional Formatting: Go to the “Home” tab, click on “Conditional Formatting” in the “Styles” group, and select “New Rule”.
- Use a Formula: Choose “Use a formula to determine which cells to format”.
- Enter the Formula: Enter a formula that compares the selected cell with the corresponding cell in the second spreadsheet. For example, if you are comparing cell A1 in the first spreadsheet with cell A1 in the second spreadsheet (located in Sheet2), the formula would be
=A1<>Sheet2!A1. - Set the Formatting: Click the “Format” button and choose the formatting you want to apply to the cells that meet the criteria (e.g., fill color, font color).
- Apply the Rule: Click “OK” to apply the conditional formatting rule.
- Repeat for the Second Range (Optional): If you want to highlight differences in both spreadsheets, repeat the process for the corresponding range in the second spreadsheet, adjusting the formula accordingly (e.g.,
=A1<>Sheet1!A1if you are in Sheet2).
- Example Scenario: Imagine you have two spreadsheets with customer data, and you want to identify any discrepancies in the email addresses. You can use conditional formatting to highlight the email addresses that don’t match between the two spreadsheets, allowing you to quickly spot and correct any errors.
5. What Are Some Common Formulas For Conditional Formatting In Spreadsheet Comparison In Excel 2010?
When using conditional formatting to compare spreadsheets in Excel 2010, several formulas can be used to identify different types of discrepancies. Here are some common formulas:
- Exact Match:
=A1=Sheet2!A1– Checks if the value in cell A1 of the current sheet is exactly the same as the value in cell A1 of Sheet2. - Not Equal:
=A1<>Sheet2!A1– Checks if the value in cell A1 of the current sheet is different from the value in cell A1 of Sheet2. This is useful for highlighting discrepancies. - Case-Insensitive Match:
=UPPER(A1)=UPPER(Sheet2!A1)– Converts both values to uppercase before comparing, effectively ignoring case differences. - Numeric Comparison (Greater Than):
=A1>Sheet2!A1– Checks if the value in cell A1 of the current sheet is greater than the value in cell A1 of Sheet2. Useful for comparing numerical data. - Text Contains:
=ISNUMBER(SEARCH(Sheet2!A1,A1))– Checks if the text in cell A1 of Sheet2 is found within the text in cell A1 of the current sheet. - Blank Cell Check:
=ISBLANK(A1)– Highlights blank cells in the selected range. This can be useful for identifying missing data.
6. How Do You Compare Two Columns For Differences In Excel 2010?
Comparing two columns for differences in Excel 2010 can be achieved using various methods, including conditional formatting, formulas, and the “Go To Special” feature. Each method offers a unique approach to identifying discrepancies and highlighting differences between the two columns.
- Using Conditional Formatting:
- Select the first column of data.
- Go to “Home” > “Conditional Formatting” > “New Rule”.
- Choose “Use a formula to determine which cells to format”.
- Enter a formula like
=A1<>B1(assuming the first column is A and the second is B). - Set the desired formatting (e.g., fill color) and click “OK”.
- This will highlight cells in the first column that are different from their corresponding cells in the second column.
- Using Formulas:
- In an empty column, enter a formula like
=IF(A1=B1,"Match","Mismatch")in the first row. - Drag the formula down to apply it to all rows.
- This will display “Match” or “Mismatch” in each row, indicating whether the values in the two columns are the same or different.
- In an empty column, enter a formula like
- Using “Go To Special”:
- Select both columns of data.
- Press
Ctrl + Gto open the “Go To” dialog box, then click “Special”. - Choose “Row differences” and click “OK”.
- This will select the cells that are different from the corresponding cells in the same row. You can then apply formatting to highlight these cells.
7. Can You Compare Data Across Multiple Sheets Simultaneously In Excel 2010?
While Excel 2010 does not have a built-in feature to directly compare data across multiple sheets simultaneously, you can achieve this by using a combination of formulas, conditional formatting, and helper columns. This involves creating a consolidated view or using formulas to compare data points across different sheets.
- Consolidating Data:
- Create a new sheet to consolidate the data from the multiple sheets you want to compare.
- Use formulas like
='Sheet1'!A1,='Sheet2'!A1, etc., to pull the data from the corresponding cells in each sheet into the consolidated sheet. - Once the data is consolidated, you can use conditional formatting or formulas to compare the values in the consolidated sheet.
- Using Formulas with Sheet References:
- In a new column, use formulas that directly reference cells in different sheets.
- For example, if you want to compare cell A1 in Sheet1, Sheet2, and Sheet3, you can use a formula like
=IF(AND('Sheet1'!A1='Sheet2'!A1,'Sheet1'!A1='Sheet3'!A1),"Match","Mismatch"). - This will compare the values in the specified cells and return “Match” if they are all the same or “Mismatch” if any of them are different.
- Using 3D References:
- Excel 2010 supports 3D references, which allow you to refer to the same cell or range on multiple sheets.
- For example,
=SUM(Sheet1:Sheet3!A1)will sum the values in cell A1 on Sheet1, Sheet2, and Sheet3. - You can use 3D references in combination with other formulas to compare data across multiple sheets.
8. How Do Excel Add-Ins Enhance Spreadsheet Comparison Capabilities In Excel 2010?
Excel add-ins can significantly enhance spreadsheet comparison capabilities in Excel 2010 by providing advanced features beyond the built-in tools. These add-ins often offer more sophisticated comparison algorithms, detailed reporting, and the ability to handle large and complex datasets.
- Advanced Comparison Algorithms: Many add-ins use advanced algorithms to identify differences at the cell level, even if the data is formatted differently or contains minor variations.
- Detailed Reporting: Add-ins can generate detailed comparison reports that highlight all the differences between two spreadsheets, including cell values, formulas, formatting, and even hidden rows or columns.
- Handling Large Datasets: Some add-ins are optimized to handle very large datasets that might be too slow or cumbersome to compare using Excel’s built-in features.
- Data Reconciliation: Certain add-ins provide features for data reconciliation, allowing you to automatically merge or update data between two spreadsheets based on the comparison results.
- Audit Trail: Some add-ins offer an audit trail feature that tracks all the changes made during the comparison process, providing a record of who made what changes and when.
- Automation: Add-ins can automate the comparison process, allowing you to quickly compare multiple spreadsheets with just a few clicks.
9. What Are Some Popular Excel Add-Ins For Spreadsheet Comparison?
Several popular Excel add-ins offer enhanced spreadsheet comparison capabilities, each with its unique features and benefits. Here are a few notable examples:
- Spreadsheet Compare: This add-in, often included in Microsoft Office Professional Plus, provides a comprehensive set of tools for comparing Excel files, identifying changes, and generating detailed reports.
- Beyond Compare: A powerful comparison tool that supports Excel files and other data formats, offering advanced features for merging and synchronizing data.
- Araxis Excel Compare: An Excel-specific add-in that provides a detailed comparison of worksheets, highlighting cell-level differences, formula changes, and formatting variations.
- XL Comparator: A user-friendly add-in that simplifies the process of comparing Excel files, offering visual cues and detailed reports to help you quickly identify and resolve discrepancies.
- DiffEngineX: A high-performance Excel comparison tool designed for large and complex spreadsheets, offering advanced features for data reconciliation and audit trails.
10. How Do You Compare Workbooks For Differences With “Spreadsheet Compare” In Excel 2010?
“Spreadsheet Compare” is a tool, that is included in Microsoft Office Professional Plus. It allows you to compare two Excel workbooks for differences, providing a detailed analysis of changes in data, formulas, formatting, and more.
- Open Spreadsheet Compare: If you have Microsoft Office Professional Plus, you can find “Spreadsheet Compare” in the Microsoft Office Tools group in the Start menu.
- Compare Files: In “Spreadsheet Compare”, click “Compare Files”.
- Select Files: Choose the two Excel workbooks you want to compare and click “OK”.
- Review Results: “Spreadsheet Compare” will display the two workbooks side by side, highlighting the differences in various categories, such as:
- Data: Changes in cell values.
- Formulas: Modifications to formulas.
- Formatting: Differences in cell formatting, such as fonts, colors, and borders.
- Structure: Changes to the worksheet structure, such as inserted or deleted rows and columns.
- Filter Results: You can filter the results to focus on specific types of changes, such as data changes or formula changes.
- Generate Report: “Spreadsheet Compare” can generate a detailed report of the comparison results, which you can save or print for further analysis.
11. What Are The Limitations Of Using Excel 2010’s Built-In Features For Spreadsheet Comparison?
While Excel 2010 offers several built-in features for spreadsheet comparison, there are certain limitations to consider:
- Manual Comparison: This method is time-consuming and prone to errors, especially when dealing with large datasets.
- View Side by Side: While useful for visual comparison, it doesn’t provide a detailed analysis of the differences between the spreadsheets.
- Conditional Formatting: Can become complex and difficult to manage when comparing multiple criteria or large datasets. It also only highlights differences and doesn’t provide a summary or report.
- Lack of Advanced Features: Excel 2010’s built-in features lack advanced capabilities such as cell-level comparison, data reconciliation, and audit trails, which are offered by specialized add-ins.
- Performance Issues: Comparing large datasets using Excel’s built-in features can be slow and resource-intensive, potentially leading to performance issues.
12. How Do You Ensure Accuracy When Comparing Spreadsheets In Excel 2010?
Ensuring accuracy when comparing spreadsheets in Excel 2010 is crucial to avoid errors and make informed decisions. Here are some best practices to follow:
- Verify Data Integrity: Before comparing spreadsheets, ensure that the data is accurate and consistent. Check for data entry errors, inconsistencies in formatting, and missing values.
- Use Consistent Formatting: Apply consistent formatting to both spreadsheets to avoid false positives when comparing data. This includes using the same date formats, number formats, and text casing.
- Double-Check Formulas: If you are using formulas to compare data, double-check the formulas to ensure that they are correct and reference the correct cells.
- Use a Combination of Methods: Use a combination of comparison methods to verify the results. For example, use conditional formatting to highlight differences and then manually review the highlighted cells.
- Validate Results: After comparing spreadsheets, validate the results to ensure that they are accurate and complete. This may involve manually reviewing a sample of the data or using a third-party tool to verify the results.
- Document the Process: Document the comparison process, including the methods used, the results obtained, and any assumptions made. This will help you to reproduce the results and ensure consistency over time.
- Address Discrepancies: When discrepancies are identified, investigate the root cause and take corrective action to resolve the issues. This may involve updating the data, correcting formulas, or adjusting the comparison methods.
13. What Are Some Common Mistakes To Avoid When Comparing Spreadsheets In Excel 2010?
When comparing spreadsheets in Excel 2010, it’s important to be aware of common mistakes that can lead to inaccurate results or wasted time. Here are some pitfalls to avoid:
- Comparing Incorrect Files: Always double-check that you are comparing the correct versions of the spreadsheets. Misidentifying files can lead to comparing irrelevant data and drawing incorrect conclusions.
- Ignoring Formatting Differences: Differences in formatting (e.g., date formats, number formats, text casing) can cause false positives when comparing data. Ensure consistent formatting before comparing.
- Overlooking Hidden Rows/Columns: Hidden rows or columns can contain data that is not immediately visible, leading to incomplete comparisons. Unhide all rows and columns before comparing.
- Not Accounting for Formula Changes: If formulas have been changed in one spreadsheet but not the other, the comparison results may be misleading. Pay attention to formula differences.
- Relying Solely on Visual Inspection: Visual inspection is prone to errors, especially with large datasets. Use automated methods like conditional formatting or add-ins for more accurate comparisons.
- Not Validating Results: Always validate the comparison results to ensure accuracy. Don’t assume that the comparison is correct without verifying the findings.
- Failing to Document the Process: Document the steps you took to compare the spreadsheets, including the methods used, any assumptions made, and the results obtained. This will help you reproduce the comparison and ensure consistency in the future.
14. How Can You Compare Two Excel Files For Differences In Formulas In Excel 2010?
Comparing two Excel files for differences in formulas in Excel 2010 requires a slightly different approach than comparing data values. You’ll need to use a combination of techniques to identify which formulas have been modified or changed between the two files.
-
Using “Spreadsheet Compare” (if available):
- As mentioned earlier, “Spreadsheet Compare” (available in Microsoft Office Professional Plus) can identify formula changes.
- Open the two workbooks in “Spreadsheet Compare” and review the results, filtering for “Formula” changes.
-
Using VBA (Visual Basic for Applications):
- You can write a VBA macro to loop through all the cells in both workbooks and compare the formulas.
- Here’s a sample VBA code snippet:
Sub CompareFormulas() Dim wb1 As Workbook, wb2 As Workbook Dim ws1 As Worksheet, ws2 As Worksheet Dim cell As Range Dim i As Long, j As Long ' Set the workbooks and worksheets to compare Set wb1 = Workbooks("Workbook1.xlsx") ' Replace with the name of your first workbook Set wb2 = Workbooks("Workbook2.xlsx") ' Replace with the name of your second workbook Set ws1 = wb1.Sheets("Sheet1") ' Replace with the name of your first worksheet Set ws2 = wb2.Sheets("Sheet1") ' Replace with the name of your second worksheet ' Loop through each cell in the worksheets For i = 1 To ws1.UsedRange.Rows.Count For j = 1 To ws1.UsedRange.Columns.Count ' Check if the cell contains a formula If ws1.Cells(i, j).HasFormula And ws2.Cells(i, j).HasFormula Then ' Compare the formulas If ws1.Cells(i, j).Formula <> ws2.Cells(i, j).Formula Then ' If the formulas are different, highlight the cell ws1.Cells(i, j).Interior.Color = vbYellow ws2.Cells(i, j).Interior.Color = vbYellow End If End If Next j Next i MsgBox "Comparison complete. Cells with different formulas have been highlighted in yellow." End Sub- This code will compare the formulas in the specified worksheets and highlight the cells with different formulas in yellow.
-
Manual Review:
- If you have a small number of formulas to compare, you can manually review them side-by-side using the “View Side by Side” feature.
- This can be time-consuming, but it allows you to carefully examine the formulas and identify any changes.
15. How To Find The Differences Between Two Excel Sheets In Excel 2010?
Finding the differences between two Excel sheets in Excel 2010 can be achieved using a combination of methods, including conditional formatting, formulas, and the “Go To Special” feature. Each method offers a unique approach to identifying discrepancies and highlighting differences between the two sheets.
- Using Conditional Formatting:
- Select the range of cells in the first sheet that you want to compare.
- Go to “Home” > “Conditional Formatting” > “New Rule”.
- Choose “Use a formula to determine which cells to format”.
- Enter a formula like
=A1<>Sheet2!A1(assuming you are comparing cell A1 in the first sheet with cell A1 in the second sheet). - Set the desired formatting (e.g., fill color) and click “OK”.
- Repeat the process for the second sheet, adjusting the formula accordingly (e.g.,
=A1<>Sheet1!A1). - This will highlight cells in both sheets that are different from their corresponding cells in the other sheet.
- Using Formulas:
- In an empty column in one of the sheets, enter a formula like
=IF(A1=Sheet2!A1,"Match","Mismatch")in the first row. - Drag the formula down to apply it to all rows.
- This will display “Match” or “Mismatch” in each row, indicating whether the values in the two sheets are the same or different.
- In an empty column in one of the sheets, enter a formula like
- Using “Go To Special”:
- Select the range of cells in both sheets that you want to compare.
- Press
Ctrl + Gto open the “Go To” dialog box, then click “Special”. - Choose “Row differences” and click “OK”.
- This will select the cells that are different from the corresponding cells in the same row. You can then apply formatting to highlight these cells.
16. How Can You Effectively Manage And Reconcile Differences Identified During Spreadsheet Comparison In Excel 2010?
Effectively managing and reconciling differences identified during spreadsheet comparison in Excel 2010 requires a systematic approach to ensure that all discrepancies are addressed accurately and efficiently. Here’s a step-by-step guide:
- Document All Differences: Create a detailed list of all the differences identified during the comparison process. This list should include the cell addresses, the values in each spreadsheet, and a brief description of the discrepancy.
- Prioritize Differences: Prioritize the differences based on their potential impact on the data. Focus on the most critical discrepancies first, such as those that affect financial calculations or key performance indicators.
- Investigate Root Causes: Investigate the root causes of each difference to determine why they occurred. This may involve reviewing data entry procedures, formula calculations, or data validation rules.
- Implement Corrective Actions: Implement corrective actions to resolve the discrepancies. This may involve updating the data, correcting formulas, or adjusting data validation rules.
- Verify Corrections: After implementing corrective actions, verify that the corrections have been made accurately and that the data is now consistent between the two spreadsheets.
- Document the Reconciliation Process: Document the entire reconciliation process, including the differences identified, the root causes investigated, the corrective actions implemented, and the verification results. This documentation will serve as a valuable audit trail and will help to prevent similar discrepancies from occurring in the future.
- Update Data Entry Procedures: Based on the findings of the reconciliation process, update data entry procedures to prevent future discrepancies. This may involve providing additional training to data entry personnel, implementing stricter data validation rules, or automating data entry processes.
- Monitor Data Quality: Continuously monitor data quality to identify and address any new discrepancies that may arise. This may involve using data quality tools or implementing regular data audits.
17. What Are The Best Practices For Preparing Spreadsheets For Comparison In Excel 2010?
Preparing spreadsheets for comparison in Excel 2010 is crucial for ensuring accurate and efficient results. Here are some best practices to follow:
- Standardize Data Entry: Establish clear guidelines for data entry to ensure consistency across spreadsheets. This includes specifying the format for dates, numbers, text, and other data types.
- Use Data Validation: Implement data validation rules to restrict the type of data that can be entered into cells. This will help to prevent data entry errors and inconsistencies.
- Remove Extraneous Data: Remove any unnecessary data from the spreadsheets before comparing them. This includes comments, hidden rows/columns, and empty cells.
- Sort Data: Sort the data in both spreadsheets according to a common key to ensure that corresponding rows are aligned. This will make it easier to identify differences.
- Freeze Panes: Freeze the top row and/or leftmost column to keep headers visible while scrolling through the data. This will help to maintain context during the comparison process.
- Check for Errors: Use Excel’s built-in error checking tools to identify and correct any errors in the spreadsheets before comparing them.
- Save As Consistent File Format: Save both spreadsheets in the same file format (e.g., .xlsx) to avoid any compatibility issues.
18. How Do You Deal With Large Spreadsheets When Comparing Them In Excel 2010?
Dealing with large spreadsheets when comparing them in Excel 2010 can be challenging due to performance limitations and the sheer volume of data. Here are some strategies to help you effectively compare large spreadsheets:
- Increase System Resources: Ensure that your computer has sufficient RAM and processing power to handle large spreadsheets. Close any unnecessary applications to free up system resources.
- Disable Automatic Calculations: Disable automatic calculations in Excel to prevent the spreadsheet from recalculating formulas every time you make a change. This can significantly improve performance. To disable automatic calculations, go to “Formulas” > “Calculation Options” and select “Manual”.
- Use Efficient Formulas: Use efficient formulas that minimize the amount of calculation required. Avoid using volatile functions like
NOW()andTODAY()that recalculate every time the spreadsheet is opened or modified. - Limit the Scope of Comparison: Instead of comparing the entire spreadsheet at once, focus on comparing specific sections or columns that are most relevant to your analysis.
- Use Database Tools: If the spreadsheets are very large, consider importing the data into a database management system like Microsoft Access or SQL Server. These tools are designed to handle large datasets more efficiently than Excel.
- Use Excel Add-Ins: Consider using specialized Excel add-ins that are designed to handle large spreadsheets. These add-ins often offer advanced features for data filtering, sorting, and comparison that can significantly improve performance.
19. What Are Some Alternative Tools For Spreadsheet Comparison Besides Excel 2010?
While Excel 2010 offers some basic spreadsheet comparison capabilities, several alternative tools provide more advanced features and better performance. Here are some notable alternatives:
- Beyond Compare: A powerful comparison tool that supports Excel files and other data formats, offering advanced features for merging and synchronizing data.
- Araxis Merge: A professional-grade comparison tool that provides detailed comparisons of files and folders, including Excel files.
- DiffEngineX: A high-performance Excel comparison tool designed for large and complex spreadsheets, offering advanced features for data reconciliation and audit trails.
- Altova DiffDog: A versatile comparison tool that supports a wide range of file formats, including Excel, and offers advanced features for merging and synchronizing data.
- Code Compare: A free comparison tool that supports a variety of programming languages and file formats, including Excel.
- Online Comparison Tools: Several online tools allow you to compare Excel files without installing any software. These tools are typically free or offer a free trial period.
20. How Can COMPARE.EDU.VN Help You Compare Spreadsheets And Make Informed Decisions?
COMPARE.EDU.VN offers in-depth comparisons, breaking down features, benefits, and potential drawbacks, enabling you to weigh your options thoroughly. Access comprehensive guides on utilizing Excel 2010’s features, understanding conditional formatting techniques, and learning how specialized add-ins can streamline the comparison process.
We provide expert reviews of top Excel add-ins, offering insights into their functionalities and helping you select the perfect tool for your specific requirements. COMPARE.EDU.VN also presents real-world scenarios and case studies, showcasing how different comparison methods are applied across various industries.
Stop struggling with overwhelming choices. Visit compare.edu.vn today at 333 Comparison Plaza, Choice City, CA 90210, United States, or contact us via WhatsApp at +1 (626) 555-9090. Our dedicated resources will empower you to compare spreadsheets effectively and make confident, well-informed decisions.
FAQ Section
1. Is View Side by Side available in all Excel versions?
No, View Side by Side is available in Excel 2010 and later versions.
2. Can I compare more than two spreadsheets at once using View Side by Side?
No, View Side by Side only allows comparing two spreadsheets at a time.
3. Does conditional formatting work on all data types?
Yes, conditional formatting can be applied to various data types, including numbers, text, and dates.
4. Are there any limitations to using conditional formatting for spreadsheet comparison?
Yes, conditional formatting can become complex and difficult to manage when comparing multiple criteria or large datasets.
5. What is the best way to compare two very large Excel files?
For very large Excel files, consider using database tools or specialized Excel add-ins designed for handling large datasets.
6. How do I handle differences in formatting when comparing spreadsheets?
Ensure consistent formatting before comparing spreadsheets to avoid false positives. Use the same date formats, number formats, and text casing.
7. What if I don’t have Microsoft Office Professional Plus for Spreadsheet Compare?
You can use alternative methods like conditional formatting, formulas, or third-party Excel add-ins for spreadsheet comparison.
8. Can I use VBA to automate the spreadsheet comparison process?
Yes, you can write VBA macros to automate the comparison process, especially for complex or repetitive tasks.
9. What are some common errors to avoid when comparing spreadsheets?
Common errors include comparing incorrect files, ignoring formatting differences, overlooking hidden rows/columns, and not validating results.
10. How can I document the spreadsheet comparison process effectively?
Document the methods used, the results obtained, and any assumptions made. This will help you reproduce the results and ensure consistency over time.