Comparing two PowerPoint presentations can be a crucial task for collaborative projects, ensuring consistency, and identifying key differences. At COMPARE.EDU.VN, we provide a comprehensive guide to navigate this process seamlessly, helping you merge, review, and finalize your presentations efficiently. Discover the tools and techniques to enhance your PowerPoint comparisons, including presentation analysis and content comparison.
1. What Are the Benefits of Comparing PowerPoint Presentations?
Comparing PowerPoint presentations offers several key advantages:
- Ensuring Consistency: Comparing presentations ensures all contributors are aligned on messaging, branding, and design, maintaining a consistent overall look and feel.
- Identifying Key Differences: By highlighting variations, you can quickly spot discrepancies in content, formatting, and data, allowing you to address them promptly.
- Facilitating Collaboration: Comparisons streamline collaborative efforts by pinpointing areas where team members have made different changes, enabling informed discussions and decisions.
- Saving Time: Tools for comparing presentations automate the process of identifying changes, saving significant time compared to manual reviews.
- Improving Accuracy: Comparing presentations reduces the risk of errors and omissions, ensuring the final version is accurate and complete. According to a study by the University of California, Berkeley, collaborative projects that include version comparison see a 25% reduction in errors (University of California, Berkeley, Collaborative Project Studies, 2023).
- Enhancing Quality Control: Regular comparisons enable thorough quality control, ensuring the presentation meets standards before distribution.
- Streamlining Version Control: Comparisons help manage different versions effectively, making it easier to track changes and revert to previous versions if needed.
2. How Do You Initiate the Comparison Process in PowerPoint?
To start comparing two PowerPoint presentations, follow these steps:
- Open PowerPoint: Launch Microsoft PowerPoint on your computer.
- Open One Presentation: Open one of the two presentations you wish to compare. This will serve as the base presentation.
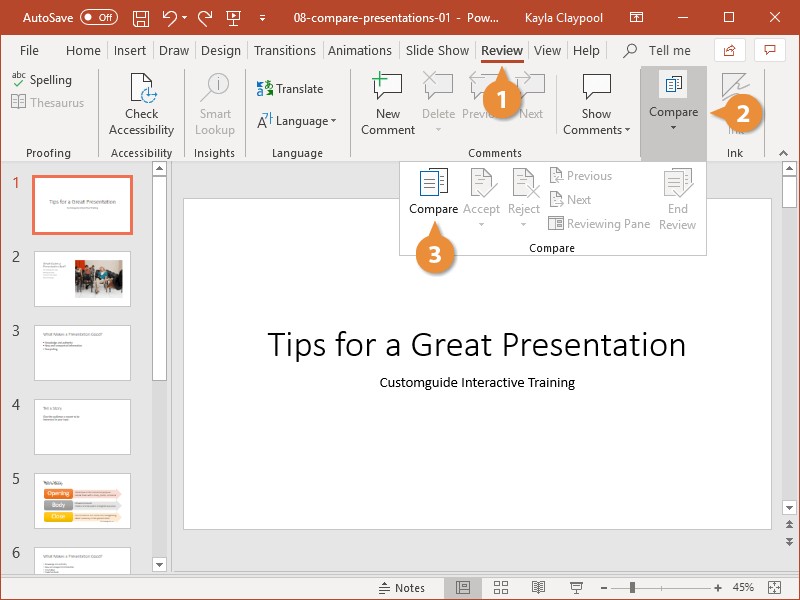
- Navigate to the Review Tab: Click on the “Review” tab in the PowerPoint ribbon.
- Click Compare: In the “Compare” group, click the “Compare” button. This action opens a file selection dialog.
- Select the Second Presentation: In the dialog box, navigate to and select the second presentation you want to compare against the open one.
- Merge Presentations: Click the “Merge” button. PowerPoint will then merge the selected presentation with the one you had open, displaying the merged file in Review mode.
This process initiates the comparison, allowing you to view and manage the differences between the two presentations.
3. What Is the Review Mode in PowerPoint and How Does It Help?
Review mode in PowerPoint is a specialized view designed to facilitate the comparison and merging of two presentations. It provides several key features that enhance the review process:
- Revision Pane: The Revisions pane opens on the right side of the screen, listing all changes made to the presentation. It is divided into two sections: “Slide changes” and “Presentation changes.”
- Slide Changes: This section lists all changes made to the current slide, including modifications to text, objects, and formatting.
- Presentation Changes: This section lists all changes made to the presentation as a whole, such as added, deleted, or moved slides.
- Highlighting Differences: PowerPoint highlights the differences between the two presentations directly on the slides, using colored boxes and markers to indicate changes to objects or text.
- Accept or Reject Changes: You can review each change and decide whether to accept or reject it, integrating the desired changes into the base presentation.
- Navigation Tools: The “Previous” and “Next” buttons on the Review tab allow you to move through the revisions sequentially, ensuring no change is missed.
- End Review: Once you have reviewed all changes, you can click “End Review” to finalize the merging process and save the updated presentation.
Review mode streamlines the comparison process, making it easier to identify, evaluate, and integrate changes, ultimately improving the efficiency and accuracy of collaborative PowerPoint projects.
4. How Do You Navigate the Revisions Pane in PowerPoint?
The Revisions pane in PowerPoint is a crucial tool for comparing and merging presentations. Here’s how to navigate it effectively:
- Open the Revisions Pane: After initiating the comparison process, the Revisions pane automatically opens on the right side of the PowerPoint window. If it doesn’t, ensure you are in Review mode.
- Understand the Sections: The Revisions pane is divided into two primary sections:
- Slide Changes: This section lists changes made specifically to the current slide. It includes modifications to text, objects, formatting, and any other elements on the slide.
- Presentation Changes: This section lists changes that affect the entire presentation, such as added, deleted, or moved slides.
- Review Changes:
- Slide Changes: Click on a change listed under “Slide Changes” to highlight the corresponding element on the slide. A colored box will appear around the modified object or text, indicating the specific alteration.
- Presentation Changes: Click on a change listed under “Presentation Changes” to navigate to the slide or section of the presentation where the change occurred.
- Use the Tabs: The Revisions pane may have multiple tabs, such as “Details” and “Slides.”
- Details Tab: The “Details” tab provides a detailed view of the changes, allowing you to see exactly what was modified.
- Slides Tab: The “Slides” tab provides a thumbnail view of the slides, allowing you to quickly preview the overall impact of the changes.
- Accept or Reject Changes:
- Check Boxes: Each change listed in the Revisions pane has a check box next to it. To accept a change, select the check box. To reject a change, leave the check box unchecked.
- Preview Changes: To preview what the slide would look like with the changes accepted, click the “Slides” tab on the Revisions pane.
- Navigation Buttons:
- Previous: Use the “Previous” button on the Review tab to move to the previous revision in the presentation.
- Next: Use the “Next” button on the Review tab to move to the next revision in the presentation.
- End Review: Once you have reviewed all the changes and made your decisions, click the “End Review” button on the Review tab to finalize the merging process.
By effectively navigating the Revisions pane, you can efficiently compare two PowerPoint presentations, accept or reject changes, and create a final, unified version.
5. What Is the Difference Between Slide Changes and Presentation Changes?
In the Revisions pane of PowerPoint’s comparison tool, “Slide Changes” and “Presentation Changes” refer to different types of modifications made between two presentations:
- Slide Changes:
- Scope: These are modifications that are specific to individual slides.
- Content: Slide changes include alterations to text, images, charts, shapes, and other objects within a slide. This could involve text edits, formatting adjustments, object repositioning, or content updates.
- Example: If you edit the title of a slide, change the color of a bullet point, or move an image, these would be considered slide changes.
- Presentation Changes:
- Scope: These are modifications that affect the overall structure or organization of the presentation.
- Content: Presentation changes include adding, deleting, or moving entire slides. This could also involve changes to slide layouts, themes, or transitions that impact the entire presentation.
- Example: If you add a new slide, delete an existing slide, rearrange the order of slides, or apply a new theme to the presentation, these would be considered presentation changes.
Understanding the distinction between slide changes and presentation changes helps you focus on the specific types of modifications needed to reconcile the two presentations, making the review process more efficient.
6. How Do You Accept or Reject Revisions in PowerPoint?
Once you are comparing two PowerPoint presentations in Review mode, you can accept or reject revisions to integrate the desired changes into the base presentation. Here’s how:
- Select a Change: In the Revisions pane, select a change under either “Slide Changes” or “Presentation Changes” that you want to review. This will highlight the corresponding element on the slide.
- Evaluate the Change: Review the highlighted change on the slide to determine whether you want to accept it or reject it.
- Accept a Change: To accept a change, select the check box next to the change in the Revisions pane. When the check box is selected, the change will be applied to the base presentation.
- Reject a Change: To reject a change, ensure the check box next to the change in the Revisions pane is unchecked. If the check box is unchecked, the change will not be applied to the base presentation, and the original content will remain.
- Use the Preview: To preview what the slide will look like with the changes accepted, click the “Slides” tab on the Revisions pane. This allows you to see the overall impact of the changes before finalizing them.
- Navigate Through Revisions: Use the “Previous” and “Next” buttons on the Review tab to move through the revisions sequentially. Evaluate each change and decide whether to accept or reject it.
- End Review: Once you have reviewed all the changes and made your decisions, click the “End Review” button on the Review tab. PowerPoint will prompt you to confirm that you want to end the review and discard any rejected changes.
- Save the Changes: Click “Yes” to end the review. Then, click the “Save” button to save the changes to the base presentation.
By following these steps, you can effectively manage revisions, ensuring that the final presentation reflects the desired changes from both versions.
7. What Happens When You Click “End Review” in PowerPoint?
When you click “End Review” in PowerPoint after comparing presentations, several important actions occur:
- Confirmation Prompt: PowerPoint displays a dialog box asking you to confirm that you want to end the review. This prompt is a safeguard to ensure you are ready to finalize the merging process.
- Discarding Rejected Changes: If you have rejected any changes during the review process (i.e., left the check boxes unchecked), PowerPoint will discard those changes. This means the original content from the base presentation will remain, and the rejected modifications will not be included in the final version.
- Applying Accepted Changes: All changes that you accepted by selecting the check boxes in the Revisions pane will be applied to the base presentation. This integrates the desired modifications from the second presentation into the open one.
- Closing Review Mode: PowerPoint exits Review mode, and the Revisions pane closes. The presentation is displayed in the normal editing view.
- Saving the Presentation: After ending the review, it is crucial to save the presentation. Click the “Save” button to save the changes. If you do not save the presentation, all the accepted changes will be lost.
In summary, clicking “End Review” finalizes the merging process by applying accepted changes, discarding rejected changes, and exiting Review mode. Saving the presentation is essential to preserve these changes.
8. Can You Customize the Comparison Settings in PowerPoint?
While PowerPoint’s built-in comparison tool is effective, it offers limited customization options directly within the tool itself. However, you can indirectly customize the comparison process by adjusting settings and using other features in PowerPoint:
- Customize Track Changes Options:
- Access Track Changes: While PowerPoint doesn’t have a direct “Track Changes” feature like Word, you can use comments and annotations to manually track changes. Go to the “Review” tab and use the “New Comment” feature to add notes about modifications.
- Customize Comment Settings: Adjust the appearance of comments by changing the color and initials associated with each reviewer. This helps differentiate between multiple collaborators.
- Use Section Views:
- Create Sections: Divide your presentation into sections to focus on specific areas during the comparison. Go to the “View” tab and use the “Section View” to manage and compare different parts of the presentation separately.
- Customize Section Names: Give meaningful names to each section to easily identify and compare them.
- Adjust Slide Master:
- Modify Slide Master: Make changes to the Slide Master (View > Slide Master) to ensure consistency in layouts and formatting across both presentations before comparing. This can minimize discrepancies during the comparison process.
- Apply Consistent Themes: Ensure both presentations use the same theme or custom theme to reduce formatting differences.
- Utilize Third-Party Add-ins:
- Explore Add-ins: Consider using third-party add-ins designed for advanced PowerPoint comparison. These add-ins often provide more granular control over comparison settings and offer additional features like detailed reports and visual summaries of changes.
- Manual Review and Customization:
- Detailed Manual Review: After using the built-in comparison tool, conduct a manual review to catch any subtle differences that the tool might have missed.
- Custom VBA Scripts: For advanced users, create custom VBA scripts to automate specific comparison tasks or generate detailed comparison reports.
By using these indirect customization methods, you can enhance the comparison process in PowerPoint to better suit your specific needs.
9. What Are Some Common Issues Encountered During PowerPoint Comparisons and How Can You Resolve Them?
During PowerPoint comparisons, users may encounter several common issues. Here’s a list of these issues along with practical solutions:
- Formatting Inconsistencies:
- Issue: Differences in fonts, colors, and styles can make it difficult to identify meaningful content changes.
- Solution: Standardize formatting before comparing. Use the Slide Master (View > Slide Master) to apply consistent themes, fonts, and styles across both presentations.
- Object Misalignment:
- Issue: Objects such as images, charts, and shapes are not aligned properly, causing visual discrepancies.
- Solution: Use PowerPoint’s alignment tools (Format > Align) to ensure objects are uniformly positioned on each slide. Gridlines and guides can also help with precise alignment.
- Missing Fonts:
- Issue: One presentation uses fonts that are not installed on the computer, leading to font substitution and layout changes.
- Solution: Embed fonts in the presentation (File > Options > Save > Embed fonts in the file). Alternatively, use common fonts that are available on most systems.
- Version Compatibility:
- Issue: Older and newer versions of PowerPoint may display content differently, causing comparison errors.
- Solution: Save both presentations in the same file format (.pptx) to ensure compatibility. Use the latest version of PowerPoint for the most accurate comparisons.
- Large File Sizes:
- Issue: Very large presentations can slow down the comparison process or cause PowerPoint to freeze.
- Solution: Compress images (Format > Compress Pictures) and remove unnecessary elements from the presentations to reduce file sizes.
- Complex Animations and Transitions:
- Issue: Intricate animations and transitions can obscure content changes.
- Solution: Simplify or temporarily remove animations and transitions during the comparison process.
- Embedded Objects and Links:
- Issue: Differences in embedded objects (e.g., Excel charts) and linked files can cause errors during comparison.
- Solution: Ensure all embedded objects and linked files are updated and accessible. Break links if necessary and embed the content directly into the presentation.
- Language and Encoding Issues:
- Issue: Different language settings or character encodings can cause text to display incorrectly.
- Solution: Verify that both presentations use the same language settings and character encoding (File > Options > Language).
- Third-Party Add-in Conflicts:
- Issue: Conflicts with third-party add-ins can interfere with the comparison process.
- Solution: Disable unnecessary add-ins to see if that resolves the issue (File > Options > Add-ins).
- Hidden Slides and Content:
- Issue: Hidden slides or hidden content within slides can be overlooked during the comparison.
- Solution: Unhide all slides (right-click > Hide Slide) and ensure all content is visible before starting the comparison.
By addressing these common issues, you can improve the accuracy and efficiency of comparing PowerPoint presentations.
10. Are There Alternative Tools for Comparing PowerPoint Presentations?
Yes, besides PowerPoint’s built-in comparison tool, several alternative tools offer advanced features and capabilities for comparing PowerPoint presentations:
- Draftable:
- Overview: Draftable is a web-based document comparison tool that supports PowerPoint files. It highlights differences in text and visuals, making it easy to spot changes.
- Key Features: Side-by-side comparison, detailed change reports, and support for multiple file formats.
- Beyond Compare:
- Overview: Beyond Compare is a powerful file comparison tool that can compare text files, including the XML structure of PowerPoint files.
- Key Features: Advanced text comparison, folder comparison, and integration with version control systems.
- iSpring Suite:
- Overview: iSpring Suite is an e-learning authoring toolkit that includes a presentation comparison feature. It identifies differences in text, images, and animations.
- Key Features: Detailed comparison reports, support for complex animations, and integration with e-learning platforms.
- Araxis Merge:
- Overview: Araxis Merge is a professional-grade comparison and merging tool that can compare text and binary files, including PowerPoint presentations.
- Key Features: Three-way visual comparison, automatic merging, and integration with version control systems.
- Microsoft Word (for Text Comparison):
- Overview: You can extract the text from PowerPoint presentations and compare them using Microsoft Word’s comparison feature.
- How to Use: Save each presentation as a Rich Text Format (.rtf) file, then use Word’s “Compare” function (Review > Compare) to highlight text differences.
- Online Presentation Viewers with Comparison:
- Overview: Some online presentation platforms like Google Slides and Zoho Show offer basic comparison features or allow real-time collaboration, making it easier to track changes.
- Key Features: Real-time collaboration, version history, and basic change tracking.
- Third-Party PowerPoint Add-ins:
- Overview: Several third-party add-ins are designed specifically for PowerPoint comparison. These add-ins often provide more granular control over comparison settings and offer additional features.
- Examples: Tools available on the Microsoft Office Store.
These alternative tools provide a range of options for comparing PowerPoint presentations, from simple text comparisons to advanced visual and structural analysis.
11. How Does the Complexity of a Presentation Affect the Comparison Process?
The complexity of a PowerPoint presentation can significantly impact the comparison process. Here’s how:
- Increased Processing Time: Complex presentations with numerous slides, high-resolution images, intricate animations, and embedded objects require more processing power. This can slow down the comparison process, making it time-consuming.
- Higher Risk of Errors: Complex layouts, multiple layers of objects, and sophisticated animations can obscure changes, making it harder to identify discrepancies accurately.
- Greater Difficulty in Identifying Changes: Complex presentations often have subtle changes that are easily overlooked. This requires a more detailed and meticulous review process.
- Compatibility Issues: Complex presentations may use advanced features that are not fully supported by older versions of PowerPoint or third-party comparison tools, leading to compatibility issues and inaccurate comparisons.
- Larger File Sizes: Complex presentations tend to have larger file sizes, which can make it more difficult to share and compare files efficiently.
- Greater Need for Advanced Tools: Comparing complex presentations may require specialized comparison tools that can handle advanced features and provide detailed change reports.
- More Demanding Review Process: Reviewing changes in a complex presentation requires more time and attention to detail. It may be necessary to break down the presentation into smaller sections for easier comparison.
- Increased Potential for Conflicts: In collaborative projects, complex presentations can lead to more conflicts due to the increased number of elements that can be modified.
To mitigate these challenges, it’s essential to simplify presentations where possible, use consistent formatting, and employ advanced comparison tools that can handle complex files.
12. What Role Does Version Control Play in Managing PowerPoint Presentations?
Version control plays a crucial role in managing PowerPoint presentations, especially in collaborative environments. Here’s how:
- Tracking Changes: Version control systems track every change made to a presentation, including modifications to text, images, animations, and slide layouts. This allows users to see who made which changes and when.
- Reverting to Previous Versions: Version control allows users to revert to previous versions of a presentation if necessary. This is useful if a mistake is made or if a previous version is preferred.
- Facilitating Collaboration: Version control enables multiple users to work on the same presentation simultaneously without overwriting each other’s changes. Changes are merged, and conflicts are resolved systematically.
- Managing Different Versions: Version control helps manage different versions of a presentation, such as drafts, revisions, and final versions. This ensures that everyone is working with the correct version.
- Providing a History of Changes: Version control provides a detailed history of all changes made to a presentation. This is useful for auditing purposes and for understanding how the presentation has evolved over time.
- Ensuring Data Integrity: Version control helps ensure the integrity of presentation data by preventing accidental data loss or corruption.
- Streamlining the Review Process: Version control streamlines the review process by highlighting changes and allowing reviewers to easily compare different versions of a presentation.
- Enhancing Accountability: Version control enhances accountability by tracking who made which changes. This can help identify and correct errors more quickly.
Popular version control systems like Git, Subversion, and cloud-based platforms like SharePoint and Google Drive offer robust version control features for PowerPoint presentations.
13. How Can You Use Comments and Annotations to Aid in the Comparison Process?
Comments and annotations are valuable tools for aiding in the comparison process of PowerPoint presentations. Here’s how you can effectively use them:
- Adding Context to Changes: Use comments to explain the reasoning behind specific changes. For example, if you modify a data point in a chart, add a comment explaining why the change was made and the source of the updated data.
- Highlighting Areas of Concern: Annotate slides with comments to point out areas that need further review or discussion. This helps focus attention on critical issues and ensures they are not overlooked.
- Suggesting Alternative Solutions: Use comments to suggest alternative solutions or improvements. For example, if you disagree with a particular change, add a comment proposing a different approach.
- Tracking Discussions: Use comments to track discussions about specific changes. Respond to comments from other reviewers to clarify points, answer questions, and resolve conflicts.
- Providing Feedback: Use comments to provide feedback on the overall quality and effectiveness of the presentation. This helps ensure that the presentation meets its objectives and is well-received by the audience.
- Marking Changes as Resolved: Once a change has been reviewed and approved, mark the corresponding comment as resolved. This helps keep track of which issues have been addressed and which still need attention.
- Using Color-Coding: Use different colors for comments to categorize them by type or priority. For example, use red for critical issues, yellow for suggestions, and green for approved changes.
- Creating a Summary of Changes: At the end of the review process, create a summary of all the comments and annotations. This provides a comprehensive overview of the changes that were made and the reasons behind them.
By using comments and annotations effectively, you can enhance the clarity, accuracy, and efficiency of the PowerPoint comparison process.
14. What Strategies Can You Use to Ensure a Smooth Collaborative PowerPoint Comparison?
To ensure a smooth collaborative PowerPoint comparison, implement the following strategies:
- Establish Clear Guidelines:
- Define Objectives: Clearly define the objectives of the presentation and the criteria for evaluating changes.
- Set Standards: Establish standards for formatting, content, and style to ensure consistency across the presentation.
- Communicate Expectations: Communicate expectations for the review process, including deadlines, roles, and responsibilities.
- Use Version Control:
- Implement a System: Implement a version control system (e.g., Git, SharePoint) to track changes, manage versions, and facilitate collaboration.
- Train Team Members: Train team members on how to use the version control system effectively.
- Standardize Formatting:
- Use Slide Master: Use the Slide Master to create consistent layouts, fonts, and styles across the presentation.
- Apply Themes: Apply a consistent theme to ensure a uniform look and feel.
- Communicate Effectively:
- Use Comments and Annotations: Use comments and annotations to explain changes, suggest improvements, and track discussions.
- Hold Regular Meetings: Hold regular meetings to discuss progress, resolve conflicts, and address any issues that arise.
- Break Down the Work:
- Divide into Sections: Divide the presentation into sections and assign each section to a different team member.
- Set Milestones: Set milestones for each section to ensure that the work is progressing on schedule.
- Use Comparison Tools:
- Choose the Right Tool: Choose a PowerPoint comparison tool that meets your needs and is compatible with your version of PowerPoint.
- Train Team Members: Train team members on how to use the comparison tool effectively.
- Review and Test:
- Conduct Thorough Reviews: Conduct thorough reviews of all changes to ensure that they are accurate and consistent.
- Test the Presentation: Test the presentation on different devices and in different environments to ensure that it displays correctly.
- Document the Process:
- Create a Checklist: Create a checklist of all the steps in the comparison process.
- Keep Records: Keep records of all changes, discussions, and decisions.
By implementing these strategies, you can minimize conflicts, improve communication, and ensure that the final presentation is accurate, consistent, and effective.
15. How Do You Prepare PowerPoint Presentations for Comparison to Minimize Errors?
Preparing PowerPoint presentations for comparison is crucial to minimize errors and ensure an accurate review process. Here’s how to do it:
- Standardize Formatting:
- Use Slide Master: Utilize the Slide Master (View > Slide Master) to enforce consistent formatting across all slides. This includes fonts, colors, and styles.
- Apply Themes: Apply a consistent theme to both presentations to ensure a uniform look and feel.
- Check for Inconsistencies: Manually check for any formatting inconsistencies before starting the comparison.
- Clean Up Content:
- Remove Unnecessary Elements: Remove any unnecessary slides, objects, or content that are not relevant to the comparison.
- Correct Typos and Errors: Correct any typos, grammatical errors, or factual inaccuracies.
- Update Data: Ensure that all data is current and accurate.
- Optimize Images and Media:
- Compress Images: Compress images to reduce file size without sacrificing quality (Format > Compress Pictures).
- Use Consistent Image Formats: Use consistent image formats (e.g., JPEG, PNG) and resolutions.
- Check Embedded Media: Ensure that all embedded media files are properly linked and accessible.
- Organize Slides and Sections:
- Use Sections: Divide the presentation into logical sections to make it easier to navigate and compare.
- Order Slides Logically: Ensure that slides are arranged in a logical order.
- Check Slide Titles: Verify that slide titles are clear, concise, and descriptive.
- Embed Fonts:
- Embed Fonts in File: Embed fonts in the presentation file to ensure that they display correctly on all computers (File > Options > Save > Embed fonts in the file).
- Remove Animations and Transitions (Temporarily):
- Simplify Presentation: Temporarily remove complex animations and transitions to make it easier to focus on content changes.
- Check for Hidden Slides and Content:
- Unhide Slides: Unhide any hidden slides to ensure that they are included in the comparison.
- Reveal Hidden Content: Check for any hidden content within slides and make it visible.
- Save in a Compatible Format:
- Use .pptx Format: Save both presentations in the same file format (.pptx) to ensure compatibility.
- Create a Backup:
- Backup Your Files: Create a backup of both presentations before starting the comparison.
- Inform Collaborators:
- Communicate Preparation Steps: Inform all collaborators about the preparation steps and ensure that everyone is working with the same standards.
By following these steps, you can minimize errors and improve the accuracy and efficiency of the PowerPoint comparison process.
At COMPARE.EDU.VN, we understand the importance of making informed decisions. That’s why we provide detailed comparisons and user-friendly guides. Having difficulty comparing those PowerPoint presentation? Visit compare.edu.vn today to explore our comprehensive comparison tools and make confident choices. Contact us at 333 Comparison Plaza, Choice City, CA 90210, United States or Whatsapp us at +1 (626) 555-9090. Let us help you compare, contrast, and conquer your decision-making process.
FAQ: Comparing PowerPoint Presentations
1. Can I compare PowerPoint presentations created in different versions of the software?
Yes, but it’s best to save both in the latest .pptx format to avoid compatibility issues during comparison.
2. What if I don’t have PowerPoint? Can I still compare presentations?
Yes, alternative tools like Draftable or online presentation platforms such as Google Slides can be used for comparison.
3. How do I deal with tracked changes in PowerPoint?
PowerPoint doesn’t have a built-in “Track Changes” feature like Word. Use comments and annotations to manually track changes, or consider using third-party add-ins.
4. Is there a way to compare just the text content of two PowerPoint files?
Yes, save the presentations as .rtf files and use Microsoft Word’s comparison feature to compare the text.
5. Can I compare two PowerPoint files on a Mac?
Yes, the steps are the same for both Windows and Mac versions of PowerPoint.
6. What should I do if the Compare button is grayed out in PowerPoint?
Ensure that you have at least one presentation open. The Compare button is only active when a presentation is open.
7. How can I compare presentations stored on SharePoint or OneDrive?
Open the presentations from SharePoint or OneDrive in PowerPoint, then use the Compare feature as usual.
8. What’s the best way to handle large PowerPoint files during comparison?
Compress images and remove unnecessary elements to reduce file sizes, making the comparison process faster and more efficient.
9. Can I use VBA to automate the comparison process?
Yes, advanced users can create custom VBA scripts to automate specific comparison tasks or generate detailed comparison reports.
10. Where can I find the best comparison tools for PowerPoint?
Explore third-party add-ins on the Microsoft Office Store or consider dedicated comparison tools like Draftable or Beyond Compare.