Can I Compare Two Excel Sheets? Yes, you absolutely can! Comparing two Excel sheets is a common task for anyone who works with data. Whether you’re tracking sales, managing inventory, or analyzing survey results, you’ll often need to identify differences between two versions of the same spreadsheet. “COMPARE.EDU.VN” offers detailed comparisons, including change tracking and discrepancy identification, to assist you in making informed decisions.
This comprehensive guide explores various methods to compare two Excel sheets, from simple visual comparisons to advanced techniques using formulas, conditional formatting, and third-party tools. We will equip you with the knowledge and skills to effectively compare Excel files, identify discrepancies, and make data-driven decisions. Let’s dive into the world of Excel comparisons.
1. Understanding the Need for Excel Sheet Comparison
Comparing two Excel sheets isn’t just about finding differences; it’s about understanding them. Several scenarios necessitate this comparison:
- Version Control: Identifying changes between different versions of a document.
- Data Validation: Ensuring data consistency across multiple sources.
- Error Detection: Spotting inconsistencies and errors in data entry.
- Collaboration: Reviewing and merging changes made by multiple users.
2. Methods for Comparing Two Excel Sheets
2.1. Manual Visual Comparison
2.1.1. Side-by-Side Viewing
Question: How can I visually compare two Excel files side by side without any fancy tools?
Answer: You can visually compare two Excel files by opening them in separate windows and arranging them side by side on your screen. This allows you to manually scan for differences.
To compare two Excel workbooks side by side:
- Open both Excel files: Launch both Excel files that you want to compare.
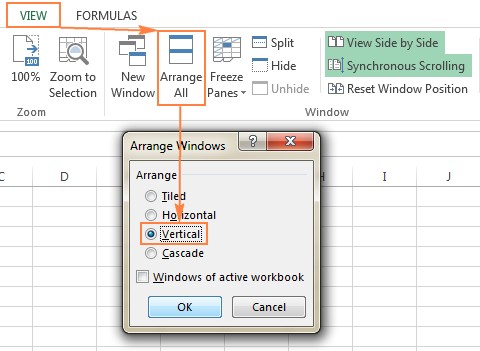
- View Side by Side: Navigate to the “View” tab in either Excel window and click the “View Side by Side” button in the “Window” group. Excel will automatically arrange the two workbooks side by side.
- Synchronous Scrolling: Ensure the “Synchronous Scrolling” option is enabled in the “Window” group to scroll both sheets simultaneously. This feature helps in comparing corresponding rows easily.
To arrange multiple Excel windows, open all the workbooks and click “View Side by Side”. A dialog box appears, allowing you to select which files to display with the active workbook. Alternatively, click “Arrange All” on the “View” tab and choose an arrangement option like tiled, horizontal, vertical, or cascade.
Pros:
- No additional software required.
- Simple and quick for small datasets.
Cons:
- Time-consuming and error-prone for large datasets.
- Difficult to spot subtle differences.
2.1.2. Comparing Two Sheets in the Same Workbook
Question: What if I want to compare two sheets that are within the same Excel workbook?
Answer: To compare two sheets within the same workbook, you can open a new window for the same workbook and then view the two windows side by side.
Here’s how:
- Open the Excel File: Open the workbook containing the two sheets you want to compare.
- New Window: Go to the “View” tab and click “New Window” in the “Window” group. This opens a new instance of the same workbook.
- View Side by Side: Click the “View Side by Side” button.
- Select Sheets: In each window, select the sheet you want to compare.
Pros:
- Convenient for comparing sheets in the same file.
- Utilizes Excel’s built-in functionalities.
Cons:
- Still requires manual scanning.
- Not suitable for large, complex datasets.
2.2. Using Excel Formulas for Comparison
2.2.1. Basic Formula to Identify Differences
Question: Can I use formulas to automatically find cells with different values in two sheets?
Answer: Yes, you can use Excel formulas to create a difference report by comparing corresponding cells in two sheets and highlighting the discrepancies.
The formula =IF(Sheet1!A1<>Sheet2!A1, "Sheet1:"&Sheet1!A1&" vs Sheet2:"&Sheet2!A1, "") can be used to compare cells in two sheets. Here’s how to implement it:
- Open a New Sheet: Create a new sheet in your Excel workbook to serve as the difference report.
- Enter the Formula: In cell A1 of the new sheet, enter the formula
=IF(Sheet1!A1<>Sheet2!A1, "Sheet1:"&Sheet1!A1&" vs Sheet2:"&Sheet2!A1, ""). - Copy the Formula: Drag the fill handle (the small square at the bottom-right corner of the cell) down and to the right to apply the formula to all corresponding cells in the range you want to compare.
Explanation:
Sheet1!A1andSheet2!A1refer to cell A1 in Sheet1 and Sheet2, respectively.<>is the “not equal to” operator.- The
IFfunction checks if the values in the corresponding cells are different. If they are, it displays the values from both sheets; otherwise, it leaves the cell blank.
Pros:
- Automates the comparison process.
- Provides a clear difference report.
Cons:
- Only compares values; doesn’t compare formulas or formatting.
- Doesn’t handle added or deleted rows/columns well.
- Dates may be displayed as serial numbers, which can be inconvenient.
2.2.2. Advanced Formulas for Specific Comparisons
Question: Are there more advanced formulas I can use for different comparison scenarios?
Answer: Yes, you can use advanced formulas to handle specific comparison scenarios, such as comparing dates, ignoring case sensitivity, or comparing entire rows.
- Comparing Dates: To compare dates accurately, use the
TEXTfunction to format dates consistently before comparing:
=IF(TEXT(Sheet1!A1, "yyyy-mm-dd")<>TEXT(Sheet2!A1, "yyyy-mm-dd"), "Different", "") - Ignoring Case Sensitivity: To ignore case sensitivity, use the
UPPERorLOWERfunctions:
=IF(UPPER(Sheet1!A1)<>UPPER(Sheet2!A1), "Different", "") - Comparing Entire Rows: To check if entire rows are identical, use the
ANDfunction combined with the comparison:
=IF(AND(Sheet1!A1=Sheet2!A1, Sheet1!B1=Sheet2!B1, Sheet1!C1=Sheet2!C1), "Same", "Different")
(Expand theANDfunction to include all relevant columns.)
Pros:
- Provides tailored solutions for specific comparison needs.
- Enhances the accuracy of the comparison.
Cons:
- Requires more complex formulas, which can be difficult to manage.
- Still limited to cell values and doesn’t handle structural differences.
2.3. Conditional Formatting for Highlighting Differences
2.3.1. Highlighting Different Cells
Question: How can I use conditional formatting to visually highlight cells with different values in two sheets?
Answer: Conditional formatting can be used to highlight cells that have different values in two sheets with a color of your choosing.
To highlight different cells using conditional formatting:
- Select the Range: In the worksheet where you want to highlight the differences, select all used cells. Start from the upper-left cell (usually A1), and press
Ctrl + Shift + Endto extend the selection to the last used cell. - New Formatting Rule: On the “Home” tab, in the “Styles” group, click “Conditional Formatting” > “New Rule”.
- Use a Formula: Select “Use a formula to determine which cells to format”.
- Enter the Formula: Enter the formula
=A1<>Sheet2!A1. ReplaceSheet2with the name of the other sheet you are comparing.
- Format: Click the “Format” button to choose the formatting style (e.g., fill color) for the different cells.
- Apply: Click “OK” to apply the conditional formatting rule.
Pros:
- Visually highlights differences, making them easy to spot.
- Can be customized with different formatting styles.
Cons:
- Only highlights value differences; doesn’t compare formulas or formatting.
- Doesn’t identify added or deleted rows/columns.
- Can slow down Excel with large datasets.
2.3.2. Customizing Conditional Formatting
Question: Can I customize conditional formatting to highlight specific types of differences, such as duplicate values or unique entries?
Answer: Yes, you can customize conditional formatting to highlight various types of differences, such as duplicate values, unique entries, or values within a certain range.
- Highlighting Duplicate Values:
- Select the range.
- Go to “Conditional Formatting” > “Highlight Cells Rules” > “Duplicate Values”.
- Choose the formatting style.
- Highlighting Unique Entries:
- Select the range.
- Go to “Conditional Formatting” > “Highlight Cells Rules” > “Duplicate Values”.
- Change the selection to “Unique”.
- Choose the formatting style.
- Highlighting Values Within a Range:
- Select the range.
- Go to “Conditional Formatting” > “Highlight Cells Rules” > “Between”.
- Enter the range and choose the formatting style.
Pros:
- Versatile and customizable for various data analysis needs.
- Enhances data visualization.
Cons:
- Requires understanding of conditional formatting rules.
- Can become complex with multiple rules.
2.4. Compare and Merge Copies of a Shared Workbook
2.4.1. Enabling Shared Workbook Feature
Question: How can I use the “Compare and Merge” feature in Excel to combine changes from multiple users working on the same workbook?
Answer: The “Compare and Merge” feature in Excel is designed to merge different versions of a shared workbook, allowing you to integrate changes made by multiple users.
Before using this feature, ensure the following preparations:
- Share the Workbook:
- Go to the “Review” tab, in the “Changes” group, and click “Share Workbook”.
- Check the box that says “Allow changes by more than one user at the same time”.
- Click “OK”. If prompted, allow Excel to save the workbook.
- Save Copies: Each user who edits the shared workbook must save a copy with a unique filename.
Pros:
- Useful for collaborative environments.
- Tracks changes made by different users.
Cons:
- Requires careful setup and adherence to procedures.
- Can become complex with many users and changes.
2.4.2. Merging Workbooks and Reviewing Changes
Question: Once the workbooks are shared and edited, how do I merge them and review the changes?
Answer: After the shared workbooks have been edited, you can merge the copies into one file and review the changes.
- Enable the “Compare and Merge Workbooks” Command:
- This command is not displayed by default. To add it to the Quick Access Toolbar, click the “File” tab > “Options” > “Quick Access Toolbar”.
- Choose “All Commands” from the “Choose commands from” dropdown.
- Find “Compare and Merge Workbooks” in the list, select it, and click “Add”. Then click “OK”.
- Merge Workbooks:
- Open the primary version of the shared workbook.
- Click the “Compare and Merge Workbooks” command in the Quick Access Toolbar.
- In the dialog box, select the copies of the shared workbook that you want to merge. Hold the
Shiftkey to select multiple files. - Click “OK”.
- Review Changes:
- Go to the “Review” tab, in the “Changes” group, and click “Track Changes” > “Highlight Changes”.
- In the “Highlight Changes” dialog, select “All” in the “When” box, “Everyone” in the “Who” box, clear the “Where” box, and check “Highlight changes on screen”.
- Click “OK”.
Excel highlights the column letters and row numbers with differences in a dark red color. Edits from different users are marked with different colors at the cell level. Hovering over a cell shows who made the change.
Pros:
- Streamlines the process of merging changes from multiple users.
- Provides a clear overview of who made which changes.
Cons:
- The “Compare and Merge Workbooks” command may be grayed out if you are trying to combine different Excel files instead of copies of the same shared workbook.
3. Third-Party Tools for Comparing Excel Files
3.1. Overview of Third-Party Tools
Question: What are the benefits of using third-party tools for comparing Excel files, and what are some popular options?
Answer: Third-party tools offer advanced features and greater efficiency for comparing Excel files, especially for complex tasks. They can comprehensively compare sheets and workbooks, spotting differences in values, formulas, and formatting, which built-in Excel options may not fully cover.
Some popular third-party tools include:
- Synkronizer Excel Compare: A tool to compare, merge, and update Excel files.
- Ablebits Compare Sheets for Excel: An Excel add-in for comparing worksheets with a user-friendly interface.
- xlCompare: A utility to compare and merge workbooks, sheets, and VBA projects.
- Change pro for Excel: A tool to compare Excel sheets on desktop and mobile devices.
These tools offer advanced features such as detailed difference reports, highlighting of differences, and the ability to merge changes seamlessly.
3.2. Synkronizer Excel Compare
3.2.1. Key Features and Benefits
Question: What are the key features and benefits of using Synkronizer Excel Compare?
Answer: Synkronizer Excel Compare is an add-in that helps you quickly compare, merge, and update two Excel files.
Key features include:
- Identifying Differences: Quickly identifies differences between two Excel sheets.
- Combining Files: Combines multiple Excel files into a single version without duplicates.
- Highlighting Differences: Highlights differences in both sheets.
- Detailed Reports: Presents detailed and easy-to-read difference reports.
- Merging and Updating: Merges and updates sheets efficiently.
3.2.2. Comparing Excel Files with Synkronizer
Question: How do I compare two Excel files using Synkronizer Excel Compare?
Answer: To compare Excel files using Synkronizer:
- Run Synkronizer: Go to the “Add-ins” tab in Excel and click the Synchronizer icon.
- Select Workbooks: In the Synkronizer pane, select the two workbooks to compare.
- Select Sheets: Select the sheets to compare. If workbooks have sheets with the same names, they will be matched automatically.
- Comparison Options: Choose a comparison option, such as “Compare as normal worksheets”, “Compare with link options”, “Compare as database”, or “Compare selected ranges”.
- Content Types: Choose the content types to compare, such as comments, names, formats, and filters.
- Start Comparison: Click the “Start” button.
3.2.3. Visualizing and Analyzing Differences with Synkronizer
Question: How does Synkronizer Excel Compare help in visualizing and analyzing the differences found between two Excel files?
Answer: Synkronizer presents two summary reports on the “Results” tab:
- Summary Report: Shows all difference types at a glance (changes in columns, rows, cells, comments, formats, and names).
- Detailed Difference Report: Provides a detailed report for each difference type. Clicking on a difference in the detailed report selects the corresponding cells on both sheets.
In addition, you can create a difference report in a separate workbook with hyperlinks for easy navigation.
3.2.4. Highlighting Differences with Synkronizer
Question: How can I highlight the differences between sheets using Synkronizer Excel Compare?
Answer: By default, Synkronizer highlights all found differences:
- Yellow: Differences in cell values
- Lilac: Differences in cell formats
- Green: Inserted rows
To highlight only relevant differences, click the “Outline” button on the “Results” tab and select the required options.
3.2.5. Updating and Merging Sheets with Synkronizer
Question: How do I update and merge sheets using Synkronizer Excel Compare?
Answer: Synkronizer allows you to transfer individual cells or move different columns/rows from the source to the target sheet.
To update one or more differences, select them in the Synkronizer pane and click one of the four update buttons. The arrows on the buttons indicate the transfer direction.
3.3. Ablebits Compare Sheets for Excel
3.3.1. Key Features and Benefits
Question: What are the key features and benefits of using Ablebits Compare Sheets for Excel?
Answer: Ablebits Compare Sheets for Excel is an add-in designed to compare worksheets with a user-friendly interface.
Key features include:
- Step-by-Step Wizard: Guides you through the comparison process with different options.
- Comparison Algorithms: Offers different comparison algorithms suited for various data sets.
- Review Differences Mode: Displays compared sheets in “Review Differences” mode for easy viewing and management of differences.
3.3.2. Comparing Excel Files with Ablebits
Question: How do I compare two Excel files using Ablebits Compare Sheets for Excel?
Answer: To compare Excel files using Ablebits:
- Click Compare Sheets: Click the “Compare Sheets” button on the “Ablebits Data” tab.
- Select Worksheets: Select the two worksheets to compare. You can choose the entire sheets, a table, or a specific range.
- Choose Comparison Algorithm: Select a comparison algorithm:
- No key columns (default)
- By key columns
- Cell-by-cell
- Specify Differences: Specify which differences to highlight and ignore, and how to mark the differences.
- Compare: Click the “Compare” button.
3.3.3. Reviewing and Merging Differences with Ablebits
Question: How does Ablebits Compare Sheets for Excel help in reviewing and merging the differences found between two Excel files?
Answer: Once the worksheets are processed, they are opened side-by-side in a “Review Differences” mode:
- Highlighting: Differences are highlighted with default colors (blue for rows only in Sheet 1, red for rows only in Sheet 2, and green for different cells in partially matching rows).
- Toolbars: Each worksheet has its own vertical toolbar to navigate through the differences and decide whether to merge or ignore them.
3.4. xlCompare and Change Pro for Excel
3.4.1. xlCompare Key Features
Question: What are the key features of xlCompare for comparing Excel files?
Answer: xlCompare offers several key features for comparing Excel files, worksheets, names, and VBA Projects, including identifying added, deleted, and changed data and quickly merging differences. Other options include:
- Finding and removing duplicate records between two worksheets.
- Updating existing records in one sheet with values from another.
- Adding unique rows and columns from one sheet to another.
- Sorting data by key columns.
- Filtering comparison results.
- Highlighting results with colors.
3.4.2. Change Pro for Excel Key Features
Question: What are the key features of Change Pro for Excel for comparing Excel sheets?
Answer: Change Pro for Excel allows you to compare two sheets in desktop Excel as well as on mobile devices. Key features include:
- Finding differences in formulas and values.
- Identifying layout changes (added/deleted rows and columns).
- Recognizing embedded objects (charts, graphs, images).
- Creating and printing difference reports.
- Filtering, sorting, and searching the difference report.
- Comparing files directly from Outlook or document management systems.
- Support for all languages.
4. Online Services to Compare Excel Files
4.1. Overview of Online Services
Question: What are the benefits and risks of using online services to compare Excel files?
Answer: Online services allow you to quickly compare two Excel sheets for differences without installing any software. While convenient, they may pose security risks, so they are best used for Excel files that do not contain sensitive information.
4.2. Using Online Services
Question: How do I use online services to compare Excel files?
Answer: To use online services:
- Choose a Service: Select an online service like XLComparator or CloudyExcel.
- Upload Files: Upload the two Excel workbooks you want to compare.
- Find Differences: Click the “Find Difference” button.
- Review Results: The differences in the two active sheets will be highlighted with different colors.
Pros:
- No software installation required.
- Quick and easy to use.
Cons:
- Security concerns for sensitive data.
- Limited features compared to desktop tools.
5. Additional Tips and Considerations
5.1. Choosing the Right Method
Question: How do I choose the right method for comparing two Excel sheets based on my specific needs?
Answer: Choosing the right method depends on the size and complexity of your data, the level of detail required, and your comfort level with Excel features. Here’s a quick guide:
- Small Datasets: Manual visual comparison or basic formulas.
- Medium Datasets: Conditional formatting or advanced formulas.
- Large Datasets: Third-party tools.
- Collaborative Work: “Compare and Merge” feature.
- Sensitive Data: Desktop tools.
- Non-Sensitive Data: Online services.
5.2. Optimizing Excel Performance
Question: How can I optimize Excel performance when comparing large datasets?
Answer: When comparing large datasets, Excel performance can be affected. Here are some tips to optimize performance:
- Close Unnecessary Files: Close any Excel files that you are not currently using.
- Disable Automatic Calculations: Set calculation mode to manual.
- Use Efficient Formulas: Avoid complex formulas that require a lot of processing power.
- Limit Conditional Formatting: Reduce the number of conditional formatting rules.
- Use Excel Tables: Convert your data ranges to Excel Tables.
- Upgrade Hardware: Consider upgrading your computer’s hardware.
- Use Third-Party Tools: Consider using third-party tools.
5.3. Ensuring Data Integrity
Question: How can I ensure data integrity when comparing and merging Excel sheets?
Answer: Ensuring data integrity is crucial when comparing and merging Excel sheets. Here are some best practices:
- Backup Data: Always create backup copies of your original files before making any changes.
- Verify Results: Double-check the comparison results to ensure accuracy.
- Use Version Control: Implement a version control system to track changes.
- Document Changes: Document any changes made during the merging process.
- Test Thoroughly: Test the merged data to ensure it functions correctly.
6. Real-World Applications of Excel Sheet Comparison
6.1. Financial Analysis
Question: How is Excel sheet comparison used in financial analysis?
Answer: In financial analysis, Excel sheet comparison is used to:
- Compare financial statements from different periods.
- Identify discrepancies in budget vs. actual spending.
- Validate financial data from different sources.
- Review and reconcile transactions.
6.2. Sales and Marketing
Question: How is Excel sheet comparison used in sales and marketing?
Answer: In sales and marketing, Excel sheet comparison is used to:
- Analyze sales data from different regions or time periods.
- Compare marketing campaign performance.
- Identify changes in customer behavior.
- Track lead generation and conversion rates.
6.3. Inventory Management
Question: How is Excel sheet comparison used in inventory management?
Answer: In inventory management, Excel sheet comparison is used to:
- Compare inventory levels across different warehouses.
- Identify discrepancies between physical inventory and records.
- Track stock movements and turnover rates.
- Reconcile inventory data from different systems.
7. FAQ: Comparing Two Excel Sheets
Question 1: Can I compare two Excel sheets if they have different layouts?
Answer: Yes, but it may require more advanced techniques or third-party tools. Using key columns for comparison can help align the data.
Question 2: How do I compare two Excel sheets with a large number of rows and columns?
Answer: For large datasets, use third-party tools or optimize Excel performance by disabling automatic calculations and limiting conditional formatting.
Question 3: Can I compare Excel sheets on different operating systems (e.g., Windows and macOS)?
Answer: Yes, Excel is cross-platform, and the comparison methods should work on both Windows and macOS.
Question 4: How do I handle errors when comparing Excel sheets?
Answer: Use error-handling functions like IFERROR to manage errors in formulas. Always verify the results to ensure accuracy.
Question 5: Can I automate the comparison process?
Answer: Yes, using VBA macros or third-party tools, you can automate the comparison process for repetitive tasks.
Question 6: How do I compare password-protected Excel sheets?
Answer: You will need to remove the password protection before comparing the sheets, or use a tool that supports password-protected files.
Question 7: How do I compare Excel sheets with hidden rows or columns?
Answer: Ensure hidden rows or columns are unhidden before comparing, or use a tool that allows you to include them in the comparison.
Question 8: Can I compare two Excel sheets for data types (e.g., number vs. text)?
Answer: Yes, use the ISTEXT, ISNUMBER, and other similar functions to check data types before comparing.
Question 9: What is the best way to present the comparison results?
Answer: Use clear and concise formatting, highlighting, and difference reports. Visual aids like charts can also be helpful.
Question 10: How do I keep track of changes made during the comparison process?
Answer: Use version control, document all changes, and create backup copies of your original files.
8. Conclusion: Empowering Data-Driven Decisions Through Excel Comparison
Comparing two Excel sheets is a critical skill for anyone working with data. Whether you choose simple visual comparisons, advanced Excel formulas, or third-party tools, the ability to identify and understand differences is essential for making informed decisions. “COMPARE.EDU.VN” stands ready to guide you with the most relevant comparison data, simplifying your path to decisive action.
By mastering the techniques discussed in this guide, you can ensure data accuracy, streamline collaborative efforts, and make data-driven decisions with confidence. Remember to choose the method that best suits your specific needs, and always prioritize data integrity.
Ready to take your Excel comparison skills to the next level? Visit compare.edu.vn to explore more detailed comparisons and discover the best solutions for your data analysis needs. Make informed decisions with our comprehensive comparisons, meticulously crafted to simplify your decision-making process. Contact us at 333 Comparison Plaza, Choice City, CA 90210, United States, or reach out via WhatsApp at +1 (626) 555-9090. We’re here to help you compare and conquer!