In today’s data-driven world, working with Excel spreadsheets is a common practice across various professions. Often, you might find yourself needing to Compare Two Excel Worksheets For Differences. This could be due to version control, error checking, or simply understanding changes made to a document. Manually sifting through rows and columns is time-consuming and prone to errors. Fortunately, Microsoft offers a powerful tool called Spreadsheet Compare, designed to efficiently highlight discrepancies between two Excel workbooks. This guide will walk you through how to use Spreadsheet Compare to effectively identify and analyze differences, ensuring data accuracy and saving valuable time.
Why is comparing Excel worksheets crucial? Imagine you’re managing a budget and need to review changes made by a colleague, or perhaps you’re tracking sales data across different periods and need to pinpoint variations. Comparing worksheets helps in numerous scenarios, including:
- Version Control: Track changes between different versions of a workbook to understand modifications and updates.
- Error Detection: Identify discrepancies that might indicate manual entry errors or formula inconsistencies.
- Auditing and Compliance: Ensure data integrity by systematically comparing spreadsheets for regulatory compliance or internal audits.
- Collaboration: Streamline collaborative workflows by easily highlighting changes made by different team members.
Microsoft Spreadsheet Compare simplifies this process, providing a clear, side-by-side comparison and detailed reports on detected differences.
Getting Started with Spreadsheet Compare
Spreadsheet Compare is not a standalone application but a feature included within specific Microsoft Office suites. It’s important to note its availability:
- Availability: Spreadsheet Compare is included with Office Professional Plus 2013, Office Professional Plus 2016, Office Professional Plus 2019, and Microsoft 365 Apps for enterprise. If you’re using a different version of Office, you may not have access to this tool.
Opening Spreadsheet Compare:
-
Access via Start Menu: The easiest way to open Spreadsheet Compare is through the Windows Start menu. Click the Start button and look for Spreadsheet Compare.
-
Search Function: If you don’t see it immediately, simply start typing “Spreadsheet Compare” after clicking the Start button. The application option should appear in the search results. Click on it to launch.
Once opened, Spreadsheet Compare presents a straightforward interface ready to compare your Excel files.
Step-by-Step Guide: Comparing Two Excel Workbooks
Comparing two Excel workbooks for differences using Spreadsheet Compare is a simple process:
-
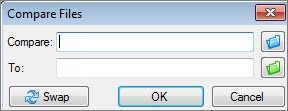
Initiate Comparison: In the Spreadsheet Compare window, navigate to the Home tab and click on Compare Files.
Alt Text: Compare Files command button highlighted in the Home tab of Microsoft Spreadsheet Compare interface.
This action will open the Compare Files dialog box, prompting you to select the workbooks you want to compare.
-
Select the ‘Compare’ File (Older Version): Click the blue folder icon located next to the Compare box. This will open a file explorer window, allowing you to browse and select the earlier version of your Excel workbook. You can choose files from your local computer, network drives, or even enter a web address if your workbooks are stored online.
-
Select the ‘To’ File (Newer Version): Next, click the green folder icon next to the To box. Browse to and select the workbook you want to compare to the earlier version (typically the newer version). Click OK to confirm your selection in the file explorer.
Tip: You can effectively compare two files even if they have the same name, as long as they are saved in different folders. This is useful for comparing versions saved in different locations.
-
Choose Comparison Options: In the left pane of the Compare Files dialog box, you’ll find a list of options that allow you to customize the comparison. These options include:
- Formulas: Compares formulas in cells.
- Macros: Checks for differences in VBA macros.
- Cell Format: Identifies changes in cell formatting (font, color, alignment, etc.).
- And more: Other options include comparing comments, worksheet names, and more.
Select the options relevant to your comparison needs by checking the corresponding boxes. Alternatively, you can click Select All to compare all aspects of the workbooks.
-
Run the Comparison: Once you’ve selected your files and comparison options, click OK to initiate the comparison process.
If either of the workbooks is password-protected, you might encounter an “Unable to open workbook” message. Click OK and you will be prompted to enter the password for the protected workbook. Spreadsheet Compare needs the password to access and compare the file content.
Understanding the Comparison Results
After running the comparison, Spreadsheet Compare displays the results in a clear, two-pane grid.
-
Side-by-Side Grid: The left pane displays the workbook selected as the “Compare” file (typically the older version), and the right pane shows the “To” file (usually the newer version). Each pane represents the workbooks being compared, with worksheets aligned for easy visual inspection.
-
Worksheet Navigation: If your workbooks contain multiple worksheets, you can navigate between them using the forward and back buttons located on the horizontal scroll bar beneath the grids. This allows you to examine differences across all sheets within the workbooks.
Note: Spreadsheet Compare will compare and display even hidden worksheets in the results, ensuring a comprehensive comparison, regardless of worksheet visibility settings.
-
Color-Coded Highlighting: Differences between the workbooks are highlighted using distinct colors, making it easy to quickly identify changes. The color-coding system is consistent:
- Green Fill Color (Entered Values): Cells with a green fill indicate that the entered value (a value not derived from a formula) has changed between the two versions.
- Green Font Color (Entered Values in Pane Results): In the detailed results list (pane below the grids), entered value changes are also indicated by a green font color.
- Blue-Green Fill Color (Calculated Values): Cells with a blue-green fill signify that a calculated value (a value derived from a formula) has changed. This often happens as a consequence of changes in entered values or formula modifications.
-
Legend Pane: The lower-left pane of the Spreadsheet Compare window acts as a legend, explaining the meaning of each color used in the highlighting. Refer to this legend to quickly understand the types of differences identified.
Alt Text: Screenshot showing comparison results in Microsoft Spreadsheet Compare, highlighting color-coded differences between two Excel worksheets.
Example Scenario: Imagine you are comparing two versions of a quarterly sales report. In the earlier version, the Q4 figures were preliminary. The updated version contains final Q4 sales numbers. Spreadsheet Compare would highlight the cells containing the updated Q4 values with a green fill (entered value change). Furthermore, if the “Year-to-Date” (YTD) column formulas are affected by these Q4 updates, the resulting changes in the YTD column would be highlighted with a blue-green fill (calculated value change).
-
Resize Cells to Fit: If cell contents are truncated due to narrow column widths, click the Resize Cells to Fit option to automatically adjust column widths and display the full cell content for better readability and comparison.
Enhancing Your Excel Comparison Workflow
To maximize the effectiveness of Spreadsheet Compare, consider these tips:
- Prepare Worksheets: Before comparing, ensure your worksheets have a consistent structure as much as possible. While Spreadsheet Compare can handle differences, similar layouts will make the comparison results easier to interpret.
- Version Naming: Adopt a clear version naming convention for your Excel workbooks (e.g., “Sales Report v1,” “Sales Report v2”). This makes it easier to identify and select the correct files for comparison.
- Regular Comparisons: For critical spreadsheets, make comparing versions a regular part of your workflow, especially when collaborating or making significant updates.
Exploring the Excel Inquire Add-in
For users requiring more advanced Excel analysis within Excel itself, the Inquire add-in is a valuable tool. Available in Excel 2013 and later, the Inquire add-in provides an “Inquire” tab in the Excel ribbon. While Spreadsheet Compare is a separate application, the Inquire add-in offers features like workbook analysis, relationship visualization between cells and worksheets, and tools to clean up excessive formatting.
If you have two workbooks open in Excel and want to leverage comparison features from within Excel, you can use the Compare Files command available in the Inquire add-in, which essentially launches Spreadsheet Compare from within Excel.
To enable the Inquire add-in, if you don’t see it, refer to Microsoft’s guide on “Turn on the Inquire add-in.” For a comprehensive overview of the Inquire add-in’s capabilities, see “What you can do with Spreadsheet Inquire.”
Conclusion
Comparing two Excel worksheets for differences is a critical task for data integrity and efficient workflow management. Microsoft Spreadsheet Compare provides a robust and user-friendly solution for quickly and accurately identifying discrepancies between Excel workbooks. By following this guide, you can effectively utilize Spreadsheet Compare to streamline your spreadsheet management, ensure data accuracy, and save significant time compared to manual comparison methods. For organizations managing mission-critical Excel files, leveraging tools like Spreadsheet Compare and exploring Microsoft Audit and Control Management Server for enhanced change management are highly recommended for minimizing risks associated with end-user developed spreadsheets.