When working with data, especially in collaborative environments or across different reporting periods, you often find yourself managing multiple Excel files. Identifying the variations between these files can become a critical task for data validation, error detection, or merging information. Whether you are dealing with sales reports, financial statements, or project updates, knowing how to effectively Compare Multiple Excel Files is an invaluable skill.
This guide explores several methods to compare Excel files, from simple built-in Excel features to more advanced techniques and third-party tools. We will delve into visual side-by-side comparisons, formula-based difference reports, conditional formatting for highlighting discrepancies, and powerful add-ins designed for comprehensive Excel file analysis. By the end of this article, you will be equipped with a range of strategies to efficiently compare multiple Excel files and pinpoint the exact differences you need to understand.
Visual Side-by-Side Comparison for Excel Files
For a quick, visual approach, especially when dealing with a limited number of files or datasets, Excel’s “View Side by Side” mode offers a straightforward solution. This feature allows you to arrange two or more Excel windows on your screen simultaneously, facilitating a direct visual comparison. This method is particularly useful when you need to quickly scan for general trends or obvious discrepancies between datasets.
Comparing Two Excel Workbooks Side by Side
Imagine you have monthly sales data across two separate Excel workbooks and need to quickly understand performance variations. Here’s how to set up a side-by-side view for two Excel files:
- Open Both Workbooks: Start by opening the two Excel files you intend to compare.
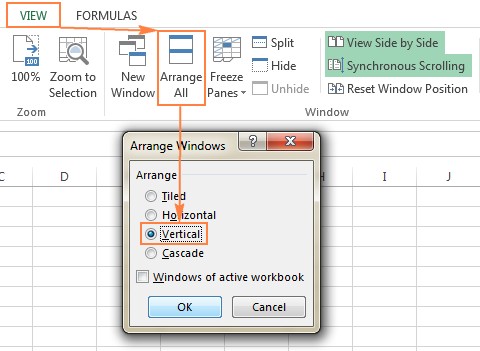
- Activate View Side by Side: Navigate to the “View” tab on the Excel ribbon. In the “Window” group, locate and click the “View Side by Side” button.
After clicking, Excel will automatically arrange the two selected workbooks to appear next to each other. By default, the arrangement is horizontal, positioning one workbook above the other.
To adjust the arrangement to a vertical layout, which is often more convenient for comparing data columns, follow these steps:
- Click the “Arrange All” button, also found in the “Window” group under the “View” tab.
- In the “Arrange Windows” dialog box, select the “Vertical” option.
This vertical arrangement positions the two Excel workbooks directly beside each other, making it easier to scroll and compare data columns.
To enhance the comparison process, Excel offers “Synchronous Scrolling.” When enabled, scrolling in one window will simultaneously scroll the other window. This is particularly helpful for row-by-row comparisons of data in aligned worksheets. Synchronous Scrolling is typically activated automatically when you enable “View Side by Side,” and the toggle is located directly beneath the “View Side by Side” button in the “Window” group of the “View” tab.
For a deeper dive into this feature, Microsoft provides detailed documentation on viewing Excel workbooks side by side.
Managing Multiple Excel Windows for Comparison
When dealing with more than two Excel files, the “View Side by Side” feature adapts to allow you to select which files you want to compare. After opening all the Excel workbooks you need to examine, clicking “View Side by Side” will trigger the “Compare Side by Side” dialog box. This dialog lists all currently open Excel workbooks, letting you choose which ones to display alongside the active workbook.
For viewing all open Excel files at once, the “Arrange All” button is the key. Located in the same “Window” group on the “View” tab, “Arrange All” offers several layout options: tiled, horizontal, vertical, or cascade. This is particularly useful when you need to get a bird’s-eye view of multiple datasets simultaneously.
Comparing Sheets Within the Same Excel Workbook
Sometimes, the data you need to compare resides within different sheets of the same Excel workbook. To view these sheets side by side, you can use the “New Window” feature in conjunction with “View Side by Side.” Here’s how:
- Open a New Window: With your Excel file open, go to the “View” tab and in the “Window” group, click “New Window.” This will open a second window displaying the same Excel file.
- Enable Side by Side View: Click the “View Side by Side” button in either of the new windows.
- Select Sheets: In each window, navigate to the specific sheet you wish to compare. For instance, select ‘Sheet1’ in one window and ‘Sheet2’ in the other.
This setup allows you to directly compare different worksheets from the same workbook in a side-by-side view, just as if they were in separate files.
Formula-Based Comparison for Excel Sheets
For a more analytical approach to compare multiple Excel files, you can use Excel formulas to generate difference reports. This method is ideal for identifying specific cells where values differ between two worksheets. By creating a formula in a new sheet, you can systematically compare corresponding cells in your source sheets and highlight the discrepancies.
To create a basic difference report, start with a new, blank worksheet in your Excel workbook. In cell A1 of this new sheet, enter the following formula:
=IF(Sheet1!A1<>Sheet2!A1, "Sheet1:"&Sheet1!A1&" vs Sheet2:"&Sheet2!A1, "")Then, use the fill handle (the small square at the bottom-right of the selected cell) to drag this formula across columns and down rows, covering the range of data you need to compare.
This formula operates by comparing the value in cell A1 of ‘Sheet1’ with cell A1 of ‘Sheet2’. If the values are different, it outputs a text string indicating the values from both sheets. If the values are identical, it leaves the cell blank.
It is important to note that this formula-based comparison is value-centric. It primarily identifies differences in cell values but does not account for variations in formulas or formatting. Also, dates in the difference report may appear as serial numbers due to Excel’s internal date representation, which may require additional formatting to interpret date differences clearly.
Conditional Formatting to Highlight Excel Differences
Conditional formatting offers a visually striking method to highlight differences directly within your Excel sheets. This technique allows you to automatically format cells that meet specific criteria, in this case, cells that contain different values across two sheets.
Here’s how to set up conditional formatting to highlight differences:
- Select the Range: In the worksheet where you want to highlight the differences, select the entire range of cells you wish to compare. Starting from the top-left cell (usually A1), press
Ctrl + Shift + Endto select all used cells in your data range. - Create a New Rule: Go to the “Home” tab on the Excel ribbon, and in the “Styles” group, click “Conditional Formatting” and then “New Rule.”
- Use a Formula: In the “New Formatting Rule” dialog box, select “Use a formula to determine which cells to format.”
- Enter the Formula: In the formula box, enter the following formula:
=A1<>Sheet2!A1Ensure that 'Sheet2' is replaced with the name of the sheet you are comparing against.- Set Formatting: Click the “Format” button to choose how you want the different cells to be highlighted (e.g., fill color, font style).
- Apply the Rule: Click “OK” in both the “Format Cells” and “New Formatting Rule” dialogs to apply the conditional formatting.
This setup will automatically highlight cells in the first sheet that have different values compared to the corresponding cells in ‘Sheet2’.
While formulas and conditional formatting are effective for basic comparisons, they have limitations:
- Value-Based Only: They primarily compare cell values and do not detect differences in formulas or cell formatting.
- Row/Column Sensitivity: Adding or deleting rows or columns in one sheet will skew the comparison, marking subsequent rows/columns as different, even if the data within is consistent.
- Sheet-Level Limitations: They operate at the sheet level and cannot identify structural differences at the workbook level, such as added or deleted sheets.
Compare and Merge for Shared Excel Workbooks
When collaborating on Excel workbooks, especially in scenarios where multiple users might be editing different copies of the same file, Excel’s “Compare and Merge Workbooks” feature becomes particularly useful. This tool is designed to consolidate changes from different versions of a shared workbook back into a primary version.
Before using this feature, ensure that the workbook is properly set up for sharing:
- Share the Workbook: Open the Excel workbook intended for sharing. Go to the “Review” tab, in the “Changes” group, click “Share Workbook” (in newer versions, this might be “Share Workbook (Legacy)”). Check the box “Allow changes by more than one user at the same time.” and click “OK.” Excel may prompt you to save the workbook.
- Save Copies: Each user editing the workbook must save their own copy with a unique file name. These copies will be used for merging changes back into the original shared workbook.
Once these steps are completed, you can proceed with comparing and merging the workbooks.
Enabling the Compare and Merge Feature
The “Compare and Merge Workbooks” command is not readily visible in Excel by default. You need to add it to your Quick Access Toolbar:
- Customize Quick Access Toolbar: Click the dropdown arrow at the end of the Quick Access Toolbar (usually located above the ribbon). Select “More Commands.”
- Choose All Commands: In the Excel Options dialog, select “All Commands” from the “Choose commands from” dropdown menu.
- Add Compare and Merge: Scroll down the list to find “Compare and Merge Workbooks,” select it, and click the “Add” button to move it to the Quick Access Toolbar.
- Confirm: Click “OK” to close the Excel Options dialog.
Comparing and Merging Workbooks
To merge changes from copies into the primary workbook:
- Open Primary Workbook: Open the original, shared version of the Excel workbook.
- Initiate Merge: Click the “Compare and Merge Workbooks” command from the Quick Access Toolbar.
- Select Copies: In the dialog box, select the copies of the shared workbook that you want to merge into the primary version. You can select multiple files by holding down the Shift key while clicking. Click “OK” to start the merge process.
Excel will then merge the changes from the selected copies into the currently open workbook.
Reviewing Merged Changes
After merging, you can review all changes made by different users:
- Track Changes Review: Go to the “Review” tab, “Changes” group, and click “Track Changes” > “Highlight Changes.”
- Configure Highlight Options: In the “Highlight Changes” dialog, set “When” to “All,” “Who” to “Everyone,” clear the “Where” box, and ensure “Highlight changes on screen” is checked. Click “OK.”
Excel will highlight columns and rows with changes in red and mark individual cells edited by different users with distinct colors. Hovering over a changed cell will display information about who made the change.
Important Note: The “Compare and Merge Workbooks” feature is specifically designed for merging copies of a shared workbook. It will not work for comparing and merging arbitrary, unrelated Excel files.
Third-Party Excel Comparison Tools
While Excel offers built-in comparison features, they may not suffice for complex comparison needs, particularly when you need to deeply compare multiple Excel files for differences in values, formulas, formatting, and structural changes. Third-party tools are designed to provide more advanced and comprehensive comparison capabilities. These tools often offer features beyond what Excel natively provides, such as detailed difference reports, merging capabilities, and the ability to compare different aspects of Excel files simultaneously.
Here are a few notable third-party tools for comparing Excel files:
Synkronizer Excel Compare: Comprehensive Excel File Management
Synkronizer Excel Compare is an add-in that offers a suite of features for comparing, merging, and updating Excel files. It aims to streamline the process of managing and reconciling differences between multiple Excel workbooks and sheets.
Key features of Synkronizer Excel Compare include:
- Detailed Difference Identification: It identifies differences not only in cell values but also in formulas, formatting, comments, and defined names.
- Merge and Update Capabilities: Allows users to merge differences selectively, updating one sheet from another with specific changes.
- Difference Reporting: Generates comprehensive, easy-to-read reports detailing all identified differences.
- Customizable Comparison: Offers various comparison options, including comparing sheets as normal worksheets, with link options, as databases, or by selected ranges.
Comparing Two Excel Files with Synkronizer
To use Synkronizer for comparing Excel files:
- Launch Synkronizer: After installing the add-in, find the “Synkronizer 11” icon in the “Add-ins” tab of the Excel ribbon and click it to open the Synkronizer pane.
- Select Workbooks and Sheets: In the Synkronizer pane, select the two Excel workbooks you want to compare. The add-in automatically detects and matches sheets with the same names across the selected workbooks. You can manually adjust sheet selections if needed.
-
Choose Comparison Options: Select from various comparison modes like “Compare as normal worksheets,” “Compare as database,” or “Compare selected ranges,” depending on the nature of your data and comparison needs.
-
Select Content Types: Customize what to compare, such as cell values, formulas, comments, names, and various formatting aspects. Filters are available to ignore specific types of differences like case sensitivity or spaces.
-
Start Comparison: Click the “Start” button in the Synkronizer pane to initiate the comparison process.
Analyzing Differences with Synkronizer
Synkronizer presents comparison results in two main formats:
- Summary Report: Provides an overview of all types of differences found, categorized by changes in columns, rows, cells, formats, comments, and names.
- Detailed Difference Report: Offers a granular view of each difference type. Clicking on a difference in the detailed report highlights the corresponding cells in both compared sheets.
Synkronizer can also generate a difference report in a separate Excel workbook, with hyperlinks that allow you to jump directly to each identified difference.
Comparing Multiple Sheets and Highlighting Differences
Synkronizer can compare all sheets within two workbooks simultaneously, presenting a summary report that covers all worksheet pairs.
Differences are visually highlighted within the sheets themselves, using different colors to distinguish between types of changes such as value differences, formatting changes, and inserted rows.
Users can customize the highlighting to focus only on relevant differences by using the “Outline” feature to filter and display specific types of changes.
Merging and Updating Sheets
Synkronizer provides powerful merge capabilities, allowing you to transfer individual cells or entire rows/columns from one sheet to another. This is crucial for consolidating changes from different versions of Excel files.
By selecting differences in the Synkronizer pane and using the update buttons, you can efficiently merge changes, choosing the direction of transfer to update your primary sheet with desired modifications from another.
For those interested in trying Synkronizer Excel Compare, a trial version is available for download from their website.
Ablebits Compare Sheets for Excel
Ablebits Compare Sheets for Excel, part of their Ultimate Suite, is another robust tool designed for comparing worksheets in Excel. It offers a user-friendly wizard interface and a “Review Differences” mode to streamline the comparison process.
Key features of Ablebits Compare Sheets include:
- Step-by-Step Wizard: Guides users through the comparison setup, making it easy to configure various options.
- Multiple Comparison Algorithms: Offers different algorithms tailored to various data structures (e.g., no key columns, by key columns, cell-by-cell).
- Review Differences Mode: Displays compared sheets side-by-side in a special mode that allows for easy review and management of differences.
Using Ablebits Compare Sheets
-
Start the Add-in: Click the “Compare Sheets” button located in the “Ablebits Data” tab, within the “Merge” group on the Excel ribbon.
-
Select Worksheets: The wizard prompts you to select the two worksheets you want to compare. You can choose entire sheets, current tables, or specific ranges.
Selecting a table within an Excel worksheet for comparison using Ablebits Compare Sheets.
-
Choose Comparison Algorithm: Select the most appropriate comparison algorithm based on your data structure. “No key columns” is suitable for sheet-based documents, “By key columns” for column-organized data with unique identifiers, and “Cell-by-cell” for spreadsheets with identical layouts.
-
Specify Match Type and Differences to Highlight: Choose a match type (e.g., First match, Best match, Full match only) and specify which differences to highlight, including formatting differences and options to ignore hidden rows or columns.
- Compare and Review: Click “Compare” to start the process. Ablebits Compare Sheets automatically creates backup copies of your workbooks before proceeding. Once processed, the worksheets are displayed in “Review Differences” mode.
Reviewing and Merging Differences in Ablebits
In “Review Differences” mode, the compared sheets are shown side-by-side with differences highlighted using color codes:
- Blue Rows: Rows unique to the first sheet.
- Red Rows: Rows unique to the second sheet.
- Green Cells: Cells with differing values in partially matching rows.
Each worksheet has a vertical toolbar for navigating through differences. You can step through each difference and decide to merge or ignore it.
Once all differences are addressed, you can save the changes and exit “Review Differences” mode. Ablebits Compare Sheets also allows you to save your progress and return to reviewing differences later, or restore original workbooks from backups.
A trial version of Ablebits Ultimate Suite, including Compare Sheets, is available for download from their website.
xlCompare: Advanced Workbook and VBA Comparison
xlCompare is a utility focused on comparing and merging not just Excel worksheets but also entire workbooks, named ranges, and VBA projects. It offers a wide range of features for in-depth Excel file analysis and management.
Key features of xlCompare include:
- Comprehensive Comparison: Compares workbooks, worksheets, defined names, and VBA projects.
- Duplicate Management: Finds and removes duplicate records between worksheets.
- Data Updating and Merging: Updates records in one sheet with values from another, adds unique rows/columns, and merges updated records.
- Advanced Filtering and Highlighting: Filters comparison results to show only differences or identical records and uses color highlighting.
Change pro for Excel: Desktop and Mobile Comparison
Change pro for Excel from Litera provides Excel sheet comparison capabilities across desktop and mobile platforms, with server-based comparison options.
Key features of Change pro for Excel:
- Formula and Value Comparison: Identifies differences in formulas and cell values.
- Layout Change Detection: Detects added/deleted rows and columns and layout modifications.
- Embedded Object Recognition: Recognizes differences in charts, graphs, and images.
- Difference Reporting: Creates detailed reports on formula, value, and layout differences.
- Integration: Direct file comparison from Outlook and document management systems.
- Language Support: Supports all languages, including multi-byte character sets.
Online Excel Comparison Services
For quick, on-the-fly comparisons without installing software, several online services offer Excel file comparison tools. These services can be useful for comparing files that do not contain sensitive information.
Examples of online Excel comparison services include XLComparator and CloudyExcel. These services typically require you to upload two Excel workbooks to their platform and then initiate the comparison.
CloudyExcel, for example, highlights differences directly in the browser after you upload your files and click “Find Difference.”
These online tools provide a convenient, albeit potentially less secure, method for quickly comparing Excel files.
In conclusion, whether you opt for Excel’s built-in features, third-party add-ins, or online services, numerous options are available to compare multiple Excel files effectively. The best method depends on the complexity of your data, the depth of comparison required, and your specific needs for reporting and merging differences. By leveraging the techniques and tools discussed, you can significantly enhance your ability to manage, analyze, and reconcile data across multiple Excel files.
Further Resources for Excel Data Comparison
Explore these additional resources for more techniques and insights into comparing and merging data in Excel: