Comparing two Excel documents might seem daunting, but it’s a crucial skill in many professional and academic scenarios. With the right tools and techniques, you can efficiently identify differences, track changes, and ensure data accuracy. At COMPARE.EDU.VN, we provide comprehensive comparisons and insights to help you make informed decisions, including comparing Excel files. This article explores various methods to compare Excel documents, providing a detailed guide for users of all levels, ultimately making file comparison effortless. Learn about Excel comparison today.
1. Understanding the Need to Compare Excel Documents
Before diving into the methods, it’s essential to understand why comparing Excel documents is crucial. This process helps in several ways:
- Identifying Discrepancies: Easily spot differences in data, formulas, and formatting between two versions of the same document or different documents altogether.
- Tracking Changes: Monitor modifications made over time, which is vital for auditing and version control.
- Ensuring Data Accuracy: Validate data integrity by comparing sources and identifying potential errors or inconsistencies.
- Collaborative Work: Facilitate teamwork by highlighting changes made by different users, streamlining the review process.
- Error Detection: Find mistakes in formulas, calculations, or data entry that could affect the outcome of your analysis.
1.1. Scenarios Where Excel Comparison is Essential
Consider these common situations:
- Financial Analysis: Comparing budget spreadsheets, expense reports, or financial statements to identify discrepancies or track financial performance.
- Data Management: Ensuring consistency across different databases or datasets, especially after updates or migrations.
- Project Management: Monitoring progress by comparing project plans, task lists, and resource allocations.
- Auditing: Verifying the accuracy and completeness of data used in reports or presentations.
- Academic Research: Validating data in research projects, comparing experimental results, or checking for errors in data collection.
1.2. Challenges in Manually Comparing Excel Documents
Manually comparing Excel documents can be time-consuming and prone to errors. The challenges include:
- Large Datasets: Difficult to manually compare large volumes of data.
- Complex Formulas: Hard to identify differences in intricate formulas and calculations.
- Formatting Differences: Time-consuming to spot variations in formatting, such as font, color, or cell styles.
- Human Error: Susceptible to overlooking subtle differences, leading to inaccurate conclusions.
- Time Constraints: Manual comparison can be impractical when dealing with tight deadlines.
2. Native Excel Features for Comparing Documents
Excel offers several built-in features that can assist in comparing documents. While they may not provide the comprehensive comparison of dedicated tools, they are readily available and useful for basic comparisons.
2.1. Using the “View Side by Side” Feature
Excel’s “View Side by Side” feature allows you to display two Excel windows simultaneously, making it easier to compare data visually.
2.1.1. Steps to Use “View Side by Side”
- Open the Excel Files: Open both Excel files you want to compare.
- Go to the View Tab: In one of the Excel windows, click the “View” tab on the ribbon.
- Click “View Side by Side”: In the “Window” group, click “View Side by Side”. Excel will automatically arrange the two windows side by side.
- Synchronous Scrolling: By default, scrolling in one window will also scroll the other. If you don’t want this, click the “Synchronous Scrolling” button in the “Window” group to toggle it off.
- Reset Window Position: If the windows are not aligned correctly, click the “Reset Window Position” button in the “Window” group.
2.1.2. Advantages and Limitations
- Advantages:
- Simple and quick setup.
- Useful for visually comparing data in real-time.
- No need to install additional software.
- Limitations:
- Manual comparison, prone to errors.
- Not suitable for large datasets or complex comparisons.
- Limited functionality for identifying specific differences automatically.
2.2. Conditional Formatting for Highlighting Differences
Conditional formatting can be used to highlight differences between two sets of data within the same worksheet or across different worksheets.
2.2.1. Steps to Use Conditional Formatting
- Open the Excel Files: Open both Excel files.
- Copy Data to a Single Worksheet: Copy the data from one file into a new sheet in the other file. This places both datasets in the same workbook for easier comparison.
- Select the Data Range: Select the data range in the first dataset that you want to compare.
- Go to Conditional Formatting: On the “Home” tab, in the “Styles” group, click “Conditional Formatting”.
- New Rule: Select “New Rule”.
- Use a Formula: Choose “Use a formula to determine which cells to format”.
- Enter the Formula: Enter a formula that compares the first cell in the selected range with the corresponding cell in the second dataset. For example, if you are comparing data in Sheet1 and Sheet2, starting from cell A1, the formula might look like this:
=A1<>Sheet2!A1. This formula checks if the value in cell A1 of Sheet1 is different from the value in cell A1 of Sheet2. - Format: Click the “Format” button to choose a formatting style (e.g., fill color, font color) to highlight the differences.
- Apply the Rule: Click “OK” to apply the rule. Excel will highlight all cells in the selected range that are different from their corresponding cells in the second dataset.
2.2.2. Advantages and Limitations
- Advantages:
- Highlights differences visually.
- Customizable formatting options.
- Useful for comparing specific data ranges.
- Limitations:
- Requires manual setup of rules and formulas.
- Not suitable for comparing entire workbooks or complex structures.
- Can be slow with large datasets.
2.3. Using Formulas to Compare Data
Excel formulas can be used to compare data between two worksheets or workbooks. This method is particularly useful for identifying exact matches or differences based on specific criteria.
2.3.1. Common Formulas for Comparison
- EXACT Function: Compares two text strings and returns TRUE if they are exactly the same, FALSE otherwise.
=EXACT(A1, Sheet2!A1)
- IF Function: Checks if a condition is met and returns one value if TRUE, another value if FALSE.
=IF(A1=Sheet2!A1, "Match", "Mismatch")
- VLOOKUP Function: Searches for a value in the first column of a range and returns a value in the same row from another column. Useful for finding matching records.
=IFERROR(VLOOKUP(A1, Sheet2!A:B, 2, FALSE), "Not Found")
- COUNTIF Function: Counts the number of cells within a range that meet a given criterion.
=COUNTIF(Sheet2!A:A, A1)
2.3.2. Steps to Use Formulas for Comparison
- Open the Excel Files: Open both Excel files.
- Create a Comparison Column: In one of the worksheets, create a new column next to the data you want to compare.
- Enter the Formula: In the first cell of the comparison column, enter the appropriate formula to compare the data with the corresponding cell in the other worksheet.
- Drag the Formula: Drag the formula down to apply it to the entire data range.
- Analyze the Results: Review the results in the comparison column to identify matches and mismatches.
2.3.3. Advantages and Limitations
- Advantages:
- Provides precise results based on specific criteria.
- Useful for identifying exact matches and differences.
- Can be customized with various formulas.
- Limitations:
- Requires knowledge of Excel formulas.
- Manual setup and configuration.
- Not suitable for comparing entire workbooks or complex structures.
3. Dedicated Excel Comparison Tools
For more advanced and comprehensive comparisons, consider using dedicated Excel comparison tools. These tools offer features such as detailed reports, change tracking, and the ability to compare formulas, formatting, and more.
3.1. Microsoft Spreadsheet Compare
Microsoft Spreadsheet Compare is a tool included with Office Professional Plus editions, designed to compare Excel files and highlight differences.
3.1.1. Features of Microsoft Spreadsheet Compare
- Detailed Comparison Reports: Generates detailed reports highlighting differences in data, formulas, formatting, and structure.
- Side-by-Side Comparison: Displays two Excel files side by side, with differences highlighted in color.
- Change Tracking: Tracks changes made between different versions of the same file.
- Error Detection: Identifies potential errors such as inconsistent formulas or broken links.
3.1.2. How to Use Microsoft Spreadsheet Compare
- Open Spreadsheet Compare:
- On the Start screen, click Spreadsheet Compare.
- If you do not see a Spreadsheet Compare option, begin typing the words Spreadsheet Compare, and then select its option.
- Select Files to Compare:
- Click Home > Compare Files.
- The Compare Files dialog box appears.
- Click the blue folder icon next to the Compare box to browse to the location of the earlier version of your workbook.
- Click the green folder icon next to the To box to browse to the location of the workbook that you want to compare to the earlier version, and then click OK.
- Choose Comparison Options:
- In the left pane, choose the options you want to see in the results of the workbook comparison by checking or unchecking the options, such as Formulas, Macros, or Cell Format. Or, just Select All.
- Run the Comparison:
- Click OK to run the comparison.
3.1.3. Advantages and Limitations
- Advantages:
- Detailed comparison reports.
- Highlights differences in various aspects of the files.
- Included with Office Professional Plus editions.
- Limitations:
- Only available with specific Office editions.
- Interface may not be as intuitive as some third-party tools.
3.2. Third-Party Excel Comparison Tools
Several third-party Excel comparison tools offer advanced features and more user-friendly interfaces. Some popular options include:
- Araxis Excel Compare:
- Offers detailed comparison of Excel files with a focus on accuracy and efficiency.
- Highlights differences in data, formulas, and formatting.
- Provides a clear and intuitive interface.
- Beyond Compare:
- A versatile comparison tool that supports Excel files along with other file types.
- Offers advanced features such as three-way merging and folder comparison.
- Customizable comparison options.
- Synkronizer:
- Specializes in comparing and synchronizing Excel files.
- Highlights changes and allows users to merge differences between files.
- Useful for collaborative work and version control.
- DiffEngineX:
- Focuses on providing accurate and reliable Excel comparison.
- Offers detailed reports and change tracking.
- Supports comparison of large and complex Excel files.
3.2.1. Features to Look for in Third-Party Tools
- Detailed Comparison Reports: Look for tools that provide comprehensive reports highlighting all differences between the files.
- Change Tracking: Choose tools that track changes made between different versions of the same file.
- Formula Comparison: Ensure the tool can compare formulas and highlight any discrepancies.
- Formatting Comparison: Check if the tool can identify differences in formatting, such as font, color, and cell styles.
- User-Friendly Interface: Opt for tools with an intuitive and easy-to-use interface.
- Support for Large Files: Make sure the tool can handle large and complex Excel files without performance issues.
3.2.2. Advantages of Using Third-Party Tools
- Advanced Features: Offer more advanced features than native Excel tools.
- User-Friendly Interfaces: Provide more intuitive and easy-to-use interfaces.
- Better Performance: Often optimized for performance with large files.
- Comprehensive Comparison: Provide more comprehensive comparisons, including formulas and formatting.
- Customer Support: Typically offer better customer support and documentation.
4. Step-by-Step Guide: Comparing Excel Documents Using Microsoft Spreadsheet Compare
This section provides a detailed, step-by-step guide on how to use Microsoft Spreadsheet Compare, a tool available with Office Professional Plus editions.
4.1. Prerequisites
Before you begin, ensure that you have:
- Microsoft Office Professional Plus: Microsoft Spreadsheet Compare is included with Office Professional Plus 2013, Office Professional Plus 2016, Office Professional Plus 2019, or Microsoft 365 Apps for enterprise.
- Access to the Files: Ensure you have access to both Excel files you want to compare.
4.2. Launching Spreadsheet Compare
- Open Spreadsheet Compare:
- On the Start screen, click Spreadsheet Compare.
- If you do not see a Spreadsheet Compare option, begin typing the words Spreadsheet Compare, and then select its option.
4.3. Selecting the Files to Compare
- Open the Compare Files Dialog Box:
- Click Home > Compare Files.
- The Compare Files dialog box appears.
- Select the First File:
- Click the blue folder icon next to the Compare box to browse to the location of the earlier version of your workbook.
- Navigate to the folder containing the file and select it.
- Select the Second File:
- Click the green folder icon next to the To box to browse to the location of the workbook that you want to compare to the earlier version, and then click OK.
- Navigate to the folder containing the second file and select it.
- Tip: You can compare two files with the same name if they’re saved in different folders.
4.4. Choosing Comparison Options
- Select Comparison Options:
- In the left pane, choose the options you want to see in the results of the workbook comparison by checking or unchecking the options.
- Available options include:
- Formulas: Compares formulas in the worksheets.
- Macros: Compares macros in the workbooks.
- Cell Format: Compares cell formatting, such as font, color, and styles.
- Values: Compares the values in the cells.
- Structure: Compares the structure of the worksheets, including the order of rows and columns.
- You can also select Select All to compare all aspects of the files.
4.5. Running the Comparison
- Run the Comparison:
- Click OK to run the comparison.
- If you get an “Unable to open workbook” message, this might mean one of the workbooks is password protected. Click OK and then enter the workbook’s password.
4.6. Understanding the Comparison Results
- Review the Results:
- The results of the comparison appear in a two-pane grid. The workbook on the left corresponds to the “Compare” (typically older) file you chose, and the workbook on the right corresponds to the “To” (typically newer) file.
- Details appear in a pane below the two grids. Changes are highlighted by color, depending on the kind of change.
- Interpreting the Color Codes:
- Changes are highlighted with a cell fill color or text font color, depending on the type of difference.
- The lower-left pane is a legend that shows what the colors mean. For example:
- Green Fill Color: Indicates that an entered value (non-formula cell) has changed.
- Blue-Green Fill: Indicates that the calculated value has changed.
- Navigating Through Worksheets:
- In the side-by-side grid, a worksheet for each file is compared to the worksheet in the other file.
- If there are multiple worksheets, they’re available by clicking the forward and back buttons on the horizontal scroll bar.
- Note: Even if a worksheet is hidden, it’s still compared and shown in the results.
4.7. Example Scenario: Analyzing Sales Data
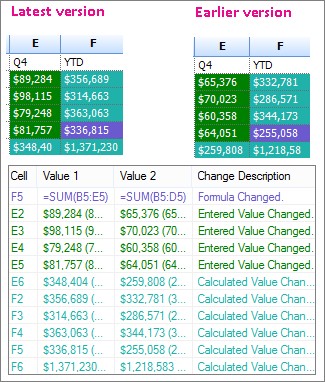
Let’s say you have two versions of a sales data workbook. The earlier version contains preliminary sales figures for Q4, while the latest version contains the final numbers.
- Open the Files: Open both the earlier and latest versions of the sales data workbook using Microsoft Spreadsheet Compare.
- Compare the Data: Run the comparison, selecting options such as “Values” and “Formulas”.
- Analyze the Results:
- In the comparison results, cells E2:E5 in both versions have a green fill, indicating that an entered value has changed. This means the sales figures for Q4 have been updated.
- The calculated results in the YTD column also changed – cells F2:F4 and E6:F6 have a blue-green fill, indicating that the calculated values have changed due to the updated sales figures.
- Additionally, you notice that the formula in cell F5 was incorrect in the earlier version (it summed only B5:D5, omitting the value for Q4). The updated workbook has corrected the formula to =SUM(B5:E5).
4.8. Tips for Effective Comparison
- Resize Cells to Fit: If the cells are too narrow to show the cell contents, click Resize Cells to Fit.
- Focus on Key Areas: Identify the key areas of the workbook that you want to compare, such as critical data ranges or formulas.
- Use Filters: Use filters to narrow down the results and focus on specific types of changes.
- Document Your Findings: Document any significant differences or errors that you find during the comparison.
5. Advanced Techniques for Excel Comparison
Beyond the basic methods, several advanced techniques can help you compare Excel documents more effectively.
5.1. Using Excel’s Inquire Add-In
The Inquire add-in in Excel 2013 and later versions provides additional tools for analyzing and comparing workbooks.
5.1.1. Features of the Inquire Add-In
- Workbook Analysis: Analyzes a workbook to identify potential issues, such as inconsistent formulas, hidden rows, and broken links.
- Cell Relationship Analysis: Visualizes relationships between cells, worksheets, and other workbooks.
- Worksheet Cleaning: Removes excess formatting from a worksheet to reduce file size and improve performance.
- Compare Files Command: Allows you to run Spreadsheet Compare directly from Excel.
5.1.2. How to Enable the Inquire Add-In
- Go to File > Options: In Excel, click “File” and then “Options”.
- Select Add-Ins: In the Excel Options dialog box, click “Add-Ins”.
- Manage COM Add-Ins: In the “Manage” dropdown at the bottom of the dialog box, select “COM Add-ins” and click “Go”.
- Check the Inquire Box: In the COM Add-ins dialog box, check the box next to “Inquire” and click “OK”.
- Inquire Tab: The “Inquire” tab should now appear on the Excel ribbon.
5.1.3. Using the Compare Files Command in Inquire
- Open the Excel Files: Open both Excel files you want to compare.
- Go to the Inquire Tab: Click the “Inquire” tab on the ribbon.
- Click Compare Files: In the “Compare” group, click “Compare Files”. This will launch Microsoft Spreadsheet Compare with the two open files selected.
5.2. Comparing Data Using Power Query
Power Query, also known as Get & Transform Data, is a powerful feature in Excel that allows you to import, transform, and combine data from multiple sources. It can also be used to compare data between two Excel files.
5.2.1. Steps to Compare Data Using Power Query
- Open a New Excel Workbook: Open a new Excel workbook.
- Get Data from Files:
- Go to the “Data” tab on the ribbon.
- Click “Get Data” > “From File” > “From Workbook”.
- Select the first Excel file you want to compare and click “Import”.
- Select the Table/Sheet: In the Navigator dialog box, select the table or sheet containing the data and click “Transform Data”. This will open the Power Query Editor.
- Rename the Query: In the Power Query Editor, rename the query to something descriptive, such as “Data1”.
- Repeat for the Second File: Repeat steps 2-4 for the second Excel file, naming the query “Data2”.
- Close & Load:
- In the Power Query Editor, click “Close & Load To…” > “Only Create Connection”.
- Repeat for both queries.
- Merge Queries:
- Go to the “Data” tab on the ribbon.
- Click “Get Data” > “Combine Queries” > “Merge”.
- In the Merge dialog box, select “Data1” as the first table and “Data2” as the second table.
- Select the columns you want to use for the merge (e.g., ID, Name).
- Choose the “Left Outer” join kind to include all rows from Data1 and matching rows from Data2.
- Click “OK”.
- Expand the Merged Column:
- Click the expand button in the header of the merged column (e.g., “Data2”).
- Select the columns you want to expand and click “OK”.
- Compare the Data: You can now compare the data from both files in the Power Query Editor. Add custom columns to identify differences, such as:
= if [Column1] = [Column1.1] then "Match" else "Mismatch"
- Close & Load to Worksheet: Click “Close & Load” to load the results to a new worksheet.
5.2.2. Advantages of Using Power Query
- Data Transformation: Power Query allows you to clean and transform data before comparison.
- Combining Data: You can combine data from multiple sources into a single dataset.
- Automation: Power Query steps can be saved and reused to automate the comparison process.
- Handling Large Datasets: Power Query is designed to handle large datasets efficiently.
5.3. Using VBA for Custom Comparison Scripts
For highly customized comparison needs, you can use VBA (Visual Basic for Applications) to write custom scripts.
5.3.1. Example VBA Script to Compare Two Worksheets
Sub CompareWorksheets()
    Dim ws1 As Worksheet, ws2 As Worksheet
    Dim lastRow As Long, i As Long
    Dim diffCount As Long

    ' Set the worksheets to compare
    Set ws1 = ThisWorkbook.Sheets("Sheet1")
    Set ws2 = ThisWorkbook.Sheets("Sheet2")

    ' Get the last row with data in the first worksheet
    lastRow = ws1.Cells(Rows.Count, "A").End(xlUp).Row

    diffCount = 0

    ' Loop through each row and compare the values
    For i = 1 To lastRow
        If ws1.Cells(i, 1).Value <> ws2.Cells(i, 1).Value Then
            Debug.Print "Difference found in row " & i & ": " & _
                        "Sheet1 - " & ws1.Cells(i, 1).Value & ", " & _
                        "Sheet2 - " & ws2.Cells(i, 1).Value
            diffCount = diffCount + 1
        End If
    Next i

    MsgBox "Comparison complete. " & diffCount & " differences found."
End Sub
5.3.2. How to Use the VBA Script
- Open the VBA Editor:
- Press Alt + F11 to open the VBA editor in Excel.
- Insert a New Module:
- In the VBA editor, click “Insert” > “Module”.
- Paste the Script:
- Paste the VBA script into the module.
- Modify the Script:
- Modify the script to suit your specific needs, such as changing the worksheet names or column to compare.
- Run the Script:
- Press F5 or click the “Run” button to execute the script.
5.3.3. Advantages of Using VBA
- Customization: VBA allows you to create highly customized comparison scripts.
- Automation: You can automate complex comparison tasks.
- Flexibility: VBA can be used to compare any aspect of the Excel files, including data, formulas, and formatting.
6. Best Practices for Excel Document Comparison
To ensure accurate and efficient Excel document comparison, follow these best practices:
6.1. Preparation is Key
- Clean the Data: Remove any unnecessary formatting, blank rows, or columns before comparing.
- Standardize Data: Ensure that the data is standardized, such as consistent date formats and number formats.
- Backup Files: Always create a backup of the files before making any changes.
6.2. Choose the Right Tool
- Assess Your Needs: Determine the complexity of the comparison and choose the appropriate tool, whether it’s a native Excel feature, a dedicated comparison tool, or a custom VBA script.
- Consider File Size: For large files, choose tools that are optimized for performance.
- Evaluate Features: Evaluate the features offered by different tools and choose the one that best meets your needs.
6.3. Focus on Key Areas
- Identify Critical Data: Identify the key areas of the workbook that you want to compare, such as critical data ranges or formulas.
- Use Filters: Use filters to narrow down the results and focus on specific types of changes.
6.4. Document Your Findings
- Track Changes: Keep a record of all changes made during the comparison process.
- Document Errors: Document any errors or inconsistencies that you find during the comparison.
- Create a Report: Create a report summarizing the findings of the comparison.
6.5. Regular Audits
- Schedule Regular Audits: Schedule regular audits of your Excel files to ensure data accuracy and consistency.
- Automate the Process: Automate the comparison process using Power Query or VBA scripts to save time and reduce the risk of errors.
7. Common Issues and Troubleshooting
While comparing Excel documents, you may encounter some common issues. Here’s how to troubleshoot them:
7.1. Unable to Open Workbook
- Cause: The workbook is password protected.
- Solution: Enter the password when prompted by Spreadsheet Compare.
- Alternative: Remove the password protection from the workbook before comparing.
7.2. Comparison Results Not Showing Differences
- Cause: The comparison options are not correctly selected.
- Solution: Double-check the comparison options in Spreadsheet Compare and ensure that you have selected the appropriate options, such as “Values”, “Formulas”, and “Cell Format”.
- Alternative: Try selecting “Select All” to compare all aspects of the files.
7.3. Performance Issues with Large Files
- Cause: The Excel files are too large and complex for the comparison tool to handle efficiently.
- Solution: Close any unnecessary programs to free up system resources.
- Alternative: Use Power Query to import and transform the data before comparison.
7.4. Inconsistent Results
- Cause: The data in the files is not standardized, such as inconsistent date formats or number formats.
- Solution: Standardize the data before comparing.
- Alternative: Use Power Query to clean and transform the data before comparison.
7.5. Incorrect Formulas
- Cause: The formulas in the workbooks are incorrect, leading to inaccurate results.
- Solution: Review the formulas in both workbooks and correct any errors.
- Alternative: Use the Inquire add-in to analyze the formulas and identify potential issues.
8. The Role of COMPARE.EDU.VN in Excel Comparison
COMPARE.EDU.VN is dedicated to providing users with comprehensive comparisons and insights to help them make informed decisions. In the context of Excel document comparison, COMPARE.EDU.VN can assist in several ways:
8.1. Providing Expert Reviews and Comparisons of Tools
COMPARE.EDU.VN offers expert reviews and comparisons of various Excel comparison tools, including Microsoft Spreadsheet Compare and third-party options. These reviews provide detailed information about the features, advantages, and limitations of each tool, helping users choose the right tool for their needs.
8.2. Offering Step-by-Step Guides and Tutorials
COMPARE.EDU.VN provides step-by-step guides and tutorials on how to use different Excel comparison techniques, including native Excel features, dedicated comparison tools, and custom VBA scripts. These guides help users of all levels learn how to compare Excel documents effectively.
8.3. Providing Best Practices and Tips
COMPARE.EDU.VN offers best practices and tips for Excel document comparison, helping users ensure accurate and efficient comparisons. These best practices cover various aspects, such as data preparation, tool selection, and result analysis.
8.4. Assisting in Troubleshooting Common Issues
COMPARE.EDU.VN assists users in troubleshooting common issues encountered during Excel document comparison. The website provides solutions and alternatives for issues such as being unable to open workbooks, comparison results not showing differences, and performance issues with large files.
9. Conclusion: Making Excel Comparison Effortless
Comparing Excel documents is a crucial skill for anyone working with data. Whether you are identifying discrepancies, tracking changes, or ensuring data accuracy, the right tools and techniques can make the process effortless. From native Excel features like “View Side by Side” and conditional formatting to dedicated tools like Microsoft Spreadsheet Compare and third-party options, there are numerous ways to compare Excel documents effectively.
By following the step-by-step guides, best practices, and troubleshooting tips provided in this article, you can streamline your Excel comparison process and ensure accurate results. Remember to assess your needs, choose the right tool, and document your findings to make the most of your Excel comparison efforts.
At COMPARE.EDU.VN, we are committed to helping you make informed decisions by providing comprehensive comparisons and insights. Visit COMPARE.EDU.VN to explore more resources and tools for Excel document comparison and other data management tasks.
10. FAQs: Comparing Excel Documents
Here are some frequently asked questions about comparing Excel documents:
1. Can I compare two Excel files with different structures?
Yes, but it may require more advanced techniques. Tools like Power Query or VBA scripts can help you align the data and compare files with different structures.
2. Is Microsoft Spreadsheet Compare available in all versions of Excel?
No, Microsoft Spreadsheet Compare is only available with Office Professional Plus 2013, Office Professional Plus 2016, Office Professional Plus 2019, or Microsoft 365 Apps for enterprise.
3. Can I compare Excel files stored on different computers?
Yes, as long as you have access to both files. You can open the files from different locations and compare them using any of the methods described in this article.
4. What is the best way to compare large Excel files?
For large Excel files, consider using dedicated comparison tools or Power Query, as they are designed to handle large datasets efficiently.
5. Can I automate the Excel comparison process?
Yes, you can automate the Excel comparison process using Power Query or VBA scripts.
6. How do I compare formulas in Excel?
You can compare formulas using Microsoft Spreadsheet Compare or custom VBA scripts.
7. Can I compare Excel files with macros?
Yes, Microsoft Spreadsheet Compare allows you to compare macros in Excel files.
8. What should I do if I encounter an error while comparing Excel files?
Refer to the troubleshooting tips in this article or consult the documentation for the tool you are using.
9. How can I ensure that my Excel files are consistent?
Schedule regular audits of your Excel files and automate the comparison process to ensure data accuracy and consistency.
10. Where can I find more resources and tools for Excel comparison?
Visit COMPARE.EDU.VN for expert reviews, step-by-step guides, and best practices for Excel document comparison.
Ready to make your Excel comparisons effortless? Visit COMPARE.EDU.VN today for expert insights and comprehensive tools. Our detailed comparisons and guides will help you identify differences, track changes, and ensure data accuracy with ease. Start making informed decisions now and streamline your data management process.
Contact Us:
Address: 333 Comparison Plaza, Choice City, CA 90210, United States
WhatsApp: +1 (626) 555-9090
Website: compare.edu.vn