Navigating feedback on a document can quickly become overwhelming when multiple reviewers return copies filled with edits. Instead of manually sifting through each version to identify changes, Microsoft Word offers a powerful feature to efficiently consolidate and compare these revisions. Think of it as a way to collate, reconcile, or integrate all feedback into a single, unified document. This guide will walk you through using Word’s “Combine” tool, offering a seamless approach to managing document revisions and ensuring no suggestion is overlooked.
Merging Two Versions of a Document
Word’s “Combine” feature simplifies the process of bringing together two versions of a document. Here’s how to merge an original document with a revised copy:
-
Navigate to the Review tab on the Word ribbon, then click Compare and select Combine from the dropdown menu.
-
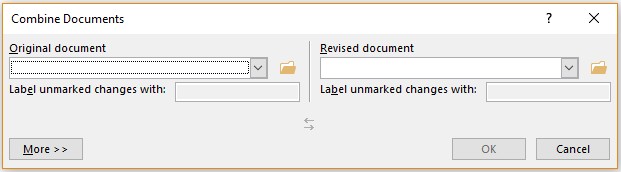
A “Combine Documents” window will appear. Under Original document, use the dropdown arrow to select the initial document you shared for review. If needed, use the folder icon to browse and locate the file. This should be the clean version, before any edits were made.
-
Next, under Revised document, choose the copy that contains the revisions you want to merge into the original.
-
In the Label unmarked changes with field, type a name or identifier. This label will help you distinguish who suggested which changes within the merged document.
-
For additional control over the merge process, click More.
-
Under Show changes in, it’s recommended to select New document. This keeps your original files untouched and displays the combined version in a separate document for easy review.
This image shows the “New document” option selected under “Show changes in” within the Combine Documents window.
-
Click OK to initiate the merge. Word will generate a new document displaying three panes. The Revisions pane summarizes all tracked changes. The central pane shows the combined document with all revisions marked. The two side panes display the Original document and Revised document for source comparison. If this view is too cluttered, you can simplify it by clicking Compare > Show Source Documents > Hide Source Documents. Red vertical lines in the combined document indicate where changes have been made.
-
Once you have reviewed and addressed all combined changes, save the newly merged document.
Tip: For future collaborations, consider utilizing OneDrive’s sharing features to enable real-time co-editing and commenting, potentially streamlining the review process and minimizing the need for extensive merging later on.
Merging Additional Copies
To incorporate feedback from more than two document versions, repeat the merge process. Begin by saving the document resulting from the initial merge of two copies. Then, merge subsequent revised copies into this consolidated document.
-
Go to Review > Compare > Combine.
-
Under Original document, select the document that already contains the combined changes from previous merges.
-
Under Revised document, choose the next revised copy you wish to integrate.
-
Again, in the Label unmarked changes with box, add a name or phrase to identify the source of changes in this merge.
-
Click More for further options.
-
This time, under Show changes in, choose Original document. This will directly integrate the new revisions into your already combined document.
-
Click OK to complete the merge.
By using the “Combine” feature in Microsoft Word, you can efficiently compare and consolidate feedback from multiple reviewers, ensuring a streamlined document revision process. This method provides a clear and organized way to review suggested edits, ultimately leading to a polished and collaborative final document.