Managing feedback on documents can quickly become overwhelming when you’re dealing with multiple reviewers. Imagine sending out a document for review and receiving numerous copies back, each filled with valuable suggestions and revisions. Sifting through each document to manually compare changes is time-consuming and inefficient. Fortunately, Microsoft Word offers a powerful feature that provides another word for “compares” in this context: Combine. Instead of laboriously comparing documents side-by-side, Word’s “Combine” function allows you to merge all those edits and ideas into a single, unified document, streamlining your review process significantly.
Merging Two Versions of a Document
Let’s walk through how to combine two versions of your document using Word’s built-in feature.
-
Start by navigating to the Review tab on the Word ribbon. Then, in the Compare group, click Compare and select Combine from the dropdown menu.
-
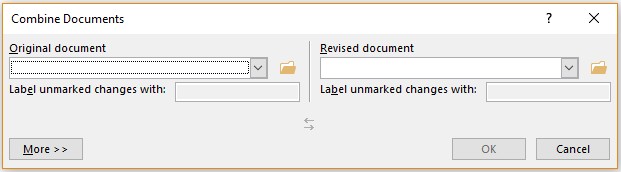
A Combine Documents window will appear. Here, you need to specify your Original document and your Revised document. Under Original document, use the dropdown arrow to select the initial document you sent out for review – the one without any of the feedback incorporated. If you need to locate it, click the folder icon to browse your files. This is your baseline, the document before any modifications.
-
Next, under Revised document, choose the reviewed copy that you want to merge into your original. This is the document containing suggestions and edits from a reviewer.
-
In the Label unmarked changes with box, type a name or a phrase to identify the reviewer who made the changes in the revised document. This label will help you track who suggested which edits within the combined document.
-
For more control over the combine process, click More. This expands the options for how Word handles the merging process.
-
Under Show changes in, select New document. This is generally recommended as it keeps your original documents untouched and presents the combined result in a fresh document.
Alt text: Choosing to show combined changes in a new document within the Combine Documents options.
-
Click OK. Word will then generate a new document that integrates the content of both your original and revised documents. The screen will typically split into three panes:
- Revisions Pane: Located on the left, this pane lists all the tracked changes made between the documents.
- Combined Document Pane: The central pane displays the newly created document with all revisions merged.
- Source Documents Pane: On the right, split into two, you’ll see both the Original document (top) and the Revised document (bottom) for direct comparison if needed.
If you find the three-pane view too cluttered, you can simplify it by clicking Compare > Show Source Documents > Hide Source Documents. Notice the red vertical lines in the combined document, these visually indicate where changes have been made.
-
Review the combined changes in the new document. Accept or reject each revision as needed to finalize your document. Once you are satisfied, save the combined document.
Tip: To avoid this merging process altogether in the future, consider leveraging cloud collaboration. By sharing your document on OneDrive and inviting reviewers to directly add their edits and comments in a collaborative environment, you can eliminate the need to combine multiple copies later.
Merging Multiple Copies
What if you have feedback from more than one reviewer? Word’s “Combine” feature is still your ally. To merge additional copies, you’ll work iteratively.
-
After combining the first two versions and saving the resulting combined document, start the process again. Click Review > Compare > Combine.
-
This time, under Original document, select the document that already contains the combined changes from the previous merge. This becomes your new baseline.
-
Under Revised document, choose the next reviewer’s copy that you want to incorporate.
-
Again, in the Label unmarked changes with box, type a name or phrase to identify this reviewer’s contributions.
-
Click More to explore options if needed.
-
Under Show changes in, you can choose to either show changes in a New document (to keep each merge separate) or, to directly integrate into the Original document from this step (which is the document with previous merges). Choose Original document if you want to keep building upon the previously combined version.
-
Click OK. Word will merge the new set of revisions into your chosen document. Repeat this process for all remaining reviewed copies, each time using the latest combined version as your “Original document” and a new reviewer’s copy as the “Revised document”.
By using the “Combine” feature, you’re effectively using merge and unify as alternative actions to manually “compare” multiple documents. This not only saves time but also ensures you don’t miss any crucial feedback during your document review process. Word offers more than just “compare”; it provides tools to truly streamline your workflow.
See also
View and compare documents side by side
Compare document differences using the legal blackline option