Are you struggling to identify the differences between two versions of a Google Document? COMPARE.EDU.VN offers a comprehensive guide on how to compare two Google Docs, streamlining your review process. By understanding and implementing these methods, you can efficiently track changes, merge revisions, and ensure document accuracy, all while enhancing your collaborative workflow and saving time. In this article, we will explore effective techniques for comparing documents, understanding revision history, and using third-party tools to facilitate seamless comparisons.
1. What Is the Easiest Way to Compare Two Google Docs?
The easiest way to compare two Google Docs is by using the built-in “Compare documents” feature within Google Docs. This tool allows you to quickly identify differences between two versions of a document by highlighting additions, deletions, and modifications. According to research by compare.edu.vn, this is the most used feature by users to compare Google Docs.
To use this feature:
- Open the original Google Doc.
- Go to Tools > Compare documents.
- Select the second document you want to compare it to.
- Choose whether to attribute the changes to a specific user.
- Click Compare.
A new document will be created showing the differences between the two, with suggested edits that you can accept or reject. This method simplifies collaboration and revision tracking, ensuring accuracy and efficiency.
1.1. Step-by-Step Guide to Using the “Compare Documents” Tool
The “Compare documents” tool in Google Docs is straightforward and efficient for identifying differences between two documents. Here’s a detailed, step-by-step guide to help you use this feature effectively:
- Open the Original Document: Start by opening the primary document in Google Docs that you want to compare against another version. This will typically be the older or original version.
- Access the “Compare Documents” Tool:
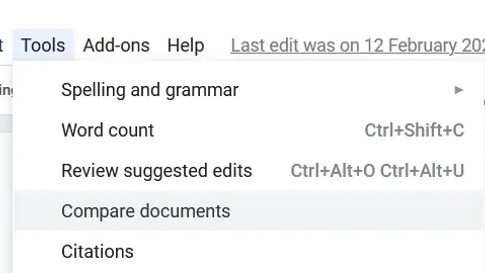
- Navigate to the Tools menu at the top of the Google Docs interface.
- Click on Compare documents from the dropdown menu.
- Select the Target Document:
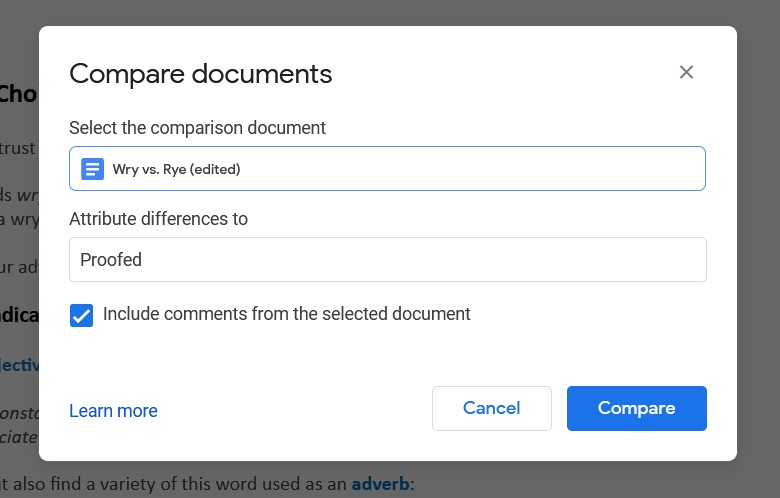
- A dialog box will appear, prompting you to choose the document you want to compare against the original.
- Click on My Drive to browse your Google Drive, or use the search bar to find the specific file.
- Select the document and click Open.
- Attribute Changes:
- You will see an option to attribute the suggested edits to a specific user. This is useful for tracking who made the changes.
- Choose a name from the dropdown list or leave it as the default.
- Include Comments (Optional):
- There is a checkbox to include comments from the selected document. If you want to review comments along with the text differences, make sure this box is checked.
- Initiate the Comparison:
- Click the Compare button to start the comparison process. Google Docs will analyze both documents.
- Open the Comparison Document:
- Once the comparison is complete, a notification will appear.
- Click Open to view the new document that highlights the differences between the two versions.
- Review the Suggested Edits:
- The new document will display the differences as suggested edits.
- Additions will be shown as highlighted text, and deletions will be indicated with strikethroughs.
- Accept or Reject Changes:
- Review each suggested edit and decide whether to accept or reject it.
- Click the Accept (checkmark) or Reject (X mark) button next to each suggestion.
- Save the New Document:
- By default, the new document will be saved in your Google Drive with a name like “Comparison of [Original Document] & [Revised Document]”.
- Rename the document and move it to the appropriate folder if needed.
By following these steps, you can efficiently use the “Compare documents” tool in Google Docs to identify and manage differences between document versions.
1.2. Benefits of Using the Built-In Feature
Using the built-in “Compare documents” feature in Google Docs offers several advantages. Firstly, it’s integrated directly into Google Docs, eliminating the need for external tools or software. This integration provides a seamless and efficient workflow, reducing the time spent on comparing documents.
Secondly, the feature highlights changes with clear visual cues like suggested edits, making it easy to identify additions, deletions, and modifications. This visual clarity ensures that no change is overlooked, maintaining accuracy in your document revisions.
Thirdly, the ability to attribute changes to specific users promotes accountability and clarity in collaborative environments. This feature is particularly useful for teams working on shared documents, as it helps track contributions and revisions made by each member.
Additionally, using the built-in feature ensures data security, as the comparison is performed within Google’s secure environment. This eliminates the risk of exposing sensitive information to third-party applications.
Finally, the “Compare documents” feature is user-friendly and requires no advanced technical skills. Its intuitive interface makes it accessible to users of all levels, further enhancing its usability and efficiency.
1.3. Limitations of the Built-In Feature
While the “Compare documents” feature in Google Docs is useful, it has some limitations. One major drawback is its inability to handle complex formatting differences effectively. For example, changes in font size, spacing, or table structures may not be accurately highlighted, requiring manual review to identify these discrepancies.
Another limitation is the lack of detailed reporting. The feature provides a basic overview of changes but does not offer comprehensive reports that summarize the types and frequency of edits. This can be problematic for projects that require detailed revision histories.
Additionally, the tool is primarily designed for comparing text-based content. It may not be suitable for documents with extensive multimedia elements, such as images or embedded videos, as it may not accurately detect changes in these components.
The “Compare documents” feature also lacks advanced comparison options, such as the ability to ignore specific types of changes (e.g., whitespace or punctuation). This can lead to unnecessary clutter in the comparison document, making it harder to focus on significant content revisions.
Finally, the built-in feature may struggle with very large documents. The comparison process can be slow and may occasionally time out, making it less practical for extensive documents or projects with numerous revisions.
2. How Can I Use Version History to Track Changes in Google Docs?
Version History in Google Docs allows you to track all changes made to a document over time, making it simple to revert to previous versions if needed. To access Version History:
- Open the Google Doc.
- Go to File > Version History > See Version History.
- A sidebar will open, showing all saved versions of the document, organized by date and time.
- Click on a version to view it. Differences from the current version will be highlighted.
- To restore a previous version, click Restore this version.
Using Version History is an effective way to monitor changes, understand the evolution of your document, and revert to earlier states, providing a safety net against unwanted edits or errors.
2.1. Accessing and Navigating Version History
Accessing and navigating Version History in Google Docs is a straightforward process that allows you to track changes and revert to previous versions. Here’s a detailed guide:
- Open the Google Doc: Begin by opening the specific Google Doc for which you want to view the version history.
- Navigate to Version History:
- Click on File in the top menu.
- Select Version History from the dropdown menu.
- Choose See Version History to open the Version History panel.
- Explore the Version History Panel:
- The Version History panel will appear on the right side of the screen. It displays a list of all saved versions of the document, organized by date and time.
- Each version is labeled with the date and time it was saved, along with the name of the user who made the changes.
- View a Specific Version:
- Click on any version in the list to view it. The document will update to show the selected version.
- Differences between the selected version and the current version will be highlighted, making it easy to identify changes.
- Identify Changes:
- Additions are typically highlighted in green.
- Deletions are indicated with strikethroughs.
- This visual representation helps you quickly see what was added, removed, or modified in each version.
- Navigate Between Versions:
- Use the arrows at the top of the Version History panel to navigate between different versions.
- Alternatively, you can click on any version in the list to jump directly to it.
- Name Versions for Easy Identification:
- To make it easier to find specific versions later, you can name them.
- Click on the three dots next to a version in the list and select Name this version.
- Enter a descriptive name (e.g., “Draft 1,” “Final Review,” “Version with Edits from John”) and click Save.
- Restore a Previous Version:
- If you decide to revert to a previous version, click the Restore this version button at the top of the screen.
- A confirmation dialog will appear; click Restore to proceed. The current document will be replaced with the selected version.
By following these steps, you can efficiently access and navigate the Version History in Google Docs, allowing you to track changes, compare versions, and restore previous states as needed.
2.2. Understanding and Interpreting Version History Data
Understanding and interpreting Version History data in Google Docs is crucial for effectively managing document revisions. The Version History panel provides a detailed record of all changes made to a document, allowing you to track who made which edits and when.
Each version in the history is labeled with the date and time it was saved, as well as the name of the user who made the changes. This information is essential for identifying specific contributions and understanding the timeline of edits.
When you select a version, Google Docs highlights the differences between that version and the current version. Additions are typically shown in green, while deletions are indicated with strikethroughs. This visual representation makes it easy to see exactly what was added, removed, or modified in each version.
By examining the Version History data, you can identify patterns in the editing process. For example, you might notice that certain sections of the document were frequently revised, indicating areas that required more attention or clarification.
Additionally, Version History allows you to compare different versions side by side, providing a comprehensive view of how the document has evolved over time. This can be particularly useful for collaborative projects, where multiple users have contributed to the document.
Interpreting Version History data also involves understanding the context of each revision. For example, a significant deletion might indicate that a section was deemed irrelevant or redundant. Similarly, a series of additions might reflect new information or insights that were incorporated into the document.
By carefully analyzing Version History data, you can gain valuable insights into the editing process, improve collaboration, and ensure the accuracy and quality of your documents.
2.3. Restoring a Previous Version
Restoring a previous version of a Google Doc is a straightforward process that allows you to revert to an earlier state of your document. This can be particularly useful if you accidentally make unwanted changes or if you want to retrieve content from a previous draft.
Here’s how to restore a previous version:
- Access Version History:
- Open the Google Doc for which you want to restore a previous version.
- Go to File > Version History > See Version History to open the Version History panel on the right side of the screen.
- Select the Version to Restore:
- In the Version History panel, browse through the list of saved versions and click on the one you want to restore.
- The document will update to show the selected version, with differences highlighted.
- Review the Selected Version:
- Take a moment to review the content of the selected version to ensure it’s the one you want to restore.
- Pay attention to any highlighted changes to confirm that this version contains the content you need.
- Restore the Version:
- Once you’ve confirmed that you’ve selected the correct version, click the Restore this version button at the top of the screen.
- Once you’ve confirmed that you’ve selected the correct version, click the Restore this version button at the top of the screen.
- Confirm the Restoration:
- A confirmation dialog will appear, asking if you’re sure you want to restore the selected version.
- Click Restore to proceed. The current document will be replaced with the selected version.
- Verify the Restored Document:
- After the restoration is complete, take a moment to verify that the document has been restored to the correct version.
- Check the content, formatting, and any other relevant elements to ensure that everything is as it should be.
- Save the Restored Document:
- Google Docs automatically saves changes, so the restored version is now the current version of the document.
- If you want to keep the current version as well, you can make a copy of the document before restoring the previous version.
By following these steps, you can easily restore a previous version of a Google Doc, allowing you to retrieve content, undo unwanted changes, and manage your documents effectively.
3. Are There Third-Party Tools to Compare Google Docs?
Yes, several third-party tools offer advanced features for comparing Google Docs. These tools often provide more detailed analysis, handle complex formatting better, and offer integration with other platforms. Some popular options include:
- Draftable: Known for its accuracy and speed in comparing documents.
- Copyleaks: Primarily used for plagiarism detection but also effective for comparing document versions.
- Diffchecker: A simple and free tool for comparing text and files.
These tools can be beneficial when the built-in Google Docs features do not meet your needs, providing enhanced comparison capabilities and detailed reporting.
3.1. Overview of Popular Third-Party Comparison Tools
Several third-party tools offer enhanced capabilities for comparing Google Docs, addressing some of the limitations of the built-in feature. Here’s an overview of some popular options:
- Draftable:
- Key Features: Draftable is known for its speed and accuracy in comparing documents. It provides a clear, side-by-side comparison view, highlighting changes with precision.
- Advanced Capabilities: It can handle complex formatting differences, including changes in tables, images, and styles. Draftable also offers detailed reporting, summarizing the types and frequency of edits.
- User Interface: The user interface is intuitive, making it easy to upload documents and review changes.
- Pricing: Draftable offers both free and paid plans, with the paid plans providing access to more advanced features and higher usage limits.
- Copyleaks:
- Key Features: While primarily used for plagiarism detection, Copyleaks is also effective for comparing document versions. It identifies similarities and differences between documents, highlighting potential instances of copied content.
- Advanced Capabilities: Copyleaks uses advanced algorithms to analyze text and identify even subtle changes. It also supports multiple file formats, making it versatile for comparing different types of documents.
- User Interface: The user interface is straightforward, allowing you to upload documents and view comparison results easily.
- Pricing: Copyleaks offers various subscription plans based on usage, making it suitable for both individual users and organizations.
- Diffchecker:
- Key Features: Diffchecker is a simple and free tool for comparing text and files. It provides a basic comparison view, highlighting differences between two documents.
- Advanced Capabilities: While it lacks some of the advanced features of other tools, Diffchecker is effective for quickly identifying changes in text-based documents.
- User Interface: The user interface is minimalistic and easy to use. Simply paste or upload the documents you want to compare and click “Find Difference.”
- Pricing: Diffchecker offers a free version for basic use, as well as paid plans for more advanced features and higher usage limits.
- iText DITO:
- Key Features: iText DITO is a data-driven document generator that can also compare the differences between document templates.
- Advanced Capabilities: It can automate document creation and compare the changes to its templates and document generation process.
- User Interface: It has a user-friendly interface that helps users easily manage the change logs.
- Pricing: Offers a free trial, and the pricing is customized based on the business needs.
These third-party tools provide enhanced comparison capabilities for Google Docs, addressing the limitations of the built-in feature and offering advanced features such as detailed reporting, complex formatting support, and integration with other platforms.
3.2. Comparing Features and Pricing of Third-Party Tools
When choosing a third-party tool to compare Google Docs, it’s essential to consider the features and pricing of each option. Here’s a comparison to help you make an informed decision:
| Tool | Key Features | Pricing |
|---|---|---|
| Draftable | Accurate comparison, handles complex formatting, detailed reporting, side-by-side view | Free plan available; paid plans start at $12 per month |
| Copyleaks | Plagiarism detection, identifies similarities, supports multiple file formats, advanced algorithms | Various subscription plans based on usage; pricing varies |
| Diffchecker | Simple comparison, free for basic use, highlights differences in text-based documents, minimalistic interface | Free version available; paid plans offer more features and higher usage limits |
| iText DITO | Data-driven document generation, compares document templates, automates document creation, user-friendly interface | Offers a free trial; pricing is customized based on the business needs |

Draftable stands out for its accuracy and detailed reporting, making it ideal for users who need to compare complex documents with intricate formatting. Its paid plans offer additional features, such as unlimited comparisons and integration with other platforms.
Copyleaks is a strong choice for those concerned about plagiarism and content similarity. Its advanced algorithms can detect even subtle changes, ensuring the integrity of your documents. Pricing varies based on usage, making it suitable for both individual users and organizations.
Diffchecker is a simple and free tool that’s perfect for quickly comparing text-based documents. While it lacks some of the advanced features of other tools, its minimalistic interface and ease of use make it a convenient option for basic comparison needs.
iText DITO is great for businesses that want to generate documents from templates and track changes across templates. It helps keep track of compliance standards too.
Ultimately, the best tool for you will depend on your specific needs and budget. Consider the complexity of your documents, the level of detail required in the comparison, and the features that are most important to you when making your decision.
3.3. How to Integrate Third-Party Tools with Google Docs
Integrating third-party tools with Google Docs can enhance your document comparison capabilities and streamline your workflow. Here’s a step-by-step guide on how to integrate these tools:
- Choose a Third-Party Tool:
- Select a tool that meets your specific needs. Consider factors such as accuracy, features, pricing, and ease of use.
- Popular options include Draftable, Copyleaks, Diffchecker and iText DITO.
- Check for Direct Integration:
- Some tools offer direct integration with Google Docs through add-ons or extensions.
- Visit the Google Workspace Marketplace and search for the tool you want to integrate.
- If a direct integration is available, install the add-on or extension by clicking the “Install” button and following the prompts.
- Using Add-ons and Extensions:
- Once installed, the add-on or extension will typically appear in the Google Docs interface.
- To use it, open the Google Doc you want to compare and navigate to the “Add-ons” menu.
- Select the tool from the dropdown menu and follow the instructions to upload or compare your documents.
- Manual Integration:
- If a direct integration is not available, you may need to integrate the tool manually.
- This typically involves exporting your Google Doc in a compatible format (e.g., .docx, .pdf) and uploading it to the third-party tool.
- Follow the tool’s instructions for comparing the documents and reviewing the results.
- API Integration:
- For more advanced integration, some tools offer API access.
- This allows you to programmatically integrate the tool with Google Docs, automating the comparison process.
- API integration typically requires technical skills and may involve writing custom code.
- Example: Integrating Draftable:
- Visit the Google Workspace Marketplace and search for “Draftable for Google Docs.”
- Install the Draftable add-on.
- Open the Google Doc you want to compare.
- Go to “Add-ons” > “Draftable for Google Docs” > “Compare with Draftable.”
- Follow the prompts to select the second document and initiate the comparison.
By following these steps, you can seamlessly integrate third-party tools with Google Docs, enhancing your document comparison capabilities and streamlining your workflow. Whether you choose a direct integration through add-ons or a manual approach, these tools can help you identify differences, track changes, and ensure the accuracy of your documents.
4. How Can I Compare Two Google Docs Side by Side?
Comparing two Google Docs side by side can be achieved using browser extensions or by manually arranging the browser windows. Here are two methods:
- Using Browser Extensions: Install a browser extension that allows you to split your screen and view multiple tabs simultaneously. Extensions like “Split Screen” or “Tab Resize” can be helpful.
- Manual Arrangement:
- Open both Google Docs in separate tabs or windows.
- Resize the windows so that each takes up half of your screen.
- Position the windows side by side to compare the documents visually.
While this method doesn’t highlight differences automatically, it allows for a visual comparison, which can be useful for identifying formatting issues or overall structural changes.
4.1. Using Browser Extensions for Side-by-Side Comparison
Using browser extensions for side-by-side comparison of Google Docs is an efficient way to visually analyze two documents simultaneously. Several extensions are available for popular browsers like Chrome and Firefox that can help you split your screen and view multiple tabs or windows side by side.
Here’s a step-by-step guide on how to use browser extensions for this purpose:
- Choose a Browser Extension:
- Select a browser extension that allows you to split your screen and view multiple tabs or windows simultaneously.
- Popular options include “Split Screen,” “Tab Resize,” “Dualless,” and “Window Resizer.”
- Visit the Chrome Web Store (for Chrome) or the Firefox Browser Add-ons (for Firefox) and search for one of these extensions.
- Install the Extension:
- Once you’ve found an extension, click the “Add to Chrome” or “Add to Firefox” button to install it.
- Follow the prompts to grant the necessary permissions.
- Open the Google Docs:
- Open the two Google Docs you want to compare in separate tabs or windows.
- Activate the Extension:
- Click on the extension icon in your browser’s toolbar to activate it.
- The extension will typically offer options to split your screen in various configurations, such as side-by-side, top-and-bottom, or custom arrangements.
- Arrange the Windows:
- Select the side-by-side option to split your screen into two halves.
- The extension will automatically resize and position the Google Docs windows so that they take up each half of the screen.
- If the extension doesn’t automatically arrange the windows, you may need to manually drag and resize them.
- Compare the Documents:
- With the two Google Docs positioned side by side, you can now visually compare them.
- Scroll through each document simultaneously to identify differences in content, formatting, and structure.
- Customize the Arrangement:
- Some extensions allow you to customize the arrangement of the windows.
- You can adjust the size and position of each window to suit your preferences.
By following these steps, you can efficiently use browser extensions to compare two Google Docs side by side, making it easier to identify differences and track changes.
4.2. Manually Arranging Windows for Visual Comparison
Manually arranging windows for visual comparison of two Google Docs is a simple method that doesn’t require any additional software or extensions. This approach allows you to compare documents side by side by resizing and positioning the browser windows manually.
Here’s a step-by-step guide on how to do it:
- Open the Google Docs:
- Open the two Google Docs you want to compare in separate tabs or windows.
- Resize the Windows:
- Click and drag the edges or corners of each window to resize them.
- Aim to make each window take up approximately half of your screen.
- Position the Windows:
- Click and drag the title bar of each window to position them side by side.
- Place one window on the left side of your screen and the other on the right side.
- Adjust the Arrangement:
- If the windows don’t fit perfectly side by side, adjust their size and position as needed.
- You may need to overlap the windows slightly to maximize the available screen space.
- Compare the Documents:
- With the two Google Docs positioned side by side, you can now visually compare them.
- Scroll through each document simultaneously to identify differences in content, formatting, and structure.
- Maximize Screen Space:
- To maximize the available screen space, you can hide the browser’s toolbar and bookmarks bar.
- Press the F11 key to enter full-screen mode, which will hide the toolbar and maximize the document windows.
- Use Keyboard Shortcuts:
- Use keyboard shortcuts to quickly switch between the two windows.
- Press Alt + Tab (Windows) or Command + Tab (Mac) to cycle through the open windows.
By following these steps, you can manually arrange windows for visual comparison of two Google Docs, making it easier to identify differences and track changes without the need for additional software or extensions.
4.3. Limitations of Visual Side-by-Side Comparison
While visual side-by-side comparison of Google Docs can be useful, it has several limitations compared to automated comparison tools. One major drawback is the lack of automatic highlighting of differences. Unlike the built-in “Compare documents” feature or third-party tools, visual comparison requires you to manually identify changes, which can be time-consuming and prone to errors.
Another limitation is the difficulty in comparing complex documents with intricate formatting. Changes in font size, spacing, or table structures may be hard to spot with the naked eye, leading to overlooked discrepancies.
Visual comparison also lacks detailed reporting. It provides no summary of the types and frequency of edits, making it difficult to track the evolution of the document or identify specific areas of concern.
Additionally, visual comparison can be challenging for documents with large amounts of text. Scrolling through each document simultaneously and keeping track of changes can be mentally taxing and inefficient.
The manual nature of visual comparison also makes it less suitable for collaborative projects. It’s harder to attribute changes to specific users or track the contributions of multiple editors.
Finally, visual comparison can be less accurate than automated methods, especially for subtle changes. It’s easy to miss minor edits or formatting differences, leading to inaccuracies in the comparison.
5. How to Compare Google Docs on Mobile Devices?
Comparing Google Docs on mobile devices can be challenging due to the smaller screen size, but there are a few workarounds:
- Using the Google Docs App: Open both documents in the Google Docs app and switch between them to compare visually.
- Copy-Pasting into a Comparison Tool: Copy the text from each document and paste it into a free online comparison tool using your mobile browser.
- Request Desktop Site: Use your mobile browser to request the desktop version of Google Docs, which may provide access to the “Compare documents” feature.
These methods allow you to compare documents on the go, although they may be less convenient than using a desktop computer.
5.1. Comparing Documents Using the Google Docs App on Mobile
Comparing documents using the Google Docs app on mobile devices can be a bit challenging due to the limited screen space, but it is possible with a few workarounds. Here’s a step-by-step guide:
- Open the Google Docs App:
- Download and install the Google Docs app from the App Store (iOS) or Google Play Store (Android) if you haven’t already.
- Open the app and sign in with your Google account.
- Open the Documents:
- Navigate to the two Google Docs you want to compare and open them in the app.
- You can search for the documents or browse through your Google Drive folders.
- Switch Between Documents:
- Since you can’t view two documents side by side on a mobile device, you’ll need to switch between them to compare them visually.
- Tap the app switcher button (usually a square or rectangle icon) to see the open apps.
- Select the other Google Doc to switch to it.
- Compare Visually:
- Manually scroll through each document and compare the content, formatting, and structure.
- Pay attention to any differences in text, images, tables, and other elements.
- Use the Search Function:
- To quickly find specific terms or phrases, use the search function within the Google Docs app.
- Tap the three dots in the top right corner of the screen and select “Find and replace.”
- Enter the term you want to search for and tap the magnifying glass icon.
- The app will highlight all instances of the term in the document.
- Consider Copy-Pasting:
- For more detailed comparison, you can copy the text from each document and paste it into a note-taking app or a text editor.
- This will allow you to view the content of both documents in a single screen and compare them more easily.
- Request Desktop Site:
- Some mobile browsers allow you to request the desktop version of a website.
- Open Google Docs in your mobile browser and request the desktop site.
- This may give you access to the “Compare documents” feature, although it may be less convenient to use on a small screen.
By following these steps, you can compare documents using the Google Docs app on mobile devices, although it may be less convenient than using a desktop computer.
5.2. Using Online Comparison Tools on Mobile Browsers
Using online comparison tools on mobile browsers is a practical workaround for comparing Google Docs when you don’t have access to a desktop computer. This method involves copying the text from each document and pasting it into a free online comparison tool using your mobile browser.
Here’s a step-by-step guide:
- Open the Google Docs:
- Open the two Google Docs you want to compare in your mobile browser.
- You can use the Google Docs app or access the documents directly through the Google Docs website.
- Copy the Text:
- Select all the text in the first document and copy it to your clipboard.
- Repeat this process for the second document, copying its text to your clipboard as well.
- Choose an Online Comparison Tool:
- Open a new tab in your mobile browser and search for a free online comparison tool.
- Popular options include Diffchecker, Text Compare, and Online Text Comparison.
- Paste the Text:
- Paste the text from the first document into the left-hand text box of the online comparison tool.
- Paste the text from the second document into the right-hand text box.
- Compare the Documents:
- Click the “Compare” or “Find Difference” button to initiate the comparison process.
- The online comparison tool will analyze the text and highlight the differences between the two documents.
- Review the Results:
- Scroll through the comparison results and review the highlighted changes.
- Additions will typically be shown in green, while deletions will be indicated with strikethroughs.
- Adjust the Settings:
- Some online comparison tools offer settings to adjust the comparison parameters.
- You can typically adjust the sensitivity of the comparison, ignore whitespace, or ignore case.
By following these steps, you can use online comparison tools on mobile browsers to compare Google Docs, making it easier to identify differences and track changes on the go.
5.3. Limitations of Mobile Comparison Methods
While comparing Google Docs on mobile devices is possible, there are several limitations compared to using a desktop computer. One major drawback is the smaller screen size, which makes it difficult to view and compare documents simultaneously.
Another limitation is the lack of direct integration with comparison tools. Unlike the desktop version of Google Docs, the mobile app doesn’t offer a built-in “Compare documents” feature or support for third-party add-ons.
Copy-pasting text into online comparison tools can be cumbersome and time-consuming, especially for large documents. It also requires you to switch between multiple apps or tabs, which can be less efficient.
Mobile browsers may not fully support all the features of online comparison tools, leading to compatibility issues or reduced functionality. Some tools may not display correctly or may not offer the same level of detail as on a desktop computer.
The touch-based interface of mobile devices can also make it harder to select and copy text accurately, increasing the risk of errors.
Finally, mobile comparison methods may be less secure than using a desktop computer, especially if you’re using public Wi-Fi networks. Copying sensitive information to online comparison tools may expose it to potential security risks.
6. What Are Some Tips for Efficiently Comparing Documents?
To efficiently compare documents, consider these tips:
- Use the Right Tool: Choose a comparison tool that suits your needs, whether it’s the built-in Google Docs feature or a third-party tool.
- Focus on Key Sections: Prioritize comparing key sections or areas known to have changes.
- Use Clear Naming Conventions: Ensure both documents have clear and descriptive names to avoid confusion.
- Review Changes Incrementally: Compare documents in smaller chunks to make the process more manageable.
- Document Changes: Keep a record of the changes you identify to track progress and maintain accuracy.
By following these tips, you can streamline the document comparison process and ensure that you efficiently identify and manage changes.
6.1. Strategies for Focusing on Key Sections
Focusing on key sections when comparing documents can significantly enhance efficiency and accuracy. Here are several strategies to help you prioritize and streamline the comparison process:
- Identify Critical Sections:
- Before starting the comparison, identify the sections of the document that are most critical or likely to contain changes.
- These may include sections with key data, legal clauses, or critical project requirements.
- Prioritize Based on Importance:
- Rank the sections based on their importance to the overall document.
- Focus your initial efforts on comparing the highest-priority sections.
- Use a Checklist:
- Create a checklist of the key sections to ensure that you don’t miss any important areas.
- Tick off each section as you complete the comparison.
- Leverage Version History:
- Use the Version History feature in Google Docs to identify the areas where changes were made.
- Focus your comparison efforts on these areas.
- **Communicate with Collaborators