In today’s data-driven world, Excel spreadsheets are indispensable tools for managing and analyzing information. Whether you are tracking budgets, managing inventory, or analyzing sales figures, Excel helps you organize and make sense of complex datasets. However, managing multiple versions of these spreadsheets can quickly become challenging. You might find yourself needing to compare two different Excel files to identify changes, discrepancies, or errors. Manually going through rows and columns is time-consuming and prone to mistakes. Fortunately, Microsoft offers a built-in tool called Spreadsheet Compare designed to streamline this very process.
This guide will walk you through how to effectively use Microsoft Spreadsheet Compare to quickly and accurately identify the differences between two Excel spreadsheets. We’ll cover everything from accessing the tool to understanding the comparison results, ensuring you can confidently manage and audit your Excel data.
What is Spreadsheet Compare and Who Can Use It?
Microsoft Spreadsheet Compare is a powerful utility specifically designed to highlight the differences between two Excel workbooks or even different versions of the same workbook. It goes beyond simply showing changed values; it can identify differences in formulas, macros, cell formatting, and more. This makes it an invaluable tool for anyone who needs to:
- Audit spreadsheets: Ensure data integrity and accuracy by identifying unintended changes.
- Track changes: See exactly what modifications have been made between different versions of a workbook.
- Debug errors: Pinpoint discrepancies in formulas or data entry that might be causing issues.
- Collaborate effectively: Understand changes made by different team members in shared workbooks.
Availability: It’s important to note that Spreadsheet Compare is not available in all versions of Microsoft Office. This tool is included with:
- Office Professional Plus 2013
- Office Professional Plus 2016
- Office Professional Plus 2019
- Microsoft 365 Apps for enterprise
If you are using one of these versions, you will have access to Spreadsheet Compare and can follow the steps below to start comparing your Excel files.
Step-by-Step Guide to Compare Excel Spreadsheets
Let’s dive into the practical steps of using Spreadsheet Compare to analyze your Excel workbooks.
Open Spreadsheet Compare
The first step is to launch the Spreadsheet Compare application. Unlike Excel itself, Spreadsheet Compare is a standalone application.
- Access from the Start Menu: Click on the Start button in Windows.
- Find Spreadsheet Compare: Look for “Spreadsheet Compare” in your list of applications. You may need to scroll down to find it or type “Spreadsheet Compare” directly into the search bar.
- Open the Application: Click on “Spreadsheet Compare” to open the application.
If you are unable to locate it directly, searching for “Spreadsheet Compare” in the start menu search bar is the quickest way to find and launch the tool.
Select Files for Comparison
Once Spreadsheet Compare is open, you’ll need to specify the two Excel files you want to compare.
-
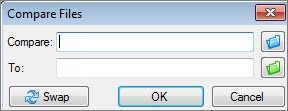
Click “Compare Files”: In the Spreadsheet Compare window, click on the Home tab, then select Compare Files. This will open the “Compare Files” dialog box.
-
Choose the “Compare” File (Older Version): Click the blue folder icon next to the Compare box. This allows you to browse your computer or network to locate the earlier version of your Excel workbook. You can also paste a web address if your file is stored online. Select the file and click Open.
-
Choose the “To” File (Newer Version): Click the green folder icon next to the To box. Browse to and select the more recent version of the workbook you want to compare against the first file. Click OK.
Tip: Spreadsheet Compare is flexible; you can compare files with the same name as long as they are saved in different folders. This is particularly useful when you have versioned files stored in separate directories.
Choose Comparison Options
Before running the comparison, you can customize what aspects of the workbooks Spreadsheet Compare will analyze.
- Select Comparison Criteria: In the left pane of the “Compare Files” dialog, you’ll see a list of options. These options determine what elements of the Excel files will be compared. You can choose to compare:
- Formulas: Identifies changes in formulas.
- Macros (VBA): Highlights differences in VBA code.
- Cell Format: Detects changes in cell formatting (fonts, colors, styles, etc.).
- And more: Options also include comparing comment, worksheet names, and more granular elements.
- Customize or “Select All”: Check or uncheck the boxes next to these options to tailor the comparison to your needs. If you want a comprehensive comparison, simply click Select All.
- Run the Comparison: Click OK to initiate the comparison process.
Password Protected Files: If either of your Excel files is password-protected, you might encounter an “Unable to open workbook” message. If this happens, click OK and you will be prompted to enter the password for the protected workbook. Spreadsheet Compare needs the password to access and analyze the file content.
Analyze the Results
After clicking “OK,” Spreadsheet Compare will analyze the two Excel files based on your selected options. The results are presented in a clear, visual format.
-
Two-Pane Grid Display: The comparison results are displayed in a split-screen view. The left pane shows the “Compare” file (typically the older version), and the right pane displays the “To” file (usually the newer version).
-
Color-Coded Highlighting: Differences are highlighted with distinct colors directly within the spreadsheet grids. The color-coding is intuitive and helps you quickly spot changes.
-
Details Pane: Below the two grids, a details pane provides a legend explaining the color codes and offers a list of specific changes detected. This pane often provides more granular information about each difference.
-
Worksheet Navigation: If your workbooks contain multiple worksheets, you can navigate through them using the forward and back buttons located on the horizontal scroll bar within the grid display. Spreadsheet Compare compares all worksheets, even hidden ones.
Understanding the Comparison Results
Interpreting the color-coded highlights is key to effectively using Spreadsheet Compare. Here’s a breakdown of common color indicators:
- Green Fill (Entered Value Change): Indicates that a cell containing a manually entered value (not a formula) has been changed between the two versions.
- Blue-Green Fill (Calculated Value Change): Signals that a cell containing a formula has produced a different result in the newer version. This could be due to changes in input values or modifications to the formula itself.
- Other Colors: Spreadsheet Compare uses other colors to represent different types of changes, such as formatting changes, structural changes, or differences in VBA code. The legend in the lower-left pane of the results window will always provide a comprehensive guide to the color codes used in your specific comparison.
Example Interpretation: Imagine you are comparing two versions of a sales report. If you see a green-filled cell in the “Sales Revenue” column, it means the sales figure for that period was directly changed. If you see a blue-green filled cell in the “Profit Margin” column, it suggests that the profit margin changed because either the revenue or cost figures (or the formula calculating the margin) was altered.
Resize Cells for Better View: If cell contents are truncated due to column width, click Resize Cells to Fit within the Spreadsheet Compare interface to automatically adjust column widths and view the complete cell data.
Explore Excel’s Inquire Add-in
For users working directly within Excel 2013 and later versions, there’s another valuable tool to consider: the Inquire add-in. While Spreadsheet Compare is a separate application for comparing files side-by-side, the Inquire add-in provides analysis and auditing capabilities directly within Excel itself.
Inquire Add-in Features:
- Workbook Analysis: Provides an overview of a workbook’s structure, formulas, errors, and hidden information.
- Relationship Exploration: Visually maps relationships between cells, worksheets, and even workbooks, helping you understand data flow and dependencies.
- Formatting Cleanup: Helps remove excessive or inconsistent formatting that can bloat file size and cause performance issues.
- Compare within Excel: The Inquire add-in also includes a “Compare Files” command that essentially launches Spreadsheet Compare from within Excel, offering a convenient access point if you are already working in Excel.
Enabling Inquire: If you don’t see the “Inquire” tab in your Excel ribbon, you may need to enable the add-in. Go to File > Options > Add-ins. In the “Manage” dropdown at the bottom, select “COM Add-ins” and click “Go…”. Check the box next to “Inquire” and click “OK”.
Conclusion
Microsoft Spreadsheet Compare is an essential tool for anyone working with multiple Excel spreadsheets or managing versions of critical workbooks. By following this guide, you can effectively use Spreadsheet Compare to quickly and accurately pinpoint differences, ensure data integrity, and streamline your Excel management processes. Whether you are auditing financial data, tracking project changes, or simply ensuring accuracy in your spreadsheets, Spreadsheet Compare empowers you to work with confidence and precision.